
Linux| 04shell编程
什么是shell
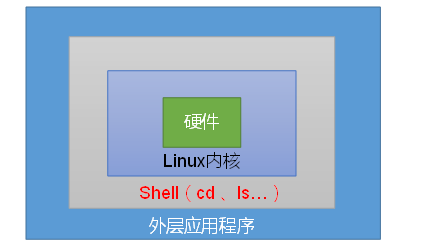
Shell是命令解释器,用于解释用户对操作系统的操作;
Shell有很多:cat/etc/shells
CentOS7默认使用Shell是bash
shell是一个命令行解释器,它接收应用程序/ 用户命令,然后调用操作系统内核;功能强大的编程语言;
Linux的启动过程
BIOS(基本的输入输出系统,在主板上,通过bash选择引导的介质硬盘或光盘或网络 ) - MBR(硬盘引导) - BootLoader(grub 启动和引导内核,确定内核版本)- kernel(初始化加载硬件) -
systemd(1号进程) - 系统初始化 - Shell
[root@Linux100 ~]#  dd if=/dev/sda of=mbr.bin bs=446 count=1
记录了1+0 的读入
记录了1+0 的写出
446字节(446 B)已复制,0.000149735 秒,3.0 MB/秒

[root@Linux100 ~]# hexdump -C mbr.bin
00000000  eb 63 90 10 8e d0 bc 00  b0 b8 00 00 8e d8 8e c0  |.c..............|
00000010  fb be 00 7c bf 00 06 b9  00 02 f3 a4 ea 21 06 00  |...|.........!..|
00000020  00 be be 07 38 04 75 0b  83 c6 10 81 fe fe 07 75  |....8.u........u|
00000030  f3 eb 16 b4 02 b0 01 bb  00 7c b2 80 8a 74 01 8b  |.........|...t..|
00000040  4c 02 cd 13 ea 00 7c 00  00 eb fe 00 00 00 00 00  |L.....|.........|
00000050  00 00 00 00 00 00 00 00  00 00 00 80 01 00 00 00  |................|
...
00000180  47 65 6f 6d 00 48 61 72  64 20 44 69 73 6b 00 52  |Geom.Hard Disk.R|
00000190  65 61 64 00 20 45 72 72  6f 72 0d 0a 00 bb 01 00  |ead. Error......|
000001a0  b4 0e cd 10 ac 3c 00 75  f4 c3 00 00 00 00 00 00  |.....<.u........|
000001b0  00 00 00 00 00 00 00 00  90 e5 09 00 00 00        |..............|
000001be

[root@Linux100 ~]#  dd if=/dev/sda of=mbr2.bin bs=512 count=1
记录了1+0 的读入
记录了1+0 的写出
512字节(512 B)已复制,0.000193616 秒,2.6 MB/秒


[root@Linux100 ~]# hexdump -C mbr2.bin | more
00000000  eb 63 90 10 8e d0 bc 00  b0 b8 00 00 8e d8 8e c0  |.c..............|
00000010  fb be 00 7c bf 00 06 b9  00 02 f3 a4 ea 21 06 00  |...|.........!..|
00000020  00 be be 07 38 04 75 0b  83 c6 10 81 fe fe 07 75  |....8.u........u|
00000030  f3 eb 16 b4 02 b0 01 bb  00 7c b2 80 8a 74 01 8b  |.........|...t..|
00000040  4c 02 cd 13 ea 00 7c 00  00 eb fe 00 00 00 00 00  |L.....|.........|
00000050  00 00 00 00 00 00 00 00  00 00 00 80 01 00 00 00  |................|
...
000001b0  00 00 00 00 00 00 00 00  90 e5 09 00 00 00 80 20  |............... |
000001c0  21 00 83 aa 28 82 00 08  00 00 00 00 20 00 00 aa  |!...(....... ...|
000001d0  29 82 8e fe ff ff 00 08  20 00 00 f8 1f 06 00 00  |)....... .......|
000001e0  00 00 00 00 00 00 00 00  00 00 00 00 00 00 00 00  |................|
000001f0  00 00 00 00 00 00 00 00  00 00 00 00 00 00 55 aa  |..............U.|

55 aa说明磁盘是可引导的

[root@Linux100 ~]# cd /boot/grub2/
[root@Linux100 grub2]# ls
device.map  fonts  grub.cfg  grubenv  i386-pc  locale
[root@Linux100 grub2]# grub2-editenv list
saved_entry=CentOS Linux (3.10.0-862.el7.x86_64) 7 (Core)
[root@Linux100 grub2]# uname -r
3.10.0-862.el7.x86_64


#CentOS6的 引导
[root@Linux100 grub2]# which init
/sbin/init
[root@Linux100 grub2]# cd /etc/rc.d/
[root@Linux100 rc.d]# ls
init.d  rc0.d  rc1.d  rc2.d  rc3.d  rc4.d  rc5.d  rc6.d  rc.local


[root@Linux100 grub2]# top -p 1  #1号进程systemd


[root@Linux100 rc.d]# cd /etc/systemd/system/
[root@Linux100 system]# ls
basic.target.wants                           default.target                                           network-online.target.wants
...
dbus-org.freedesktop.nm-dispatcher.service   multi-user.target.wants


[root@Linux100 rc.d]# cd /etc/systemd/system/
[root@Linux100 system]# ls
basic.target.wants                           default.target                                           network-online.target.wants
...

#CentOS6 在这个目录去读取各种 service, 而在systemd中就不是各种shell脚本了而是各种配置文件,这也是6和7的主要区别
[root@Linux100 system]# cd /usr/lib/systemd/system
[root@Linux100 system]# ls
abrt-ccpp.service                        iscsiuio.service                               shutdown.target
...
iscsi.service                            selinux-policy-migrate-local-changes@.service
iscsi-shutdown.service                   serial-getty@.service


[root@Linux100 system]# ls /sbin/grub2-
grub2-bios-setup           grub2-macbless             grub2-probe                grub2-set-default
grub2-get-kernel-settings  grub2-mkconfig             grub2-reboot               grub2-setpassword
grub2-install              grub2-ofpathname           grub2-rpm-sort             grub2-sparc64-setup
[root@Linux100 system]# ls /sbin/grub2-mkconfig
/sbin/grub2-mkconfig
[root@Linux100 system]# vim  /sbin/grub2-mkconfig
shell脚步
- UNIX的哲学:一条命令只做一件事
- 为了组合命令和多次执行,使用脚步文件来保存需要执行的命令
- 赋予该文件执行权限(chmod u+rx finename)可读可执行权限
将cd 和ls 命令顺序执行
[root@Linux100 system]# cd /var/ ; ls
account adm cache crash db empty games gopher kerberos lib local lock log mail nis opt preserve run spool target tmp
Shell解析器
Linux提供的Shell解析器有
[kris@hadoop datas]$ cat /etc/shells
/bin/sh
/bin/bash
/sbin/nologin
/bin/dash
in/tcsh
/bin/csh
bash和sh的关系
[kris@hadoop bin]$ ll | grep bash
-rwxr-xr-x. 1 root root 941880 5月  11 2016 bash
lrwxrwxrwx. 1 root root      4 9月   3 2013 sh -> bash
Centos默认的解析器是bash
[kris@hadoop datas]$ sh helloWorld.sh bash helloWorld.sh
Shell脚本
怎么编写一个shell脚步
标准的Shell脚步 要包含哪些元素
① Sha-Bang
② 命令
③ “#”号开头的注释
④ chmod u+rx filename 可执行权限
⑤ 执行命令(看是否需要对当前环境产生影响)
- bash ./filename.sh #在当前终端产生一个bash的子进程,子进程下再去运行这个脚本,不需要赋予执行权限也可以执行
- ./filename.sh #产生一个子进程再去运行,但它会用Sha-Bang去解释执行,需要可执行权限才能执行
- source ./filename #在当前进程运行
- . ./filename.sh #在当前进程运行
shell脚本的执行方式
[root@Linux100 ~]# vim 2.sh
#!/bin/bash
#demo2
cd /tmp
pwd


[root@Linux100 ~]# bash 2.sh
[root@Linux100 ~]# pwd
/root
[root@Linux100 ~]# bash 2.sh  #bash创建子进程执行完之后还会返回当前进程
/tmp
[root@Linux100 ~]# pwd
/root
[root@Linux100 ~]# ./2.sh  #需要赋权执行权限
-bash: ./2.sh: 权限不够
[root@Linux100 ~]# chmod u+x 2.sh
[root@Linux100 ~]#
[root@Linux100 ~]# ./2.sh #创建子进程执行完之后还会返回当前进程
/tmp
[root@Linux100 ~]# pwd
/root
[root@Linux100 ~]#
[root@Linux100 ~]#
[root@Linux100 ~]# source ./2.sh  #在当前进程下执行,不会返回到之前的目前
/tmp
[root@Linux100 tmp]# pwd
/tmp
[root@Linux100 tmp]# cd
[root@Linux100 ~]#
[root@Linux100 ~]# . ./2.sh  #在当前进程下执行,不会返回到之前的目前
/tmp
[root@Linux100 tmp]# pwd
/tmp
[root@Linux100 tmp]#
[root@Linux100 tmp]# cd
[root@Linux100 ~]#
内建命令和外部命令的区别
- 内建命令不需要创建子进程;比如cd、pwd
- 内建命令对当前Shell 生效
管道和重定向
进程通信的通信工具,方便shell中两条命令互相之间可以通信,管道会产生子进程和子shell;
管道与管道符
- 管道和信号一样,也是进程通信的方式之一;
- 匿名管道(管道符)是Shell编程经常用到的通信工具;
- 管道符 "|" ,将前一个命令执行的结果传递给后面的命令;ps | cat echo 123 | ps
将两个应用程序连接到一起,把第一个应用程序的输出 作为第二个应用程序的输入,类似递推到第n个应用程序;
[root@Linux100 ~]# ls
1.sh  2.sh  anaconda-ks.cfg  initial-setup-ks.cfg  mbr2.bin  mbr.bin
[root@Linux100 ~]# cat anaconda-ks.cfg | more
#version=DEVEL
# System authorization information
auth --enableshadow --passalgo=sha512


[root@Linux100 ~]# cat | ps -f
UID         PID   PPID  C STIME TTY          TIME CMD
root       3303   3074  0 07:52 pts/1    00:00:00 sudo -i -u root
root       3309   3303  0 07:52 pts/1    00:00:00 -bash
root       4353   3309  0 09:09 pts/1    00:00:00 cat
root       4354   3309  0 09:09 pts/1    00:00:00 ps -f

[root@Linux100 ~]# cd /proc/
[root@Linux100 proc]# cd /proc/20
2079/ 2098/
[root@Linux100 proc]# cd /proc/4353
[root@Linux100 4353]# ls
attr       clear_refs       cpuset   fd       limits     mem         net        oom_score      personality  schedstat  stack   syscall  wchan
autogroup  cmdline          cwd      fdinfo   loginuid   mountinfo   ns         oom_score_adj  projid_map   sessionid  stat    task
auxv       comm             environ  gid_map  map_files  mounts      numa_maps  pagemap        root         setgroups  statm   timers
cgroup     coredump_filter  exe      io       maps       mountstats  oom_adj    patch_state    sched        smaps      status  uid_map
[root@Linux100 4353]# cd fd
[root@Linux100 fd]# ls -l
总用量 0
lrwx------. 1 root root 64 9月  28 09:11 0 -> /dev/pts/1  #0标准输入,图形界面的终端
l-wx------. 1 root root 64 9月  28 09:11 1 -> pipe:[53111] #1为标准的输出,指向了一个pipe管道,
lrwx------. 1 root root 64 9月  28 09:09 2 -> /dev/pts/1


[root@Linux100 fd]# cd /proc/4354/fd
-bash: cd: /proc/4354/fd: 没有那个文件或目录
#因为ps 执行完就立即消失了,cat在去等待输入,所以4353没有进程和文件描述符

管道符可以创建相应的子进程,子进程如果是shell脚本,shell脚本就称作子shell,
管道符是通过子进程方式运行的,如果使用了cd  pwd等内部命令 执行完之后当前的父进程是得不到相应结果的;
如果想使用内部命令可以封装到一个shell脚步中,只是在脚本之内,离开之后就不起作用了,尽量避免在管道符中使用内部命令
连接两条命令的工具
- ; 是隔开两条命令,第一条执行完执行第二条,两条命令之间是没有任何关系的;
- 管道符是把第一条命令执行的结果传递给第二条命令,同时为第一条和第二条命令建立子进程;它是在子进程中运行的,所以在子进程中如果有内建命令的话是不会传递给父进程的;
子进程与子shell
重定向符号
可以把标准输出输出到一个文件中,文件可以代替键盘作为输入
重定向符号
① 一个进程默认会打开标准输入(键盘 终端)、标准输出、错误输出三个文件描述符;
② 输入重定向符号: "<" 例如:read var < /path/to/a/file
③ 输出重定向符号: ">" “>>” "2>" "&>",例如 echo 123 > /path/to/a/file (> 是清空文件再写入,>>是追加的方式,2> 是错误的信息输出到文件,&> 无论正确还是错误信息都输出到文件)
④ 输入和输出重定向组合使用
- cat > /path/to/a/file << EOF
- I am $USER
- EOF
[root@Linux100 ~]# wc -l < 1.sh
7
[root@Linux100 ~]# read var
123
[root@Linux100 ~]# echo $var
123
[root@Linux100 ~]# vim a.txt
[root@Linux100 ~]# read var2 < a.txt
[root@Linux100 ~]#
[root@Linux100 ~]# echo $var2
123
[root@Linux100 ~]# vim a.txt
[root@Linux100 ~]# echo $var
123
[root@Linux100 ~]# echo $var2
123
[root@Linux100 ~]#
[root@Linux100 ~]#
[root@Linux100 ~]#
[root@Linux100 ~]# echo $var2 > b.txt
[root@Linux100 ~]# cat b.txt
123
[root@Linux100 ~]# echo $var2 >> b.txt
[root@Linux100 ~]# cat b.txt
123
123
[root@Linux100 ~]#
[root@Linux100 ~]# nocmd 2> c.txt
[root@Linux100 ~]# cat c.txt
bash: nocmd: 未找到命令...
[root@Linux100 ~]#
[root@Linux100 ~]#
[root@Linux100 ~]# nocmd &> c.txt
[root@Linux100 ~]# cat c.txt
bash: nocmd: 未找到命令...
[root@Linux100 ~]#
[root@Linux100 ~]# ls &> d.txt
[root@Linux100 ~]# cat d.txt
1.sh
2.sh
anaconda-ks.cfg
a.txt
b.txt
c.txt
d.txt
initial-setup-ks.cfg
mbr2.bin
mbr.bin
[root@Linux100 ~]#
[root@Linux100 ~]#
[root@Linux100 ~]# vim 3.sh
[root@Linux100 ~]# bash 3.sh
[root@Linux100 ~]# ls
1.sh  2.sh  3.sh  anaconda-ks.cfg  a.sh  a.txt  b.txt  c.txt  d.txt  initial-setup-ks.cfg  mbr2.bin  mbr.bin
[root@Linux100 ~]# cat a.sh
echo "Hello bash"
变量
变量的分类
① 用户自定义变量:这种变量是最常见的变量,由用户自由定义变量名和变量的值。
② 环境变量:这种变量中主要保存的是和系统操作环境相关的数据,比如当前登录用户,用户的家目录,命令的提示符等。不是太好理解吧,那么大家还记得在Windows中,同一台
电脑可以有多个用户登录,而且每个用户都可以定义自己的桌面样式和分辨率,这些其实就是Windows的操作环境,可以当做是Windows的环境变量来理解。环境变量的变量名可以
自由定义,但是一般对系统起作用的环境变量的变量名是系统预先设定好的。
③ 位置参数变量:这种变量主要是用来向脚本当中传递参数或数据的,变量名不能自定义,变量作用是固定的。
④ 预定义变量:是Bash中已经定义好的变量,变量名不能自定义,变量作用也是固定的。
① 用户自定义变量
变量的命名:
#变量名不能用数字开头,#等号左右两侧不能有空格,#变量的值如果有空格,必须用引号包含
变量调用:
name="kris song" #定义变量name
echo $name #输出变量name的值
变量查看:
set [选项]
选项:
- -u: 如果设定此选项,调用未声明变量时会报错(默认无任何提示)
- -x: 如果设定此选项,在命令执行之前,会把命令先输出一次
[kris@hadoop101 test]$ set
BASH=/bin/bash
…省略部分输出…
name='kris song'
#直接使用set命令,会查询系统中所有的变量,包含用户自定义变量和环境变量
[kris@hadoop101 test]$ set -u  #当设置了-u选项后,如果调用没有设定的变量会有报错。默认是没有任何输出的。
[kris@hadoop101 test]$ echo $file
-bash: file: unbound variable
[kris@hadoop101 test]$ set -x  #如果设定了-x选项,会在每个命令执行之前,先把命令输出一次
[kris@hadoop101 test]$ ls
+ ls --color=auto
012  0abc  abc  abcd
变量删除
[kris@hadoop101 test]$ unset 变量名
shell中变量不区分类型,弱类型的变量,shell属于解释性语言;
① 变量的定义,命名规则
常用系统变量:shell、user,显示当前shell中所有变量:set
- 字母、数字、下划线
- 不以数字开头
用户变量可以是由字母、数字或下划线组成的长度不超过 20 的任意字符串,区分大小,采用等号进行赋值,在变量、等号和值之间不能有空格。定义完成后,可以使用 $ 符号进行引用
在定义变量时,有一些规则需要遵守:
- 变量名称可以由字母、数字和下划线组成,但是不能以数字开头。如果变量名是“2name”则是错误的。
- 在Bash中,变量的默认类型都是字符串型,如果要进行数值运算,则必修指定变量类型为数值型。
- 变量用等号连接值,等号左右两侧不能有空格。
- 变量的值如果有空格,需要使用单引号或双引号包括。如:“test="hello world!"”。其中双引号括起来的内容“$”、“\”和反引号都拥有特殊含义,而单引号括起来的内容都是普通字符。
- 在变量的值中,可以使用“\”转义符。
- 如果需要增加变量的值,那么可以进行变量值的叠加。不过变量需要用双引号包含用变量名"或用{变量名}包含变量名。
例如:
[kris@hadoop101 test]$ test=123   //定义 变量
[kris@hadoop101 test]$ echo $test
123
[kris@hadoop101 test]$ test="$test"456
[kris@hadoop101 test]$ echo $test       #叠加变量test,变量值变成了123456
123456
[kris@hadoop101 test]$ test=${test}789  #再叠加变量test,变量值编程了123456789
[kris@hadoop101 test]$ echo $test
123456789

变量值的叠加可以使用两种格式:"$变量名" 或${变量名}
把命令的结果作为变量值赋予变量,则需要使用反引号或$()包含命令。例如:
[kris@hadoop101 test]$ test=$(date)  或 test=`test`
[kris@hadoop101 test]$ echo $test
2021年 03月 28日 星期日 10:48:42 CST

环境变量名建议大写,便于区分。
② 变量的赋值
为变量赋值的过程,称为变量替换
变量名=变量值,a=123 (等于左右不能出现空格)
使用let为变量赋值,let a=10+20 ()
将命令赋值给变量,l=ls
将命令结果赋值给变量,使用$() 或者反引号 `` ,letc=$(ls -l /etc)
变量值有空格等特殊字符可以包含在" "或者 ' '中
[root@Linux100 ~]# cmd1=`ls /root/`
[root@Linux100 ~]# cmd2=$(ls /root/)


[root@Linux100 ~]# string1="hello 'bash' "
[root@Linux100 ~]# echo $string1
hello 'bash'
[kris@hadoop datas]$ A=6 //定义变量
[kris@hadoop datas]$ A=9  //重写赋值
[kris@hadoop datas]$ echo $A
9
[kris@hadoop datas]$ unset A //撤销
[kris@hadoop datas]$ echo $A

[kris@hadoop datas]$ readonly b=11  //变量是只读,不能重新赋值
[kris@hadoop datas]$ echo $b
11
在bash中,变量默认类型都是字符串类型,无法直接进行数值运算
变量的值如果有空格,需要使用双引号或单引号括起来
[kris@hadoop datas]$ vim helloWorld.sh
#!/bin/bash
echo "Hello World"
echo $a
[kris@hadoop datas]$ sh helloWorld.sh
Hello World          //发现并没有打印变量a的值
[kris@hadoop datas]$ export a
[kris@hadoop datas]$ sh helloWorld.sh
Hello World
I love kk
[kris@hadoop datas]$ sh helloWorld.sh
Hello World
I love kk
③ 变量的引用
- ${变量名} 称作对变量的引用;
- echo ${变量名} 查看变量的值;
- ${变量名} 在部分情况下可以省略为 $变量名
{}什么情况可以省,见下:
[root@Linux100 ~]# string1="hello bash"
[root@Linux100 ~]# echo ${string1}
hello bash
[root@Linux100 ~]# echo $string1
hello bash
[root@Linux100 ~]# echo $string123

[root@Linux100 ~]# echo ${string1}23
hello bash23
④ 变量的作用范围
变量的默认作用范围:变量只对当前终端,当前shell生效,如果产生子shell或平行shell或父shell进程都不生效;
- 变量的导出: export
- 变量的删除:unset
[root@Linux100 ~]# a=1
[root@Linux100 ~]# bash
[root@Linux100 ~]# echo $a

[root@Linux100 ~]# a=2
[root@Linux100 ~]# exit
exit
[root@Linux100 ~]# echo $a
1
[root@Linux100 ~]#
[root@Linux100 ~]# demo_var1="hello subshell"
[root@Linux100 ~]# vim 4.sh
[root@Linux100 ~]# chmod u+x 4.sh
[root@Linux100 ~]# bash 4.sh

[root@Linux100 ~]# ./4.sh

##子进程定义的变量想在当前shell中使用,执行方式变更下即可:
[root@Linux100 ~]# source 4.sh
hello subshell
[root@Linux100 ~]# . 4.sh
hello subshell
[root@Linux100 ~]# . ./4.sh
hello subshell

如何让子进程得到父进程的变量,增加关键字export
[root@Linux100 ~]# export demo_var1
[root@Linux100 ~]# ./4.sh
hello subshell
[root@Linux100 ~]# bash 4.sh
hello subshell

#取消删除变量赋值
[root@Linux100 ~]# unset demo_var1
⑤ 系统环境变量
环境变量设置
  [kris@hadoop101 ~]$ export age="18"
环境变量查询和删除
env命令和set命令的区别是,set命令可以查看所有变量,而env命令只能查看环境变量。
[kris@hadoop101 ~]$ unset gender      #删除环境变量gender
[kris@hadoop101 ~]$ env | grep gender
[kris@hadoop101 ~]$ env | grep age
  age=18
环境变量:每个shell打开都可以获得到的变量
- set 和env命令
- $? $$ $0
- $PATH
- $PS1
[kris@hadoop101 ~]$ env
[kris@hadoop101 ~]$ set


[kris@hadoop101 ~]$ env
HOSTNAME=hadoop101    #主机名
TERM=linux                    #终端环境
SHELL=/bin/bash           #当前的shell
HADOOP_HOME=/opt/module/hadoop-2.7.2
HISTSIZE=1000          #历史命令条数
SSH_CLIENT=192.168.1.1 9806 22  #当前操作环境是用ssh连接的,这里记录客户端ip
PHOENIX_CLASSPATH=/opt/module/phoenix
QTDIR=/usr/lib64/qt-3.3
QTINC=/usr/lib64/qt-3.3/include
SSH_TTY=/dev/pts/0   #ssh连接的终端时pts/1
PHOENIX_HOME=/opt/module/phoenix
USER=kris               #当前登录的用户
LS_COLORS=rs=0:di=01;34:ln=01;36:mh=00:pi=40;33:so=01;35:do=01;35:bd=40;33;01:cd=40;33;01:or=40;31;01:mi=01;05;37;41:su=37;41:sg=30;43:ca=30;41:tw=30;42:ow=34;42:st=37;44:ex=01;32:*.tar=01;31:*.tgz=01;31:*.arj=01;31:*.taz=01;31:*.lzh=01;31:*.lzma=01;31:*.tlz=01;31:*.txz=01;31:*.zip=01;31:*.z=01;31:*.Z=01;31:*.dz=01;31:*.gz=01;31:*.lz=01;31:*.xz=01;31:*.bz2=01;31:* #定义颜色显示
HBASE_HOME=/opt/module/hbase-1.3.1
age=18     #刚刚定义的环境变量
MAIL=/var/spool/mail/kris  #用户邮箱
PATH=/usr/lib64/qt-3.3/bin:/usr/local/bin:/bin:/usr/bin:/usr/local/sbin:/usr/sbin:/sbin:/opt/module/jdk1.8.0_144/bin:/opt/module/hadoop-2.7.2/bin:/opt/module/hadoop-2.7.2/sbin:/opt/module/hive/bin:/opt/module/hbase-1.3.1/bin:/opt/module/kylin/bin:/opt/module/phoenix/bin:/home/kris/bin      #系统查找命令的路径
HIVE_HOME=/opt/module/hive
PWD=/home/kris        #当前所在目录
JAVA_HOME=/opt/module/jdk1.8.0_144
LANG=zh_CN.UTF-8    #语系
SSH_ASKPASS=/usr/libexec/openssh/gnome-ssh-askpass
HISTCONTROL=ignoredups
SHLVL=1                #当前在第一层子shell中。
HOME=/home/kris   #当前登录用户的家目录
KYLIN_HOME=/opt/module/kylin
LOGNAME=kris  #登录用户
QTLIB=/usr/lib64/qt-3.3/lib
CVS_RSH=ssh
SSH_CONNECTION=192.168.1.1 9806 192.168.1.101 22
LESSOPEN=||/usr/bin/lesspipe.sh %s
G_BROKEN_FILENAMES=1
_=/bin/env   #上次执行命令的最后一个参数或命令本身

[kris@hadoop101 ~]$ set
BASH=/bin/bash       #Bash的位置
BASH_VERSINFO=([0]="4" [1]="1" [2]="2" [3]="1" [4]="release"
[5]="i386-redhat-linux-gnu")   #Bash版本
BASH_VERSION='4.1.2(1)-release' #bash的版本
COLORS=/etc/DIR_COLORS     #颜色记录文件
HISTFILE=/root/.bash_history   #历史命令保存文件
HISTFILESIZE=1000   #在文件当中记录的历史命令最大条数
HISTSIZE=1000     #在缓存中记录的历史命令最大条数
LANG=zh_CN.UTF-8   #语系环境
MACHTYPE=i386-redhat-linux-gnu #软件类型是i386兼容类型
MAILCHECK=60       #每60秒去扫描新邮件
PPID=2166 #父shell的PID。我们当前Shell是一个子shell
PS1='[\u@\h \W]\$ ' #命令提示符
PS2='> '     #如果命令一行没有输入完成,第二行命令的提示符
UID=0       #当前用户的UID
env命令可以查询到所有的环境变量,可是还有一些变量虽然不是环境变量,却是和Bash操作接口相关的变量,这些变量也对我们的Bash操作终端起到了重要的作用。
这些变量就只能用set命令来查看了
PATH变量:系统查找命令的路径
先查询下PATH环境变量的值:
[kris@hadoop101 ~]$ echo $PATH
/usr/lib64/qt-3.3/bin:
/usr/local/bin:
/bin:
/usr/bin:
/usr/local/sbin:
/usr/sbin:
/sbin:/opt/module/jdk1.8.0_144/bin:
/opt/module/hadoop-2.7.2/bin:
/opt/module/hadoop-2.7.2/sbin:
/opt/module/hive/bin:
/opt/module/hbase-1.3.1/bin:
/opt/module/kylin/bin:
/opt/module/phoenix/bin:
/home/kris/bin
PATH变量的值是用“:”分割的路径,这些路径就是系统查找命令的路径。也就是说当我们输入了一个程序名,如果没有写入路径,系统就会到PATH变量定义的路径中去寻找,是否有
可以执行的程序。如果找到则执行,否则会报“命令没有发现”的错误。
那么是不是我们把自己的脚本拷贝到PATH变量定义的路径中,我们自己写的脚本也可以不输入路径而直接运行呢?
那么我们是不是可以修改PATH变量的值,而不是把程序脚本复制到/bin/目录中。当然是可以的,我们通过变量的叠加就可以实现了:
[root@localhost ~]# PATH="$PATH":/root/sh
#在变量PATH的后面,加入/root/sh目录
[root@localhost ~]# echo $PATH
/usr/lib/qt-3.3/bin:/usr/local/sbin:/usr/local/bin:/sbin:/bin:/usr/sbin:/usr/bin:/root/bin:/root/sh
#查询PATH的值,变量叠加生效了
当然我们这样定义的PATH变量只是临时生效,一旦重启或注销就会消失,如果想要永久生效,需要写入环境变量配置文件
[root@Linux100 ~]# env | more

[root@Linux100 ~]# echo $UID
0
[root@Linux100 ~]# echo $USER
root
[root@Linux100 ~]# echo $PATH
/usr/local/sbin:/sbin:/bin:/usr/sbin:/usr/bin:/root/bin
[root@Linux100 ~]#
[root@Linux100 ~]# vim 5.sh
[root@Linux100 ~]# chmod u+x 5.sh
[root@Linux100 ~]# ./5.sh
hello bash
108K    .
[root@Linux100 ~]# 5.sh
bash: 5.sh: 未找到命令...
[root@Linux100 ~]#
[root@Linux100 ~]# pwd
/root
[root@Linux100 ~]# echo $PATH
/usr/local/sbin:/sbin:/bin:/usr/sbin:/usr/bin:/root/bin
[root@Linux100 ~]# PATH=$PATH:/root
[root@Linux100 ~]# echo $PATH
/usr/local/sbin:/sbin:/bin:/usr/sbin:/usr/bin:/root/bin:/root
[root@Linux100 ~]# 5.sh
hello bash
108K    .
[root@Linux100 ~]# cd /var/
[root@Linux100 var]# 5.sh
hello bash
1.3G    .
[root@Linux100 var]# echo $PATH
/usr/local/sbin:/sbin:/bin:/usr/sbin:/usr/bin:/root/bin:/root
[root@Linux100 var]# bash
[root@Linux100 var]# echo $PATH
/usr/local/sbin:/sbin:/bin:/usr/sbin:/usr/bin:/root/bin:/root
[root@Linux100 var]#
[root@Linux100 var]#
[root@Linux100 var]# exit
exit
[root@Linux100 var]#
[root@Linux100 var]# echo $PS1
[\u@\h \W]\$
[root@Linux100 var]#
[root@Linux100 var]#
[root@Linux100 var]# set | more


[root@Linux100 var]# echo $?
0
[root@Linux100 var]# echo $$
11683
[root@Linux100 var]# echo $0
bash
[root@Linux100 var]# ifconfig
ens33: flags=4163<UP,BROADCAST,RUNNING,MULTICAST>  mtu 1500
        inet 192.168.10.100  netmask 255.255.255.0  broadcast 192.168.10.255
        inet6 fe80::9a69:d316:fe22:10ef  prefixlen 64  scopeid 0x20<link>
        ether 00:0c:29:87:0d:d1  txqueuelen 1000  (Ethernet)
        RX packets 17491  bytes 1385999 (1.3 MiB)
        RX errors 0  dropped 0  overruns 0  frame 0
        TX packets 4579  bytes 626978 (612.2 KiB)
        TX errors 0  dropped 0 overruns 0  carrier 0  collisions 0

lo: flags=73<UP,LOOPBACK,RUNNING>  mtu 65536
        inet 127.0.0.1  netmask 255.0.0.0
        inet6 ::1  prefixlen 128  scopeid 0x10<host>
        loop  txqueuelen 1000  (Local Loopback)
        RX packets 264  bytes 29880 (29.1 KiB)
        RX errors 0  dropped 0  overruns 0  frame 0
        TX packets 264  bytes 29880 (29.1 KiB)
        TX errors 0  dropped 0 overruns 0  carrier 0  collisions 0

virbr0: flags=4099<UP,BROADCAST,MULTICAST>  mtu 1500
        inet 192.168.122.1  netmask 255.255.255.0  broadcast 192.168.122.255
        ether 52:54:00:8e:b2:c7  txqueuelen 1000  (Ethernet)
        RX packets 0  bytes 0 (0.0 B)
        RX errors 0  dropped 0  overruns 0  frame 0
        TX packets 0  bytes 0 (0.0 B)
        TX errors 0  dropped 0 overruns 0  carrier 0  collisions 0

[root@Linux100 var]# echo $?
0
[root@Linux100 var]# ifconfig em0
em0: error fetching interface information: Device not found
[root@Linux100 var]# echo $?  #上一条命令是否执行成功
1
[root@Linux100 var]# echo $$ #当前进程的PID
11683
[root@Linux100 var]# echo $0 #当前进程的名称
bash


[root@Linux100 var]#  vim 6.sh
#!/bin/bash
#PID Pname
echo $$
echo $0


[root@Linux100 var]# chmod u+x 6.sh
[root@Linux100 var]# bash 6.sh
12406
6.sh
[root@Linux100 var]# . 6.sh
11683
bash


[root@Linux100 var]#  vim 7.sh
#/bin/bash
# $1 $2 $3...$9 ${10}
#pos1=$1
#pos2=$2

#echo $pos1
#echo $pos2

echo $1
echo ${2-_}


[root@Linux100 var]# chmod u+x 7.sh
[root@Linux100 var]# ./7.sh -a -l
[root@Linux100 var]#  vim 7.sh
[root@Linux100 var]# ./7.sh -a -l
-a
-l
[root@Linux100 var]#  vim 7.sh

[root@Linux100 var]# ./7.sh -a -l
-a
-l_
[root@Linux100 var]# ./7.sh -a
-a
_
[root@Linux100 var]#  vim 7.sh
[root@Linux100 var]# ./7.sh -a
-a
_
[root@Linux100 var]# ./7.sh -a -l
-a
-l
特殊变量 @、?
9代表第一到第九个参数,十以上的参数,十以上的参数需要用大括号包含,如${10})
[kris@hadoop datas]$ vim parameter.sh
#!/bin/bash
echo "$0 $1 $2 $3"
echo $#
[kris@hadoop datas]$ sh parameter.sh Hello World java
parameter.sh Hello World java
3
十以上的参数需要用大括号包含,如${10}
功能描述:这个变量代表命令行中所有的参数,*把所有的参数看成一个整体)@(功能描述:这个变量也代表命令行中所有的参数,不过@把每个参数区分对待)和@都表示传递给函数或脚本的所有参数,不被双引号
[kris@hadoop datas]$ vim for3.sh
#!/bin/bash
for i in "$*"   //不带" "的$*和$@;输出的结果是一样的,都是3行echo的内容;
        do
                echo "Hello hi java"
        done
for j in "$@"
        do
                echo "你好"
        done
[kris@hadoop datas]$ sh for3.sh 1 2 3
Hello hi java
你好
你好
你好
$? (功能描述:最后一次执行的命令的返回状态。如果这个变量的值为0,证明上一个命令正确执行;如果这个变量的值为非0(具体是哪个数,由命令自己来决定),则证明上一个命令执行不正确了。)
如何检查一个变量是否为空??
[kris@hadoop datas]$ [ $a ]
[kris@hadoop datas]$ echo $?
1
[kris@hadoop datas]$ a="my life"
[kris@hadoop datas]$ echo $?
0
位置变量
- $1 $2 $3 ...$n
位置参数变量
|
位置参数变量 |
作 用 |
| $n |
n为数字,$0代表命令本身,$1-$9代表第一到第九个参数,十以上的参数需要用大括号包含,如${10}. |
| $* | 这个变量代表命令行中所有的参数,$*把所有的参数看成一个整体 |
| $@ | 这个变量也代表命令行中所有的参数,不过$@把每个参数区分对待 |
| $# | 这个变量代表命令行中所有参数的个数 |
#!/bin/bash
a=$1                #给a变量赋值是第一个参数
b=$2                #给b变量赋值是第二个参数
sum=$(( $a + $b ))  #变量sum的和是a+b
echo $sum           #打印变量sum的值
echo $0             #打印命令本身
#!/bin/bash
echo "Total of $# parameters" #$#代表所有参数的个数
echo "The parameters is: $*"  #$*代表所有的参数
echo "The parameters is: $@"  #$@也代表所有参数
$*会把接收的所有参数当成一个整体对待,而$@则会区分对待接收到的所有参数,例如:

#!/bin/bash
#$*
#定义for循环,in后面有几个值,for会循环多少次,注意“$*”要用双引号括起来
#每次循环会把in后面的值赋予变量i
#Shell把$*中的所有参数看成是一个整体,所以这个for循环只会循环一次

for i in "$*"
    do
       echo "The parameters is: $i" #打印变量$i的值
    done

#$@
#同样in后面的有几个值,for循环几次,每次都把值赋予变量y
#可是Shell中把“$@”中的每个参数都看成是独立的,所以“$@”中有几个参数,就会循环几次

x=1 #定义变量x的值为1
for y in "$@"
    do
      echo "The parameter$x is $y" #输出变量y的值
      x=$(($x+1))                  #变量x每次循环都加1,为了输出看的更清楚
    done
预定义变量
| 预定义变量 | 作用 |
| $? |
最后一次执行的命令的返回状态。如果这个变量的值为0,证明上一个命令正确执行; 如果这个变量的值为非0(具体是哪个数,由命令自己来决定),则证明上一个命令执行不正确了。 |
| $$ | 当前进程的进程号(PID) |
| $! | 后台运行的最后一个进程的进程号(PID) |
[kris@hadoop101 ~]$ echo $? #预定义变量“$?”的值是0,证明上一个命令执行正确
0
[kris@hadoop101 ~]$ ls fill
ls: 无法访问fill: 没有那个文件或目录
[kris@hadoop101 ~]$ echo $?  #变量“$?”返回一个非0的值,证明上一个命令没有正确执行
#至于错误的返回值到底是多少,是在编写ls命令时定义好的,如果碰到文件不存在就返回数值2
2

#!/bin/bash
echo "The current process is $$"         #输出当前进程的PID,这个PID就是这个脚本执行时生产的进程的PID

find /home/kris -name count.sh &         #使用find命令在kris目录下查找count.sh文件   #符号&的意思是把命令放入后台执行
echo "The last one Daemon process is $!" #输出这个后台执行命令的进程的PID,也就是输出find命令的PID号
接收键盘输入
read [选项] [变量名]
选项:
  -p "提示信息":指定读取值时的提示符;
   -t  秒数:read会一直等待用户输入,使用此选项可以指定等待的时间(秒)。
   -n 字符数: read命令只接受指定的字符数,就会执行。
   -s: 隐藏输入的数据,适用于机密信息的输入。


#/bin/bash
read -p "Please input a num in 5 seconds:" a
echo $a
⑥ 环境变量配置文件
配置文件
- /etc/profile
- /etc/profile.d
- ~/.bash_profile
- ~/.bashrc
- /etc/bashrc
不管是root账号或普通账号都需要事前声明的,保存在/etc/profile和 /etc/bashrc;
- /etc下是给所有用户通用的,
- ~家目录是给用户单独使用的
~ 那两个表示用户的家目录,一般是保存用户特有的一些配置,例如一些变量只能root用户使用那就保存在 ~/.bash_profile或~/.bashrc中;
~他们俩分为 proile和bashrc文件,因为登陆用户时也分为两种,login shell 与nologin shell,
用时 su - 用户名(称为login shell,所有的配置文件5个都会被执行),su 用户名 (称为nologin shell,使用的是 ~/.bashrc和/etc/bashrc )
#保存系统或终端启动时的环境,当使用su - 用户名时这个文件就会被第一个加载
[root@Linux100 var]# vim /etc/profile
echo /etc/profile

[root@Linux100 var]# vim /etc/bashrc
echo /etc/bashrc

#root用户家目录,是root用户特有的
[root@Linux100 ~]# vim ~/.bashrc
echo .bashrc

[root@Linux100 ~]# vim ~/.bash_profile
echo .bash_profile

[root@Linux100 ~]# ls /etc/profile.d/
256term.csh                   bash_completion.sh  colorls.csh  flatpak.sh  less.csh       sh.local  vte.sh
256term.sh                    colorgrep.csh       colorls.sh   lang.csh    less.sh        vim.csh   which2.csh
abrt-console-notification.sh  colorgrep.sh        csh.local    lang.sh     PackageKit.sh  vim.sh    which2.sh


[root@Linux100 ~]#
[root@Linux100 ~]# su - root
上一次登录:一 9月 19 23:09:58 CST 2022pts/0 上
/etc/profile  #
.bash_profile #自己特性的文件
.bashrc          #login shell即使用su - 用户切换时
/etc/bashrc    #由.bashrc再去加载/etc/bashrc


给命令搜索路径增加一个新的路径, 使用PATH加到任意一个上述文件中
[root@Linux100 ~]# export PATH=$PATH:/new/path
当前系统的所有终端都会增加


#配置文件加载不完全,则运行的环境和我们登陆的环境是不同的,不建议使用
[root@Linux100 ~]# su root
.bashrc
/etc/bashrc

[root@Linux100 ~]# bash
.bashrc
/etc/bashrc
这两个配置文件是个每次打开终端/shell的时候才去运行的,所以在配置文件新添加的配置文件,不会立即生效,比如在/etc/bashrc中添加了source下即可
[root@Linux100 ~]# source /etc/bashrc
/etc/bashrc
数组
定义数组:IPTS=( 10.0.0.1 10.0.0.2 10.0.0.3 )
显示数组的所有元素:echo ${IPTS[@]}
显示数组元素个数:echo ${#IPTS[@]}
显示数组的第一个元素:echo ${IPTS[0]}
[root@Linux100 ~]# ipts=( 10.0.0.1 10.0.0.2 10.0.0.3 )
[root@Linux100 ~]#
[root@Linux100 ~]# echo $ipts
10.0.0.1
[root@Linux100 ~]# echo ${ipts[@]}
10.0.0.1 10.0.0.2 10.0.0.3
[root@Linux100 ~]#
[root@Linux100 ~]# echo ${#ipts[@]}
3
[root@Linux100 ~]#
[root@Linux100 ~]# echo ${ipts[0]}
10.0.0.1
[root@Linux100 ~]# echo ${ipts[2]}
10.0.0.3
[root@Linux100 ~]# echo ${ipts[3]}

[root@Linux100 ~]#
特殊字符-转义和引用
特殊字符:一个字符不仅有字面意义,还有元意(meta-meaning)
- #注释
- ;分号 (分割两行的命令,有时命令较短可以把它合并到一起)
- \ 转义符号
- " 和 ' 引号
单个字符前的转义符号
- \n \r \t 单个字母的转义
- \$ \'' \\ 单个非字母的转义
[root@Linux100 ~]# echo "$a"

[root@Linux100 ~]# echo "\$a"
$a
[root@Linux100 ~]# echo " abc"x"edf "
 abcxedf
[root@Linux100 ~]# echo " abc\"x\"edf "
 abc"x"edf
常用的引用符号
- " 双引号 (不完全引用,如果里面有变量,会进行解释)
- ' 单引号 (完全引用,里面是什么值就显示什么值 )
- `反引号
[root@Linux100 ~]# var1=123
[root@Linux100 ~]# echo '$var1'
$var1
[root@Linux100 ~]# echo "$var1"
123
运算符
数值运算的方法
数值运算,可以采用以下三种方法中的任意一种:
1)使用declare声明变量类型
既然所有变量的默认类型是字符串型,那么只要我们把变量声明为整数型不就可以运算了吗?使用declare命令就可以实现声明变量的类型。命令如下:
declare [+/-][选项] 变量名
选项:
-: 给变量设定类型属性
+: 取消变量的类型属性
-a: 将变量声明为数组型
-i: 将变量声明为整数型(integer)
-r: 讲变量声明为只读变量。注意,一旦设置为只读变量,既不能修改变量的值,也不能删除变量,甚至不能通过+r取消只读属性
-x: 将变量声明为环境变量
-p: 显示指定变量的被声明的类型

[kris@hadoop101 ~]$ a=11
[kris@hadoop101 ~]$ b=22
[kris@hadoop101 ~]$ declare -i c=$a+$b
[kris@hadoop101 ~]$ echo $c
33
数组变量类型
[kris@hadoop101 ~]$ name[0]="kris"
[kris@hadoop101 ~]$ name[1]="song"
[kris@hadoop101 ~]$ echo ${name}
kris
[kris@hadoop101 ~]$ echo ${name[0]}
kris
[kris@hadoop101 ~]$ echo ${name[1]}
song
[kris@hadoop101 ~]$ echo ${name[*]}
kris song

数组下标从0开始,调用数组时,需要使用 ${数组[下标]} 的方式读取;
[kris@hadoop101 ~]$ declare -x age=20 #把变量age声明为环境变量
[kris@hadoop101 ~]$ declare -r age #给age赋予只读属性
[kris@hadoop101 ~]$ age=30 #age变量的值就不能修改了
-bash: age: readonly variable
[kris@hadoop101 ~]$ declare +r age #也不能取消只读属性
-bash: declare: age: readonly variable
[kris@hadoop101 ~]$ unset age #也不能删除变量
-bash: unset: age: cannot unset: readonly variable
[kris@hadoop101 ~]$ echo $age
20


查询变量属性和取消变量属性
变量属性的查询使用“-p”选项,变量属性的取消使用“+”选项。
[kris@hadoop101 ~]$ declare -p c
declare -i c="33"
[kris@hadoop101 ~]$ declare -p name
declare -a name='([0]="kris" [1]="song")'
[kris@hadoop101 ~]$ declare -x age
[kris@hadoop101 ~]$ declare -p age
declare -rx age="20"
2)使用expr或let数值运算工具
要想进行数值运算的第二种方法是使用expr命令,这种命令就没有declare命令复杂了
[kris@hadoop101 ~]$ echo $a
11
[kris@hadoop101 ~]$ echo $b
22
[kris@hadoop101 ~]$ d=$(expr $a+$b)
[kris@hadoop101 ~]$ echo $d
11+22
[kris@hadoop101 ~]$ d=$(expr $a + $b)  # + 号左右要有空格;
[kris@hadoop101 ~]$ echo $d
33
[kris@hadoop101 ~]$ let e=$a+$b
[kris@hadoop101 ~]$ echo $e
33

n=20                     #定义变量n
let n+=1                #变量n的值等于变量本身再加1
echo $n
    21
3)使用$方式运算
使用“$((运算式))” 或 “$[运算式]”方式运算
其实这是一种方式“$(())”和“$[]”这两种括号按照个人习惯使用即可
[kris@hadoop101 ~]$ f=$(( $a+$b ))
[kris@hadoop101 ~]$ echo $f
33
[kris@hadoop101 ~]$ g=$[ $a+$b ]
[kris@hadoop101 ~]$ echo $g
33
这三种数值运算方式,按照自己的习惯来使用。推荐使用“$((运算式))”的方式
常用运算符
| 优先级 | 运算符 | 说明 |
| 13 | -,+ | 单目负、单目正 |
| 12 | !,~ | 逻辑非、按位取反或补码 |
| 11 | * , / , % | 乘、除、取模 |
| 10 | +, - | 加、减 |
| 9 | << , >> | 按位左移、按位右移 |
| 8 | < =, > =, < , > | 小于或等于、大于或等于、小于、大于 |
| 7 | == , != | 等于、不等于 |
| 6 | & | 按位与 |
| 5 | ^ | 按位异或 |
| 4 | | | 按位或 |
| 3 | && | 逻辑与 |
| 2 | || | 逻辑或 |
| 1 | =,+=,-=,*=,/=,%=,&=, ^=, |=, <<=, >>= | 赋值、运算且赋值 |
运算符优先级表明在每个表达式或子表达式中哪一个运算对象首先被求值,数值越大优先级越高,具有较高优先级级别的运算符先于较低级别的运算符进行求值运算。
基本语法
(1)“$((运算式))”或“$[运算式]” 一般都是用这种形式的
(2)expr + , - , *, /, % 加,减,乘,除,取余
注意:expr运算符间要有空格
[kris@hadoop datas]$ expr `expr 2 + 3` \* 4
[kris@hadoop datas]$ echo $[(2+3)*4]
[kris@hadoop datas]$ s=$[(2+3)*4]
[kris@hadoop datas]$ echo $s
20
[kris@hadoop datas]$ echo $(((2+3)*4))
赋值运算符
- =赋值运算符,用于算数赋值和字符串赋值
- 使用unset取消变量的赋值
- =除了作为赋值运算符还可以作为测试操作符
算数运算符
- + - * / ** %
- 使用expr进行运算:expr 4 + 5
数字常量
- let "变量名 = 变量值"
- 变量值使用0开头为八进制
- 变量值使用0x开头为十六进制
双圆括号(是let命令的简化)
- ((a = 10))
- ((a++))
- echo $((10+20))
[root@Linux100 ~]# expr 4 + 5
9
[root@Linux100 ~]# expr 4 +5
expr: 语法错误
[root@Linux100 ~]# expr 4+5
4+5
[root@Linux100 ~]# expr 4 + 5.2
expr: 非整数参数
[root@Linux100 ~]# num1=`expr 4 + 5`
[root@Linux100 ~]# echo $num1
9


[root@Linux100 ~]#
[root@Linux100 ~]# (( a=4+5 ))
[root@Linux100 ~]# echo $a
9
[root@Linux100 ~]# b=4+5
[root@Linux100 ~]# echo $b
4+5
[root@Linux100 ~]# (( a++ ))
[root@Linux100 ~]# echo $a
10
[root@Linux100 ~]# (( a++ ))
[root@Linux100 ~]# echo $a
11
特殊符号大全
① 引号
- ' 完全引用
- " 不完全引用
- ` 执行命令
② 括号
() (()) $() 圆括号
- 单独使用圆括号会产生一个子shell ( xyz=123 )
- 数组初始化 IPS=( ip1 ip2 ip3)
[ ] [[ ]]方括号
- 单独使用方括号是测试(test) 或数组元素功能
- 两个方括号表示测试表达式
< > 尖括号 重定向符号
{ } 花括号
- 输出范围 echo {0..9}
- 文件复制 cp /etc/passwd{,.bak}
[root@Linux100 ~]# (abc=123)
[root@Linux100 ~]# echo $abc

[root@Linux100 ~]# ipt=(ip1 ip2 ip3)
[root@Linux100 ~]# echo $(( 10+20 ))
30
[root@Linux100 ~]# cmd1=$(ls)
[root@Linux100 ~]# echo $cmd1
1.sh 2.sh 3.sh 4.sh 5.sh anaconda-ks.cfg a.sh a.txt b.txt c.txt d.txt initial-setup-ks.cfg mbr2.bin mbr.bin
[root@Linux100 ~]#
[root@Linux100 ~]# [ 5 -gt 4]
-bash: [: 缺少 `]'
[root@Linux100 ~]# [ 5 -gt 4 ]
[root@Linux100 ~]# echo $?
0
[root@Linux100 ~]# [ 5 -gt 6 ]
[root@Linux100 ~]# echo $?
1
[root@Linux100 ~]#
[root@Linux100 ~]# [[ 5 > 4 ]]
[root@Linux100 ~]# echo $?
0
[root@Linux100 ~]# ls > a.txt
[root@Linux100 ~]# cat a.txt

[root@Linux100 ~]# echo {0..9}
0 1 2 3 4 5 6 7 8 9
[root@Linux100 ~]# ls
1.sh  2.sh  3.sh  4.sh  5.sh  anaconda-ks.cfg  a.sh  a.txt  b.txt  c.txt  d.txt  initial-setup-ks.cfg  mbr2.bin  mbr.bin
[root@Linux100 ~]# cp -v /root/anaconda-ks.cfg{,.bak}
③ 运算和逻辑符号
- + - * / % 算数运算符
- > < = 比较运算符
- && || ! 逻辑运算符
[root@Linux100 ~]# (( 5 > 4 ))
[root@Linux100 ~]# echo $?
0
[root@Linux100 ~]# (( 5 < 4 ))
[root@Linux100 ~]# echo $?
1
[root@Linux100 ~]# (( 5 > 4  && 6 > 5 ))
[root@Linux100 ~]# echo $?
0
[root@Linux100 ~]# (( 5 > 4  && 6 < 5 ))
[root@Linux100 ~]# echo $?
1
[root@Linux100 ~]# (( 5 > 4  || 6 < 5 ))
[root@Linux100 ~]# echo $?
0
[root@Linux100 ~]#
[root@Linux100 ~]# (( ! 5 < 4 ))
[root@Linux100 ~]# echo $?
0
④ 转义符号
\ 转义某字符
- \n 普通字符转义之后有不同的功能;
- \' 特殊字符转义之后,当做普通字符来使用;
⑤ 其他符号
- # 注释符
- ; 命令分隔符
- case 语句的分隔符要转义;;
- : 空指令
- . 和source命令相同
- ~ 家目录
- , 分割目录
- * 通配符
- ? 条件测试 或 通配符
- $ 取值符号
- | 管道符
- & 后台运行
- _ 空格
[root@Linux100 ~]# cd -
-bash: cd: OLDPWD 未设定
[root@Linux100 ~]#
[root@Linux100 ~]# ls ; pwd
1.sh  2.sh  3.sh  4.sh  5.sh  anaconda-ks.cfg  anaconda-ks.cfg.bak  a.sh  a.txt  b.txt  c.txt  d.txt  initial-setup-ks.cfg  mbr2.bin  mbr.bin
/root
[root@Linux100 ~]# :
[root@Linux100 ~]# echo $?
0
[root@Linux100 ~]# ./
1.sh     2.sh     4.sh     5.sh     .cache/  .config/ .dbus/   .local/
[root@Linux100 ~]# .
-bash: .: 需要文件名参数
.: 用法:. 文件名 [参数]
[root@Linux100 ~]#
[root@Linux100 ~]# ./bash
-bash: ./bash: 没有那个文件或目录
[root@Linux100 ~]# . bash
-bash: .: /bin/bash: 无法执行二进制文件
[root@Linux100 ~]# cd ~
[root@Linux100 ~]# cd -
/root
[root@Linux100 ~]# cd /etc/
[root@Linux100 etc]# cd /var/log/
[root@Linux100 log]# cd -
/etc
[root@Linux100 etc]# cd -
/var/log
[root@Linux100 log]# cd
[root@Linux100 ~]# ls ?.sh
1.sh  2.sh  3.sh  4.sh  5.sh  a.sh
[root@Linux100 ~]#
[root@Linux100 ~]# echo {0..9}
0 1 2 3 4 5 6 7 8 9
[root@Linux100 ~]# echo { 0..9 }
{ 0..9 }
测试与判断
条件判断
基本语法
[ condition ](注意condition前后要有空格)
注意:条件非空即为true,[ kris ]返回true,[] 返回false。
常用判断条件
(1)两个整数之间比较
= 字符串比较
-lt 小于(less than)            -le 小于等于(less equal)
-eq 等于(equal)                -gt 大于(greater than)
-ge 大于等于(greater equal)    -ne 不等于(Not equal)
(2)按照文件权限进行判断
-r 有读的权限(read)            -w 有写的权限(write)
-x 有执行的权限(execute)
(3)按照文件类型进行判断
-f 文件存在并且是一个常规的文件(file)
-e 文件存在(existence)        -d 文件存在并是一个目录(directory)

[kris@hadoop datas]$ [ -x /home/kris/datas/for.sh ]
[kris@hadoop datas]$ echo $?
1
[kris@hadoop datas]$ [ -r /home/kris/datas/for.sh ]
[kris@hadoop datas]$ echo $?
0
多条件判断
[kris@hadoop datas]$ [ $[4%2] = 0 ] && echo yes || echo no  多条件判断;
yes
判断一个文件是否存在
[kris@hadoop100 datas]$ vim exists.txt
#!/bin/bash
if [ -f chengji.txt ]; then   ######## -f文件存在并且是常规文件; -e文件存在; -d文件存在且是个目录
        echo "文件存在"
else
        echo "文件不存在"
fi
1、由单引号括起来的字符都作为普通字符出现。特殊字符用单引号括起来以后,也会失去原有意义,而只作为普通字符解释。如例程中的 '-1 day',再比如:
[kris@hadoop101 ~]$ string='$PATH'
[kris@hadoop101 ~]$ echo $string
$PATH
可见$保持了其本身的含义,作为普通字符出现。
2、由双引号括起来的字符,除$(美元符号)、\(反斜杠)、’(单引号)、和”(双引号)这几个字符仍是特殊字符并保留其特殊功能外,其余字符仍作为普通字符对待。
对于“$”来说,就是用其后指定的变量的值来代替这个变量和$;
[kris@hadoop101 ~]$ string="$PATH"
[kris@hadoop101 ~]$ echo $string
/usr/lib64/qt-3.3/bin:/usr/local/bin:/bin:/usr/bin:/usr/local/sbin:
/usr/sbin:/sbin:/opt/module/jdk1.8.0_144/bin:
/opt/module/hadoop-2.7.2/bin:/opt/module/hadoop-2.7.2/sbin:
/opt/module/jdk1.8.0_144/bin:/opt/module/hadoop-2.7.2/bin:
/opt/module/hadoop-2.7.2/sbin:/opt/module/jdk1.8.0_144/bin:
/opt/module/hadoop-2.7.2/bin:/opt/module/hadoop-2.7.2/sbin:
/opt/module/jdk1.8.0_144/bin:/opt/module/hadoop-2.7.2/bin:
/opt/module/hadoop-2.7.2/sbin:/home/kris/bin
对于“\”而言,是转义字符,它告诉shell不要对其后面的那个字符进行特殊处理,只当作普通字符即可。可以想见,在双引号中需要在前面加上“\”的只有四个字符$,\,’和”本身。而对”号,若其前面没有加
“\”,则Shell会将它同前一个”号匹配。如例程中的"-$i day",会随着循环,将$i转换成其代表的值。
3、反引号(`)这个字符所对应的键一般位于键盘的左上角,不要将其同单引号(’)混淆。反引号括起来的字符串被shell解释为命令行,在执行时,shell首先执行该命令行,并以它的标准输出结果取代
整个反引号(包括两个反引号)部分。如例程中的`date -d '-1 day' +%Y%m%d`就是把这条命令的结果赋给变量OPDATE。
① 退出与退出状态
- exit
- exit 10 返回10给shell,返回值非0位不正常退出
- $? 判断当前shell前一个进程是否退出
[root@Linux100 ~]# vim 8.sh
#!bin/bash
#exit demo
ppwd
exit 10

[root@Linux100 ~]# bash 8.sh
8.sh:行4: ppwd: 未找到命令
[root@Linux100 ~]# echo $?
127
[root@Linux100 ~]# vim 8.sh
[root@Linux100 ~]# bash 8.sh
8.sh:行4: ppwd: 未找到命令
[root@Linux100 ~]# echo $?
10
② 测试命令test
test 命令用于检查文件或者比较值
test可以做以下测试:
- 文件测试
- 整数比较测试
- 字符串测试
test测试语句可以简化为[ ] 符号
[ ]符号还有扩展写法[[ ]] 支持 &&、||、< 、>
[root@Linux100 ~]# man test
[root@Linux100 ~]# test -f /etc/passwd
[root@Linux100 ~]# echo $0
-bash
[root@Linux100 ~]# echo $?
0
[root@Linux100 ~]# test -f /etc/passwd2
[root@Linux100 ~]# echo $?
1
[root@Linux100 ~]# [ -d /etc/ ]
[root@Linux100 ~]# echo $?
0
[root@Linux100 ~]# [ 5 -gt 4 ]
[root@Linux100 ~]# echo $?
0
[root@Linux100 ~]# [[ 5 > 4 ]]
[root@Linux100 ~]# echo $?
0
[root@Linux100 ~]# ["abc" = "abc"]
bash: [abc: 未找到命令...
[root@Linux100 ~]# [ "abc" = "abc" ]
[root@Linux100 ~]# echo $?
0
[root@Linux100 ~]# [ "abc" = "ABC" ]
[root@Linux100 ~]# echo $?
1
③ 使用if-then语句
if 判断
(1)[ 条件判断式 ],中括号和条件判断式之间必须有空格
(2)if后要有空格

[kris@hadoop datas]$ vim if.sh
#!/bin/bash
if [ $1 -eq "1" ]
then
        echo "one"
elif [ $1 -eq "2" ]
then
        echo "two"
else
        echo "other"
fi
-------------------
#!/bin/bash
if [ $1 -eq "1" ]; then echo "one"
fi
运算式$[4%2] 和表达式[ 4 -eq 3 ],注意区别
if [ 测试条件成立 ] 或 命令返回值是否为0
then 执行相应命令
fi 结束
[root@Linux100 ~]# [ $UID = 0 ]
[root@Linux100 ~]# echo $?
0
[root@Linux100 ~]# echo $USER
root
[root@Linux100 ~]# [ $USER = root ]
[root@Linux100 ~]# echo $?
0
[root@Linux100 ~]# if [ $UID = 0  ]
> then
>     echo "root user"
> fi
root user
[root@Linux100 ~]# su - blake
上一次登录:四 9月 29 21:43:17 CST 2022从 192.168.10.1pts/1 上
/etc/profile
/etc/bashrc
[blake@Linux100 ~]$ if [ $UID = 0 ]
> then
>     echo "root user"
> fi
[blake@Linux100 ~]$ if pwd
> then
>     echo "pwd running"
> fi
/home/blake
pwd running
[blake@Linux100 ~]$ if abc; then      echo "pwd running"; fi
bash: abc: 未找到命令...
[blake@Linux100 ~]$ echo $?
0
[blake@Linux100 ~]$ abc
bash: abc: 未找到命令...
[blake@Linux100 ~]$ echo $?
127
④ 使用if-then-else语言
if-then-else语句可以在条件不成立时也运行相应的命令
if [ 测试条件成立 ]
then 执行相应命令
else 测试条件不成立,执行相应命令
fi 结束
使用if-elif-else语句
if-then-else语句可以在条件不成立时也运行相应的命令
if [ 测试条件成立 ]
then 执行相应命令
elif [ 测试条件成立 ]
then 执行相应命令
else 测试条件不成立,执行相应命令
fi 结束
[root@Linux100 ~]# vim 9.sh
#!/bin/bash
#if else demo

if [ $USER = root ] ; then
   echo " user root "
   echo $UID
else
   echo " other user "
   echo $UID
fi

[root@Linux100 ~]# chmod u+x 9.sh
[root@Linux100 ~]# ./9.sh
 user root
[root@Linux100 ~]# vim 9.sh
[root@Linux100 ~]# ./9.sh
 user root
0
[root@Linux100 ~]# vim 10.sh
#!/bin/bash
#root user1 other
if [ $USER = root ] ; then
   echo "root"
elif [ $USER = user1  ] ; then
   echo "user1"
else
   echo "other user"
fi


[root@Linux100 ~]# chmod u+x 10.sh
[root@Linux100 ~]# ./10.sh
root
[root@Linux100 ~]# id
uid=0(root) gid=0(root) 组=0(root) 环境=unconfined_u:unconfined_r:unconfined_t:s0-s0:c0.c1023
⑤ 嵌套if的使用
if条件测试中可以再嵌套if条件测试
if [ 测试条件成立 ]
then 执行相应命令
if [ 测试条件成立 ]
then 执行相应命令
fi
fi 结束
[root@Linux100 ~]# vim 11.sh
#!/bin/bash
#demo if then if then fi fi

if [ $UID = 0 ] ; then
    echo "please run"
    if [ -x /tmp/10.sh ] ; then
        /tmp/10.sh
    fi
else
    echo "switch user root"
fi

[root@Linux100 ~]# chmod u+x 11.sh
[root@Linux100 ~]# ./11.sh
please run
case 分支
case 语句和select 语句可以构成分支
case "$变量" in
"情况1" )
命令... ;;
"情况2" )
命令... ;;
* )
命令... ;;
esac
[root@Linux100 ~]# vim 12.sh
#!/bin/bash
#case demo

case "$1" in
    "start"|"START")
     echo $0 start...
    ;;

    "stop")
    echo $0 stop...
    ;;

    "restart"|"rebload")
     echo $0 restart
    ;;
    *)
      echo "Usage: $0 {start|stop|restart|rebload}"
    ;;
esac

[root@Linux100 ~]# chmod u+x 12.sh
[root@Linux100 ~]# ./12.sh start
./12.sh start...
[root@Linux100 ~]# ./12.sh START
./12.sh start...
[root@Linux100 ~]# ./12.sh stop
./12.sh stop...
[root@Linux100 ~]# ./12.sh restart
./12.sh restart
[root@Linux100 ~]# ./12.sh abc
Usage: ./12.sh {start|stop|restart|rebload}
案例
#!/bin/bash
case $1 in
"1")
        echo "Monday"
;;
"2")
        echo "Tuesday"
;;
"3")
        echo "Wednesday"
;;
"4")
        echo "Thursday"
;;
"5")
        echo "Friday"
;;
*)
        echo "Weekend"
;;
esac

[kris@hadoop datas]$ ./case.sh 3
Wednesday
循环
C语言风格的for命令
for ((变量初始化; 循环判断条件; 变量变化))
do
循环执行的命令
done
[root@Linux100 ~]# for (( i=1; i<=10; i++))
> do
>    echo $i
> done
1
2
3
4
5
6
7
8
9
10
while 循环
[kris@hadoop datas]$ vim while.sh
#!/bin/bash
i=1
s=0
while [ $i -le 100 ]
do
  s=$[$s+$i]
  i=$[$i+1]
done
echo $s
[kris@hadoop datas]$ sh while.sh 3333333333
5050
while test测试是否成立
do
命令
done
until循环
until循环与while循环相反,循环测试为假时,执行循环,为真时循环停止;
[root@Linux100 ~]# a=1
[root@Linux100 ~]# while [ $a -lt 10 ]; do ((a++)) ; echo $a; done
2
3
4
5
6
7
8
9
10

# 构建死循环,一直输出always
[root@Linux100 ~]# while :; do echo always; done
always
always
always
always
always
always
always
always

#until的用法
[root@Linux100 ~]# until :; do echo always; done

[root@Linux100 ~]# until :; do echo always; done
always
always
always
always
always
always
循环的使用
循环和循环可以嵌套;
循环中可以嵌套判断,反过来也可以嵌套;
循环可以使用break和continue语句在循环中退出;
[root@Linux100 ~]# ls /etc/profile.d/
256term.csh                   bash_completion.sh  colorls.csh  flatpak.sh  less.csh       sh.local  vte.sh
256term.sh                    colorgrep.csh       colorls.sh   lang.csh    less.sh        vim.csh   which2.csh
abrt-console-notification.sh  colorgrep.sh        csh.local    lang.sh     PackageKit.sh  vim.sh    which2.sh
[root@Linux100 ~]#
[root@Linux100 ~]# for sc_name in /etc/profile.d/*.sh
> do
>    echo $sc_name
> done
/etc/profile.d/256term.sh
/etc/profile.d/abrt-console-notification.sh
/etc/profile.d/bash_completion.sh
/etc/profile.d/colorgrep.sh
/etc/profile.d/colorls.sh
/etc/profile.d/flatpak.sh
/etc/profile.d/lang.sh
/etc/profile.d/less.sh
/etc/profile.d/PackageKit.sh
/etc/profile.d/vim.sh
/etc/profile.d/vte.sh
/etc/profile.d/which2.sh
[root@Linux100 ~]# for sc_name in /etc/profile.d/*.sh
> do
>    if [ -x $sc_name ] ; then
>       . $sc_name
>    fi
> done

[root@Linux100 ~]# for num in {1..9}; do     if [ $num -eq 5 ] ; then       break;    fi; echo $num; done
1
2
3
4
[root@Linux100 ~]# for num in {1..9}
> do
>    if [ $num -eq 5 ] ; then
>            continue
>    fi
>     echo $num
> done
1
2
3
4
6
7
8
9
for循环和if的使用
表达式
[kris@hadoop datas]$ vi for.sh
#!/bin/bash

for ((i=0;i<10;i++))
do
        if [ $[$i%2] -eq 0 ]
        then
        echo $i
fi
done

或者这样写:
for ((i=0;i<10;i++))
do
        if [ $(($i%2)) = 0 ]; then echo $i
     fi
done

[kris@hadoop datas]$ sh for.sh
0
2
4
6
8

#!/bin/bash
for((i=0;i<10;i++))
do
        if [ $(($i%2)) = 0 ]; then echo $i
        elif [ $(($i%3)) = 0 ]; then echo $i
        else echo "我是奇数"
fi
done
使用循环处理命令行参数
命令行参数可以使用$1 $2 ... ${10} .. $n 进行读取;
$0 代表脚本名称;
$*和$@代表所有位置参数;
$# 代表位置参数的数量;
[root@Linux100 ~]# vim 13.sh

#!/bin/bash
#help display help help
for pos in $*
do
    if [ "$pos" = "help" ] ; then
       echo $pos  $pos
    fi

done

[root@Linux100 ~]# bash 13.sh a b c help
help help
[root@Linux100 ~]# bash 13.sh help
help help


[root@Linux100 ~]# vim 13.sh
#for pos in $*
#do
# if [ "$pos" = "help" ] ; then
# echo $pos $pos
# fi
#
#done

while [ $# -ge 1 ]
do
if [ "$1" = "help" ]; then
echo $1 $1
fi
shift
done

[root@Linux100 ~]# ./13.sh a b c
[root@Linux100 ~]# ./13.sh a b c help
help help
函数
函数function
bash 可以进入子shell,exit是退出来,

source a.sh是在当前shell执行
./a.sh是在子shell中执行的

export 使得当前shell和子shell中定义的变量都起作用
系统函数
basename [string / pathname] [suffix]
(功能描述:basename命令会删掉所有的前缀包括最后一个(‘/’)字符,然后将字符串显示出来。
suffix为后缀,如果suffix被指定了,basename会将pathname或string中的suffix去掉。

[kris@hadoop datas]$ basename /home/kris/datas/while.sh
while.sh
[kris@hadoop datas]$ basename /home/kris/datas/while.sh .sh
while

dirname 文件绝对路径        (功能描述:从给定的包含绝对路径的文件名中去除文件名(非目录的部分),然后返回剩下的路径(目录的部分))
[kris@hadoop datas]$ dirname /home/kris/datas/while.sh
/home/kris/datas
自定义函数
必须在调用函数地方之前,先声明函数,shell脚本是逐行运行。不会像其它语言一样先编译。
函数返回值,只能通过$?系统变量获得,可以显示加:return返回,如果不加,将以最后一条命令运行结果,作为返回值。return后跟数值n(0-255)

#/bin/bash
function sum()
{
        s=$echo $s
}
sum $1 $2
~
~
[kris@hadoop datas]$
[kris@hadoop datas]$ sh function.sh 1 3
4
函数用于"包含"重复使用的命令集合
自定义函数
function fname() {
命令
}
函数的执行: fname
函数作用范围的变量: local变量名
函数的参数: $1 $2 $3 .. $n
[root@Linux100 ~]# function cdls() {
> cd /var
> ls
> }
[root@Linux100 ~]# cdls
6.sh  account  cache  db     games   kerberos  local  log   nis  preserve  spool   tmp
7.sh  adm      crash  empty  gopher  lib       lock   mail  opt  run       target  yp
[root@Linux100 var]#
[root@Linux100 var]# unset cdls
[root@Linux100 var]# cdls() {
> cd $1
> ls
> }
[root@Linux100 var]# cdls /tmp/
systemd-private-5d8b4ece36874ac4ad2d4fef306f2cce-colord.service-RLvTDp        tracker-extract-files.1000
systemd-private-5d8b4ece36874ac4ad2d4fef306f2cce-cups.service-1UNTcA          yum_save_tx.2022-09-27.14-39.HV38Fc.yumtx
systemd-private-5d8b4ece36874ac4ad2d4fef306f2cce-rtkit-daemon.service-73Qrhh  yum_save_tx.2022-09-28.07-40.lf8f2A.yumtx
[root@Linux100 tmp]# cd ~
[root@Linux100 ~]# vim 14.sh
#!bin/bash

#function

checkpid() {
  local i
  for i in $* ; do
      [ -d "/proc/$i" ] && return 0
  done

  return 1
}


[root@Linux100 ~]# chmod u+x 14.sh
[root@Linux100 ~]# source 14.sh
[root@Linux100 ~]# checkpid 1
[root@Linux100 ~]# echo $?
0
[root@Linux100 ~]# checkpid 1 2
[root@Linux100 ~]# echo $?
0
[root@Linux100 ~]# checkpid 65533
[root@Linux100 ~]# echo $?
1
系统脚本
系统自建了函数库,可以在脚本中引用: /etc/init.d/functions
自建函数库:使用source函数脚本文件"导入" 函数
[root@Linux100 ~]# vim /etc/init.d/functions
[root@Linux100 ~]# source  /etc/init.d/functions
[root@Linux100 ~]# echo_success
[root@Linux100 ~]#                                         [  确定  ]
[root@Linux100 ~]# vim /etc/profile
[root@Linux100 ~]# vim .bashrc
[root@Linux100 ~]# vim .bash_profile
脚本控制
脚本控制优先级控制
可以使用nice 和renice 调整脚本优先级
避免出现"不可控的"死循环
- 死循环导致cpu占用过高
- 死循环导致死机
[blake@Linux100 ~]$  ulimit -a
core file size          (blocks, -c) 0
data seg size           (kbytes, -d) unlimited
scheduling priority             (-e) 0
file size               (blocks, -f) unlimited
pending signals                 (-i) 15601
max locked memory       (kbytes, -l) 64
max memory size         (kbytes, -m) unlimited
open files                      (-n) 1024
pipe size            (512 bytes, -p) 8
POSIX message queues     (bytes, -q) 819200
real-time priority              (-r) 0
stack size              (kbytes, -s) 8192
cpu time               (seconds, -t) unlimited
max user processes              (-u) 4096
virtual memory          (kbytes, -v) unlimited
file locks                      (-x) unlimited

[root@Linux100 ~]# su - blake
上一次登录:五 9月 30 19:35:02 CST 2022从 192.168.10.1pts/1 上
/etc/profile
/etc/bashrc
[blake@Linux100 ~]$ func() { func | func& }
[blake@Linux100 ~]$ func
[1] 8614

--bash: fork: retry: 没有子进程
--bash: fork: retry: 没有子进程

一直到这个普通用户没有资源去创建子进程了
fork炸弹

[blake@Linux100 ~]$ func() { func | func& } ; func
#上一行可简化下成下行,root用户不受系统控制会假死,一直创建子进程
[blake@Linux100 ~]$ .(){.|.&};.
捕获信号
捕获信号脚本的编写
- kill默认会发送15号信号给应用程序;
- ctrl+c发送2号信号给应用程序;
- 9号信号不可阻塞;
#!/bin/bash
#signal demo

trap "echo sig 15" 15
trap "echo sig 2" 2
echo $$
while :
do
  :
done

[root@Linux100 ~]# chmod u+x 15.sh
[root@Linux100 ~]# ./15.sh
9924
sig 15
sig 15
已杀死
[root@Linux100 ~]# vim 15.sh
[root@Linux100 ~]# ./15.sh
10038
^Csig 2
^Csig 2
已杀死


#另外开启一个终端
[root@Linux100 ~]# kill -15 9924
[root@Linux100 ~]# kill  9924
[root@Linux100 ~]# kill -9 9924
[root@Linux100 ~]# kill -9 10038
计划任务
一次性计划任务 at
- 计划任务:让计算机在指定的时间运行程序;
- 计划任务分为:一次性计划任务、 周期性计划任务
- 一次性计划任务: at
[root@Linux100 ~]# date
2022年 10月 01日 星期六 09:29:07 CST
[root@Linux100 ~]# at 9:31
at> echo Hello > /tmp/hello.txt
at> <EOF>
at> <EOT>
job 1 at Sat Oct  1 09:31:00 2022
[root@Linux100 ~]# atq
1    Sat Oct  1 09:31:00 2022 a root
[root@Linux100 ~]# atq
[root@Linux100 ~]# atq
[root@Linux100 ~]# cat /tmp/hello.txt
Hello
[root@Linux100 ~]# ls -ls /tmp/hello.txt
4 -rw-r--r--. 1 root root 6 10月  1 09:31 /tmp/hello.txt
周期性计划任务
cron
- 配置方式:crontab -e
- 查看现有的计划任务:crontab -l
- 配置格式:分钟 小时 日期 月份 星期 执行的命令;注意命令的路径问题
[root@Linux100 log]# crontab -e
30 3 * * 1-5 /usr/bin/date >> /tmp/date.txt

[root@Linux100 ~]# crontab -e
no crontab for root - using an empty one
crontab: installing new crontab
[root@Linux100 ~]# cd /var/log/
[root@Linux100 log]# ls
anaconda           btmp       firewalld           maillog   rhsm               sssd                    wtmp
audit              chrony     gdm                 messages  sa                 tallylog                Xorg.0.log
boot.log           cron       glusterfs           ntpstats  samba              tuned                   Xorg.0.log.old
boot.log-20220928  cups       grubby_prune_debug  pluto     secure             vmware-vgauthsvc.log.0  Xorg.9.log
boot.log-20220929  dmesg      lastlog             ppp       speech-dispatcher  vmware-vmsvc.log        yum.log
boot.log-20220930  dmesg.old  libvirt             qemu-ga   spooler            wpa_supplicant.log
[root@Linux100 log]# tail -f cron
Oct  1 00:01:01 Linux100 anacron[9843]: Normal exit (0 jobs run)
Oct  1 00:01:01 Linux100 run-parts(/etc/cron.hourly)[9845]: finished 0anacron
Oct  1 09:24:49 Linux100 crond[1176]: (CRON) INFO (RANDOM_DELAY will be scaled with factor 79% if used.)
Oct  1 09:24:50 Linux100 crond[1176]: (CRON) INFO (running with inotify support)
Oct  1 09:30:01 Linux100 CROND[2006]: (root) CMD (/usr/lib64/sa/sa1 1 1)
Oct  1 09:40:01 Linux100 CROND[2145]: (root) CMD (/usr/lib64/sa/sa1 1 1)
Oct  1 09:42:52 Linux100 crontab[2182]: (root) BEGIN EDIT (root)
Oct  1 09:43:37 Linux100 crontab[2182]: (root) REPLACE (root)
Oct  1 09:43:37 Linux100 crontab[2182]: (root) END EDIT (root)
Oct  1 09:44:01 Linux100 CROND[2195]: (root) CMD (/usr/bin/date >> /tmp/date.txt)
^C
[root@Linux100 log]# cat /tmp/date.txt
2022年 10月 01日 星期六 09:44:01 CST
[root@Linux100 log]# cat /tmp/date.txt
2022年 10月 01日 星期六 09:44:01 CST
2022年 10月 01日 星期六 09:45:01 CST
# 每个用户都有自己的一个周期性计划任务
[root@Linux100 log]# ls /var/spool/cron/
root
计划任务加锁flock
如果计算机不能按照预期时间运行
- anacontab延时计划任务
- flock锁文件 (应用于备份脚本)
[root@Linux100 ~]# vim /etc/cron.d/
0hourly     raid-check  sysstat
[root@Linux100 ~]# vim /etc/cron.d/0hourly
[root@Linux100 ~]# vim /etc/anacrontab
[root@Linux100 ~]# cat /etc/cron.daily/logrotate
#!/bin/sh

/usr/sbin/logrotate -s /var/lib/logrotate/logrotate.status /etc/logrotate.conf
EXITVALUE=$?
if [ $EXITVALUE != 0 ]; then
    /usr/bin/logger -t logrotate "ALERT exited abnormally with [$EXITVALUE]"
fi
exit 0
[root@Linux100 ~]#
[root@Linux100 ~]#
[root@Linux100 ~]#
[root@Linux100 ~]# vim a.sh
[root@Linux100 ~]# vim b.sh
[root@Linux100 ~]# chmod u+x b.sh
[root@Linux100 ~]# flock -xn "/tmp/f.lock" -c "/root/b.sh"

#打开另外一个终端再去运行就会失败
[root@Linux100 ~]# flock -xn "/tmp/f.lock" -c "/root/b.sh"
脚本的常用执行方式
第一种:采用bash或sh+脚本的相对路径或绝对路径(不用赋予脚本+x权限)
sh helloworld.sh
第二种:采用输入脚本的绝对路径或相对路径执行脚本(必须具有可执行权限+x)
[kris@hadoop datas]$ chmod +x helloWorld.sh
[kris@hadoop datas]$ ./helloWorld.sh
注意:第一种执行方法,本质是bash解析器帮你执行脚本,所以脚本本身不需要执行权限。第二种执行方法,本质是脚本需要自己执行,所以需要执行权限。
多命令处理
把内容输出到文件:
[kris@hadoop datas]$ cat batch.sh  //脚本的内容如下:
#!/bin/bash

cd /home/kris
touch cls.txt
echo "I love cls" >>cls.txt
[kris@hadoop datas]$ sh batch.sh
[kris@hadoop datas]$ cat cls.txt
I love cls
环境变量配置文件
source命令
[root@localhost ~]# source 配置文件
  或
[root@localhost ~]# . 配置文件
环境变量配置文件
1)登录时生效的环境变量配置文件
在Linux系统登录时主要生效的环境变量配置文件有以下五个:
- /etc/profile
- /etc/profile.d/*.sh
- ~/.bash_profile
- ~/.bashrc
- /etc/bashrc
环境变量配置文件调用过程:
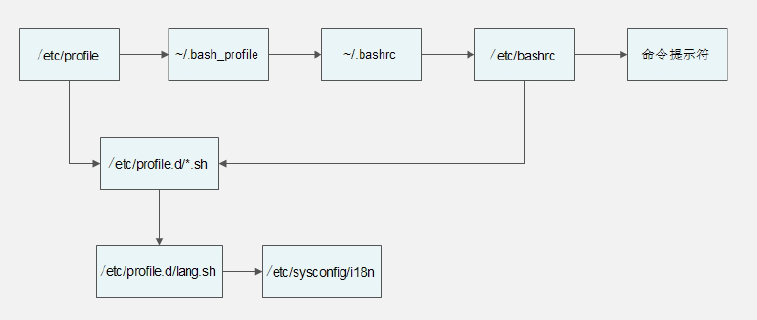
① 在用户登录过程先调用/etc/profile 文件
在这个环境变量配置文件中会定义这些默认环境变量:
- USER变量:根据登录的用户,给这个变量赋值(就是让USER变量的值是当前用户)。
- LOGNAME变量:根据USER变量的值,给这个变量赋值。
- MAIL变量:根据登录的用户,定义用户的邮箱为/var/spool/mail/用户名。
- PATH变量:根据登录用户的UID是否为0,判断PATH变量是否包含/sbin、/usr/sbin和/usr/local/sbin这三个系统命令目录。
- HOSTNAME变量:更加主机名,给这个变量赋值。
- HISTSIZE变量:定义历史命令的保存条数。
- umask:定义umask默认权限。注意/etc/profile文件中的umask权限是在“有用户登录过程(也就是输入了用户名和密码)”时才会生效。
调用/etc/profile.d/*.sh文件,也就是调用/etc/profile.d/目录下所有以.sh结尾的文件。
② 由/etc/profile文件调用/etc/profile.d/*.sh文件
这个目录中所有以.sh结尾的文件都会被/etc/profile文件调用,这里最常用的就是lang.sh文件,而这个文件又会调用/etc/sysconfig/i18n文件。/etc/sysconfig/i18n这个文件是默认语系配
置文件。
③ 由/etc/profile文件调用~/.bash_profile文件,~/.bash_profile文件就没有那么复杂了,这个文件主要实现了两个功能:
- 调用了~/.bashrc文件。
- 在PATH变量后面加入了“:$HOME/bin”这个目录。即如果我们在自己的家目录中建立bin目录,把自己的脚本放入“~/bin”目录,就可以直接执行脚本,而不用通过目录执行了。
④ 由~/.bash_profile文件调用~/.bashrc文件,在~/.bashrc文件中主要实现了:
- 定义默认别名,所以可以把自己定义的别名放入这个文件。
- 调用/etc/bashrc
⑤ 由~/.bashrc调用了/etc/bashrc文件,在/etc/bashrc文件中主要定义了这些内容:
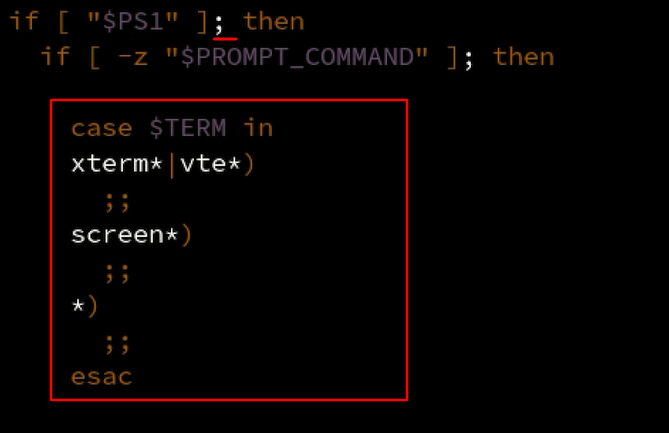
PS1变量:也就是用户的提示符,如果我们想要永久修改提示符,就要在这个文件中修改
umask:定义umask默认权限。这个文件中定义的umask是针对“没有登录过程(也就是不需要输入用户名和密码时,比如从一个终端切换到另一个终端,或进入子Shell)”时生
效的。如果是“有用户登录过程”,则是/etc/profile文件中的umask生效。
PATH变量:会给PATH变量追加值,当然也是在“没有登录过程”时才生效。
⑥ 调用/etc/profile.d/*.sh文件,这也是在“没有用户登录过程”时才调用。在“有用户登录过程”时,/etc/profile.d/*.sh文件已经被/etc/profile文件调用过了。
这五个环境变量配置文件会被依次调用,如果是我们自己定义的环境变量应该放入哪个文件呢?
- 如果你的修改是打算对所有用户生效的,那么可以放入/etc/profile环境变量配置文件;
- 如果你的修改只是给自己使用的,那么可以放入~/.bash_profile或~/.bashrc这两个配置文件中的任一个。
可是如果我们误删除了这些环境变量,比如删除了/etc/bashrc文件,或删除了~/.bashrc文件,那么这些文件中配置就会失效(~/.bashrc文件会调用/etc/bashrc文件)。
那么我们的提示符就会变成: -bash-4.1#
2)注销生效的环境变量配置文件
在用户退出登录时,只会调用一个环境变量配置文件,就是~/.bash_logout。这个文件默认没有写入任何内容,可是如果我们希望再退出登录时执行一些操作,比如清除历史命令,备
份某些数据,就可以把命令写入这个文件。
3)其他配置文件
还有一些环节变量配置文件,最常见的就是~/bash_history文件,也就是历史命令保存文件。这里我们只是把它归入环境变量配置文件小节而已。

 浙公网安备 33010602011771号