Angular使用总结 --- 以密码确认为例实现模版驱动表单的自定义校验
上一篇 总结了模版驱动表单的基本用法,示例中的校验使用的是原生HTML5的校验方式,本文补上自定义校验的部分。
HTML5原生的表单校验属性(必填,长度限制,取值间隔,正则表达式等等)可以满足普通的校验需求,但是有些场景必须用到自定义校验,比如注册时的密码确认,有比对关系的时间/数值选择, 需要到请求到服务端取值验证等等···这里以密码确认为例进行说明。
指令开发
表单的验证状态是通过 formContro l的 errors 属性反馈出来的,所以基本的思路肯定就是需要添加校验规则,然后将验证结果添加到formControl实例的errors属性中。那么问题来了,模版驱动表单的控制都是在HTML模版中完成的,无法直接接触到 formControl实例。这个时候就需要使用指令了,将检验规则进行包装。Angular提供了 验证器供应商 NG_VALIDATORS ,用于处理表单自定义校验。先创建指令。
import { Directive} from '@angular/core';
import { NG_VALIDATORS, Validator, AbstractControl} from '@angular/forms';

@Directive({
  selector: '[appConfirmpsw]',
  providers: [{
    provide : NG_VALIDATORS,
    useExisting : ConfirmpswDirective,
    multi: true
  }]
})
export class ConfirmpswDirective implements Validator {

  constructor() {

   }
  validate(control: AbstractControl): {[key: string]: any} {
     //检验规则
  }
}
1、为指令指定供应商 NG_VALIDATORS , 和别名类 ConfirmpswDirective , 及 multi 为true(可以用同一个token,注册不同的 provide)。因为是在 NG_VALIDATORS 提供商中注册的指令,所以才能被Angular的验证流程识别,需要注意的是要用useExisting来注册,这样就不会创建一个新的实例。
2、用 Validator接口来约束 自定义的指令,这是Angular提供的验证器的类 。有validate属性,会传入表单的formControl,返回 ValidationErrors 对象。
现在指令结构完成,开始进行校验部分。首先需要传入已输入的密码,所以增加@input,再指定校验规则,判断绑定表单的值和传入的已输入值是否相同
@Input('appConfirmpsw') confirmpsw: string;
为了避免使用指令时,还需要额外传入confirmpsw属性 ( <input type="password" appConfirmpsw [confirmpsw]="'xxx'" >),所以我们将 指令名称appConfirmpsw作为confirmpsw的别名,这样传值会比较方便,简化为 <input type="password" [appConfirmpsw] = "'xxx'">。
这里专门写一个检验函数,用来比对值和返回结果。记得在指令的validate中调用一下
export function comfirmPswValidator(_confirmpsw: string): ValidatorFn { //传入已输入的密码值 , 返回一个ValidatorFn
  return (control: AbstractControl): {[key: string]: any} => {  //传入绑定表单的formControl
    if ( !control.value ) { //如果绑定未输入值,则返回 required错误
      return { 'required' : true };
    }
  //如果两次输入的值不相同,则返回confirmpsw的错误
    return control.value !== _confirmpsw ? {'confirmpsw' : {value: true}} : null;
  };
}
完整指令如下:
import { Directive, Input } from '@angular/core';
import { NG_VALIDATORS, Validator, AbstractControl, ValidatorFn} from '@angular/forms';

@Directive({
  selector: '[appConfirmpsw]',
  providers: [{
    provide : NG_VALIDATORS,
    useExisting : ConfirmpswDirective,
    multi: true
  }]
})
export class ConfirmpswDirective implements Validator {

  @Input('appConfirmpsw') confirmpsw: string;
  constructor() {

   }
  validate(control: AbstractControl): {[key: string]: any} {
    console.log(this.confirmpsw);
    return this.confirmpsw ? comfirmPswValidator(this.confirmpsw)(control) : null;
  }
}

export function comfirmPswValidator(_confirmpsw: string): ValidatorFn {
  return (control: AbstractControl): {[key: string]: any} => {
    if ( !control.value ) {
      return { 'required' : true };
    }
    return control.value !== _confirmpsw ? {'confirmpsw' : {value: true}} : null;
  };
}
使用
测试一下指令的效果吧
<div class="input-group"> <label class="group-label" for="psw-new"> 新密码 :</label> <input class="group-input" [(ngModel)]="inputpsw.new" #new="ngModel" type="password" name="psw" id="psw-new" required> </div> <div class="input-group input-error" *ngIf="new.touched&&new.invalid"> <div class="group-error-content" *ngIf="new.errors?.required">确认密码为必填项!</div> </div> <div class="input-group"> <label class="group-label" for="psw-confirm">确认密码 :</label> <input class="group-input" [(ngModel)]="inputpsw.confirm" #confirm="ngModel" type="password" name="confirm" id="psw-confirm" [appConfirmpsw] = "new.value" required> </div> <div class="input-group input-error" *ngIf="confirm.touched&&confirm.invalid"> <div class="group-error-content" *ngIf="confirm.errors?.required">新密码为必填项!</div> <div class="group-error-content" *ngIf="confirm.errors?.confirmpsw">密码输入不一致!</div> </div>
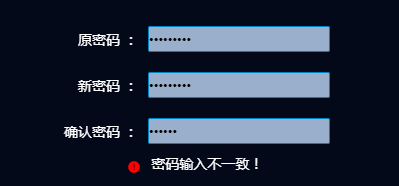
传入new表单的值,并通过errors.confirmpsw属性来控制提示语反馈。密码输入不一致,可以正确的校验到

确认密码为空时的提示也正确

以上完成了一个自定义验证器。有不妥当的地方,望大神指正。


 浙公网安备 33010602011771号