大数据-高并发Nginx
Nginx入门
简介:
Nginx做为一个强大的Web服务器软件,具有高性能、高并发性和低内存占用的特点。此外,其也能够提供强大的反向代理功能。俄罗斯大约有超过20%的虚拟主机采用Nginx作为反向代理服务器,在国内也有腾讯、新浪、网易等多家网站在使用Nginx作为反向代理服务器。据Netcraft统计,世界上最繁忙的网站中有11.48%使用Nginx作为其服务器或者代理服务器。基于反向代理的功能,Nginx作为负载均衡主要有以下几点理由:
- 高并发连接
- 内存消耗少
- 配置文件非常简单
- 成本低廉
- 支持Rewrite重写规则
- 内置的健康检查功能
- 节省带宽
- 稳定性高
并发处理
Tomcat 1000 < thhpd <nginx 5W
Nginx|Tengine
实验:
安装nginx之前安转,安装三个依赖环境
yum install gcc pcre-devel openssl-devel -y
然后安装nginx到opt/syy/nginx/目录里面
进入nginx的解压目录下面,
./configure --prefix =/opt/syy/nginx
# 编译安装
make && make install
在/etc/init.d下创建文件nginx
[root@localhost ~]# vim /etc/init.d/nginx
其内容参考nginx官方文档
#!/bin/sh
#
# nginx - this script starts and stops the nginx daemon
#
# chkconfig:   - 85 15
# description:  NGINX is an HTTP(S) server, HTTP(S) reverse \
#               proxy and IMAP/POP3 proxy server
# processname: nginx
# config:      /etc/nginx/nginx.conf
# config:      /etc/sysconfig/nginx
# pidfile:     /var/run/nginx.pid

# Source function library.
. /etc/rc.d/init.d/functions

# Source networking configuration.
. /etc/sysconfig/network

# Check that networking is up.
[ "$NETWORKING" = "no" ] && exit 0

nginx="/opt/syy/nginx/sbin/nginx"
prog=$(basename $nginx)

NGINX_CONF_FILE="/opt/syy/nginx/conf/nginx.conf"

[ -f /etc/sysconfig/nginx ] && . /etc/sysconfig/nginx

lockfile=/var/lock/subsys/nginx

make_dirs() {
   # make required directories
   user=`$nginx -V 2>&1 | grep "configure arguments:.*--user=" | sed 's/[^*]*--user=\([^ ]*\).*/\1/g' -`
   if [ -n "$user" ]; then
      if [ -z "`grep $user /etc/passwd`" ]; then
         useradd -M -s /bin/nologin $user
      fi
      options=`$nginx -V 2>&1 | grep 'configure arguments:'`
      for opt in $options; do
          if [ `echo $opt | grep '.*-temp-path'` ]; then
              value=`echo $opt | cut -d "=" -f 2`
              if [ ! -d "$value" ]; then
                  # echo "creating" $value
                  mkdir -p $value && chown -R $user $value
              fi
          fi
       done
    fi
}

start() {
    [ -x $nginx ] || exit 5
    [ -f $NGINX_CONF_FILE ] || exit 6
    make_dirs
    echo -n $"Starting $prog: "
    daemon $nginx -c $NGINX_CONF_FILE
    retval=$?
    echo
    [ $retval -eq 0 ] && touch $lockfile
    return $retval
}

stop() {
    echo -n $"Stopping $prog: "
    killproc $prog -QUIT
    retval=$?
    echo
    [ $retval -eq 0 ] && rm -f $lockfile
    return $retval
}

restart() {
    configtest || return $?
    stop
    sleep 1
    start
}

reload() {
    configtest || return $?
    echo -n $"Reloading $prog: "
    killproc $prog -HUP
    retval=$?
    echo
}

force_reload() {
    restart
}

configtest() {
  $nginx -t -c $NGINX_CONF_FILE
}

rh_status() {
    status $prog
}

rh_status_q() {
    rh_status >/dev/null 2>&1
}

case "$1" in
    start)
        rh_status_q && exit 0
        $1
        ;;
    stop)
        rh_status_q || exit 0
        $1
        ;;
    restart|configtest)
        $1
        ;;
    reload)
        rh_status_q || exit 7
        $1
        ;;
    force-reload)
        force_reload
        ;;
    status)
        rh_status
        ;;
    condrestart|try-restart)
        rh_status_q || exit 0
            ;;
    *)
        echo $"Usage: $0 {start|stop|status|restart|condrestart|try-restart|reload|force-reload|configtest}"
        exit 2
esac
需要注意的配置:
nginx=”/usr/local/nginx/sbin/nginx” //修改成nginx执行程序的路径。

NGINX_CONF_FILE=”/usr/local/nginx/conf/nginx.conf” //修改成nginx.conf文件的路径。
保存后设置文件的执行权限
[root@localhost ~]# chmod a+x /etc/init.d/nginx
至此就可以通过下面指令控制启动停止
/etc/init.d/nginx start
/etc/init.d/nginx stop
上面的方法完成了用脚本管理nginx服务的功能,但是还是不太方便。
先将nginx服务加入chkconfig管理列表:
[root@localhost ~]# chkconfig --add /etc/init.d/nginx
加完这个之后,就可以使用service对nginx进行启动,重启等操作了。
service nginx start
service nginx stop
service nginx restart
最后设置开机自动启动
[root@localhost ~]# chkconfig nginx on
nginx.conf的配置:
# 自定义用户
#user  nobody;
#
worker_processes  1;

#error_log  logs/error.log;
#error_log  logs/error.log  notice;
#error_log  logs/error.log  info;

#pid        logs/nginx.pid;

events {
    worker_connections  1024;
}

# load modules compiled as Dynamic Shared Object (DSO)
#
#dso {
#    load ngx_http_fastcgi_module.so;
#    load ngx_http_rewrite_module.so;
#}

http {
    include       mime.types;
    default_type  application/octet-stream;
    #可以做一个数据的监听器,做日志分析
    #log_format  main  '$remote_addr - $remote_user [$time_local] "$request" '
    #                  '$status $body_bytes_sent "$http_referer" '
    #                  '"$http_user_agent" "$http_x_forwarded_for"';  日志格式定义

    #access_log  logs/access.log  main;
	#0拷贝,
    sendfile        on
    #缓存buuf
    #tcp_nopush     on;
	#http协议的keepalive三次连接到四次挥手的时间,实验中设置为0
    keepalive_timeout  0;
    #keepalive_timeout  65;

	#压缩数据
    #gzip  on;
	server {
		listen 80;
		server_name shaoyayu.net;
		location / {
			root html;
		}
	}
    server {
        listen       80;
        server_name  localhost;

        #charset koi8-r;

        #access_log  logs/host.access.log  main;

        location / {
            root   html;
            index  index.html index.htm;
        }

        #error_page  404              /404.html;

        # redirect server error pages to the static page /50x.html
        #
        error_page   500 502 503 504  /50x.html;
        location = /50x.html {
            root   html;
        }

    }
}
Nginx的反向代理
配置相对于的nginx.conf
#user  nobody;
worker_processes  1;

#error_log  logs/error.log;
#error_log  logs/error.log  notice;
#error_log  logs/error.log  info;

#pid        logs/nginx.pid;


events {
    worker_connections  1024;
}

# load modules compiled as Dynamic Shared Object (DSO)
#
#dso {
#    load ngx_http_fastcgi_module.so;
#    load ngx_http_rewrite_module.so;
#}

http {
    include       mime.types;
    default_type  application/octet-stream;

    #log_format  main  '$remote_addr - $remote_user [$time_local] "$request" '
    #                  '$status $body_bytes_sent "$http_referer" '
    #                  '"$http_user_agent" "$http_x_forwarded_for"';

    #access_log  logs/access.log  main;

    sendfile        on;
    #tcp_nopush     on;

    keepalive_timeout  0;
    #keepalive_timeout  65;

    #gzip  on;

    server {
        listen 80;
        server_name shaoyayu.50.vip;
	location / {
            root /mnt;
            autoindex on;
       }
    }


    server {
        listen       80;
        server_name  MDNode01;

        #charset koi8-r;

        #access_log  logs/host.access.log  main;

        location / {
            root   html;
            index  index.html index.htm;
        }

        #error_page  404              /404.html;

        # redirect server error pages to the static page /50x.html
        #
        error_page   500 502 503 504  /50x.html;
        location = /50x.html {
            root   html;
        }

        # proxy the PHP scripts to Apache listening on 127.0.0.1:80
        #
        #location ~ \.php$ {
        #    proxy_pass   http://127.0.0.1;
        #}

        # pass the PHP scripts to FastCGI server listening on 127.0.0.1:9000
        #
        #location ~ \.php$ {
        #    root           html;
        #    fastcgi_pass   127.0.0.1:9000;
        #    fastcgi_index  index.php;
        #    fastcgi_param  SCRIPT_FILENAME  /scripts$fastcgi_script_name;
        #    include        fastcgi_params;
        #}

        # deny access to .htaccess files, if Apache's document root
        # concurs with nginx's one
        #
        #location ~ /\.ht {
        #    deny  all;
        #}
    }


    # another virtual host using mix of IP-, name-, and port-based configuration
    #
    #server {
    #    listen       8000;
    #    listen       somename:8080;
    #    server_name  somename  alias  another.alias;

    #    location / {
    #        root   html;
    #        index  index.html index.htm;
    #    }
    #}


    # HTTPS server
    #
    #server {
    #    listen       443 ssl;
    #    server_name  localhost;

    #    ssl_certificate      cert.pem;
    #    ssl_certificate_key  cert.key;

    #    ssl_session_cache    shared:SSL:1m;
    #    ssl_session_timeout  5m;

    #    ssl_ciphers  HIGH:!aNULL:!MD5;
    #    ssl_prefer_server_ciphers  on;

    #    location / {
    #        root   html;
    #        index  index.html index.htm;
    #    }
    #}

}
一个server配置一个location规则
location的url配置规则
| 语法: | **location** [ = | ~ | ~* | ^~ ] *uri* { ... } **location** @*name* { ... } |
| ------- | ------------------------------------------------------------ |
| 默认值: | — |
| 上下文: | server, location |
为某个请求URI(路径)建立配置。
路径匹配在URI规范化以后进行。所谓规范化,就是先将URI中形如“%XX”的编码字符进行解码, 再解析URI中的相对路径“.”和“..”部分, 另外还可能会压缩相邻的两个或多个斜线成为一个斜线。
可以使用前缀字符串或者正则表达式定义路径。使用正则表达式需要在路径开始添加“~*”前缀 (不区分大小写),或者“~”前缀(区分大小写)。为了根据请求URI查找路径,nginx先检查前缀字符串定义的路径 (前缀路径),在这些路径中找到能最精确匹配请求URI的路径。然后nginx按在配置文件中的出现顺序检查正则表达式路径, 匹配上某个路径后即停止匹配并使用该路径的配置,否则使用最大前缀匹配的路径的配置。
路径可以嵌套,但有例外,后面将提到。
在不区分大小写的操作系统(诸如Mac OS X和Cygwin)上,前缀匹配忽略大小写(0.7.7)。但是,比较仅限于单字节的编码区域(one-byte locale)。
正则表达式中可以包含匹配组(0.7.40),结果可以被后面的其他指令使用。
如果最大前缀匹配的路径以“^~”开始,那么nginx不再检查正则表达式。
而且,使用“=”前缀可以定义URI和路径的精确匹配。如果发现匹配,则终止路径查找。 比如,如果请求“/”出现频繁,定义“location = /”可以提高这些请求的处理速度, 因为查找过程在第一次比较以后即结束。这样的路径明显不可能包含嵌套路径。
在0.7.1到0.8.41的所有nginx中,如果请求匹配的前缀字符串路径并没有“
=”或“^~”前缀, 路径查找过程仍然会停止,而不进行正则表达式匹配。
让我们用一个例子解释上面的说法:
location = / {
    [ configuration A ]
}

location / {
    [ configuration B ]
}

location /documents/ {
    [ configuration C ]
}

location ^~ /images/ {
    [ configuration D ]
}

location ~* \.(gif|jpg|jpeg)$ {
    [ configuration E ]
}
请求“/”匹配配置A, 请求“/index.html”匹配配置B, 请求“/documents/document.html”匹配配置C, 请求“/images/1.gif”匹配配置D, 请求“/documents/1.jpg”匹配配置E。
前缀“@”定义了命名路径。这种路径不在一般的请求处理中使用, 而是用在请求重定向中。这些路径不能嵌套,也不能包含嵌套路径。
Nginx收到请求头:判定IP,PORT,HOST决定server
Nginx location匹配:用客服端的URI匹配location的URI
-
先普通
- 顺序无关
- 最大前缀
- 匹配规则简单
打断:
- ^~
- 完全匹配
-
在正则
- 不完全匹配
- 正则特殊:一条URI可以匹配多条location的时候,
- 有顺序的选择第一条
- 先匹配,先应用,即使退出
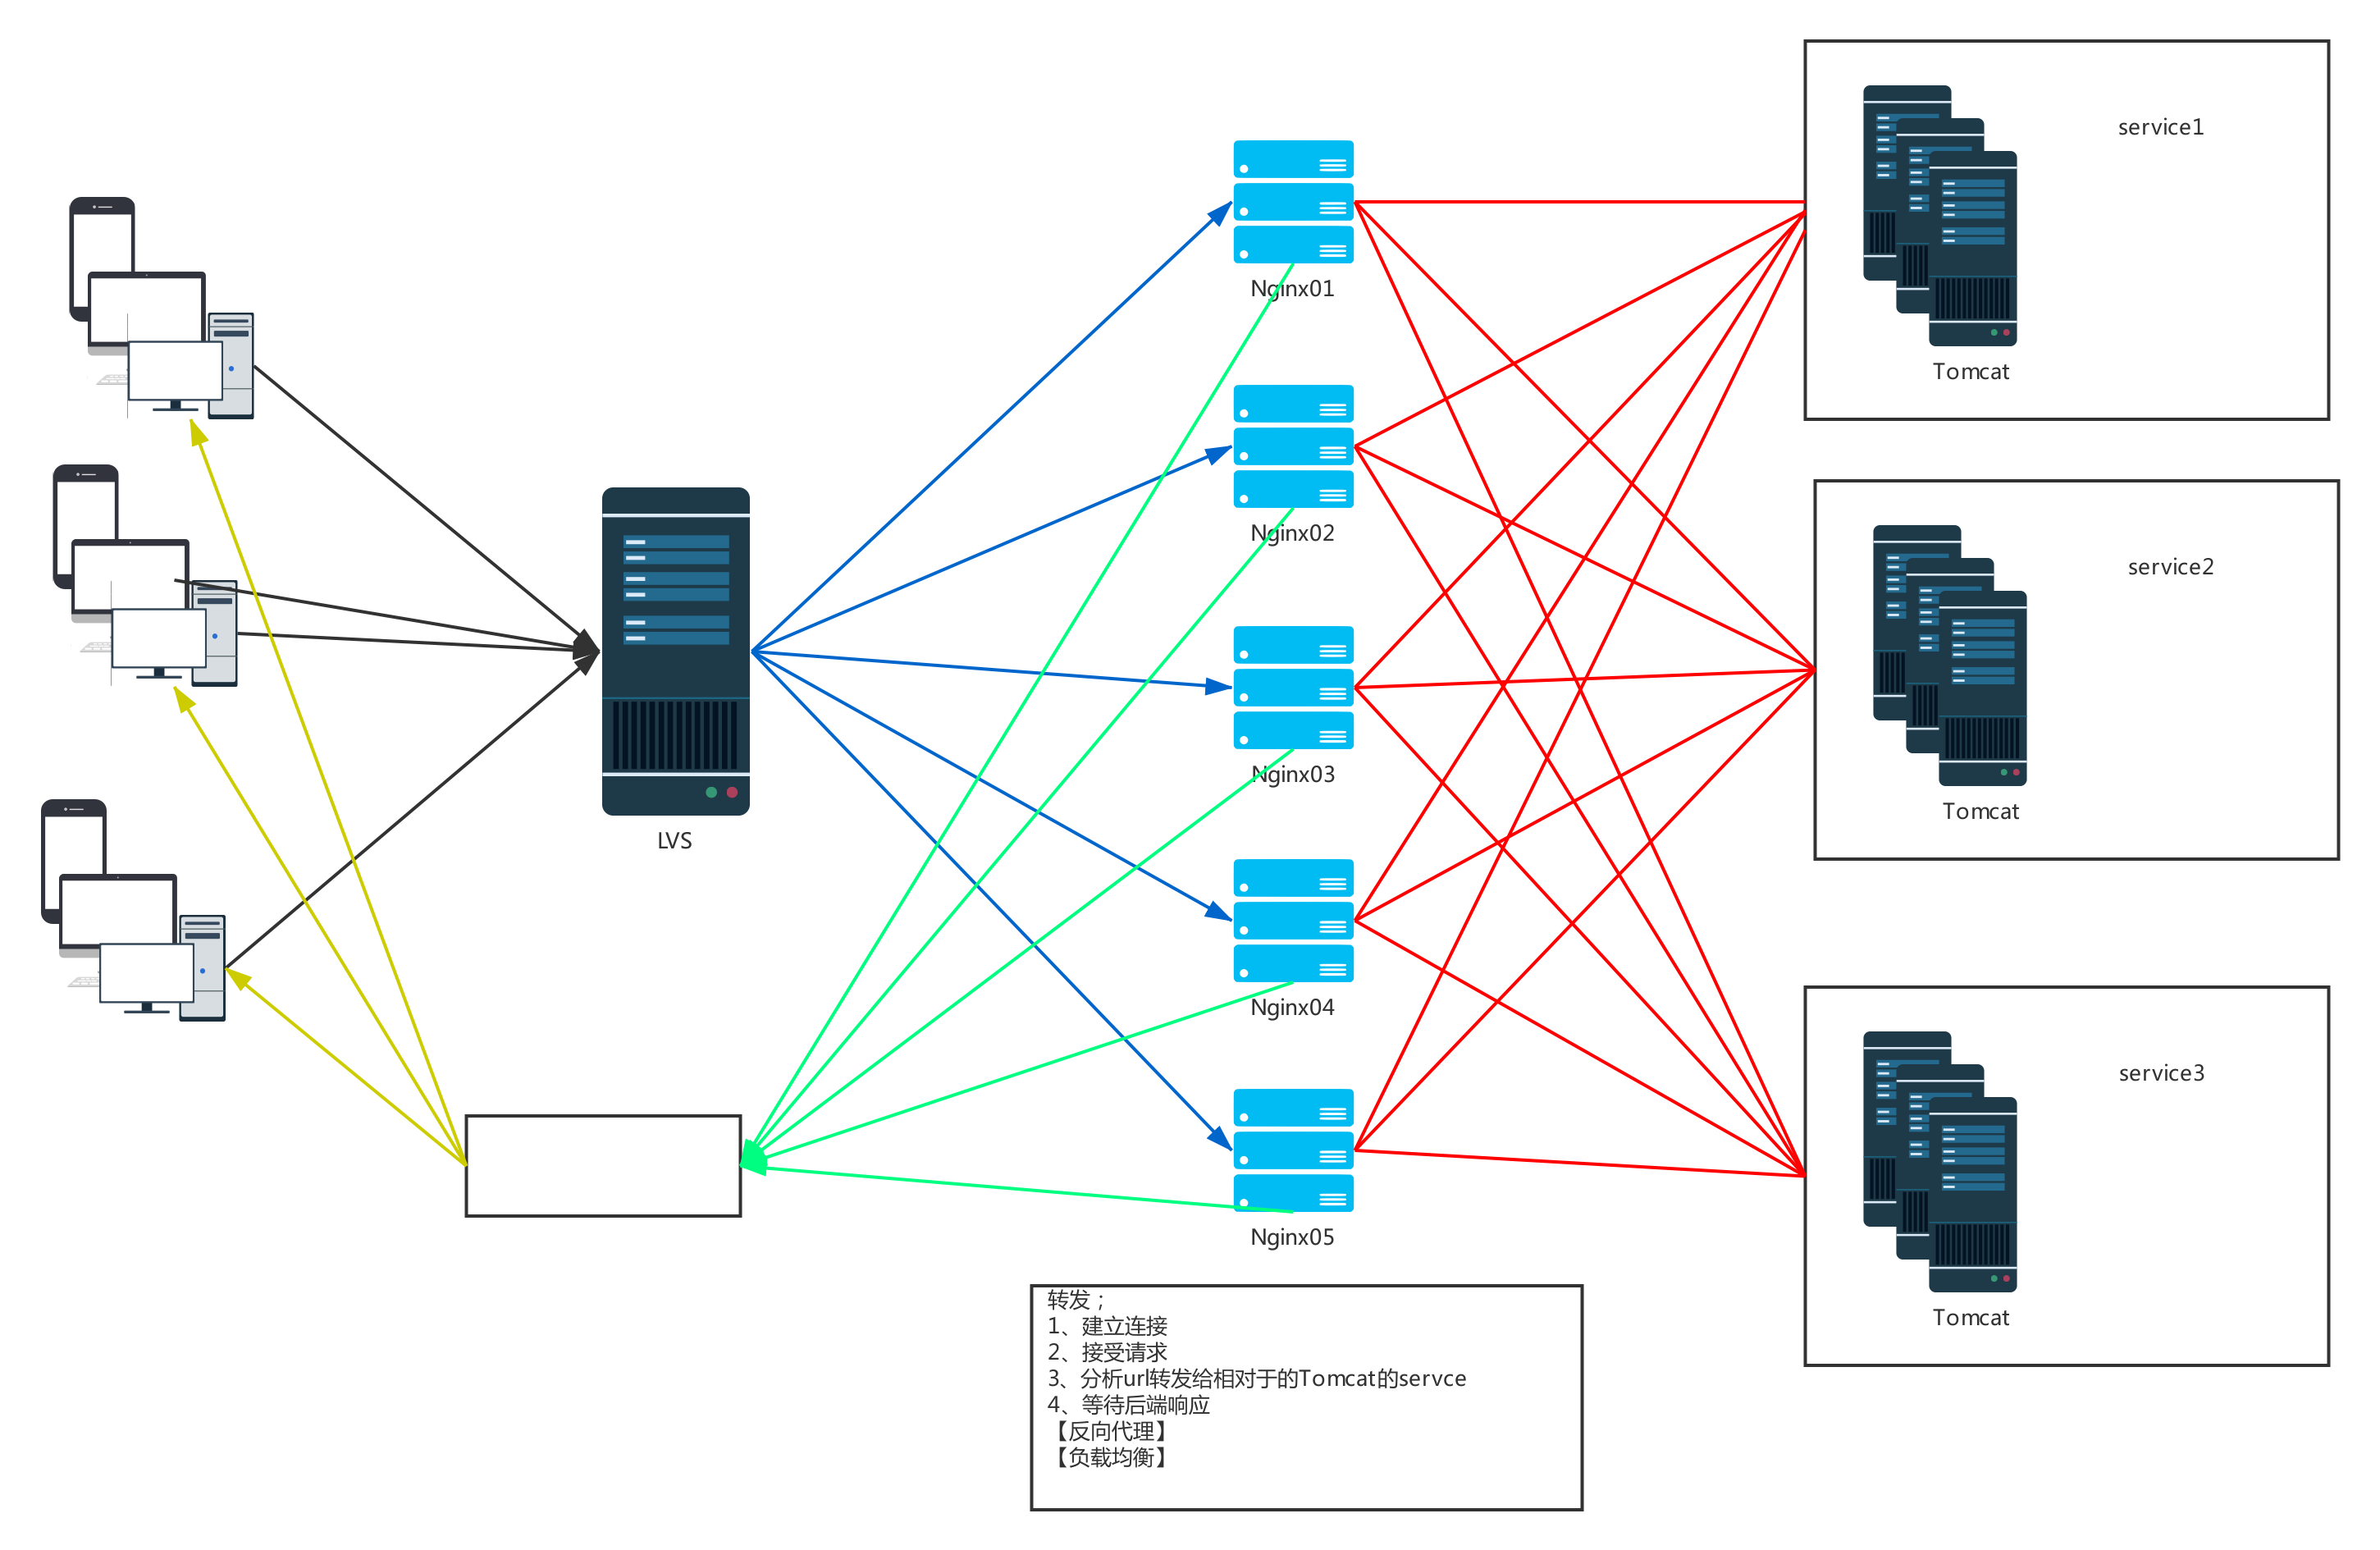
Nginx的负载均衡
worker_processes  1;
events {
    worker_connections  1024;
}
http {
    include       mime.types;
    default_type  application/octet-stream;
    sendfile        on;
    keepalive_timeout  0;
    ##定义一个集群组,
    upstream user {
        server 192.168.25.51;
        server 192.168.25.52;
        server 192.168.25.53;
    }
    server {
        listen 80;
        server_name shaoyayu.50.vip;
	location / {
            root /mnt;
            autoindex on;
       }
        location /user {
            #在http://user/
            proxy_pass http://user/;
        }
    }
    server {
        listen       80;
        server_name  MDNode01;
        location / {
            root   html;
            index  index.html index.htm;
        }

        error_page   500 502 503 504  /50x.html;
        location = /50x.html {
            root   html;
        }
    }
}
location的负载均衡解析规则
- 先从配置文件中查找是不是含有同名的upstream群组,
- 在到本机的DNS文件中查找是不是含同一个域名多台主机的情况,这样也根据本机的DNS文件配置的域名群组做负载均衡;
- 网络解析域名。
Nginx解决Session一致性问题:
校准时间
安装ntpdate 服务
yum install -y ntpdate

同步阿里授时服务器
ntpdate 203.107.6.88

同步中国国家授时服务器
ntpdate 210.72.145.44

 浙公网安备 33010602011771号