Python工具箱系列(五十一)
九宫格与词云
对图片进行九宫格切割,并且放到微信朋友圈曾经风靡一时。对于python来说,这个也非常简单。
from PIL import Image
import math


def ninerectanglegrid(inputfilename):
    """
    实现九宫格切割

    Args:
        inputfilename (string): 输入文件名称
    """
    cols = 3
    rows = 3

    # 原图
    im = Image.open(inputfilename)

    # 计算缩放比例
    width, height = im.size

    # 选取原图片长、宽中较大值作为新图片的九宫格半径
    new_image_length = width if width > height else height

    # 产生一张白底新图,并且是正方形
    new_image = Image.new(im.mode, (new_image_length, new_image_length), color='white')

    # 将原图粘贴在新图上,位置为居中
    if width > height:
        new_image.paste(im, (0, int((new_image_length - height) / 2)))
    else:
        new_image.paste(im, (int((new_image_length - width) / 2), 0))

    targetwidth = math.ceil(new_image_length/cols)
    targetheight = math.ceil(new_image_length/rows)

    # cut
    for row in range(rows):
        for col in range(cols):
            box = (targetwidth*col,targetheight*row,targetwidth*(col+1),targetheight*(row+1))
            out = new_image.crop(box)
            out.save(f'{row*cols+col}.png')


ninerectanglegrid(r'd:\test\girl.png')
运行后会将源图片直接切割成为9个图片文件。将它们上传到微信后,就可以组成九宫格图片了,其效果如下图所示。

从效果图中可以看出,如果切割点在头部附近会有一些失真的感觉。所以九宫格这种形式还是适合于二次元图片。
词云
在数据可视化方面,词云一直是一种视觉冲击力很强的方式。对输入的一段文字进行语义分割,得到不同频度的词汇,然后以正比于词频的字体大小无规则的集中显示高频词,简洁直观高效。如果仅仅是偶然一用,使用在线的词云生成工具即可。网上搜索词云在线生成工具,会得到很多结果,包括国内外的网站平台都有。对比了搜索较为靠前的几款在线工具,但或多或少都存在一些使用上瑕疵,有的是网页加载慢,有的是要注册后方可使用,有的是字体支持较差,还有的是要付费使用。尤其是各类注册,更是让人担心个人信息安全的问题。所以,坐而论道,不如起而行之,自己制作词云。主要工具有以下:
•wordcloud
•PyEcharts
•stylecloud
以下代码演示了词云生成。
import os

import jieba
import numpy as np
from PIL import Image
from wordcloud import WordCloud

# 写入用户定义的词,主要是人名/地名等专用的词
userdict_list = ['洛迦诺','莱茵兰','苏台德','特申','卢西尼亚']

def jieba_processing_txt(text,stopwordsfilename):
    """
    使用jieba进行更好的分词

    Args:
        text (string): 要处理的文本

    Returns:
        string: 分好的词
    """
    for word in userdict_list:
        jieba.add_word(word)

    mywordlist = []
    seg_list = jieba.cut(text, cut_all=False)
    liststr = "/ ".join(seg_list)

    with open(stopwords_path, encoding='utf-8') as f_stop:
        f_stop_text = f_stop.read()
        f_stop_seg_list = f_stop_text.splitlines()

    for myword in liststr.split('/'):
        if not (myword.strip() in f_stop_seg_list) and len(myword.strip()) > 1:
            mywordlist.append(myword)
    return ' '.join(mywordlist)


def create_wordcloud(inputfilelist=None,backimg=None,fontname=None,stopwordsfilename=None):
    """
    生成词云

    Args:
        inputfile (string, optional): 要处理的文档
        backimg (string, optional): 背景图
        fontname (string, optional): 字体文件
        stopwordsfilename (string, optional): 停词表
        outputfilename (string, optional): 要输出的词云图片
    """
    for index,inputfile in enumerate(inputfilelist):
        text = open(inputfile,encoding='utf-8').read()
        keywords = jieba_processing_txt(text,stopwordsfilename)

        shape_mask = np.array(Image.open(backimg))
        wc = WordCloud(background_color="white",
                    max_words=2000,
                    font_path=fontname,  # 设置字体格式,如不设置显示不了中文
                    mask=shape_mask
                    )

        wc.generate(keywords)
        wc.to_file(f'd:\\test\\wordcloud-{index}.png')

startdir = r'd:\test'

back_image = f'{startdir}\\black.jpg'
textfilename1 = f'{startdir}\\alice.txt'
textfilename2 = f'{startdir}\\历史的抉择.txt'
cn_font = f'{startdir}\\SourceHanSerifK-Light.otf'
stopwords_path = f'{startdir}\\stopwords_cn_en.txt'

inputlist = [textfilename1,textfilename2]
create_wordcloud(inputlist,back_image,cn_font,stopwords_path)
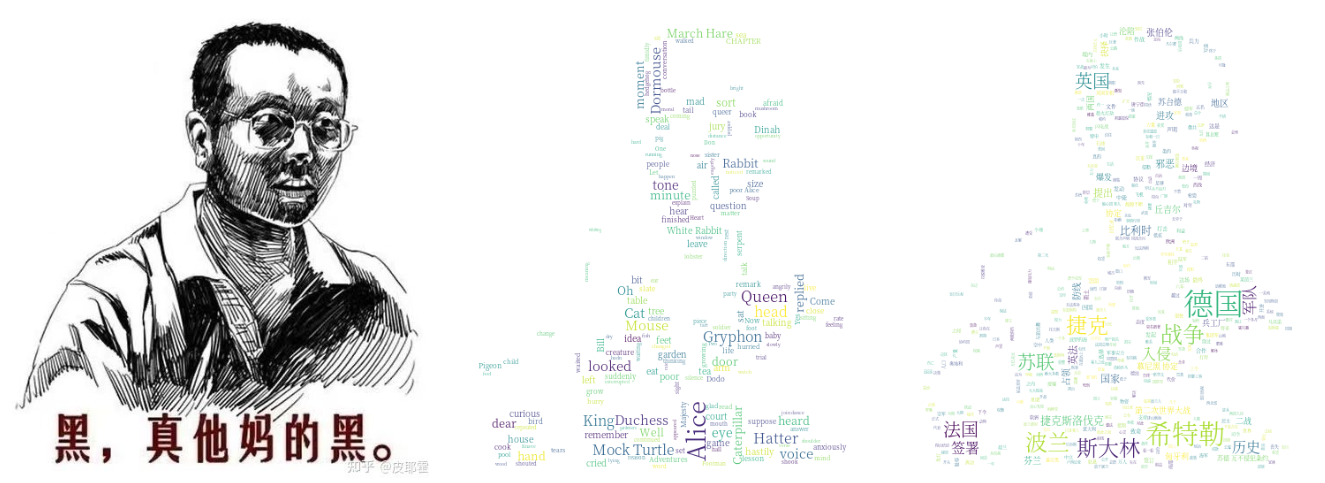
词云的效果如下图所示。

其中:
•black.jpg提供背景,随意替换
•alice.txt是英文小说,随意替换
•历史的抉择.txt是一个中文的政论文,随意替换
•SourceHanSerifK-Light.otf是一个中文字体文件,可以随意替换为自己喜欢的字体文件
•stopwords_cn_en.txt是一个包含了中英文的停词表,用于分词,在网上可以查到


【推荐】国内首个AI IDE,深度理解中文开发场景,立即下载体验Trae
【推荐】编程新体验,更懂你的AI,立即体验豆包MarsCode编程助手
【推荐】抖音旗下AI助手豆包,你的智能百科全书,全免费不限次数
【推荐】轻量又高性能的 SSH 工具 IShell:AI 加持,快人一步
· winform 绘制太阳,地球,月球 运作规律
· AI与.NET技术实操系列(五):向量存储与相似性搜索在 .NET 中的实现
· 超详细:普通电脑也行Windows部署deepseek R1训练数据并当服务器共享给他人
· 【硬核科普】Trae如何「偷看」你的代码?零基础破解AI编程运行原理
· 上周热点回顾(3.3-3.9)