[Android] 006_Activity控件布局_LinearLayout
Android_006_Activity控件布局_LinearLayout
LinearLayout: 线型布局, 分为”水平线型布局” 和 “垂直线型布局”, 只需要修改main.xml文件就可以对布局进行设置, 新建一个Activity, 那么他的默认布局方式就是线性布局.
在main.xml文件中, 将<LinearLayout></LinearLayout>设置为根标签, 那么在这个标签里的控件就会以线性布局来摆放.
LinearLayout 的属性android:orientation 可以用来控制是 “水平线形布局”还是”垂直线形布局”.
android:orientation=”vertical” 代表”垂直”线形布局
android:orientation=”horizontal” 代表 “水平” 线形布局
1. 垂直线性布局, 所有的控件从上到下依次摆放.
main.xml中的代码:
<?xml version="1.0" encoding="utf-8"?>
<LinearLayout xmlns:android="http://schemas.android.com/apk/res/android"
android:orientation="vertical"
android:layout_width="fill_parent"
android:layout_height="fill_parent"
>
<TextView
android:id="@+id/TextView1"
android:layout_width="fill_parent"
android:layout_height="wrap_content"
android:text="@string/TextView1"
android:textColor="#ff0000"
/>
<Button
android:id="@+id/Button1"
android:layout_width="fill_parent"
android:layout_height="wrap_content"
android:text="@string/Button1"
android:textColor="#00ff00"
/>
<TextView
android:id="@+id/TextView1"
android:layout_width="fill_parent"
android:layout_height="wrap_content"
android:text="@string/TextView1"
android:textColor="#ffffff"
/>
<Button
android:id="@+id/Button1"
android:layout_width="fill_parent"
android:layout_height="wrap_content"
android:text="@string/Button1"
android:textColor="#ffff00"
/>
</LinearLayout>
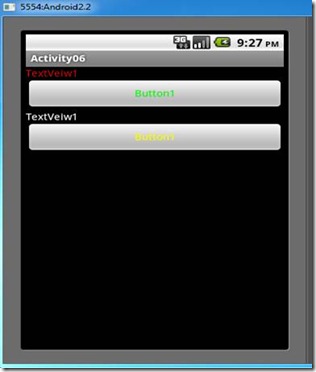
运行后显示的结果如下图, 所有的控件从上到下顺序摆放.
2. 水平线性布局, 所有的控件从左到右依次摆放.
main.xml中文件的代码:
<?xml version="1.0" encoding="utf-8"?>
<LinearLayout xmlns:android="http://schemas.android.com/apk/res/android"
android:orientation="horizontal"
android:layout_width="fill_parent"
android:layout_height="fill_parent"
>
<TextView
android:id="@+id/TextView1"
android:layout_width="wrap_content"
android:layout_height="fill_parent"
android:text="@string/TextView1"
android:textColor="#ff0000"
/>
<Button
android:id="@+id/Button1"
android:layout_width="wrap_content"
android:layout_height="fill_parent"
android:text="@string/Button1"
android:textColor="#0000ff"
/>
<TextView
android:id="@+id/TextView2"
android:layout_width="wrap_content"
android:layout_height="fill_parent"
android:text="@string/TextView2"
android:textColor="#00ff00"
/>
<Button
android:id="@+id/Button2"
android:layout_width="wrap_content"
android:layout_height="fill_parent"
android:text="@string/Button2"
android:textColor="#0000ff"
/>
</LinearLayout>
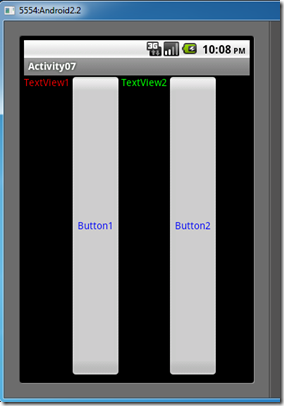
运行后显示后的结果下图, 所有控件从左到右依次摆放
仔细对比两个文件的不同之处…


