Automate Screen or Button Taps via Tasker : Simulating keypress events
When using Tasker, sometimes we want to do some automation on screen e.g. screen or button taps.
1."Input" action
We can use actions in "Input" category(especially "Dpad" action and "type" Action) to do some simple click/tap.
An example: http://tasker.wikidot.com/auto-usb-mass-storage
Auto USB mass storage when connected
With Tasker, use a trick to automatically enable USB mass storage when USB cable plugged.

Require:
- Android 2.3+
- USB debbuging off
- In fact, the button “Turn on USB storage” must show up when USB cable plugged.

Download this file

Otherwise, you can create the profile yourself with the following steps:

1 Click New and select State
Select Hardware Action then USB plugged
2 Click + in the bottom left to add an action
Select category Task and Wait
Set 250 ms and press Done
3 Click + in the bottom left to add an action
Select category Input and DPad
Set Button Down and press done
4 Click + in the bottom left to add an action
Select category Input and DPad
Set Button Press and press done
5 Click + in the bottom left to add an action
Select category Task and Wait
Set 250 ms and press Done
6 Click + in the bottom left to add an action
Select category Input and DPad
Set Button Right and press done
7 Click + in the bottom left to add an action
Select category Input and DPad
Set Button Press only If %WIN ~ Turn off USB storage < replace it with your langage

Explanation:
Tasker simulates a tap on the button “Turn on USB storage” when it appears.
Use some type of Script to do this. Yes, script may be the best solution for automation.
2.1 Monkey Script
You may need to calculate the coordinate in screen. It's so hard.
In order to get the correct coordinates, on your device go to Settings -> dev options and turn on "show pointer location" then you can go into your app and tap on the correct location and it will display the x/y coordinates of the tap which you can input on that script.Some docs about the monkey tool>>>.
2.2 "Input" command in shell
With "input" command in shell, we can simulate keypress event on Android. The keycode sucks!
More info about "Input" command, here.
Android shell support sendevent and getevent command to grab and generate tap/swipe events on screen.
So we can make a way to do this. The method "listens" to your input actions (screen taps, button presses, etc)
and turns them into a script you can use to reproduce them.
Think of it as something similar to Excel's Macro Recording feature.
Of course, you need have knowledge of basic screen events(refer to tutorial).
TUTORIAL: Remote Control Touch Screen
Solution 1:
1. run getevent ini adb shell2. copy/paste it's output to file on PC3. run script which contents one line cat $1 | gawk --non-decimal-data '{print $1, ("0x"$2)+0, ("0x"$3)+0, ("0x"$4)+0}' | sed 's/://g;s/^/sendevent /g' as convert.sh file.in > file out4. put file.out on SD-card5. Source it with Run Shell action
Note: the solution comes from here. Thanks to Vladimir Oz .
Solution 2:
You can use "Sendevent->Getevent Toolbox" to find a way out.
Simulating keypress events on Android
- During development/testing of the button-drivers itself.
- To implement automated rigorous tests. ( MonkeyTest? )
- To implement/interface additional custom software keyboards.
- Just because we can!
Q. How to generate a hardware-button-press event
    WITHOUT actually pressing any key on the device?
Let us first understand what happens when a hardware button is pressed. Here is what happens when you press a button on an Android device:
- The h/w button triggers an interrupt.
- The ISR of the corresponding driver gets called (in kernel).
- In the ISR, the driver generates an input-event.
- Android-framework (in userspace) gets the notification of the event.
- Android reads the input-event code & type.
- Compares it with the proper "keymap/keylayout" file.
- The proper button is identified.
[ drum-roll... ]
input keyevent <event_code>
Now, before we try to send any keyevent, we need to find out the event-code that maps to the h/w key we want to simulate.
The following table summarizes all the supported keycodes in Android:
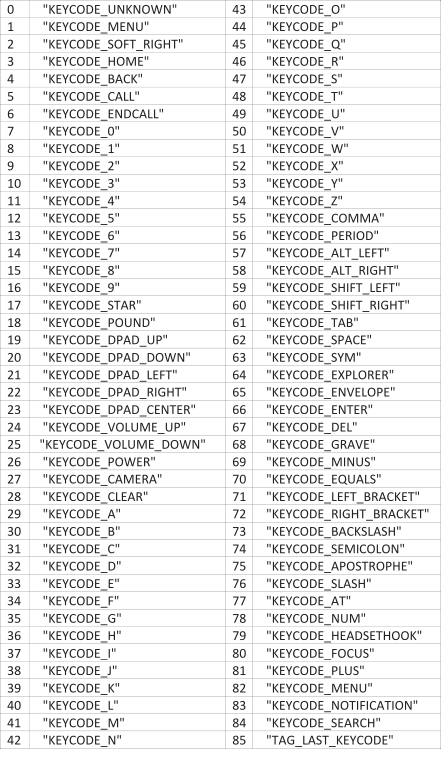
input keyevent <keycode>
The value of keycode can be any of the integer values from the above table.
In case a serial-console is NOT available on your device, you can always run the command via adb as follows:
adb shell input keyevent <keycode>
That's how a hardware-button-press is simulated in software!!
simulate screen tap with tasker
run shell -> input tap x y -> ensure use root is ticked
x y are the coordinates (activate them to show on screen in developer menu in settings)
run shell -> input tap 500 500
run shell -> input swipe 500 500 500 800
run shell -> input swipe 500 500 500 500 s
Emulating touch in Android is apparently possible with shell commands, using Tasker’s Run Shell action.
The command you use is
input tap x y
Where X and Y are coordinates. Root must be checked in the action options, and obviously Tasker needs root access to do this.
As for how you find X and Y, that’s easy:
Go to system settings, developer options, and enable “Show pointer location”.
Use that option to find the X and Y coordinates of whatever you need the touch emulation to press, and write them down.
Then use them in the above command.
You can also emulate swipes, using the following command:
input swipe X1 Y1 X2 Y2
Where X1 Y1 are the star coordinates and X2 Y2 are the end coordinates.
As an example, “input swipe 400 400 100 400″ on my phone swipes the image thumbnails in a Google Play listing.
This works great on my device, but might be dependent on device and/or OS version/ROM.
For long tap use , using the following command:
input swipe x1 y1 x2 y2 s
Set x1 and x2 to the same value and y1 and y2 to the same value to keep your swipe in the same place and set s to the number of milliseconds you want your long press to last.
TIP:
don't forget to turn off the "Show Pointer Location" and "Show Touches" BEFORE running the task.
That caused several reboots for me. Oops!
This is fantastic, only issue I'm having is that it doesn't seem to work with the screen off.. maybe if I remove keyguard?
yeah, have to wake disable key guard/ disable pattern lock, run the emulation,
enable keyguard/enable pattern lock, but totally worth it

 浙公网安备 33010602011771号