Nginx基本使用
Nginx是什么?
nginx是什么?引入百度百科的解释:Nginx是一个高性能的HTTP和反向代理web服务器,同时也提供了IMAP/POP3/SMTP服务。
这个可以这么理解,nginx是一个高性能的服务器,可以提供web服务和邮件服务,但是一般的我们用nginx主要就是为了web服务,所以我们可以认为nginx是一个高性能的web服务器,它可以作为一个HTTP服务器进行网站的发布处理,也可以作为反向代理进行负载均衡的实现。
nginx作为HTTP服务器,表示我们可以通过nginx直接访问我们服务器上的静态资源,所以我们这里的重点是nginx作为反向代理和负载均衡。
这里有两个概念:反向代理和负载均衡。
反向代理
说道反向代理,那就得看看正向代理。
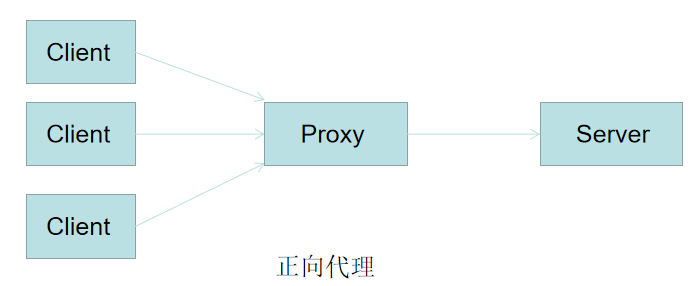
假如我们开一家公司,公司里有很多电脑,当我们用公司里的电脑访问外网资源时,我们都会向一个代理服务器发送请求,再又代理服务器去访问外网资源,访问到资源之后再将资源返回给我们。这就是一个典型的正向代理的过程,用图表示:
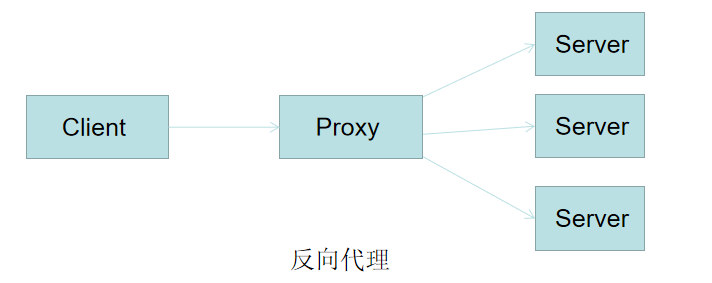
公司可能也有自己的服务器,也有自己的资源供他人访问,但是一台服务器的负载是有限的,如果访问量大,服务器响应就会很慢,一般的解决办法是将资源放到多台服务器中,使用一台服务器作为代理服务器,通过代理服务器去访问其他服务器的资源,用图表示:
正向代理,就好比我们设置代理服务器一样,我们要向服务器A请求资源,实际上我们是把请求抛给代理服务器,由代理服务器去请求服务器A的资源,也就是说,对客户端而言,给他们的资源访问提供了一个统一的出口,这样服务器A就不知道是哪个客户端的请求了。
反向代理,相对服务端而言,为请求的访问提供了一个统一的入口,也就是说客户端只要向这个代理服务器发送请求,而代理服务器对这些请求转发而目标服务器,这样客户端就不知道到底访问的是哪个服务器了。
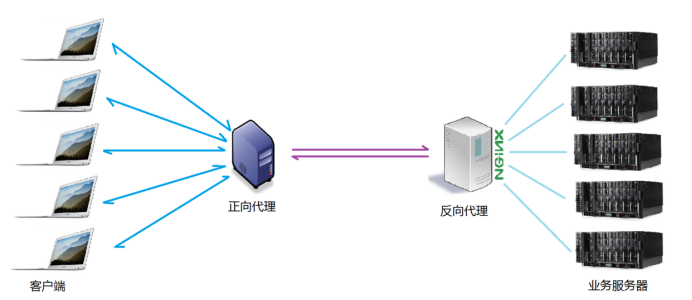
通常都是正向与反向一起使用的
负载均衡
负载均衡就是将负载(工作任务)进行平衡、分摊到多个操作单元上进行运行,对于Nginx,就是在反向代理过程中,将请求平衡的分发在不中的资源服务器中,而不至于出现一方有难七方围观的现象
Nginx安装
nginx的安装可以参考博客:https://www.cnblogs.com/shanfeng1000/p/11063851.html
Nginx配置详解
声明一下,这里我的nginx是采用apt直接安装的,安装完成之后,我们进入nginx的主目录,也就是/etc/nginx,里面会有一个nginx.conf文件,这个nginx的配置文件,nginx在启动时默认会读取这个配置文件,打开这个文件可以看到:


user www-data;
worker_processes auto;
pid /run/nginx.pid;
include /etc/nginx/modules-enabled/*.conf;

events {
    worker_connections 768;
    # multi_accept on;
}

http {

    ##
    # Basic Settings
    ##

    sendfile on;
    tcp_nopush on;
    tcp_nodelay on;
    keepalive_timeout 65;
    types_hash_max_size 2048;
    # server_tokens off;

    # server_names_hash_bucket_size 64;
    # server_name_in_redirect off;

    include /etc/nginx/mime.types;
    default_type application/octet-stream;

    ##
    # SSL Settings
    ##

    ssl_protocols TLSv1 TLSv1.1 TLSv1.2; # Dropping SSLv3, ref: POODLE
    ssl_prefer_server_ciphers on;

    ##
    # Logging Settings
    ##

    access_log /var/log/nginx/access.log;
    error_log /var/log/nginx/error.log;

    ##
    # Gzip Settings
    ##

    gzip on;

    # gzip_vary on;
    # gzip_proxied any;
    # gzip_comp_level 6;
    # gzip_buffers 16 8k;
    # gzip_http_version 1.1;
    # gzip_types text/plain text/css application/json application/javascript text/xml application/xml application/xml+rss text/javascript;

    ##
    # Virtual Host Configs
    ##

    include /etc/nginx/conf.d/*.conf;
    include /etc/nginx/sites-enabled/*;
}


#mail {
#    # See sample authentication script at:
#    # http://wiki.nginx.org/ImapAuthenticateWithApachePhpScript
#
#    # auth_http localhost/auth.php;
#    # pop3_capabilities "TOP" "USER";
#    # imap_capabilities "IMAP4rev1" "UIDPLUS";
#
#    server {
#        listen     localhost:110;
#        protocol   pop3;
#        proxy      on;
#    }
#
#    server {
#        listen     localhost:143;
#        protocol   imap;
#        proxy      on;
#    }
#}
其中http表示http服务器相关配置,mail表示邮件服务相关配置,其中mail配置被注释掉了,所以这个配置我们不介绍了。在http配置最后,有两个include配置:
 include /etc/nginx/conf.d/*.conf;
 include /etc/nginx/sites-enabled/*;
这两个配置表示/etc/nginx/conf.d目录下的conf文件和/etc/nginx/sites-enabled目录下的所有文件都将被纳入为配置放到http节点下,比如/etc/nginx/sites-enabled目录下默认会有一个default文件,这个文件里面只有一个server配置,监听80端口:
##
# You should look at the following URL's in order to grasp a solid understanding
# of Nginx configuration files in order to fully unleash the power of Nginx.
# https://www.nginx.com/resources/wiki/start/
# https://www.nginx.com/resources/wiki/start/topics/tutorials/config_pitfalls/
# https://wiki.debian.org/Nginx/DirectoryStructure
#
# In most cases, administrators will remove this file from sites-enabled/ and
# leave it as reference inside of sites-available where it will continue to be
# updated by the nginx packaging team.
#
# This file will automatically load configuration files provided by other
# applications, such as Drupal or Wordpress. These applications will be made
# available underneath a path with that package name, such as /drupal8.
#
# Please see /usr/share/doc/nginx-doc/examples/ for more detailed examples.
##

# Default server configuration
#
server {
    listen 80 default_server;
    listen [::]:80 default_server;

    # SSL configuration
    #
    # listen 443 ssl default_server;
    # listen [::]:443 ssl default_server;
    #
    # Note: You should disable gzip for SSL traffic.
    # See: https://bugs.debian.org/773332
    #
    # Read up on ssl_ciphers to ensure a secure configuration.
    # See: https://bugs.debian.org/765782
    #
    # Self signed certs generated by the ssl-cert package
    # Don't use them in a production server!
    #
    # include snippets/snakeoil.conf;

    root /var/www/html;

    # Add index.php to the list if you are using PHP
    index index.html index.htm index.nginx-debian.html;

    server_name _;

    location / {
        # First attempt to serve request as file, then
        # as directory, then fall back to displaying a 404.
        try_files $uri $uri/ =404;
    }

    # pass PHP scripts to FastCGI server
    #
    #location ~ \.php$ {
    #    include snippets/fastcgi-php.conf;
    #
    #    # With php-fpm (or other unix sockets):
    #    fastcgi_pass unix:/var/run/php/php7.0-fpm.sock;
    #    # With php-cgi (or other tcp sockets):
    #    fastcgi_pass 127.0.0.1:9000;
    #}

    # deny access to .htaccess files, if Apache's document root
    # concurs with nginx's one
    #
    #location ~ /\.ht {
    #    deny all;
    #}
}


# Virtual Host configuration for example.com
#
# You can move that to a different file under sites-available/ and symlink that
# to sites-enabled/ to enable it.
#
#server {
#    listen 80;
#    listen [::]:80;
#
#    server_name example.com;
#
#    root /var/www/example.com;
#    index index.html;
#
#    location / {
#        try_files $uri $uri/ =404;
#    }
#}
Nginx配置文件主要分成四部分:main(全局设置)、server(主机设置)、upstream(上游服务器设置,主要为反向代理、负载均衡相关配置)和 location(URL匹配特定位置后的设置)
main全局配置主要是nginx在运行时与具体业务功能无关的一些参数,比如工作进程数,运行的身份等。所以这里只是介绍后面三种配置,这三个配置都是包含着http配置(不考虑mail配置)下,他们之间的关系式:server继承main,location继承server;upstream既不会继承指令也不会被继承。
server
server配置指令主要用于指定虚拟主机域名、IP和端口;
listen 监听的端口,默认80,小于1024的要以root启动。可以为listen *:80、listen 127.0.0.1:80等形式。
server_name 服务器名,如localhost、www.example.com,可以通过正则匹配。
root 服务器根目录
index 起始页名称
upstream
用于设置一系列的后端服务器,设置反向代理及后端服务器的负载均衡;upstream配置不是配置在server配置里,而是配置在server外;
一个简单的配置如下:
  upstream example {
      ip_hash;

      server 127.0.0.1:8050 weight=5;
      server 127.0.0.1:8060 weight=1;
  }
其中example是名称,在location转发请求时会用到,ip_hash表示负载均衡采用基于哈希计算的算法,还可以是:url_hash、least_conn、least_time,server服务器配置,后面是服务器地址及端口号,weight是权重,值越大表示转发到这个服务器的请求就越多。
location
部分用于匹配网页位置,然后返回资源或者转发请求;location配置server配置中的;一个server下可以有多个location;
如果是配置访问服务器静态资源,只需配置root和index即可:
  location / {		#路由配置规则,匹配上就使用里面的配置
       root /var/www/example;   #根路径
       index index.html index.htm index.nginx-debian.html;   #起始页
  }
如果需要转发请求,需要配置:
  location / {    #路由配置规则,匹配上就使用里面的配置
        proxy_pass http://example;    #这里的example就是指上面的upstream中的一个,到底取哪个就看情况了
	# proxy_pass http://localhost:8080;	#如果不使用upstream,可以直接指定地址和端口
        proxy_http_version 1.1;
        proxy_set_header Upgrade $http_upgrade;
        proxy_set_header Connection keep-alive;
        proxy_set_header Host $host;
        proxy_set_header   X-Real-IP        $remote_addr;
        proxy_set_header   X-Forwarded-For  $proxy_add_x_forwarded_for;
        proxy_cache_bypass $http_upgrade;
        # First attempt to serve request as file, then
        # as directory, then fall back to displaying a 404.
        #try_files $uri $uri/ =404;
  }
Nginx常用命令
nginx :启动nginx
nginx -c filename :使用指定的配置文件启动nginx
nginx -t :加载配置并测试配置是否正常,可以使用-c命令
nginx -s reopen :重新打开日志文件
nginx -s reload :修改配置后重新加载生效
nginx -s stop :快速停止nginx
nginx -s quit :完整有序的停止nginx
正常的,如果我们修改了配置,比如增加了配置转发,我们可以先使用nginx -t测试一下配置是否有误,没有异常则使用nginx -s reload重新加载配置即可
Nginx实例
在/etc/nginx/conf.d目录下创建一个example.conf文件,或者将/etc/nginx/sites-enabled目录下的default文件复制到/etc/nginx/conf.d目录下并重命名为example.conf
假如我们有个项目,我们放在两个端口上跑,模拟两个服务器上运行,地址分别是:http://192.168.31.121:8080和http://192.168.31.121:8081,192.168.31.121是我本地主机的地址。
我们修改example.conf内容为:
  upstream example {
      ip_hash;

      server 192.168.31.121:8080 weight=2;
      server 192.168.31.121:8081 weight=1;
  }

  server {
        listen 81;
        root /var/www/html;

        # Add index.php to the list if you are using PHP
        index index.html index.htm index.nginx-debian.html;

        server_name example;

        location / {
                proxy_pass http://example;
                proxy_http_version 1.1;
                proxy_set_header Upgrade $http_upgrade;
                proxy_set_header Connection keep-alive;
                proxy_set_header Host $host;
                proxy_set_header   X-Real-IP        $remote_addr;
                proxy_set_header   X-Forwarded-For  $proxy_add_x_forwarded_for;
                proxy_cache_bypass $http_upgrade;
        }
  }
我的nginx是运行在linux虚拟机上的,地址是192.168.187.129,而上面的配置是监听虚拟机的81端口,将接受到的请求转发到example负载均衡上配置的地址中去,所以我们可以打开浏览器,输入http://192.168.187.129:81就可以访问到我们的项目了


【推荐】国内首个AI IDE,深度理解中文开发场景,立即下载体验Trae
【推荐】编程新体验,更懂你的AI,立即体验豆包MarsCode编程助手
【推荐】抖音旗下AI助手豆包,你的智能百科全书,全免费不限次数
【推荐】轻量又高性能的 SSH 工具 IShell:AI 加持,快人一步
· 开发者必知的日志记录最佳实践
· SQL Server 2025 AI相关能力初探
· Linux系列:如何用 C#调用 C方法造成内存泄露
· AI与.NET技术实操系列(二):开始使用ML.NET
· 记一次.NET内存居高不下排查解决与启示
· 开源Multi-agent AI智能体框架aevatar.ai,欢迎大家贡献代码
· Manus重磅发布:全球首款通用AI代理技术深度解析与实战指南
· 被坑几百块钱后,我竟然真的恢复了删除的微信聊天记录!
· 没有Manus邀请码?试试免邀请码的MGX或者开源的OpenManus吧
· 园子的第一款AI主题卫衣上架——"HELLO! HOW CAN I ASSIST YOU TODAY