Linux Centos安装ElasticSearch、分词器、es-head和Kibana、ingest-attachment
1 前言
Java中比较流行的搜索引擎是Elasticsearch,传统的数据库搜索,使用like’关键字%’,当内容过多时性能会大大降低,所以Elasticsearch就出现了。
下面,记录下Linux下Elasticsearch的安装过程。
2 Linux下安装Elasticsearch
2.1 下载和解压安装包
官网下载地址: https://www.elastic.co/cn/downloads/elasticsearch
选择合适的版本下载,然后上传到Linux中
也可以在Linux命令行,直接执行以下命令进行下载(下载比较慢):
wget https://artifacts.elastic.co/downloads/elasticsearch/elasticsearch-7.13.2-linux-x86_64.tar.gz
执行解压缩命令:
tar -zxvf elasticsearch-7.13.2-linux-x86_64.tar.gz -C /usr/local
2.2 解决es强依赖jdk问题
由于es和jdk是一个强依赖的关系,所以当我们在新版本的ElasticSearch压缩包中包含有自带的jdk,但是当我们的Linux中已经安装了jdk之后,就会发现启动es的时候优先去找的是Linux中已经装好的jdk,此时如果jdk的版本不一致,就会造成jdk不能正常运行,报错如下:
注:如果Linux服务本来没有配置jdk,则会直接使用es目录下默认的jdk,反而不会报错
warning: usage of JAVA_HOME is deprecated, use ES_JAVA_HOME
Future versions of Elasticsearch will require Java 11; your Java version from [/usr/local/jdk1.8.0_291/jre] does not meet this requirement. Consider switching to a distribution of Elasticsearch with a bundled JDK. If you are already using a distribution with a bundled JDK, ensure the JAVA_HOME environment variable is not set.
解决办法:
进入bin目录
cd /usr/local/elasticsearch-7.13.2/bin
修改elasticsearch配置
vim ./elasticsearch
############## 添加配置解决jdk版本问题 ##############

# 将jdk修改为es中自带jdk的配置目录
export JAVA_HOME=/usr/local/elasticsearch-7.13.2/jdk
export PATH=$JAVA_HOME/bin:$PATH

if [ -x "$JAVA_HOME/bin/java" ]; then
JAVA="/usr/local/elasticsearch-7.13.2/jdk/bin/java"
else
JAVA=`which java`
fi
2.3 解决内存不足问题
由于 elasticsearch 默认分配 jvm空间大小为2g,修改 jvm空间,如果Linux服务器本来配置就很高,可以不用修改。
error:
OpenJDK 64-Bit Server VM warning: INFO: os::commit_memory(0x00000000c6a00000, 962592768, 0) failed; error='Not enough space' (errno=12)
at org.elasticsearch.tools.launchers.JvmOption.flagsFinal(JvmOption.java:119)
at org.elasticsearch.tools.launchers.JvmOption.findFinalOptions(JvmOption.java:81)
at org.elasticsearch.tools.launchers.JvmErgonomics.choose(JvmErgonomics.java:38)
at org.elasticsearch.tools.launchers.JvmOptionsParser.jvmOptions(JvmOptionsParser.java:13
进入config文件夹开始配置,编辑jvm.options:
vim /usr/local/elasticsearch-7.13.2/config/jvm.options
默认配置如下:
-Xms2g
-Xmx2g
默认的配置占用内存太多了,调小一些:
-Xms256m
-Xmx256m
2.4 创建专用用户启动ES
root用户不能直接启动Elasticsearch,所以需要创建一个专用用户,来启动ES
java.lang.RuntimeException: can not run elasticsearch as root
at org.elasticsearch.bootstrap.Bootstrap.initializeNatives(Bootstrap.java:101)
at org.elasticsearch.bootstrap.Bootstrap.setup(Bootstrap.java:168)
at org.elasticsearch.bootstrap.Bootstrap.init(Bootstrap.java:397)
at org.elasticsearch.bootstrap.Elasticsearch.init(Elasticsearch.java:159)
at org.elasticsearch.bootstrap.Elasticsearch.execute(Elasticsearch.java:150)
at org.elasticsearch.cli.EnvironmentAwareCommand.execute(EnvironmentAwareCommand.java:75)
at org.elasticsearch.cli.Command.mainWithoutErrorHandling(Command.java:116)
at org.elasticsearch.cli.Command.main(Command.java:79)
at org.elasticsearch.bootstrap.Elasticsearch.main(Elasticsearch.java:115)
at org.elasticsearch.bootstrap.Elasticsearch.main(Elasticsearch.java:81)
创建用户
useradd user-es
创建所属组:
chown user-es:user-es -R /usr/local/elasticsearch-7.13.2
切换到user-es用户
su user-es
进入bin目录
cd /usr/local/elasticsearch-7.13.2/bin
启动elasticsearch
./elasticsearch
如果出现如下错误信息(最大文件数太小、线程太小、内存太低):
2.5 修改ES核心配置信息
执行命令修改elasticsearch.yml文件内容
vim /usr/local/elasticsearch-7.13.2/config/elasticsearch.yml
修改数据和日志目录
这里可以不用修改,如果不修改,默认放在elasticsearch根目录下
# 数据目录位置
path.data: /home/新用户名称/elasticsearch/data
# 日志目录位置
path.logs: /home/新用户名称/elasticsearch/logs
修改绑定的ip允许远程访问
#默认只允许本机访问,修改为0.0.0.0后则可以远程访问
# 绑定到0.0.0.0,允许任何ip来访问
network.host: 0.0.0.0
初始化节点名称
cluster.name: elasticsearch
node.name: es-node0
cluster.initial_master_nodes: ["es-node0"]
修改端口号(非必须)
http.port: 19200
2.6 vm.max_map_count [65530] is too low问题
上面几个步骤依然没启动成功,继续解决问题:
ERROR: [1] bootstrap checks failed. You must address the points described in the following [1] lines before starting Elasticsearch.
bootstrap check failure [1] of [1]: max virtual memory areas vm.max_map_count [65530] is too low, increase to at least [262144]
elasticsearch用户拥有的内存权限太小,至少需要262144,解决办法:
在 /etc/sysctl.conf 文件最后添加如下内容,即可永久修改
切换到root用户
执行命令:
su root
执行命令
vim /etc/sysctl.conf
添加如下内容
vm.max_map_count=262144
保存退出,刷新配置文件
sysctl -p
切换user-es用户,继续启动
su user-es
启动es服务
/usr/local/elasticsearch-7.13.2/bin/elasticsearch
启动成功后,可以通过http://127.0.0.1:19200/访问,如果出现以下内容,说明ES安装成功:
{
    "name": "es-node0",
    "cluster_name": "elasticsearch",
    "cluster_uuid": "ROwqoHBNQmebLiJ6fhg9Bg",
    "version": {
        "number": "7.15.0",
        "build_flavor": "default",
        "build_type": "tar",
        "build_hash": "79d65f6e357953a5b3cbcc5e2c7c21073d89aa29",
        "build_date": "2021-09-16T03:05:29.143308416Z",
        "build_snapshot": false,
        "lucene_version": "8.9.0",
        "minimum_wire_compatibility_version": "6.8.0",
        "minimum_index_compatibility_version": "6.0.0-beta1"
    },
    "tagline": "You Know, for Search"
}
2.7 可能遇到的max file descriptors [4096]问题
[1]: max file descriptors [4096] for elasticsearch process is too low, increase to at least [65535]
切换到root用户,执行命令:
vi /etc/security/limits.conf
添加如下内容:
* soft nofile 65536
* hard nofile 131072
* soft nproc 2048
* hard nproc 4096
然后重启linux
2.8 ES服务的启动与停止
前台运行,Ctrl + C 则程序终止
/usr/local/elasticsearch-7.13.2/bin/elasticsearch
后台运行
/usr/local/elasticsearch-7.13.2/bin/elasticsearch -d
出现started时启动完成
关闭ES服务
kill pid
说明:
Elasticsearch端口9300、9200,其中:
9300是tcp通讯端口,集群ES节点之间通讯使用,9200是http协议的RESTful接口
2.9 为Elasticsearch设置登录密码
ES7.x以后的版本将安全认证功能免费开放了,并将X-pack插件集成了到了开源的ElasticSearch版本中。下面将介绍如何利用X-pack给ElasticSearch相关组件设置用户名和密码。
编辑配置文件
vim /usr/local/elasticsearch-7.13.2/config/elasticsearch.yml
在 elasticsearch.yml 末尾,加入以下内容:
xpack.security.enabled: true
xpack.security.transport.ssl.enabled: true
编辑内容后重启Elasticsearch服务(必须操作)
设置用户名和密码
/usr/local/elasticsearch-7.13.2/bin/elasticsearch-setup-passwords interactive
这里依次设置elastic、kibana、logstash等的访问密码,test123

设置了访问密码,再次访问ES时,需要输入密码

好啦,单机版Elasticsearch服务终于安装好了,还是有点麻烦哦~
elasticsearch.yml配置全览
# ======================== Elasticsearch Configuration =========================
#
# NOTE: Elasticsearch comes with reasonable defaults for most settings.
#       Before you set out to tweak and tune the configuration, make sure you
#       understand what are you trying to accomplish and the consequences.
#
# The primary way of configuring a node is via this file. This template lists
# the most important settings you may want to configure for a production cluster.
#
# Please consult the documentation for further information on configuration options:
# https://www.elastic.co/guide/en/elasticsearch/reference/index.html
#
# ---------------------------------- Cluster -----------------------------------
#
# Use a descriptive name for your cluster:
#
#cluster.name: my-application
#
# ------------------------------------ Node ------------------------------------
#
# Use a descriptive name for the node:
#
#node.name: node-1
#
# Add custom attributes to the node:
#
#node.attr.rack: r1
#
# ----------------------------------- Paths ------------------------------------
#
# Path to directory where to store the data (separate multiple locations by comma):
#
#path.data: /path/to/data
#
# Path to log files:
#
#path.logs: /path/to/logs
#
# ----------------------------------- Memory -----------------------------------
#
# Lock the memory on startup:
#
#bootstrap.memory_lock: true
#
# Make sure that the heap size is set to about half the memory available
# on the system and that the owner of the process is allowed to use this
# limit.
#
# Elasticsearch performs poorly when the system is swapping the memory.
#
# ---------------------------------- Network -----------------------------------
#
# By default Elasticsearch is only accessible on localhost. Set a different
# address here to expose this node on the network:
#
#network.host: 192.168.0.1
network.host: 0.0.0.0
#
# By default Elasticsearch listens for HTTP traffic on the first free port it
# finds starting at 9200. Set a specific HTTP port here:
#
http.port: 9200
#
# For more information, consult the network module documentation.
#
# --------------------------------- Discovery ----------------------------------
#

cluster.name: elasticsearch
node.name: es-node0
cluster.initial_master_nodes: ["es-node0"]

# Pass an initial list of hosts to perform discovery when this node is started:
# The default list of hosts is ["127.0.0.1", "[::1]"]
#
#discovery.seed_hosts: ["host1", "host2"]
#
# Bootstrap the cluster using an initial set of master-eligible nodes:
#
#cluster.initial_master_nodes: ["node-1", "node-2"]
#
# For more information, consult the discovery and cluster formation module documentation.
#
# ---------------------------------- Various -----------------------------------
#
# Require explicit names when deleting indices:
#
#action.destructive_requires_name: true

ingest.geoip.downloader.enabled: false

xpack.security.enabled: true
xpack.security.transport.ssl.enabled: true

http.cors.enabled: true
http.cors.allow-origin: "*"
http.cors.allow-headers: Authorization,X-Requested-With,Content-Type,Content-Length
3 安装elasticsearch-head插件
ealsticsearch只是后端提供各种resulful api,那么怎么直观的看它的信息呢?
elasticsearch-head是一款专门针对于elasticsearch的客户端工具,用来展示数据。
elasticsearch-head是基于JavaScript语言编写的,可以使用npm部署
npm是Nodejs下的包管理器。
3.1 安装node环境
如果Linux服务已经安装过node环境,这个步骤可以跳过,没有node环境的,可以安装node环境,参考《Linux系统安装Nodejs的详细教程 - 夏威夷8080 - 博客园》。
npm环境准备好了之后,开始安装elasticsearch-head
3.2 安装elasticsearch-head
3.2.1 下载elasticsearch-head安装包
下载地址: https://github.com/mobz/elasticsearch-head

3.2.2 解压zip包
执行命令:
unzip elasticsearch-head-5.0.0.zip
把安装包移动到/usr/local下:
mv elasticsearch-head-5.0.0 /usr/local/
3.2.3 npm install
进入安装目录
cd /usr/local/elasticsearch-head-5.0.0
执行命令安装
npm install
注:如果执行失败,可以cnpm install,使用cnpm之前需要安装cnpm,通过如下命令安装
npm install -g cnpm --registry=https://registry.npm.taobao.org
显示所有使用帮助信息
npm -l
每个项目的根目录下面,一般都有一个package.json文件,定义了这个项目所需要的各种模块,以及项目的配置信息(比如名称、版本、许可证等元数据)
npm install命令根据这个配置文件,自动下载所需的模块,也就是配置项目所需的运行和开发环境。
3.2.4 启动elasticsearch-head服务
启动服务
npm run start 或者 npm run-script start
可以后台启动
nohup npm run-script start &
出现下图,说明启动elasticsearch-head服务成功:

3.2.5 访问elasticsearch-head服务
然后访问: http://localhost:9100/
elasticsearch-head服务访问成功:

3.2.6 使用Head插件访问elasticsearch
访问失败,要允许跨域,需要修改elasticsearch.yml文件,添加如下内容:
http.cors.enabled: true
http.cors.allow-origin: "*"
出现以下界面,说明访问成功:

3.2.7 ES开启安全密码认证后,es-head连接方式
在web界面访问时,该框由原来的 http://172.16.3.227:9100替换为 http://172.16.3.227:9100/?auth_user=elastic&auth_password=123456

4. ES ik分词器的下载和安装,测试
之前我们创建索引,查询数据,都是使用的默认的分词器,分词效果不太理想,会把text的字段分成一个一个汉字,然后搜索的时候也会把搜索的句子进行分词,所以这里就需要更加智能的分词器IK分词器了。
4.1 下载ik分词器
下载地址:https://github.com/medcl/elasticsearch-analysis-ik/releases ,这里你需要根据你的Es的版本来下载对应版本的IK,这里我使用的是6.3.2的ES,所以就下载ik-6.3.2.zip的文件。

4.2 解压
在es的安装目录/plugin/下创建ik目录,然后将文件复制到 ik下面即可,完成之后效果如下:

到这里已经完成了,不需要去elasticSearch的 elasticsearch.yml 文件去配置。
4.3 重启ElasticSearch
4.4 测试效果
#插入测试数据

PUT book/analyze/1
{
"text": "我是中国人"
}

未使用ik分词器的时候测试分词效果:


POST book/_analyze
{
"text": "我是中国人"
}
//结果是:
{
"tokens": [
{
"token": "我",
"start_offset": 0,
"end_offset": 1,
"type": "<IDEOGRAPHIC>",
"position": 0
},
{
"token": "是",
"start_offset": 1,
"end_offset": 2,
"type": "<IDEOGRAPHIC>",
"position": 1
},
{
"token": "中",
"start_offset": 2,
"end_offset": 3,
"type": "<IDEOGRAPHIC>",
"position": 2
},
{
"token": "国",
"start_offset": 3,
"end_offset": 4,
"type": "<IDEOGRAPHIC>",
"position": 3
},
{
"token": "人",
"start_offset": 4,
"end_offset": 5,
"type": "<IDEOGRAPHIC>",
"position": 4
}
]
}
使用IK分词器之后,结果如下:
POST book_v6/_analyze
{
"analyzer": "ik_max_word",
"text": "我是中国人"
}
//结果如下:
{
"tokens": [
{
"token": "我",
"start_offset": 0,
"end_offset": 1,
"type": "CN_CHAR",
"position": 0
},
{
"token": "是",
"start_offset": 1,
"end_offset": 2,
"type": "CN_CHAR",
"position": 1
},
{
"token": "中国人",
"start_offset": 2,
"end_offset": 5,
"type": "CN_WORD",
"position": 2
},
{
"token": "中国",
"start_offset": 2,
"end_offset": 4,
"type": "CN_WORD",
"position": 3
},
{
"token": "国人",
"start_offset": 3,
"end_offset": 5,
"type": "CN_WORD",
"position": 4
}
]
}
对于上面两个分词效果的解释:
1. 如果未安装ik分词器,那么,你如果写 "analyzer": "ik_max_word",那么程序就会报错,因为你没有安装ik分词器
2. 如果你安装了ik分词器之后,你不指定分词器,不加上 "analyzer": "ik_max_word" 这句话,那么其分词效果跟你没有安装ik分词器是一致的,也是分词成每个汉字。
4.5 创建指定分词器的索引
索引创建之后就可以使用ik进行分词了,当你使用ES搜索的时候也会使用ik对搜索语句进行分词,进行匹配。
PUT book_v5

{
"settings":{
"number_of_shards": "6",
"number_of_replicas": "1",
//指定分词器
"analysis":{
"analyzer":{
"ik":{
"tokenizer":"ik_max_word"
}
}
}
},
"mappings":{
"novel":{
"properties":{
"author":{
"type":"text"
},
"wordCount":{
"type":"integer"
},
"publishDate":{
"type":"date",
"format":"yyyy-MM-dd HH:mm:ss || yyyy-MM-dd"
},
"briefIntroduction":{
"type":"text"
},
"bookName":{
"type":"text"
}
}
}
}
}
关于ik分词器的分词类型(可以根据需求进行选择):
ik_max_word:会将文本做最细粒度的拆分,比如会将“中华人民共和国国歌”拆分为“中华人民共和国,中华人民,中华,华人,人民共和国,人民,人,民,共和国,共和,和,国国,国歌”,会穷尽各种可能的组合;
ik_smart:会做最粗粒度的拆分,比如会将“中华人民共和国国歌”拆分为“中华人民共和国,国歌”。如下:
POST book_v6/_analyze
{
"analyzer": "ik_smart",
"text": "我是中国人"
}
//结果
{
"tokens": [
{
"token": "我",
"start_offset": 0,
"end_offset": 1,
"type": "CN_CHAR",
"position": 0
},
{
"token": "是",
"start_offset": 1,
"end_offset": 2,
"type": "CN_CHAR",
"position": 1
},
{
"token": "中国人",
"start_offset": 2,
"end_offset": 5,
"type": "CN_WORD",
"position": 2
}
]
}
5 安装Kibana
Kibana是一个基于Node.js的Elasticsearch索引库数据统计工具,可以利用Elasticsearch的聚合功能,生成各种图表,如柱形图,线状图,饼图等。而且还提供了操作Elasticsearch索引数据的控制台,并且提供了一定的API提示,非常有利于我们学习Elasticsearch的语法。
5.1 下载Kibana
需要选择和es版本一致的版本的kibana下载,下载地址:https://www.elastic.co/downloads/past-releases#kibana

5.2 解压
tar -zxvf kibana-7.17.3-linux-x86_64.tar.gz -C /usr/local
5.3 修改配置文件
cd /usr/local/

vi kibana-7.17.3/config/kibana.yml
配置参数如下:
#配置端口号

server.port: 5601

#配置网络访问地址

server.host: "0.0.0.0"

server.publicBaseUrl: "http://116.205.230.143:5601"

#配置es链接地址(es集群,可以用逗号分隔)

elasticsearch.hosts: ["http://116.205.230.143:9200"]

#配置中文语言界面

i18n.locale: "zh-CN"
5.4 分配普通用户权限
注意:必须使用普通用户启动服务,Kibana如果用root用户启动也会报错跟ElasticSearch一样,需要换成非root用户启动。这里把权限加上即可
chown -R elasticsearch:elasticsearch /usr/local/kibana-7.17.3-linux-x86_64/
5.5 启动kibana
#切换用户

su elasticsearch

#进入bin目录

cd /usr/local/kibana-7.17.3-linux-x86_64/bin/

#直接启动

./kibana

#后台启动

nohup ./kibana &

nohup ./kibana > kibana.log 2>&1 &

#允许root用户去启动,没试过这个命令不知道行不行

./kibana --allow-root
注意:防火墙开启5601端口
5.6 kibana关闭
在使用ps命令ps -ef|grep kibana 和 ps -ef|grep 5601 查看进程的时候都找不到。所以我们可以尝试 使用下面的命令找到kibana进程:
fuser -n tcp 5601

kill -9 端口

# 或者下面的命令

ps -ef | grep node

netstat -anltp | grep 5601

netstat -tunlp | grep 5601
启动后的效果:


警告1:
#! Elasticsearch built-in security features are not enabled. Without authentication, your cluster could be accessible to anyone. See https://www.elastic.co/guide/en/elasticsearch/reference/7.17/security-minimal-setup.html to enable security.

意思是未启用 Elasticsearch 内置的安全功能,即没有开启身份验证的功能。 如果没有身份验证,任何人都可以访问您的集群。下面会详细介绍开启 Elasticsearch 自带的身份验证功能,如果你不想看到报错警告则在ES的elasticsearch.yml加入这个参数:xpack.security.enabled: false
警告2:
#! this request accesses system indices: [.apm-agent-configuration, .apm-custom-link, .kibana_7.17.3_001, .kibana_task_manager_7.17.3_001, .tasks], but in a future major version, direct access to system indices will be prevented by default

说我们访问了系统索引,所以我们尽量别访问系统的索引,从上面响应的时间来看,响应的36699ms,太久了。在后面ES的主要版本中,会默认禁止直接访问系统索引。只要我们不访问系统索引应该就不会出现这个警告。

5.7 Kibana 配置 xpack
截止到目前Elasticsearch的部分已经修改完毕,下面修改kibana配置以便于让其和Elasticsearch完成连接。
修改kibana的配置文件config/kibana.yml:
cd /usr/local/kibana-7.17.3-linux-x86_64/

vi config/kibana.yml
在配置文件中添加下面内容:
elasticsearch.username: "kibana"

elasticsearch.password: "之前设置的密码"
重启Kibana
注:kibana 使用ps -ef|grep kibana是查不到进程的,因为其实运行在node里面。但是我们也不能关闭所有node里面的软件,所以我们需要查询kibana监听端口5601的进程。使用下面命令关闭kibana
fuser -n tcp 5601

kill -9 端口

# 或者下面的命令

ps -ef | grep node

netstat -anltp | grep 5601

netstat -tunlp | grep 5601
然后重启Kibana
#切换用户

su elasticsearch

#进入bin目录

cd /usr/local/kibana-7.17.3-linux-x86_64/bin/

#直接启动

./kibana

#后台启动

nohup ./kibana &

nohup ./kibana > kibana.log 2>&1 &
此时访问kibana(http://localhost:5601)会提示需要输入账号密码。注意此时需要输入的是elastic的用户密码。

5.8 kibana.yml配置全览
# Kibana is served by a back end server. This setting specifies the port to use.
server.port: 5601

# Specifies the address to which the Kibana server will bind. IP addresses and host names are both valid values.
# The default is 'localhost', which usually means remote machines will not be able to connect.
# To allow connections from remote users, set this parameter to a non-loopback address.
server.host: "0.0.0.0"

# Enables you to specify a path to mount Kibana at if you are running behind a proxy.
# Use the `server.rewriteBasePath` setting to tell Kibana if it should remove the basePath
# from requests it receives, and to prevent a deprecation warning at startup.
# This setting cannot end in a slash.
#server.basePath: ""

# Specifies whether Kibana should rewrite requests that are prefixed with
# `server.basePath` or require that they are rewritten by your reverse proxy.
# This setting was effectively always `false` before Kibana 6.3 and will
# default to `true` starting in Kibana 7.0.
#server.rewriteBasePath: false

# Specifies the public URL at which Kibana is available for end users. If
# `server.basePath` is configured this URL should end with the same basePath.
server.publicBaseUrl: "http://203.34.56.93:5601"

# The maximum payload size in bytes for incoming server requests.
#server.maxPayload: 1048576

# The Kibana server's name.  This is used for display purposes.
#server.name: "your-hostname"

# The URLs of the Elasticsearch instances to use for all your queries.
elasticsearch.hosts: ["http://203.34.56.93:9200"]

# Kibana uses an index in Elasticsearch to store saved searches, visualizations and
# dashboards. Kibana creates a new index if the index doesn't already exist.
#kibana.index: ".kibana"

# The default application to load.
#kibana.defaultAppId: "home"

# If your Elasticsearch is protected with basic authentication, these settings provide
# the username and password that the Kibana server uses to perform maintenance on the Kibana
# index at startup. Your Kibana users still need to authenticate with Elasticsearch, which
# is proxied through the Kibana server.
elasticsearch.username: "elastic"
elasticsearch.password: "test123"

# Kibana can also authenticate to Elasticsearch via "service account tokens".
# If may use this token instead of a username/password.
# elasticsearch.serviceAccountToken: "my_token"

# Enables SSL and paths to the PEM-format SSL certificate and SSL key files, respectively.
# These settings enable SSL for outgoing requests from the Kibana server to the browser.
#server.ssl.enabled: false
#server.ssl.certificate: /path/to/your/server.crt
#server.ssl.key: /path/to/your/server.key

# Optional settings that provide the paths to the PEM-format SSL certificate and key files.
# These files are used to verify the identity of Kibana to Elasticsearch and are required when
# xpack.security.http.ssl.client_authentication in Elasticsearch is set to required.
#elasticsearch.ssl.certificate: /path/to/your/client.crt
#elasticsearch.ssl.key: /path/to/your/client.key

# Optional setting that enables you to specify a path to the PEM file for the certificate
# authority for your Elasticsearch instance.
#elasticsearch.ssl.certificateAuthorities: [ "/path/to/your/CA.pem" ]

# To disregard the validity of SSL certificates, change this setting's value to 'none'.
#elasticsearch.ssl.verificationMode: full

# Time in milliseconds to wait for Elasticsearch to respond to pings. Defaults to the value of
# the elasticsearch.requestTimeout setting.
#elasticsearch.pingTimeout: 1500

# Time in milliseconds to wait for responses from the back end or Elasticsearch. This value
# must be a positive integer.
#elasticsearch.requestTimeout: 30000

# List of Kibana client-side headers to send to Elasticsearch. To send *no* client-side
# headers, set this value to [] (an empty list).
#elasticsearch.requestHeadersWhitelist: [ authorization ]

# Header names and values that are sent to Elasticsearch. Any custom headers cannot be overwritten
# by client-side headers, regardless of the elasticsearch.requestHeadersWhitelist configuration.
#elasticsearch.customHeaders: {}

# Time in milliseconds for Elasticsearch to wait for responses from shards. Set to 0 to disable.
#elasticsearch.shardTimeout: 30000

# Logs queries sent to Elasticsearch. Requires logging.verbose set to true.
#elasticsearch.logQueries: false

# Specifies the path where Kibana creates the process ID file.
#pid.file: /run/kibana/kibana.pid

# Enables you to specify a file where Kibana stores log output.
#logging.dest: stdout

# Set the value of this setting to true to suppress all logging output.
#logging.silent: false

# Set the value of this setting to true to suppress all logging output other than error messages.
#logging.quiet: false

# Set the value of this setting to true to log all events, including system usage information
# and all requests.
#logging.verbose: false

# Set the interval in milliseconds to sample system and process performance
# metrics. Minimum is 100ms. Defaults to 5000.
#ops.interval: 5000

# Specifies locale to be used for all localizable strings, dates and number formats.
# Supported languages are the following: English - en , by default , Chinese - zh-CN .
i18n.locale: "zh-CN"
6 所有安装包

有需要的可以留言联系我索取安装包,我都放到我的阿里网盘里了。
7 安全组开放的端口

8 Java restful方式操作es
import com.alibaba.fastjson2.JSONArray;
import com.alibaba.fastjson2.JSONObject;
import com.google.gson.Gson;
import com.google.gson.GsonBuilder;
import com.google.gson.JsonObject;
import com.google.gson.JsonParser;
import org.apache.http.HttpEntity;
import org.apache.http.HttpResponse;
import org.apache.http.auth.AuthScope;
import org.apache.http.auth.UsernamePasswordCredentials;
import org.apache.http.client.CredentialsProvider;
import org.apache.http.client.methods.*;
import org.apache.http.entity.ContentType;
import org.apache.http.entity.StringEntity;
import org.apache.http.impl.client.BasicCredentialsProvider;
import org.apache.http.impl.client.CloseableHttpClient;
import org.apache.http.impl.client.HttpClients;
import org.apache.http.util.EntityUtils;

import java.io.IOException;

public class ElasticsearchClient {

    private static final String ES_BASE_URL = "http://127.0.0.1:9200"; // 替换为你的Elasticsearch URL
    private static final String USERNAME = "elastic"; // 替换为你的Elasticsearch用户名
    private static final String PASSWORD = "test123"; // 替换为你的Elasticsearch密码

    private final CloseableHttpClient httpClient;

    public ElasticsearchClient() {
        CredentialsProvider credsProvider = new BasicCredentialsProvider();
        credsProvider.setCredentials(AuthScope.ANY,
                new UsernamePasswordCredentials(USERNAME, PASSWORD));
        this.httpClient = HttpClients.custom()
                .setDefaultCredentialsProvider(credsProvider)
                .build();
    }

    // 判断索引是否存在
    public boolean existsIndex(String indexName) throws IOException {
        boolean flag = false;
        HttpGet request = new HttpGet(ES_BASE_URL + "/" + indexName);
        request.addHeader("Accept", "application/json");
        HttpResponse response = httpClient.execute(request);
        int statusCode = response.getStatusLine().getStatusCode();

        if (statusCode == 200) {
            // 索引存在,但这里我们其实不需要解析响应体来确认索引名,因为URL已经指定了
            // 如果需要确认索引的详细信息,可以解析响应体
            System.out.println("索引 '"+indexName+"' 存在。");
            flag = true;
        } else if (statusCode == 404) {
            // 索引不存在
            System.out.println("索引 '"+indexName+"' 不存在。");
        } else if (statusCode == 401) {
            // 身份验证失败
            System.out.println("身份验证失败,请检查用户名和密码。");
        } else {
            // 其他错误
            System.out.println("请求失败,状态码: " + statusCode);
        }
        return flag;
    }

    // 添加索引
    public void createIndex(String indexName, JsonObject mappings) throws IOException {
        HttpPut request = new HttpPut(ES_BASE_URL + "/" + indexName);
        request.addHeader("Content-Type", "application/json");
        request.setEntity(new StringEntity(mappings.toString()));
        HttpResponse response = httpClient.execute(request);
        int statusCode = response.getStatusLine().getStatusCode();
        if (statusCode != 200) {
            throw new RuntimeException("创建索引失败,状态码: " + statusCode);
        }
    }

    // 删除索引
    public void deleteIndex(String indexName) throws IOException {
        HttpDelete request = new HttpDelete(ES_BASE_URL + "/" + indexName);
        HttpResponse response = httpClient.execute(request);
        int statusCode = response.getStatusLine().getStatusCode();
        if (statusCode != 200 && statusCode != 204) { // 204 No Content 也是可能的成功响应
            throw new RuntimeException("删除索引失败,状态码: " + statusCode);
        }
    }

    // 更新索引映射(通过重新索引实现)
    // 注意:这不是一个真正的“更新映射”操作,因为Elasticsearch不允许在现有索引上更改映射类型。
    // 这里的方法是为了说明目的而提供的,你可能需要实现自己的重新索引逻辑。
    public void updateIndexMapping(String indexName, JsonObject newMapping) throws IOException {
        // 通常,这意味着你需要创建一个新索引,将数据从旧索引重新索引到新索引,然后删除旧索引。
        // 这里只是一个占位符方法。
        throw new UnsupportedOperationException("Elasticsearch不支持直接更新索引映射。");
    }

    // 插入文档数据
//    public void indexDocument(String indexName, String documentId, JsonObject document) throws IOException {
//        HttpPost request = new HttpPost(ES_BASE_URL + "/" + indexName + "/" + "_doc/" + documentId);
    public void indexDocument(String indexName, JsonObject document) throws IOException {
        HttpPost request = new HttpPost(ES_BASE_URL + "/" + indexName + "/" + "_doc");
        request.addHeader("Content-Type", "application/json;charset=UTF-8");
        request.setEntity(new StringEntity(document.toString(), ContentType.APPLICATION_JSON.withCharset("UTF-8")));
        HttpResponse response = httpClient.execute(request);
        int statusCode = response.getStatusLine().getStatusCode();
        if (statusCode != 200 && statusCode != 201) { // 201 Created 也是可能的成功响应
            throw new RuntimeException("插入文档失败,状态码: " + statusCode);
        }
    }

    // 修改文档数据(通过重新索引实现)
    /*public void updateDocument(String indexName, String documentId, JsonObject newDocument) throws IOException {
        // 在Elasticsearch中,更新文档实际上是通过删除旧文档并索引新文档来实现的。
        indexDocument(indexName, documentId, newDocument); // 使用相同的documentId来“覆盖”旧文档
    }*/

    // 查询文档数据
    public JsonObject getDocument(String indexName, String documentId) throws IOException {
        HttpGet request = new HttpGet(ES_BASE_URL + "/" + indexName + "/" + "_doc/" + documentId);
        HttpResponse response = httpClient.execute(request);
        int statusCode = response.getStatusLine().getStatusCode();
        if (statusCode == 200) {
            HttpEntity entity = response.getEntity();
            String jsonResponse = EntityUtils.toString(entity);
            return JsonParser.parseString(jsonResponse).getAsJsonObject();
        } else {
            throw new RuntimeException("查询文档失败,状态码: " + statusCode);
        }
    }

    // 删除文档数据
    public void deleteDocument(String indexName, String documentId) throws IOException {
        HttpDelete request = new HttpDelete(ES_BASE_URL + "/" + indexName + "/" + "_doc/" + documentId);
        HttpResponse response = httpClient.execute(request);
        int statusCode = response.getStatusLine().getStatusCode();
        if (statusCode != 200 && statusCode != 204) { // 204 No Content 也是可能的成功响应
            throw new RuntimeException("删除文档失败,状态码: " + statusCode);
        }
    }

    // 多条件查询文档
    public String searchDocuments(String indexName, JsonObject document) throws IOException {
        HttpPost request = new HttpPost(ES_BASE_URL + "/" + indexName + "/_search");
        request.addHeader("Content-Type", "application/json");
        // 将查询体设置为请求实体
        request.setEntity(new StringEntity(document.toString(), ContentType.APPLICATION_JSON.withCharset("UTF-8")));
        // 执行请求并获取响应
        HttpResponse response = httpClient.execute(request);
        int statusCode = response.getStatusLine().getStatusCode();
        if (statusCode != 200 && statusCode != 204) { // 204 No Content 也是可能的成功响应
            throw new RuntimeException("搜索文档失败,状态码: " + statusCode);
        }
        HttpEntity responseEntity = response.getEntity();
        String responseBody = EntityUtils.toString(responseEntity, "UTF-8");
        return responseBody; // 返回响应体(通常是JSON格式的查询结果)
    }

    // 关闭HttpClient
    public void close() throws IOException {
        httpClient.close();
    }

    public static void main(String[] args) {
        ElasticsearchClient client = new ElasticsearchClient();
        try {
            // 判断索引是否存在
//            boolean rs = client.existsIndex("jinhang");

            // 删除索引
//            client.deleteIndex("linhang");

            // 示例:创建一个索引
            // ... 设置mappings内容 ...
            String mapping = "" +
                    "{  \n" +
                    "  \"mappings\": {  \n" +
                    "    \"properties\": {  \n" +
                    "      \"code\": {  \n" +
                    "        \"type\": \"keyword\"  \n" +
                    "      },  \n" +
                    "      \"title\": {  \n" +
                    "        \"type\": \"text\",  \n" +
                    "        \"analyzer\": \"standard\"  \n" +
                    "      },  \n" +
                    "      \"orgName\": {  \n" +
                    "        \"type\": \"text\",  \n" +
                    "        \"analyzer\": \"standard\"  \n" +
                    "      },  \n" +
                    "      \"publishDate\": {  \n" +
                    "        \"type\": \"date\",  \n" +
                    "        \"format\": \"yyyy-MM-dd'T'HH:mm:ss.SSSZ||yyyy-MM-dd'T'HH:mm:ss||epoch_millis\"  \n" +
                    "      },  \n" +
                    "      \"publisUserName\": {  \n" +
                    "        \"type\": \"text\",  \n" +
                    "        \"analyzer\": \"standard\"  \n" +
                    "      },  \n" +
                    "      \"publisUserId\": {  \n" +
                    "        \"type\": \"keyword\"  \n" +
                    "      },  \n" +
                    "      \"documentContent\": {  \n" +
                    "        \"type\": \"text\",  \n" +
                    "        \"analyzer\": \"standard\"  \n" +
                    "      },  \n" +
                    "      \"type\": {  \n" +
                    "        \"type\": \"keyword\"  \n" +
                    "      },  \n" +
                    "      \"remark\": {  \n" +
                    "        \"type\": \"text\",  \n" +
                    "        \"analyzer\": \"standard\"  \n" +
                    "      }  \n" +
                    "    }  \n" +
                    "  }  \n" +
                    "}";
            JsonObject mappings = JsonParser.parseString(mapping).getAsJsonObject();
//            client.createIndex("linhang", mappings);

            // 示例:插入一个文档
            String doc = "{\n" +
                    "  \"code\": \"ABC456\",\n" +
                    "  \"title\": \"示例文档标题3\",\n" +
                    "  \"orgName\": \"示例组织3\",\n" +
                    "  \"publishDate\": \"2023-10-05T14:48:10.000Z\",\n" +
                    "  \"publisUserName\": \"发布者姓名2\",\n" +
                    "  \"publisUserId\": \"user456\",\n" +
                    "  \"documentContent\": \"这是文档的详细内容,可以包含任何文本信息3。\",\n" +
                    "  \"type\": \"涉密文档\",\n" +
                    "  \"remark\": \"这是一些备注信息3\"\n" +
                    "}";
            JsonObject document = JsonParser.parseString(doc).getAsJsonObject();
            // ... 设置document内容 ...
//            client.indexDocument("linhang", document);

            // 删除一个文档
//            client.deleteDocument("linhang", "x5025pIBGS6xF5FxLf5t");

            // 示例:查询一个文档
//            JsonObject retrievedDocument = client.getDocument("linhang", "x5025pIBGS6xF5FxLf5t");
//            System.out.println(retrievedDocument);

            // 搜索文档
            String param = "{\n" +
                    "  \"query\": {\n" +
                    "    \"bool\": {\n" +
                    "      \"must\": [\n" +
                    "        {\n" +
                    "          \"range\": {\n" +
                    "            \"publishDate\": {\n" +
                    "              \"gte\": \"2020-10-05T14:48:00.000Z\",\n" +
                    "              \"lte\": \"2029-10-05T14:48:00.000Z\"\n" +
                    "            }\n" +
                    "          }\n" +
                    "        }\n" +
                    "      ]\n" +
                    "    }\n" +
                    "  }\n" +
                    "}";
            JsonObject paramObj = JsonParser.parseString(param).getAsJsonObject();
            String rs = client.searchDocuments("linhang", paramObj);
            System.out.println("搜索的结果:"+rs);

            // 其他操作...

        } catch (IOException e) {
            e.printStackTrace();
        } finally {
            try {
                client.close();
            } catch (IOException e) {
                e.printStackTrace();
            }
        }
    }
}
9 安装和使用 Ingest-Attachment
Ingest-Attachment是一个开箱即用的插件,可以实现对(PDF,DOC等)主流格式文件的文本抽取及自动导入。
安装(可以手动下载插件包放入到es plugin目录下):
cmd 进入到elasticsearch bin目录下,执行以下命令,等待安装插件
elasticsearch-plugin install ingest-attachment
卸载:
cmd 进入到elasticsearch bin目录下,执行以下命令
elasticsearch-plugin remove ingest-attachment
kibana tool工具操作 使用ingest-attachment
建立ElasticSearch文件存储,用于检索文件名称、文件内容
9.1、建立文本抽取管道pipeline(全局执行一次即可使用)
PUT _ingest/pipeline/attachment
{
  "description": "Extract attachment information",
    "processors": [
      {
        "attachment": {
          "field": "data",
          "indexed_chars": -1,# -1 表示提取所有字符
          "ignore_missing": true
        }
      },
      {
        "remove": {
          "field": "data"# 提取完成后移除原始 base64 数据,节省存储空间
        }
      }
    ]
}
9.2、建立索引filedata
属性列:文件名称,文件扩展名,文件路径,读取的文件内容
PUT /filedata
{
  "mappings": {
    "properties": {
      "filename": {
        "type": "text",
          "analyzer": "ik_max_word"
      },
      "fileext": {
        "type": "keyword"
      },
      "filepath": {
        "type": "keyword"
      },
      "attachment.data": {
        "type": "text",
          "analyzer": "ik_max_word"
      }
    }
  }
}
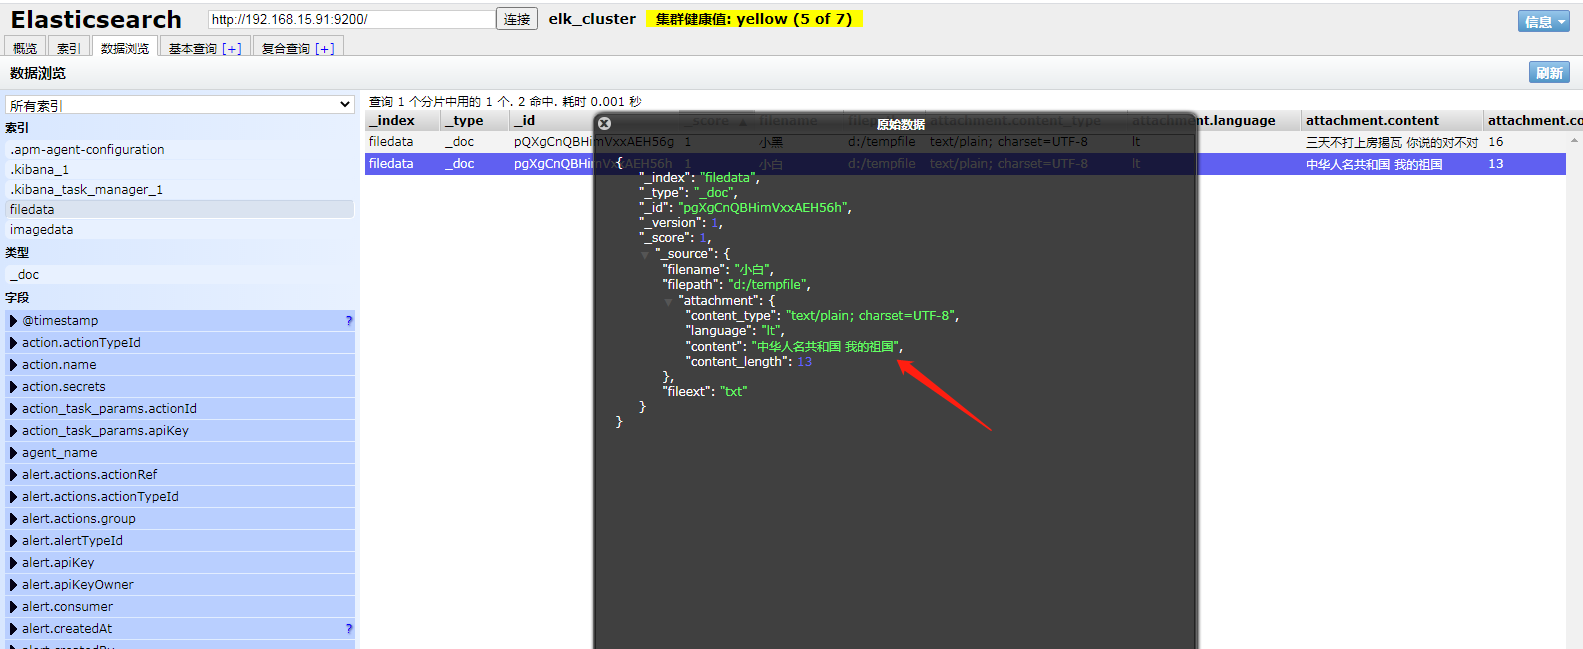
9.3、kibana tool批量创建数据
PUT /filedata/_bulk?pipeline=attachment&pretty=true
{"index":{}}
{"filename":"小黑","fileext":"txt","filepath":"d:/tempfile", "data":"5LiJ5aSp5LiN5omT5LiK5oi/5o+t55OmIOS9oOivtOeahOWvueS4jeWvuQ=="}
{"index":{}}
{"filename":"小白","fileext":"txt","filepath":"d:/tempfile","data":"5Lit5Y2O5Lq65ZCN5YWx5ZKM5Zu9IOaIkeeahOelluWbvQ=="}
存储的数据如下:
9.4、通过IK分词插件查询
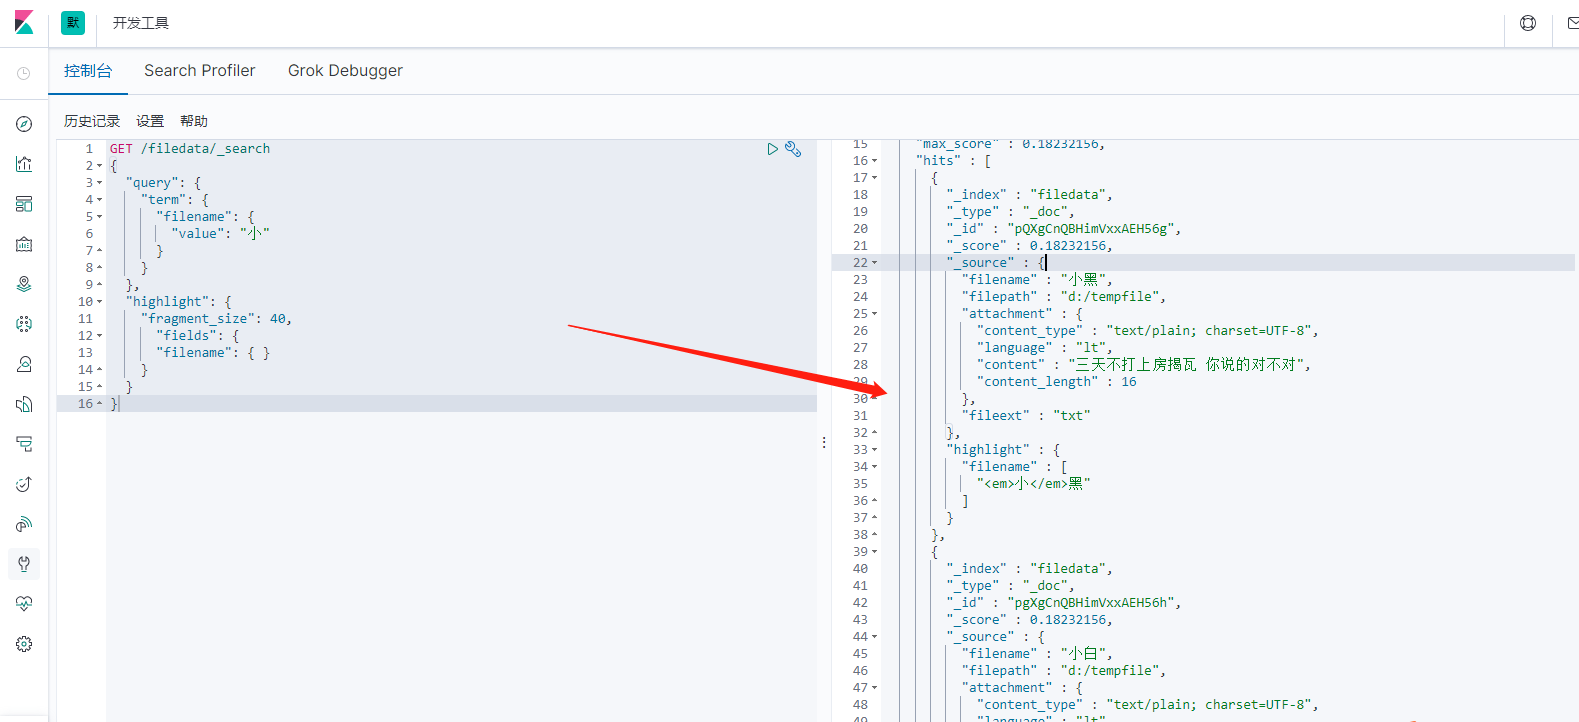
term根据IK分词查询,highlight高亮显示,此查询为根据文件名称查询
GET /filedata/_search
{
  "query": {
    "term": {
      "filename": {
        "value": "小"
      }
    }
  },
  "highlight": {
    "fragment_size": 40,
      "fields": {
      "filename": { }
    }
  }
}
查询结果如下图:
9.5、ingest-attachment 通过管道pipeline提取文本数据,根据文本内容查询
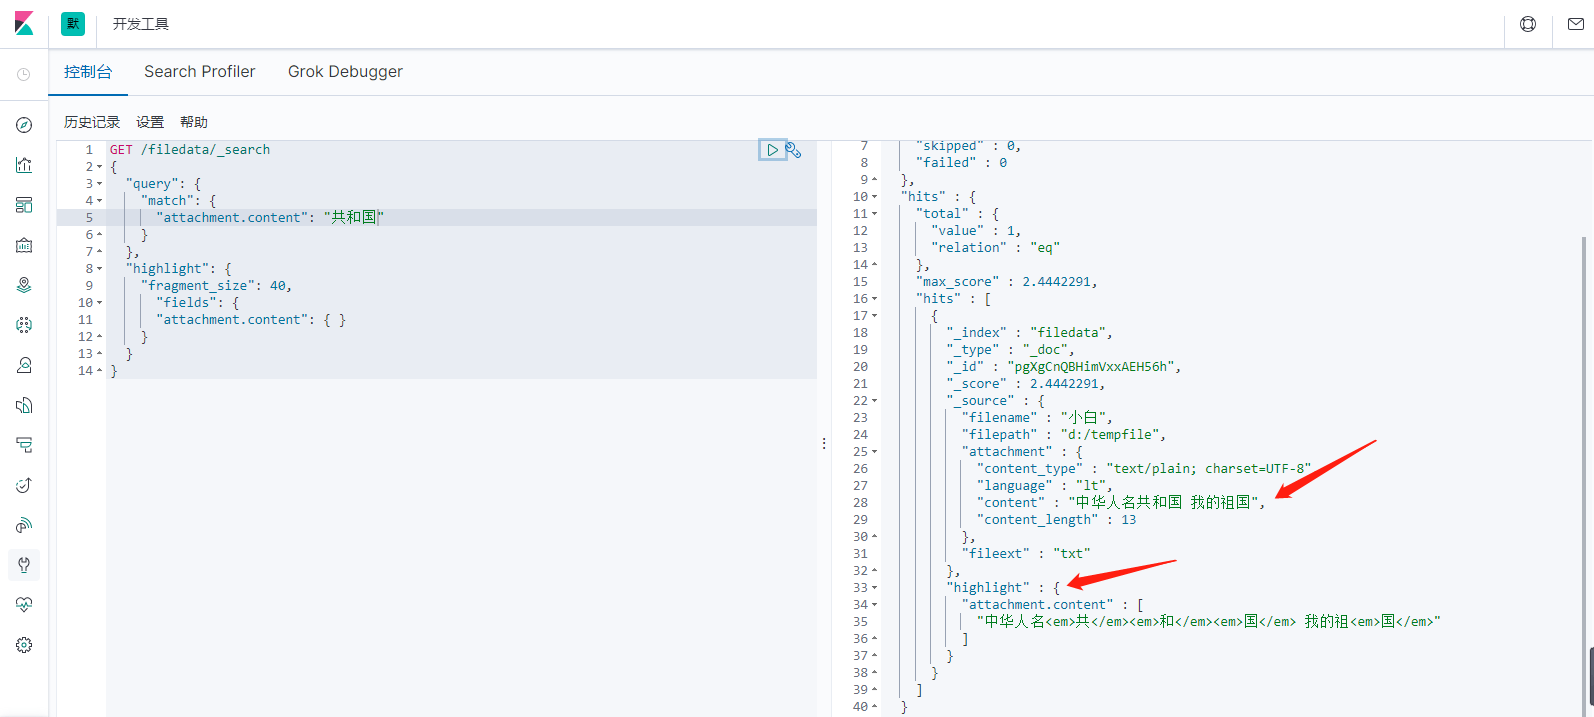
match根据属性查询,highlight高亮显示
GET /filedata/_search
{
  "query": {
    "match": {
      "attachment.content": "共和国"
    }
  },
  "highlight": {
    "fragment_size": 40,
      "fields": {
      "attachment.content": { }
    }
  }
}
查询结果如下
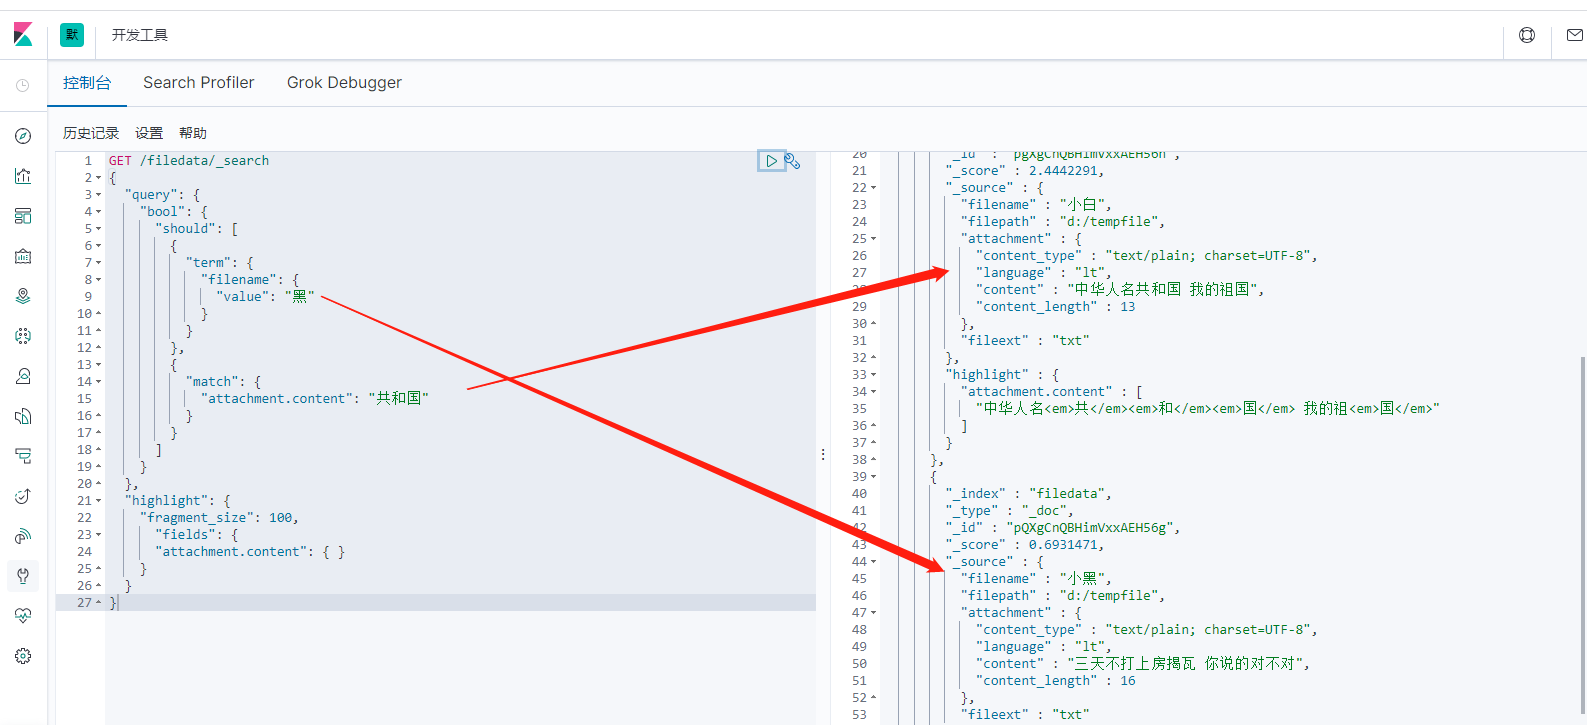
9.6、Elasticsearch bool过滤查询,match和term联合查询
GET /filedata/_search
{
  "query": {
    "bool": {
      "should": [
        {
          "term": {
            "filename": {
              "value": "黑"
            }
          }
        },
        {
          "match": {
            "attachment.content": "共和国"
          }
        }
      ]
    }
  },
  "highlight": {
    "fragment_size": 100,
      "fields": {
      "attachment.content": { }
    }
  }
}
查询结果如下
到此ingest-attachment插件,安装,应用已完成(ingest-attachment应用体现在管道pipeline提取文本数据)。
注:在使用时,需要将其文本数据转成base64的编码,使用管道将其base64编码放入es 即可,ingest-attachment 会自动从你添加的base64的编码中提取文本放入 attament.content 中。
准备文件并上传索引

Ingest Attachment Plugin 需要文件以 Base64 编码形式存储在字段中。你需要在 Java 中读取文件并进行 Base64 编码。

Java 示例代码
依赖
在 pom.xml 中添加 Base64 编码支持:

<dependency>
    <groupId>commons-codec</groupId>
    <artifactId>commons-codec</artifactId>
    <version>1.15</version>
</dependency>

Base64 编码文件

import org.apache.commons.codec.binary.Base64;
import java.io.File;
import java.io.FileInputStream;
import java.io.IOException;
import java.util.Base64;

public class FileEncoder {

    public static String encodeFileToBase64(File file) {
        try (FileInputStream fis = new FileInputStream(file)) {
            byte[] fileContent = new byte[(int) file.length()];
            fis.read(fileContent);
            return Base64.getEncoder().encodeToString(fileContent);
        } catch (IOException e) {
            e.printStackTrace();
        }
        return null;
    }
}
索引文档到 Elasticsearch


import co.elastic.clients.elasticsearch.ElasticsearchClient;
import co.elastic.clients.elasticsearch.core.IndexRequest;
import co.elastic.clients.elasticsearch.core.IndexResponse;
import java.io.File;
import java.io.IOException;
import java.util.HashMap;
import java.util.Map;

public class ElasticsearchAttachmentIndexer {

    private final ElasticsearchClient client;

    public ElasticsearchAttachmentIndexer(ElasticsearchClient client) {
        this.client = client;
    }

    public void indexDocument(File file) throws IOException {
        String base64Content = FileEncoder.encodeFileToBase64(file);

        Map<String, Object> document = new HashMap<>();
        document.put("file_name", file.getName());
        document.put("data", base64Content);

        IndexRequest<Map<String, Object>> request = IndexRequest.of(i -> i
                .index("documents")
                .pipeline("attachment_pipeline") // 使用指定的 Ingest Pipeline
                .document(document)
        );

        IndexResponse response = client.index(request);
        System.out.println("Document indexed with ID: " + response.id());
    }
}

搜索索引数据

解析后的文件内容存储在字段 attachment.content 中。你可以使用此字段进行全文搜索。

搜索示例

import co.elastic.clients.elasticsearch.core.SearchRequest;
import co.elastic.clients.elasticsearch.core.SearchResponse;
import co.elastic.clients.elasticsearch.core.search.Hit;
import java.io.IOException;
import java.util.List;

public class DocumentSearcher {

    private final ElasticsearchClient client;

    public DocumentSearcher(ElasticsearchClient client) {
        this.client = client;
    }

    public void searchDocuments(String keyword) throws IOException {
        SearchRequest request = new SearchRequest.Builder()
                .index("documents")
                .query(q -> q
                        .match(t -> t
                                .field("attachment.content") // 搜索解析后的文本内容
                                .query(keyword)
                        )
                )
                .build();

        SearchResponse<Map> response = client.search(request, Map.class);
        List<Hit<Map>> hits = response.hits().hits();

        System.out.println("Search results:");
        for (Hit<Map> hit : hits) {
            System.out.println("Document ID: " + hit.id());
            System.out.println("File Name: " + hit.source().get("file_name"));
            System.out.println("Content Preview: " + ((Map<String, Object>) hit.source().get("attachment"))
                    .get("content").toString().substring(0, 100) + "...");
        }
    }
}

验证和测试
上传文件并索引:
使用 ElasticsearchAttachmentIndexer 进行文件上传和索引。
搜索测试:
使用 DocumentSearcher 搜索文件内容。
注意事项
Base64 编码文件大小限制:
默认情况下,Elasticsearch 对上传文件大小有限制,通常为 100MB。如果需要处理更大的文件,可以在 elasticsearch.yml 中配置 ingest.attachment.max_size。
性能优化:
大文件的 Base64 编码会占用较多的存储空间,建议配置 indexed_chars 参数来限制提取的字符数。
建议对文件内容使用适当的 analyzer,如 standard 或 english 分析器,以提高搜索效果。
权限配置:
确保 Elasticsearch 用户具有足够的权限来使用 Ingest Pipeline。
使用 Ingest Attachment Plugin 可以大大简化对二进制文件的文本提取和索引操作,适合需要处理各种复杂格式文档的搜索需求。

 浙公网安备 33010602011771号