linux安装php7.4和nginx并安装配置wordpress
一、安装php
centos7系统下使用yum安装php7.4正式版,当前基于WLNMP提供的一键安装包来安装
1、添加epel源
yum install epel-release
2、添加WLNMP一键安装包源
rpm -ivh http://mirrors.wlnmp.com/centos/wlnmp-release-centos.noarch.rpm
3、安装php7.4
yum clean all
yum install wphp74
在centos7系统安装完php7.4,默认会通过php-fpm方式自动启动,并且已经设置好了开机自启,只需要配置下nginx即可。
二、安装nginx
1、配置nginx
- 如果使用WLNMP提供的nginx,只需要在安装后取消include enable-php71.conf;注释即可
WLNMP安装nginx方法
yum install wnginx
- 如果当前使用的是非WLNMP提供的nginx,只需要在nginx中配置以下内容即可
location ~ [^/]\.php(/|$)
        {
            try_files $uri =404;
            fastcgi_pass  unix:/tmp/php-fpm74.sock;
            fastcgi_index index.php;
            include fastcgi.conf;
        }
三、安装wordpress
去官网下载最新的wordpress包并解压上传到ng配置的站点根目录即可,安装好后访问wordpress文章可能会出现“File note found”,
出现此问题有可能的原因
- 目录权限:根目录权限和访问文件的权限
- Nginx中root配置的位置
加上这一行
try_files $uri $uri/ /index.php?q=$uri&$args;
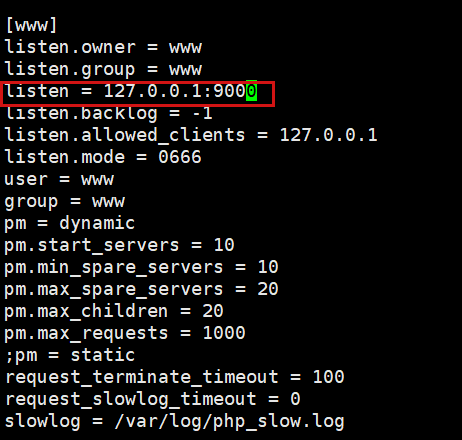
四、php-fpm启动以后,没有出现9000端口
vim /usr/local/php/etc/php-fpm.conf

把listen这一行改一下即可
五、ng配置
# wordpress ng 配置
    server {
        listen       80;
        server_name  ww.xxx.com;
        root  /usr/local/xxxx;
        location / {
            root /usr/local/xxxx;
            index  index.html index.htm index.php;
            try_files $uri $uri/ /index.php?q=$uri&$args;
        }

        # PHP 脚本请求全部转发到 FastCGI处理. 使用FastCGI协议默认配置.
        # Fastcgi服务器和程序(PHP,Python)沟通的协议.
        location ~ \.php$ {
            # 设置脚本文件请求的路径
            fastcgi_param SCRIPT_FILENAME $document_root$fastcgi_script_name;
            # 设置监听端口
            fastcgi_pass localhost:9000;
            # fastcgi_pass unix:/run/php-fpm/www.sock;
            # 设置nginx的默认首页文件(上面已经设置过了,可以删除)
            fastcgi_index index.php;
            # 引入fastcgi的配置文件
            include fastcgi_params;
        }
    }


【推荐】国内首个AI IDE,深度理解中文开发场景,立即下载体验Trae
【推荐】编程新体验,更懂你的AI,立即体验豆包MarsCode编程助手
【推荐】抖音旗下AI助手豆包,你的智能百科全书,全免费不限次数
【推荐】轻量又高性能的 SSH 工具 IShell:AI 加持,快人一步
· 分享一个免费、快速、无限量使用的满血 DeepSeek R1 模型,支持深度思考和联网搜索!
· 基于 Docker 搭建 FRP 内网穿透开源项目(很简单哒)
· ollama系列01:轻松3步本地部署deepseek,普通电脑可用
· 按钮权限的设计及实现
· 25岁的心里话