

java web使用WebSocket
一.WebSocket是什么
1.概念
WebSocket协议是基于TCP的一种新的网络协议,它实现了浏览器与服务器双全工(full-duplex)通信——允许服务器主动发送信息给客户端。
2.实现原理
在实现WebSocket连线过程中,需要通过浏览器发出WebSocket连线请求,然后服务器发出回应,这个过程通常称为“握手”。在WebSocket API,浏览器和服务器只需要做一个握手的动作,然后浏览器和服务器之间就形成了一条快速通道,两者间就可以直接互相传送数据。

二.在java web使用WebSocket
1.创建一个jsp项目
往简单来说,就是用idea创建一个maven项目 ,add support为web application的项目。
2.maven添加WebSocket库
<dependencies>
    <dependency>
        <groupId>javax.websocket</groupId>
        <artifactId>javax.websocket-api</artifactId>
        <version>1.1</version>
        <scope>provided</scope>
    </dependency>
</dependencies>
3.声明WebSocket类

import javax.websocket.*;
import javax.websocket.server.PathParam;
import javax.websocket.server.ServerEndpoint;
import java.io.IOException;

@ServerEndpoint(value = "/websocketTest/{userId}")
public class TestWebSocket {

    private static String userId;

    //连接时执行
    @OnOpen
    public void onOpen(@PathParam("userId") String userId, Session session) throws IOException {
        this.userId = userId;
        System.out.println("新连接:" + userId);
    }

    //关闭时执行
    @OnClose
    public void onClose() {
        System.out.println("连接:" + this.userId + " 关闭");
    }

    //收到消息时执行
    @OnMessage
    public void onMessage(String message, Session session) throws IOException {
        System.out.println("收到用户" + this.userId + "的消息" + message);
        session.getBasicRemote().sendText("收到 " + this.userId + " 的消息 "); //回复用户
    }

    //连接错误时执行
    @OnError
    public void onError(Session session, Throwable error) {
        System.out.println("用户id为:" + this.userId + "的连接发送错误");
        error.printStackTrace();
    }
}
使用@ServerEndpoint来声明接口:@serverEndpoint(value=“/websocket/{paraName}”);其中“{}”用来表示带参数的连接,如果需要获取{}参数,可以在方法中添加@PathParam("paraName") 。连接地址格式为:ws://localhost:8080/projectName/websocket/abc。
Session代表的是两个WebSocket端点的会话。当WebSocket握手成功后,WebSocket就会提供一个打开的session,可以通过这个session来对另一个端点发送数据。如果这个session关闭了,那发送数据将会报错。
4.前端代码
<!DOCTYPE html>
<html>
<head>
  <meta charset="UTF-8">
  <title></title>
</head>
<body>
websocket Demo---- user000 <br />
<input id="text" type="text" />
<button onclick="send()"> Send </button>
<button   onclick="closeWebSocket()"> Close </button>
<div id="message">   </div>

<script type="text/javascript">
  //判断当前浏览器是否支持WebSocket
  if('WebSocket' in window){
    websocket = new WebSocket("ws://localhost:8080/test/websocketTest/user000");
    console.log("link success")
  }else{
    alert('Not support websocket')
  }

  //连接发生错误的回调方法
  websocket.onerror = function(){
    setMessageInnerHTML("error");
  };

  //连接成功建立的回调方法
  websocket.onopen = function(event){
    setMessageInnerHTML("open");
  }
  console.log("-----")
  //接收到消息的回调方法
  websocket.onmessage = function(event){
    setMessageInnerHTML(event.data);
  }

  //连接关闭的回调方法
  websocket.onclose = function(){
    setMessageInnerHTML("close");
  }

  //监听窗口关闭事件,当窗口关闭时,主动去关闭websocket连接,防止连接还没断开就关闭窗口,server端会抛异常。
  window.onbeforeunload = function(){
    websocket.close();
  }

  //将消息显示在网页上
  function setMessageInnerHTML(innerHTML){
    document.getElementById('message').innerHTML += innerHTML + '<br/>';
  }

  //关闭连接
  function closeWebSocket(){
    websocket.close();
  }

  //发送消息
  function send(){
    var message = document.getElementById('text').value;
    websocket.send(message);
  }
</script>

</body>
</html>
在前端打开WebSocket,根据地址和后端交互。
websocket = new WebSocket("ws://localhost:8080/test/websocketTest/user000");
注意上面这一段中的test是这个项目在tomcat设置的启动地址名称。
5.测试运行
在浏览器打开页面后,就立即进行了连接。建立了连接,在前端发送数据,然后就接收到后端返回的信息。
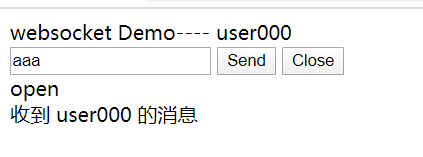
在后端可以看到连接的建立和接收到的信息。

三.总结
1.WebSocket建立连接后,通信就是全双工模式,客户端和服务端就可以在任何时间里自由发送数据。适合于服务端要主动推送实时数据的场景。


【推荐】国内首个AI IDE,深度理解中文开发场景,立即下载体验Trae
【推荐】编程新体验,更懂你的AI,立即体验豆包MarsCode编程助手
【推荐】抖音旗下AI助手豆包,你的智能百科全书,全免费不限次数
【推荐】轻量又高性能的 SSH 工具 IShell:AI 加持,快人一步
· 10年+ .NET Coder 心语,封装的思维:从隐藏、稳定开始理解其本质意义
· .NET Core 中如何实现缓存的预热?
· 从 HTTP 原因短语缺失研究 HTTP/2 和 HTTP/3 的设计差异
· AI与.NET技术实操系列:向量存储与相似性搜索在 .NET 中的实现
· 基于Microsoft.Extensions.AI核心库实现RAG应用
· TypeScript + Deepseek 打造卜卦网站:技术与玄学的结合
· 阿里巴巴 QwQ-32B真的超越了 DeepSeek R-1吗?
· 【译】Visual Studio 中新的强大生产力特性
· 10年+ .NET Coder 心语 ── 封装的思维:从隐藏、稳定开始理解其本质意义
· 【设计模式】告别冗长if-else语句:使用策略模式优化代码结构