Java笔记 - 线程与并行API
一、线程简介
1、线程与进程
每个进程都具有独立的代码和数据空间,进程间的切换会有较大的开销。线程是轻量级的进程,同一类线程共享代码和数据空间,每个线程有独立的运行栈和程序计数器(PC),线程切换的开销小。
多进程:在操作系统中能同时运行多个任务(程序)
多线程:在同一应用程序中有多个顺序流同时执行
2、线程的应用
二、线程状态控制
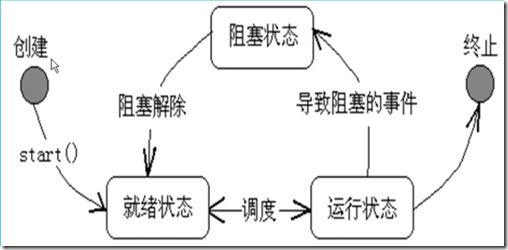
线程具有创建、就绪、运行、阻塞、终止,五种状,详细的状态转换如下图所示:
1、线程的创建与启动
JVM启动时会有一个由主方法所定义的线程,程序员可以通过实现 Runable接口的类 或 Thread类 的实例创建新的线程,每个线程对象都是通过方法run()来完成其操作,通过start()方法来启动一个线程。
(1)定义线程类实现Runable接口【建议】
使用Runable接口可以更灵活的定义多线程,如:为多个线程提供共享的数据(线程同步问题),另外,在实现Runable接口的类的run方法定义中可以使用Thread的静态方法。
  1 public class Main {
  2 	public static void main(String args[]) {
  3 		Runner1 r = new Runner1();
  4 		Thread t = new Thread(r);
  5
  6 		t.start();//r.run()是方法调用,而非线程启动
  7
  8 		for(int i=0; i<100; i++) {
  9 			System.out.println("Main Thread:------" + i);
 10 		}
 11 	}
 12 }
 13
 14 //同一个Runable可以创建多个Thread
 15 class Runner1 implements Runnable {
 16 	public int a = 0;
 17 	public void run() {//定义线程体
 18 		for(int i=0; i<100; i++) {
 19 			System.out.println("Runner1 :" + i);
 20 		}
 21 	}
 22 }
(2)定义Thread的子类,并重写run()方法
  1 public class Main {
  2 	public static void main(String args[]) {
  3
  4 		Runner1 r = new Runner1();
  5 		r.start();
  6
  7 		for(int i=0; i<100; i++) {
  8 			System.out.println("Main Thread:------" + i);
  9 		}
 10 	}
 11 }
 12
 13 //Thread类已经实现了Runable接口
 14 class Runner1 extends Thread {
 15 	public void run() {
 16 		for(int i=0; i<100; i++) {
 17 			System.out.println("Runner1 :" + i);
 18 		}
 19 	}
 20 }
 21
(3)如何关闭一个线程
  1 public class Main {
  2 	public static void main(String args[]){
  3 		Runner r = new Runner();
  4        	Thread t = new Thread(r);
  5         t.start(); //线程启动
  6
  7         for(int i=0;i<10;i++){
  8         	if(i%2==0 & i>0)
  9         		System.out.println("in thread main i=" + i);
 10         }
 11         System.out.println("Thread main is over");
 12
 13         //stop()与interrupt()会立即关闭线程,造成正在打开的资源无法关闭,不建议使用
 14         r.shutDown();
 15     }
 16 }
 17 //设置flag标志位,表示线程是否关闭
 18 class Runner implements Runnable {
 19   private boolean flag=true;
 20
 21 	public void run() {
 22 		int i = 0;
 23 		while (flag==true) {
 24 			System.out.println(" " + i++);
 25 		}
 26 	}
 27
 28   public void shutDown() {
 29 		flag = false;
 30   }
 31 }
2、线程的基本操作
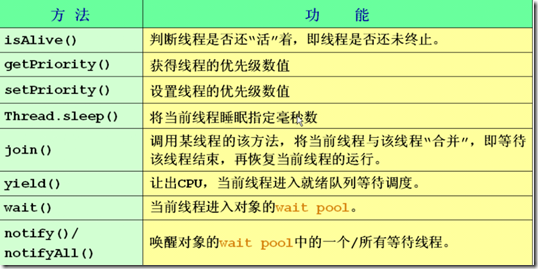
线程控制基本方法如下:
(1)线程优先级
JAVA提供一个线程调度器来监视程序中启动后进入就绪状态的所有线程。线程调度器按照线程的优先级决定调度那个线程来执行。线程的优先级用户数字表示,范围从1到10,线程的缺省优先级是5。
Thread.MIN_PRIORITY = 1
Thread.NORM_PRIORITY = 5
Thread.MAX_PRIORITY = 10
  1 public class Main {
  2 	public static void main(String[] args) {
  3 		Thread t1 = new Thread(new T1());
  4 		Thread t2 = new Thread(new T2());
  5
  6 		System.out.println(t1.getPriority()); //获取线程对象的优先级
  7 		t1.setPriority(Thread.NORM_PRIORITY + 3);//设置线程对象的优先级
  8 		t1.start();
  9 		t2.start();
 10 	}
 11 }
 12
 13 class T1 implements Runnable {
 14 	public void run() {
 15 		for(int i=0; i<100; i++) {
 16 			System.out.println("T1: " + i);
 17 		}
 18 	}
 19 }
 20
 21 class T2 implements Runnable {
 22 	public void run() {
 23 		for(int i=0; i<100; i++) {
 24 			System.out.println("------T2: " + i);
 25 		}
 26 	}
 27 }
(2)线程wait与sleep方法
wait是Object的方法,调用wait方法时必须锁定对象,wait时别的线程可以访问锁定的对象,wait需要notify或notifyALL方法唤醒。
sleep是Thread静态方法,sleep时别的方法不能访问锁定的对象,sleep方法等睡眠时间到了,可以自己苏醒。
  1 import java.util.*;
  2 public class Main {
  3   public static void main(String[] args) {
  4     MyThread thread = new MyThread();
  5     thread.start();//每隔一秒输出一次时间
  6
  7     try {
  8     	//在未继承Thread类的方法在可以调用Thread的静态方法sleep暂停进程
  9     	Thread.sleep(10000);
 10     	} catch (InterruptedException e) {
 11     		e.printStackTrace();
 12     	}//主线程等待10s
 13
 14     thread.interrupt();//不建议使用interrupt和stop
 15   }
 16 }
 17
 18 class MyThread extends Thread {
 19 	boolean flag = true;
 20 	public void run(){
 21 		while(flag){
 22 			//若调用该线程的主线程还“活着”
 23 			if(Thread.currentThread().isAlive()) {
 24 				System.out.println("==="+new Date()+"===");
 25 			}
 26
 27 			try {
 28 	                //public static sleep(long millis)throw InterruptedException
 29 			//使得当前线程休眠,暂停执行millis毫秒
 30 				sleep(1000); //1000毫秒,即1s
 31 			} catch (InterruptedException e) {
 32 				//重写的方法不能抛出比被重写的方法不同的异常
 33 				//此处只能写try catch,不能写throws
 34 				return;
 35 			}
 36 		}
 37 	}
 38 }
(3)线程合并
  1 public class Main {
  2   public static void main(String[] args) {
  3     MyThread2 t1 = new MyThread2("myThread");
  4     t1.start();
  5     try {
  6     	t1.join();
  7     } catch (InterruptedException e) {}
  8
  9     for(int i=1;i<=3;i++){
 10       System.out.println("i am main thread");
 11     }
 12   }
 13 }
 14 class MyThread2 extends Thread {
 15   MyThread2(String s){
 16   	super(s);//设置当前线程名为 s
 17   }
 18
 19   public void run(){
 20     for(int i =1;i<=3;i++){
 21       System.out.println("i am "+getName());//输出线程名
 22     }
 23   }
 24 }//线程合并结果,相当于方法调用
三、线程同步与死锁
1、线程同步
Java引入了对象互斥锁的概念,使用synchronized修饰符修饰方法和代码块,表明在某一时间段内,只能有一个线程访问被锁住的同步对象或同步方法,以保证共享数据的完整性;但其他线程仍可以访问没有锁定的方法,所以,要想保证数据同步,需将所有改变该属性值的方法都加锁,但锁加的越多,执行效率会被降低。建议对于读属性的方法无需加锁 。
  1 public class Main implements Runnable {
  2
  3 	private static int num = 100;
  4
  5 	public static void main(String[] args) throws Exception {
  6 		Main test = new Main();
  7 	    Thread t1 = new Thread(test);
  8 	    Thread t2 = new Thread(test);
  9 	    //设置线程名字
 10 	    t1.setName("t1");
 11 	    t2.setName("t2");
 12 	    //启动线程
 13 	    t1.start();
 14 	    t2.start();
 15
 16 	   // test.m2();//使t1和t2同步
 17 	   // test.m3();//使t1、t2和主线程 同步
 18 	   // System.out.println("Main"+" : "+(num));
 19 	}
 20 	 //在某一时间段,保证只有一个线程访问被锁住的方法
 21 	public synchronized void m1(){
 22 		//若不使用死锁,num++和num输出 的原子性过程可能会打断,结果是都是102或101
 23 		num++;
 24 		System.out.println(Thread.currentThread().getName() +": "+ num);
 25 	}
 26
 27 	//其他线程仍可以访问没有锁定的方法,导致数据有可能不同步
 28 	public  void m2() {
 29 		num++;
 30 	}
 31
 32 	//要想保证数据同步,需将所有改变该属性值的方法都加锁
 33 	public  void m3() {
 34 		synchronized (this) {//互斥锁
 35 			num++;
 36 		}
 37 	  }
 38
 39 	public void run() {
 40 		try {
 41 			m1();
 42 		} catch(Exception e) {
 43 			e.printStackTrace();
 44 		}
 45 	}
 46 }
2、线程死锁
(1)死锁实例
  1 public class Main  implements Runnable {
  2 	public int flag = 1;
  3 	static Object o1 = new Object(), o2 = new Object();
  4
  5 	public static void main(String[] args) {
  6 		Main td1 = new Main();
  7 		Main td2 = new Main();
  8 		td1.flag = 1;
  9 		td2.flag = 0;
 10 		Thread t1 = new Thread(td1);
 11 		Thread t2 = new Thread(td2);
 12 		t1.start();
 13 		t2.start();
 14 	}
 15
 16 	public void run() {
 17 		System.out.println("flag=" + flag);
 18 		if(flag == 1) {
 19 			synchronized(o1) {
 20 				try {
 21 					Thread.sleep(500);
 22 				} catch (Exception e) {
 23 					e.printStackTrace();
 24 				}
 25 				synchronized(o2) {
 26 					System.out.println("1");
 27 				}
 28 			}
 29 		}
 30 		if(flag == 0) {
 31 			synchronized(o2) {
 32 				try {
 33 					Thread.sleep(500);
 34 				} catch (Exception e) {
 35 					e.printStackTrace();
 36 				}
 37 				synchronized(o1) {
 38 					System.out.println("0");
 39 				}
 40 			}
 41 		}
 42 	}
 43 }
四、经典同步问题
1、生产者消费者
  1
  2 public class Main {
  3 	public static void main(String[] args) {
  4 		SyncStack ss = new SyncStack();
  5
  6 		//生成者
  7 		Producer p = new Producer(ss);
  8 		new Thread(p).start();
  9
 10 		//消费者
 11 		Consumer c = new Consumer(ss);
 12 		new Thread(c).start();
 13 	}
 14 }
 15
 16 class WoTou {
 17 	int id;
 18 	WoTou(int id) {
 19 		this.id = id;
 20 	}
 21 	public String toString() {
 22 		return "WoTou : " + id;
 23 	}
 24 }
 25
 26 //支持多线程同步操作的堆栈的实现
 27 class SyncStack {
 28 	private int index = 0;
 29 	private WoTou[] arrWT = new WoTou[6];
 30
 31 	public synchronized void push(WoTou wt) {
 32 		while(index == arrWT.length) {
 33 			try {
 34 				//Object的wait只能在synchronized修饰的方法中使用
 35 				//让当前正在访问的线程wait
 36 				this.wait();
 37 			} catch (InterruptedException e) {
 38 				e.printStackTrace();
 39 			}
 40 		}
 41 		this.notifyAll();//唤醒所有线程,此处也可使用notify()唤醒一个线程;
 42
 43 		arrWT[index] = wt;
 44 		index ++;
 45 	}
 46
 47 	public synchronized WoTou pop() {
 48 		//不能写if,在发生异常后还需在判断index值
 49 		while(index == 0) {
 50 			try {
 51 				this.wait();
 52 			} catch (InterruptedException e) {
 53 				e.printStackTrace();
 54 			}
 55 		}
 56 		this.notifyAll();//	notify();
 57 		index--;
 58 		return arrWT[index];
 59 	}
 60 }
 61
 62 class Producer implements Runnable {
 63 	SyncStack ss = null;
 64 	Producer(SyncStack ss) {
 65 		this.ss = ss;
 66 	}
 67
 68 	public void run() {
 69 		for(int i=0; i<20; i++) {
 70 			WoTou wt = new WoTou(i);
 71 			ss.push(wt);
 72 			System.out.println("生产了:" + wt);
 73
 74 			try {
 75 				Thread.sleep((int)(Math.random() * 200));
 76 			} catch (InterruptedException e) {
 77 				e.printStackTrace();
 78 			}
 79 		}
 80 	}
 81 }
 82
 83 class Consumer implements Runnable {
 84 	SyncStack ss = null;
 85 	Consumer(SyncStack ss) {
 86 		this.ss = ss;
 87 	}
 88
 89 	public void run() {
 90 		for(int i=0; i<20; i++) {
 91 			WoTou wt = ss.pop();
 92 			System.out.println("消费了: " + wt);
 93 			try {
 94 				Thread.sleep((int)(Math.random() * 1000));
 95 			} catch (InterruptedException e) {
 96 				e.printStackTrace();
 97 			}
 98 		}
 99 	}
100 }


