


Spring Boot 2.x快速上手(九)Spring Boot与MyBatis整合
MyBatis 是一款优秀的持久层框架,它支持定制化 SQL、存储过程以及高级映射。MyBatis 避免了几乎所有的 JDBC 代码和手动设置参数以及获取结果集。MyBatis 可以使用简单的 XML 或注解来配置和映射原生信息,将接口和 Java 的 POJOs(Plain Old Java Objects,普通的 Java对象)映射成数据库中的记录。
目录
一、Spring Boot与MyBatis整合
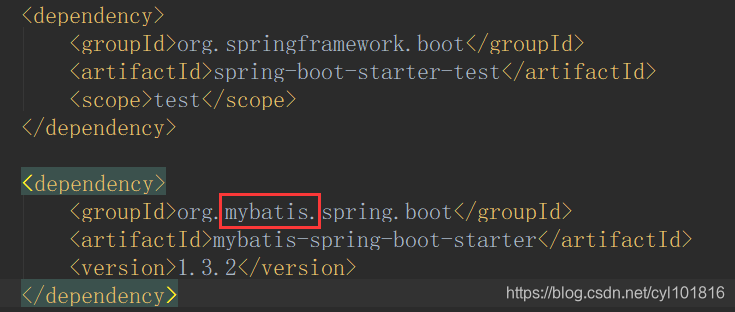
首先,创建一个新的项目,模板还是选择web和mysql,这里不选择mybatis,因为mybatis的starter不是由springframewor提供的,pom文件中的引用很显然和其他的包是由很大的区别的:
完成创建之后,我们需要在application.properties文件中进行数据源,mybatis的相关配置,当然了,配置文件中相应的包和文件都要进行创建:
#Datasource
spring.datasource.driver-class-name=com.mysql.jdbc.Driver
spring.datasource.url=jdbc:mysql://localhost:3306/scoot?useUnicode=true&characterEncoding=utf-8&serverTimezone=UTC
spring.datasource.username=root
spring.datasource.password=root

#mybatis
#Core Config File
#Start width /
mybatis.config-location=classpath:/mybatis/mybatis-config.xml
mybatis.mapper-locations=classpath:/mybatis/mapper/*.xml
接下来进行相关实体类、业务逻辑、实现类、控制类的编写:
实体类:
@Getter
@Setter
//@AllArgsConstructor
public class Emp {
    private Integer empno;
    private String ename;
    private String job;
    private Integer mgr;
    private Date hiredate;
    private Float sal;
    private Float comm;
    private Integer deptno;
}
业务逻辑接口:
public interface EmpMapper {

    public Emp findById(Integer empno);
}
实现类:
@Service
public class EmpService {
    @Resource
    private EmpMapper empMapper =null;

    public Emp findById(Integer empno){
        Emp emp = empMapper.findById(empno);
        return  emp;
    }
}
控制类:
@RestController
public class EmpController {
    @Resource
    private EmpService empService = null;

    @RequestMapping("/emp/{id}")
    public Emp  findById(@PathVariable("id") Integer id){
        Emp emp = empService.findById(id);
        return emp;
    }
}
最后进行实体类Emp类查询的mapper映射文件配置:
<!--映射文件配置,namespace指向接口-->
<mapper namespace="com.laoqi.springbootmybatis.mapper.EmpMapper">
    <select id="findById" parameterType="Integer"  resultType="com.laoqi.springbootmybatis.entity.Emp">
        select * from emp where empno = #{value}
    </select>
</mapper>
在入口类中添加包的扫描,然后启动测试即可:
@MapperScan("com.laoqi.springbootmybatis.mapper")测试结果:

二、MyBatis数据查询
下面以具体的一个查询数据案例举例说明,编写一个具体的案例查询语句:
select * from emp e ,dept d where e.deptno = d.deptno and d.dname="RESEARCH" and e.sal >1500还是按照业务逻辑接口、实现类、控制类进行编写代码,
业务逻辑接口:
public List<Map> findDepts(Map param);实现类:
public List<Map> findDepts(String dname, Float sal) {
    Map param = new HashMap();
    param.put("pdname", dname);
    param.put("psal", sal);
    return empMapper.findDepts(param);
}
控制类:
    @RequestMapping("/emp/list")
    public List<Map> findDepts(String dname,Float sal){
        List<Map> list =  empService.findDepts(dname,sal);
        return list;
    }
最后进行mapper映射文件的配置,这里使用if语句进行条件的选择查询:
<!--  resultType 代表将查询到的每一条记录都包装为map,key值是字段名,value是字段值  -->
    <select id="findDepts"  parameterType="java.util.Map" resultType="java.util.LinkedHashMap">
        select * from emp e ,dept d where e.deptno = d.deptno
        <if test="pdname!=null" >
            and dname=#{pdname}
        </if>
        <if test="psal!=null">
            and  sal >#{psal}
        </if>
    </select>
测试结果:

三、创建数据
创建数据依旧按照举例的方式进行学习,
INSERT INTO `scoot`.`emp`(`empno`, `ename`, `job`, `mgr`, `hiredate`, `sal`, `comm`, `deptno`) VALUES (7900, 'JAMES', 'CLERK', 7698, '1981-12-03', 950.00, NULL, 30);
还是按照业务逻辑接口、实现类、控制类进行编写代码,
业务逻辑接口:
public void create(Emp emp);实现类:
    @Transactional(rollbackFor = Exception.class)
    public void create(Emp emp){
        empMapper.create(emp);
    }
控制类:
    @RequestMapping("/emp/create")
    public Emp create(){
        Emp emp = new Emp();
        emp.setSal(1000f);
        emp.setComm(0f);
        emp.setDeptno(30);
        emp.setEname("laoqi");
        emp.setHiredate(new Date());
        emp.setJob("teacher");
        emp.setMgr(null);
        empService.create(emp);
        return  emp;
    }
最后进行mapper映射文件的配置,
<insert id="create" parameterType="com.laoqi.springbootmybatis.entity.Emp">
        INSERT INTO `scoot`.`emp`(`ename`, `job`, `mgr`, `hiredate`, `sal`, `comm`, `deptno`)
        VALUES (#{ename}, #{job}, #{mgr}, #{hiredate}, #{sal}, #{comm}, #{deptno})
        <!-- 自动进行主键回填 select LAST_INSERT_ID()用于获取最新插入的id,是mysql内置函数-->
        <selectKey keyProperty="empno" keyColumn="empno" resultType="Integer" order="AFTER">
            select LAST_INSERT_ID()
        </selectKey>
    </insert>
测试结果:


四、更新与删除数据
数据的更新与删除,依旧是按照代码编写顺序就行编写就OK了,在这里不进行重复的代码粘贴了。
五、小结
SB整合mybatis还是采用添加依赖,进行简单的数据源和mybatis的相关配置即可进行使用,熟悉了对插件工具的使用,和了解这些东西的作用,提高开发效率就已经达到目的了。

 浙公网安备 33010602011771号