
30、Flask实战第30天:cms模版抽离和个人信息页面完成
cms模版抽离
新建一个cms_base.html文件作为基础模板,把cms_index.html的内容拷贝到cms_base.html中。
编辑 cms_base.html,把在不同页面会变动的部分用block包起来
标题部分
<title>{% block title %}{% endblock %}</title>
在head中再预留一个block个,因为在其他页面可能会再加载一些js或css
{% block head %}{% endblock %}
内容标题和内容
<h1>{% block page_title %}{% endblock %}</h1>
<div class="main_content">
      {% block main_content %}{% endblock %}
</div>
模板已经编辑好了,现在就可以来编辑cms_index.html了
把cms_index.html的原来内容清空,然后继承cms_base.html,在把block填进来填充自己的内容就可以了,如下


{% extends 'cms/cms_base.html' %}

{% block title %}
    CMS管理系统
{% endblock %}

{% block  page_title %}
    欢迎来到CMS管理系统
{% endblock %}


<!--因为首页这里没有其他内容,这里就不配置main_content了-->
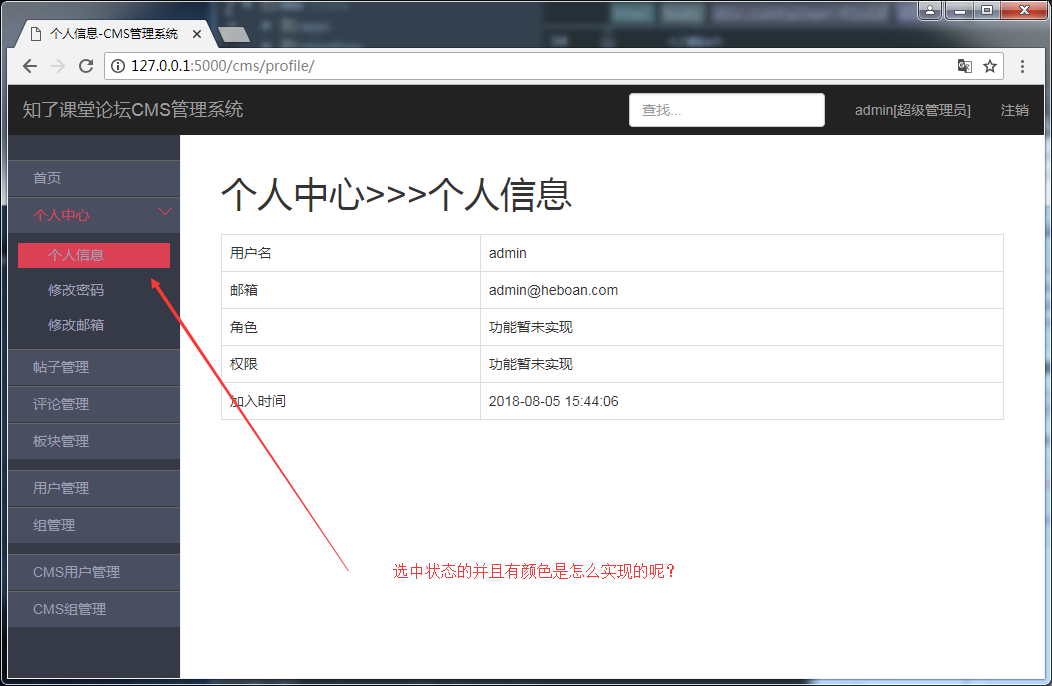
个人信息页面
创建个人信息页cms_profile.html,暂时留空即可
编辑cms.views,编写个人信息的视图
@bp.route('/profile/')
@login_required
def profile():
    return render_template('cms/cms_profile.html')
再来编辑cms_profile.html
{% extends 'cms/cms_base.html' %}

{% block title %}
    个人信息-CMS管理系统
{% endblock %}

{% block page_title %}
    个人中心>>>个人信息
{% endblock %}

{% block main_content %}
    <!--这里使用的是bootstrap的表格样式,中文网站找到'带边框的表格'-->
    <table class="table table-bordered">
        <tr>
            <td>用户名</td>
            <td>{{ g.cms_user.username }}</td>
        </tr>
        <tr>
            <td>邮箱</td>
            <td>{{ g.cms_user.email }}</td>
        </tr>
        <tr>
            <td>角色</td>
            <td>功能暂未实现</td>
        </tr>
        <tr>
            <td>权限</td>
            <td>功能暂未实现</td>
        </tr>
        <tr>
            <td>加入时间</td>
            <td>{{ g.cms_user.join_time }}</td>
        </tr>


    </table>
{% endblock %}
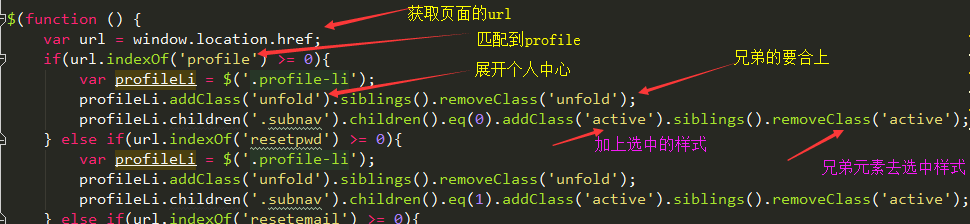
编辑cms_base.html, 把"首页"和"个人信息"的url改过来
<li class="unfold"><a href="{{ url_for('cms.index') }}">首页</a></li>
...
<li><a href="{{ url_for('cms.profile') }}">个人信息</a></li>
它是由js实现的,在cms_base.js里面
每天进步一点,加油!

 浙公网安备 33010602011771号