iOS基础 - UI布局中所体现的设计思想:复合设计模式
▶ 复合设计模式
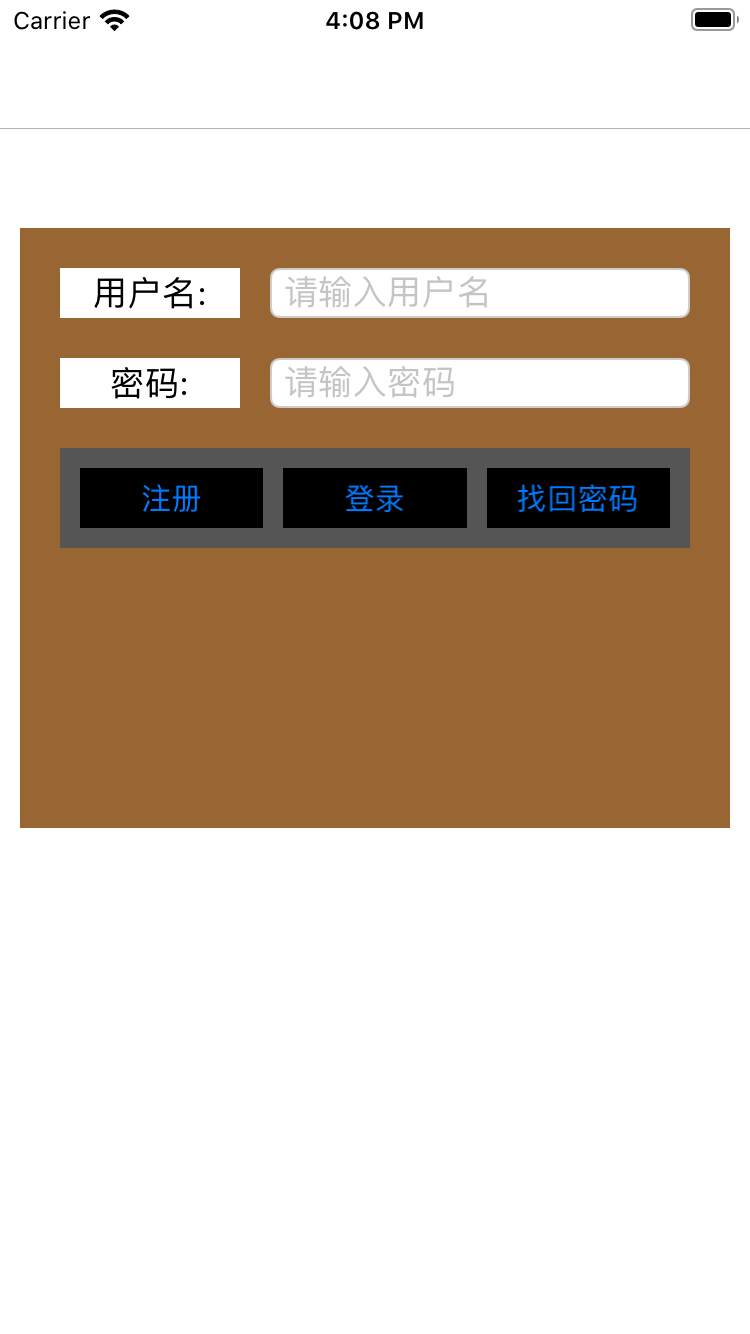
1 - 在开发时往往会需要许多零碎的小控件展示在界面上!如果需要一个,就创建一个....那么这样写出的代码太过凌乱,所以采用一种合理的设计模式是很重要。下面代码中就封装了登录页面上所涉及的控件
// - LTView.h
 1 #import <UIKit/UIKit.h>
 2 @interface LTView : UIView
 3
 4 // 方式一
 5 @property(nonatomic,strong)UILabel *titleLabel;
 6 @property(nonatomic,strong)UITextField *textField;
 7
 8 // 方式二
 9 - (id)initWithFrame:(CGRect)frame
10               title:(NSString *)title
11         placeHolder:(NSString *)placeHolder
12     secureTextEntry:(BOOL)secureTextEntry;
13
14 // 方式三:彻底封装、隐藏类内部的控件,对外提供一个接口部分(属性),通过属性赋值,修改控件的内容
15 // 核心思想: 重写 setter方法,赋值的同时做其他操作
16 @property(nonatomic,strong)NSString *title;
17 @property(nonatomic,strong)NSString *placeHolder;
18 @property(nonatomic,strong)NSString *text;
19 @property(nonatomic,assign)BOOL secureTextEntry;
20
21 @end
// - LTView.m
 1 #import "LTView.h"
 2 @implementation LTView
 3
 4 // 方式一:重写初始化方法,同时自创两个 UI
 5 -(id)initWithFrame:(CGRect)frame{
 6
 7     self = [super initWithFrame:frame];
 8     if (self) {
 9
10         // titleLabel
11         self.titleLabel = [[UILabel alloc] initWithFrame:CGRectMake(0, 0, frame.size.width / 3.5, frame.size.height)];
12         _titleLabel.backgroundColor = [UIColor whiteColor];
13         self.titleLabel.text = @"用户名:";
14         self.titleLabel.textAlignment = NSTextAlignmentCenter;
15         [self addSubview:self.titleLabel];
16
17         // textField
18         self.textField = [[UITextField alloc] initWithFrame:CGRectMake(frame.size.width / 3 + .01, 0, frame.size.width - .01 - frame.size.width / 3, frame.size.height)];
19         self.textField.borderStyle = UITextBorderStyleRoundedRect;
20         self.textField.placeholder = @"请输入用户名";
21         self.textField.clearButtonMode = UITextFieldViewModeWhileEditing;
22         [self addSubview:self.textField];
23     }
24
25     return self;
26 }
27
28 // 方式二:自定义初始化方法,创建对象的同时指定要显示的标题、内容
29 - (id)initWithFrame:(CGRect)frame
30               title:(NSString *)title
31         placeHolder:(NSString *)placeHolder
32     secureTextEntry:(BOOL)secureTextEntry{
33
34
35     self = [self initWithFrame:frame];
36
37     if (self) {
38
39         self.titleLabel.text = title;
40         self.textField.placeholder = placeHolder;
41         self.textField.secureTextEntry = secureTextEntry;
42     }
43
44     return self;
45 }
46
47 // 方式三:重写 setter
48 -(void)setTitle:(NSString *)title{
49
50     _title  = title;
51     _titleLabel.text = title;
52 }
53
54 -(void)setPlaceHolder:(NSString *)placeHolder{
55
56     _placeHolder = placeHolder;
57     _textField.placeholder = placeHolder;
58 }
59
60 - (void)setSecureTextEntry:(BOOL)secureTextEntry{
61
62     _secureTextEntry = secureTextEntry;
63     _textField.secureTextEntry = secureTextEntry;
64 }
65
66 - (void)setText:(NSString *)text{
67
68     _text = text;
69     _textField.text = text;
70 }
71
72 @end
// - ButtonView.h
1 #import <UIKit/UIKit.h>
2
3 @interface ButtonView : UIView
4
5 - (id)initWithFrame:(CGRect)frame
6              titles:(NSArray *)titles
7            selector:(NSArray *)selectors;
8
9 @end
// - ButtonView.m
 1 #import "ButtonView.h"
 2 #define KSpace 10
 3 @implementation ButtonView
 4 - (id)initWithFrame:(CGRect)frame
 5              titles:(NSArray *)titles
 6            selector:(NSArray *)selectors{
 7
 8     self = [super initWithFrame:frame];
 9     if (self) {
10         for (int i = 0 ; i < titles.count; i ++) {
11             // 创建 Btn
12             UIButton *button = [UIButton buttonWithType:UIButtonTypeSystem];
13             CGFloat btWidth = (frame.size.width - KSpace) / titles.count - KSpace;
14             button.frame = CGRectMake(KSpace * (i + 1) + btWidth * i , 10, btWidth, 30);
15
16             NSString *selString = [selectors objectAtIndex:i];
17             SEL sel = NSSelectorFromString(selString);
18             button.backgroundColor = [UIColor blackColor];
19             [button setTitle:[titles objectAtIndex:i] forState:UIControlStateNormal];
20
21             [button addTarget:self action:sel forControlEvents:UIControlEventTouchUpInside];
22             [self addSubview:button];
23         }
24     }
25     return self;
26 }
27
28 - (void)doRegister{
29     NSLog(@"注册");
30 }
31 - (void)doLogin{
32     NSLog(@"登录");
33 }
34 - (void)searchPassword{
35     NSLog(@"找回密码");
36 }
37
38 @end
// - LoginView.h
1 #import <UIKit/UIKit.h>
2 @class LTView;
3 @interface LoginView : UIView
4
5 @property (nonatomic,strong) LTView *nameView;
6 @property (nonatomic,strong) LTView *passwordView;
7
8
9 @end
// - LoginView.m
 1 #import "LoginView.h"
 2 #import "ButtonView.h"
 3 #import "LTView.h"
 4
 5 #define KTopMargin 20
 6 #define KLeftMargin 20
 7 #define KSpace 20
 8 #define KLTViewHeight 50
 9 @implementation LoginView
10
11 - (id)initWithFrame:(CGRect)frame{
12
13     self = [super initWithFrame:frame];
14     if (self) {
15
16         // 用户名:方式一
17         self.nameView = [[LTView alloc] initWithFrame:CGRectMake(KLeftMargin, KTopMargin, frame.size.width - KLeftMargin * 2, KLTViewHeight/2.0)];
18         [self addSubview:self.nameView];
19
20         // 密码:方式一
21         self.passwordView = [[LTView alloc] initWithFrame:CGRectMake(self.nameView.frame.origin.x, self.nameView.frame.origin.y + self.nameView.frame.size.height + KSpace, self.nameView.frame.size.width, self.nameView.frame.size.height)];
22         // 方式三
23         self.passwordView.title = @"密码:";
24         self.passwordView.placeHolder = @"请输入密码";
25         self.passwordView.secureTextEntry = YES;
26         [self addSubview:self.passwordView];
27
28         // Btn
29         NSArray *titlesArray = [NSArray arrayWithObjects:@"注册",@"登录",@"找回密码", nil];
30         NSArray *selectorsArray = [NSArray arrayWithObjects:@"doRegister",@"doLogin",@"searchPassword", nil];
31         ButtonView *buttonView = [[ButtonView alloc]initWithFrame:CGRectMake(KLeftMargin, self.passwordView.frame.origin.y + KSpace +self.passwordView.frame.size.height, frame.size.width - KLeftMargin * 2, KLTViewHeight) titles:titlesArray selector:selectorsArray];
32         buttonView.backgroundColor = [UIColor darkGrayColor];
33         [self addSubview:buttonView];
34     }
35
36     return self;
37 }
38
39 @end
// - ViewController.m
 1 #import "ViewController.h"
 2 #import "LTView.h"
 3 #import "LoginView.h"
 4 @interface ViewController ()
 5 @property (retain, nonatomic) LoginView * loginView;
 6
 7 @end
 8
 9 @implementation ViewController
10
11 - (void)viewDidLoad {
12     [super viewDidLoad];
13
14 //    // 方式一:输入用户名
15 //    LTView *lt01 = [[LTView alloc] initWithFrame:CGRectMake(20, 50, self.view.frame.size.width-60, 40)];
16 //    [lt01 setBackgroundColor:[UIColor blackColor]];
17 //    [self.view addSubview:lt01];
18
19 //    // 方式二:输入用户密码
20 //    LTView *lt02 = [[LTView alloc] initWithFrame:CGRectMake(20, 120, self.view.frame.size.width-60, 40) title:@"密码:" placeHolder:@"请输入密码" secureTextEntry:YES];
21 //    lt02.backgroundColor = [UIColor blackColor];
22 //    [self.view addSubview:lt02];
23
24
25     // 方式三:封装了用户名、用户密码、注册、登录、找回密码 等控件
26     self.loginView = [[LoginView alloc] initWithFrame:CGRectMake(10, 50, self.view.frame.size.width-20, 300)];
27     self.loginView.backgroundColor = [UIColor brownColor];
28     [self.view addSubview:self.loginView];
29 }
30
31 @end
运行效果

 浙公网安备 33010602011771号