
UI基础 - convertPoint:和convertRect: | 当子视图超出父视图时如何响应
■ 坐标转换
1. convertPoint: 和 convertRect: 两方法是分别将 point、rect 从目标视图中转换到当前视图里,并返回在当前视图中的像素值。注:fromView、toView 参数如果是 nil,那么其缺省值是 self.view.window
2. 代码示例

 1     // 红色视图
 2     UIView *redView = [[UIView alloc] initWithFrame:CGRectMake(0, 100, 280, 200)];
 3     redView.backgroundColor = [UIColor redColor];
 4     [self.view addSubview:redView];
 5
 6     // 蓝色视图
 7     UIView *blueView = [[UIView alloc] initWithFrame:CGRectMake(0, 320, 100, 80)];
 8     blueView.backgroundColor = [UIColor blueColor];
 9     [self.view addSubview:blueView];
10
11     // 灰色视图:红色视图的子视图
12     UIView *grayView = [[UIView alloc] initWithFrame:CGRectMake(30, 50, 140, 100)];
13     grayView.backgroundColor = [UIColor grayColor];
14     [redView addSubview:grayView];
15
16     // ---------------- fromView -----------------
17     CGPoint newPointI = [self.view convertPoint:grayView.center fromView:redView];
18     NSLog(@"redView 的子视图 grayView 相对于在 self.view 中的中心位置:%@",NSStringFromCGPoint(newPointI));// {100, 200}
19     // {30 + 140/2.0,  100 + 50 + 100/2.0}
20
21
22     CGRect newRectI = [self.view convertRect:grayView.frame fromView:redView];
23     NSLog(@"redView 的子视图 grayView 相对于在 self.view 中的位置:%@",NSStringFromCGRect(newRectI));// {{30, 150}, {140, 100}}
24     // {{30, 100 + 50}, {140, 100}}
25
26     CGRect newRectII = [grayView convertRect:CGRectMake(50, 50, 20, 20) fromView:blueView];
27     NSLog(@"blueView 内的 CGRect 相对于在 grayView 中的位置:%@",NSStringFromCGRect(newRectII));    // {{20, 220}, {20, 20}}
28     // {{-30 + 50, -(100 + 50) + 320 + 50}, {20, 20}}
29
30     // ------------------- toView -------------------
31     CGPoint newPointIV  = [redView convertPoint:grayView.center toView:self.view];
32     NSLog(@"redView 的子视图 grayView 相对于在 self.view 中的中心位置:%@",NSStringFromCGPoint(newPointIV));// {100, 200}
33
34     CGRect newRectV = [redView convertRect:grayView.frame toView:self.view];
35     NSLog(@"redView 的子视图 grayView 相对于在 self.view 中的位置:%@",NSStringFromCGRect(newRectV));// {{30, 150}, {140, 100}}
36
37     CGRect newRectIVI = [blueView convertRect:CGRectMake(50, 50, 20, 20) toView:grayView];
38     NSLog(@"blueView 内的 CGRect 相对于在 grayView 中的位置:%@",NSStringFromCGRect(newRectIVI));   // {{20, 220}, {20, 20}}
■ 应用场景
1. 我们知道 UIButton 超出父视图的部分是无法响应事件的....... 如何使其超出父视图的部分,同样可以响应触摸事件?我们知道 UIView 提供了两个方法来确定响应者
- (UIView *)hitTest:(CGPoint)point withEvent:(UIEvent *)event;
- (BOOL)pointInside:(CGPoint)point withEvent:(UIEvent *)event;
每次点击 View 时,两个方法各会调用两次:分别是入栈、出栈操作。注:superView 先入栈,其调用时机分别是消息传递时、响应时
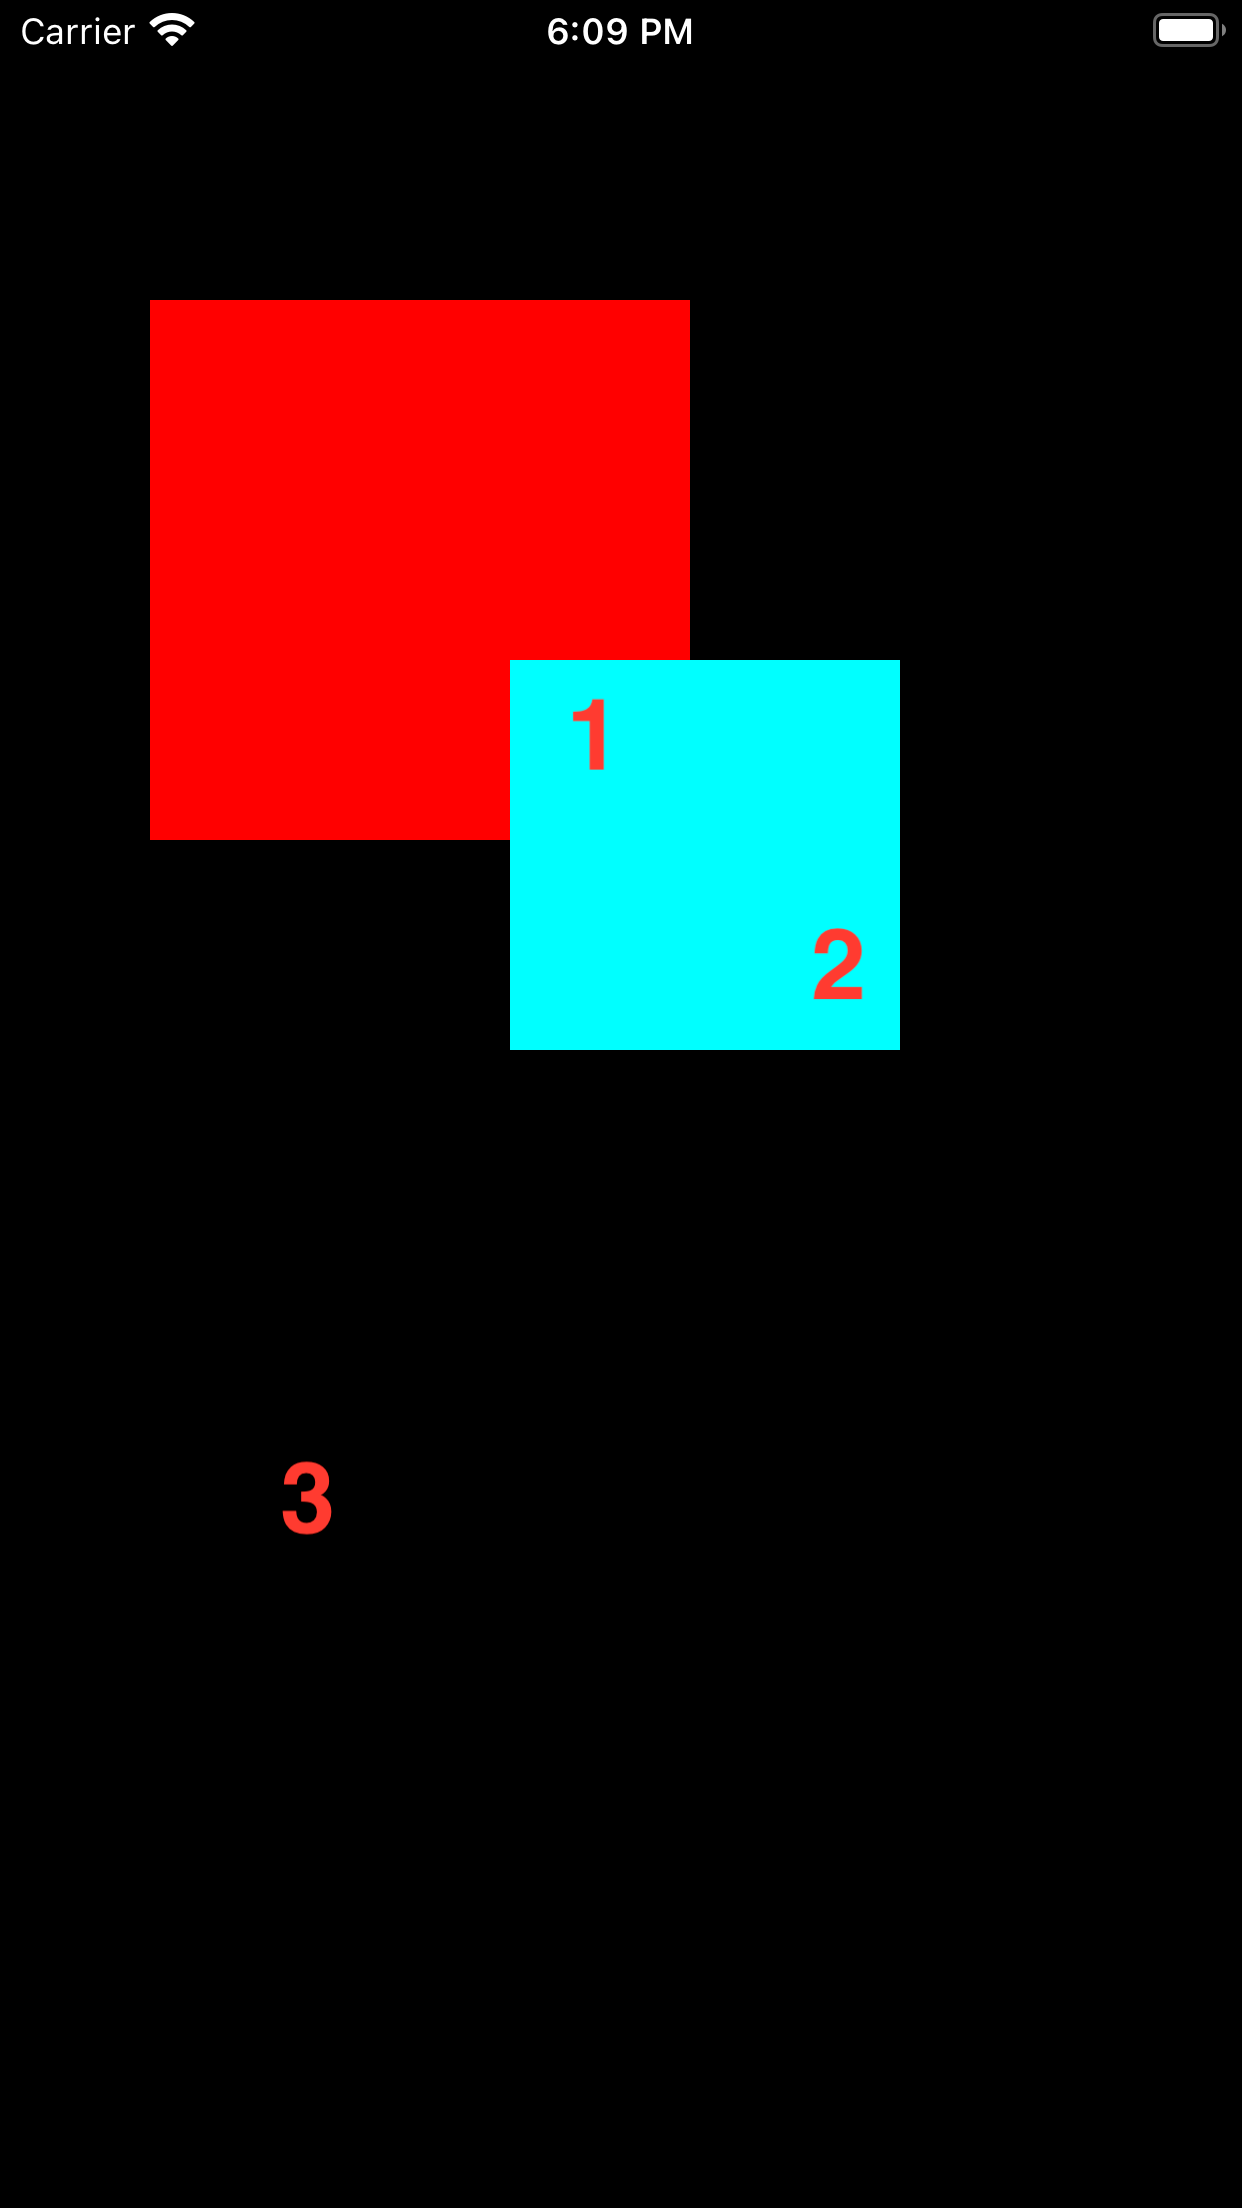
2. 在 RedView 上面添加一个超出其范围的 Btn,当我们点击超出范围的区域时,同样可以触发 Btn 绑定的方法
// - RedView.m
 1 #import "RedView.h"
 2
 3 @implementation RedView
 4
 5 // 是否能接受触摸事件
 6 -(UIView*)hitTest:(CGPoint)point withEvent:(UIEvent *)event{
 7
 8     UIView *view = [super hitTest:point withEvent:event];
 9     NSLog(@"%s---%@",__FUNCTION__,view);// 超出 self 的点击区域会返回 nil
10     // 在这里我们通过判断 nil 的值,就可以找到超出 self 范围的子视图
11     if (view == nil) {
12         for (UIView *subView in self.subviews) {
13             // subView 就是 testBtn
14             CGPoint convertPoint = [subView convertPoint:point fromView:self];// 坐标转换
15             if (CGRectContainsPoint(subView.bounds, convertPoint)) {
16                 view = subView;
17             }
18         }
19     }
20     return view;
21 }
22
23 // 触摸点是否在自己身上
24 -(BOOL)pointInside:(CGPoint)point withEvent:(UIEvent *)event{
25
26     NSLog(@"pointInside:%@",[super pointInside:point withEvent:event]?@"yes":@"no");
27     return [super pointInside:point withEvent:event];
28 }
29
30 @end
// - ViewController.m
 1 #import "ViewController.h"
 2 #import "RedView.h"
 3
 4 @implementation ViewController
 5
 6 - (void)viewDidLoad {
 7     [super viewDidLoad];
 8     self.view.backgroundColor = [UIColor blackColor];
 9
10     // 父视图 RedView
11     RedView *redView = [[RedView alloc] initWithFrame:CGRectMake(50, 100, 180, 180)];
12     redView.backgroundColor = [UIColor redColor];
13     [self.view addSubview:redView];
14
15     // 子视图 Btn
16     UIButton *testBtn = [UIButton buttonWithType:UIButtonTypeCustom];
17     testBtn.frame = CGRectMake(120, 120, 130, 130);
18     testBtn.backgroundColor = [UIColor cyanColor];
19     [redView addSubview:testBtn];
20     [testBtn addTarget:self action:@selector(makeClick) forControlEvents:UIControlEventTouchUpInside];
21
22 }
23
24 // Btn 超出父视图范围,但是同样可以触发该方法
25 -(void)makeClick{
26
27     NSLog(@"%s",__func__);
28 }
29
30 @end
运行效果
日志信息
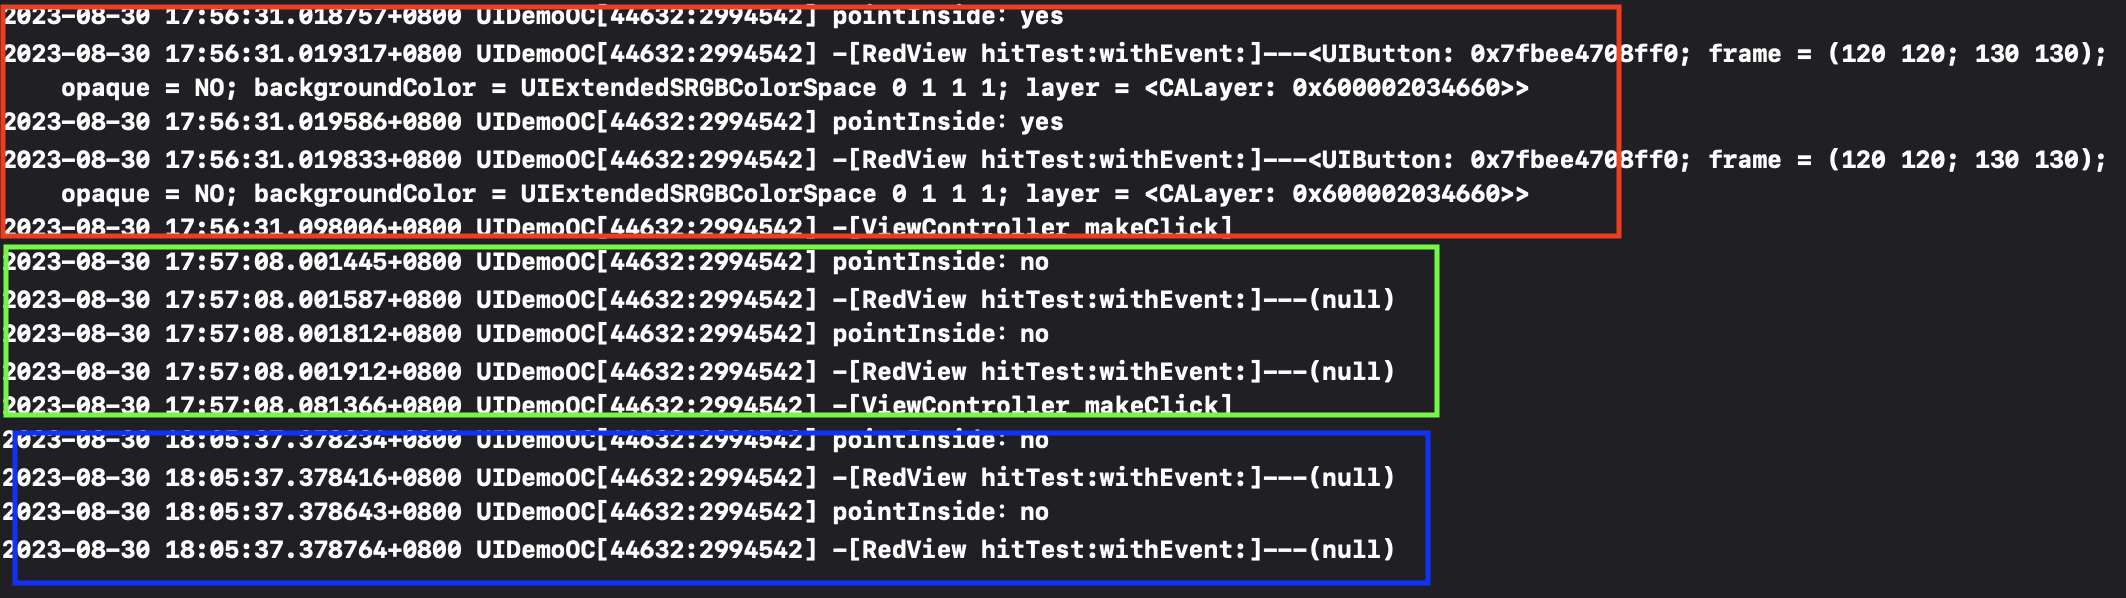
红色框:鼠标点击在 1 处的日志,makeClick: 方法触发
绿色框:鼠标点击在 2 处的日志,makeClick: 方法同样会触发
蓝色框:鼠标点击在 3 处的日志,makeClick: 方法不会触发
分类:
UI章节


【推荐】国内首个AI IDE,深度理解中文开发场景,立即下载体验Trae
【推荐】编程新体验,更懂你的AI,立即体验豆包MarsCode编程助手
【推荐】抖音旗下AI助手豆包,你的智能百科全书,全免费不限次数
【推荐】轻量又高性能的 SSH 工具 IShell:AI 加持,快人一步
· AI与.NET技术实操系列:向量存储与相似性搜索在 .NET 中的实现
· 基于Microsoft.Extensions.AI核心库实现RAG应用
· Linux系列:如何用heaptrack跟踪.NET程序的非托管内存泄露
· 开发者必知的日志记录最佳实践
· SQL Server 2025 AI相关能力初探
· 震惊!C++程序真的从main开始吗?99%的程序员都答错了
· 【硬核科普】Trae如何「偷看」你的代码?零基础破解AI编程运行原理
· 单元测试从入门到精通
· 上周热点回顾(3.3-3.9)
· winform 绘制太阳,地球,月球 运作规律