SpringBoot:员工管理系统(业务)
7、登录
业务流程
- 在
index.html页,输入用户名和密码,点击登录;- 发起请求,对用户名密码进行判断
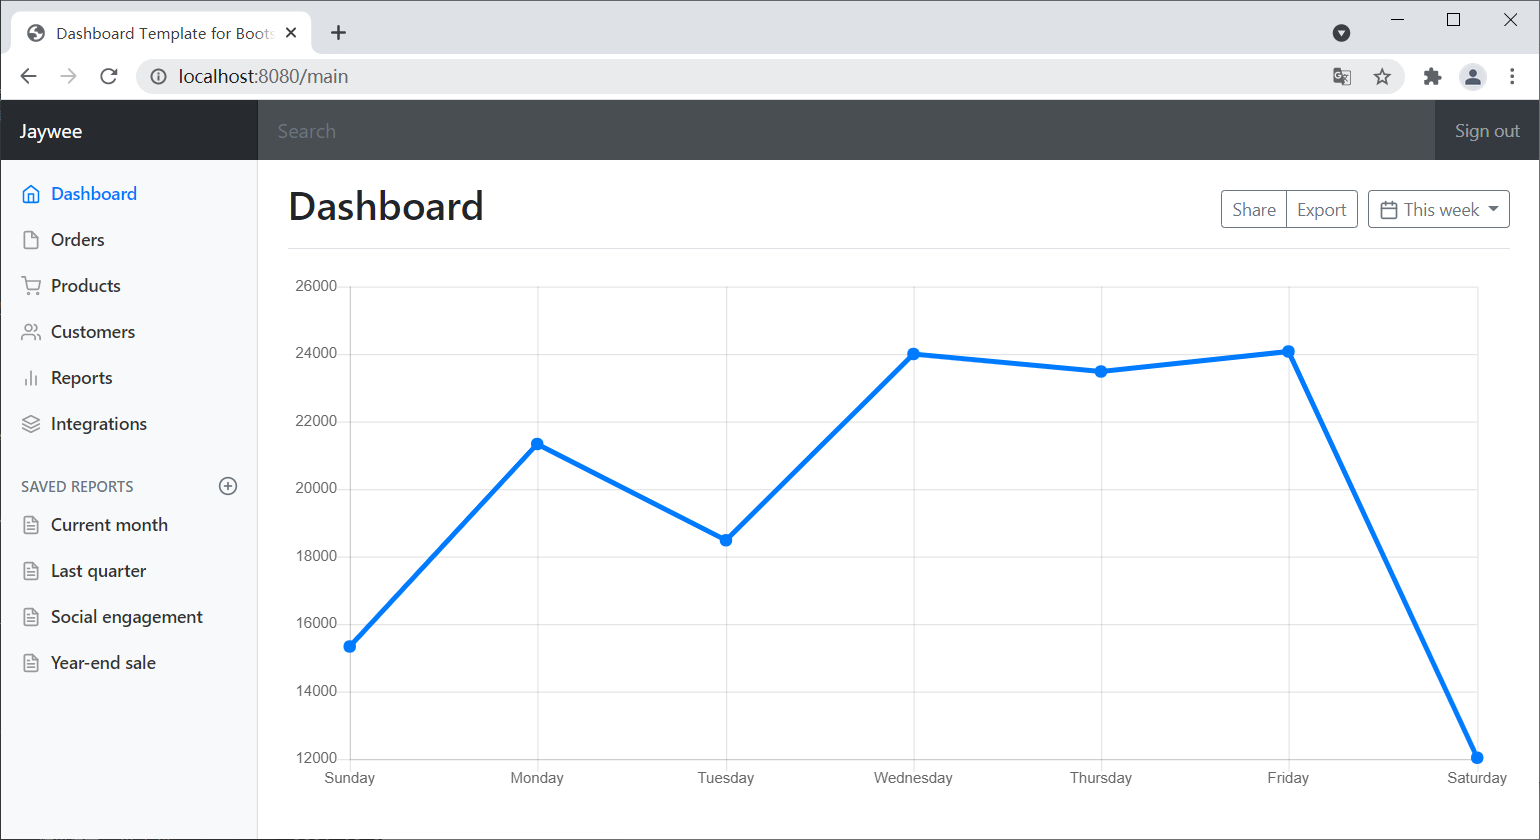
- 登录成功,跳转到
dashboard.html
7.1、准备:视图控制器
- 添加视图控制器:
MyMvcConfig中为dashboard页面添加一个视图映射
@Override
public void addViewControllers(ViewControllerRegistry registry) {
	...
    // dashboard页
    registry.addViewController("/main").setViewName("dashboard");
}
7.2、准备:登录业务
登录功能需要验证用户名和密码,所以需要补充一套相应的业务。
- 自顶向下分析:Controller 调 Service,Service 调 DAO
- 自底向上编写:先写 DAO,再写 Service,再写 Controller ;
-
EmployeeMapper
/** * 查询用户:登录功能 * * @param name 员工名:用户名 * @param employeeId 员工ID:密码 * @return 待查询员工 */ Employee getEmployeeForLogin(String name, String employeeId); -
EmployeeMapper.xml
<select id="getEmployeeForLogin" resultMap="employeeMap"> SELECT create_time, update_time, employee_id, name, email, gender, birthday, department_id FROM springboot_staff.employee WHERE name = #{name} and employee_id = #{employeeId} </select> -
EmployeeService:同 EmployeeMapper
-
EmployeeServiceImpl
@Override
public Employee getEmployeeForLogin(String name, String employeeId) {
    return employeeMapper.getEmployeeForLogin(name, employeeId);
}
7.3、接口
LoginController
- 判断用户名和密码是否为空;
- 调用 Service 层,查询数据库中是否有匹配的员工;
- 设置页面
- 登录成功:设置 Session,重定向到目标页(需要视图控制器);
- 登录失败:设置参数,转发到首页
/**
 * 登录
 */
@PostMapping("/employee/login")
public String login(@RequestParam("username") String username,
                    @RequestParam("password") String password,
                    Model model, HttpSession session) {
    // 判空
    if (StringUtils.isEmpty(username) || StringUtils.isEmpty(password)) {
        model.addAttribute("msg", "用户名或密码为空");
        return "index";
    }

    Employee employee = employeeService.getEmployeeForLogin(username, password);

    if (employee != null) {
        // 创建一个EmployeeConstant类,静态变量作为常量
        session.setAttribute(EmployeeConstant.LOGIN_EMPLOYEE, employee);
        return "redirect:/main";
    } else {
        model.addAttribute("msg", "用户名或密码错误");
        return "index";
    }
}

/**
 * 注销
 */
@GetMapping("/employee/logout")
public String logout(HttpSession session) {
    session.invalidate();
    return "redirect:/index.html";
}
7.4、页面
index.html
- Thymeleaf 语法——链接 URL 表达式:
@{...} - 提交方式:post;
- 添加一个 p标签,用于接收提示信息(如:用户名密码错误);
- 字段要求有 name 属性,否则后台无法接收到;
<!-- 登录 -->
<form class="form-signin" th:action="@{/employee/login}" method="post">
    ...
    <p style="color:red" th:text="${msg}"></p>
    <input name="username" ...>
    <input name="password" ...>
</form>

<!-- 注销 -->
<a class="nav-link" href="/employee/logout">Sign out</a>
dashboard.html
- 如果跳转到 dashboard 页面 后没有 CSS 样式,在引入 CSS 文件的 link 标签的 href 前添加
/; - 成功登录后,dashboard 页面左上角展示当前登录的员工名;
- Thymeleaf 语法——插入片段:
[[${对象.属性}]]
<head>
	...
    <link href="/asserts/css/bootstrap.min.css" rel="stylesheet">
    <link href="/asserts/css/dashboard.css" rel="stylesheet">
</head>

<body>
    ...
    <div class="navbar-brand col-sm-3 col-md-2 mr-0">[[${session.loginEmployee.name}]]
    ...
</body>
7.5、拦截器
- 编写:根据 Session 是否为空,判断用户是否成功登入;
- 注册:向注册器中添加写好的拦截器,拦截所有页面,首页和登录请求除外;
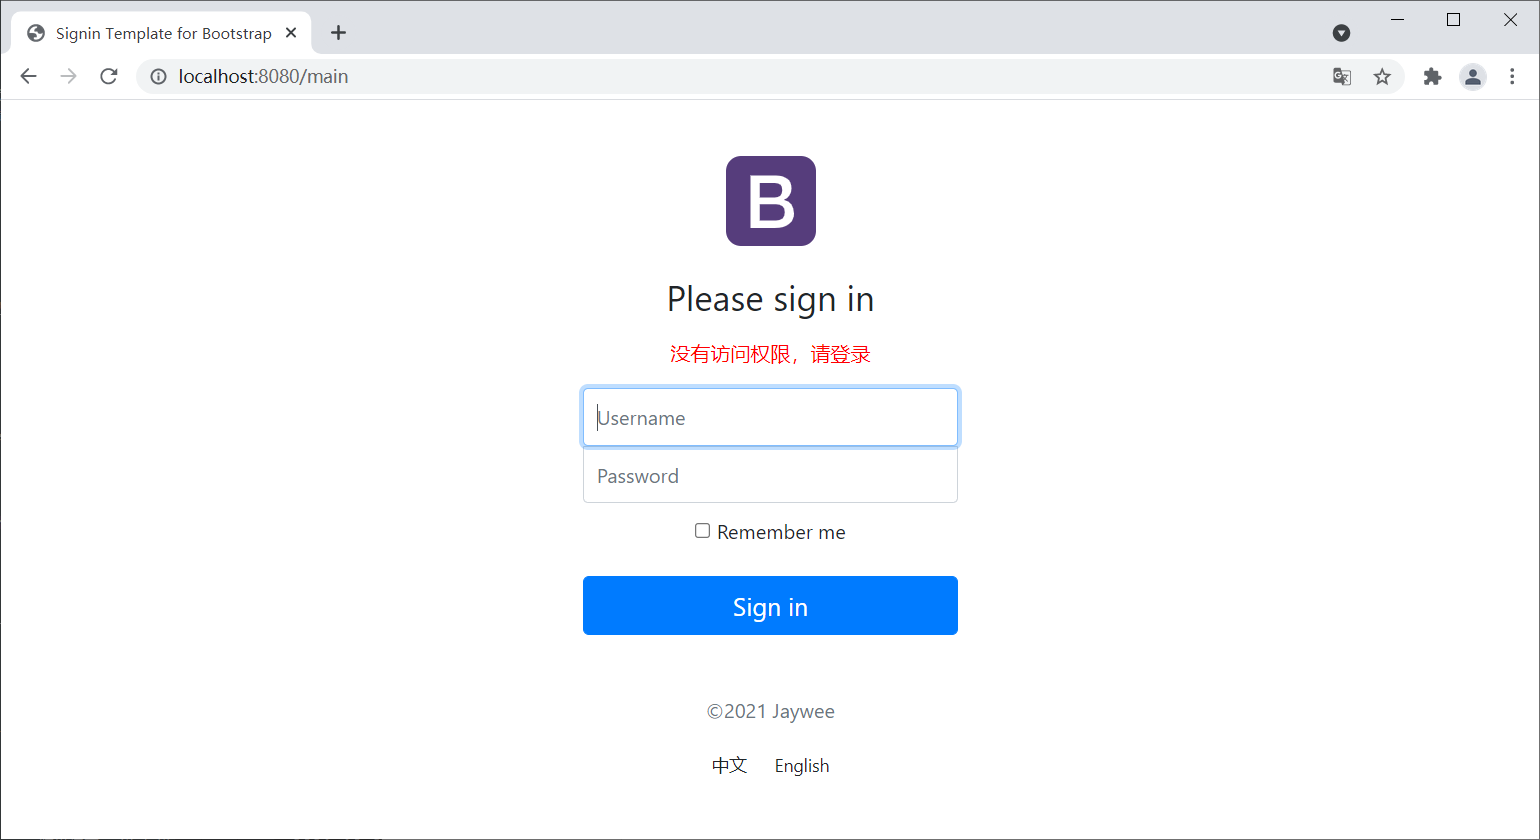
LoginHandlerInterceptor
获取 Session,判断是否为空;
- Session 为空:用户未登录或已退出
- 设置参数(提示信息),转发到首页;
- 拦截请求
- Session 非空:用户已登入
- 放行请求
public class LoginHandlerInterceptor implements HandlerInterceptor {
    @Override
    public boolean preHandle(HttpServletRequest request, HttpServletResponse response, Object handler) throws Exception {

        Employee loginEmployee = (Employee) request.getSession().getAttribute(EmployeeConstant.LOGIN_EMPLOYEE);

        if (loginEmployee == null) {
            request.setAttribute("msg", "没有访问权限,请登录");
            // 跳转到首页,【/index.html】是视图控制器,也可以填【/】
            request.getRequestDispatcher("/index.html").forward(request, response);
            return false;
        }
        return true;
    }
}
MyMvcConfig
addInterceptor:添加拦截器;addPathPatterns:添加拦截的路径,/**代表所有路径;excludePathPatterns:添加排除的路径,即不被拦截的路径
@Override
public void addInterceptors(InterceptorRegistry registry) {
    LoginHandlerInterceptor loginHandlerInterceptor = new LoginHandlerInterceptor();

    registry.addInterceptor(loginHandlerInterceptor)
            .addPathPatterns("/**")
            .excludePathPatterns("/index.html", "/", "/employee/login", "/asserts/**");
}
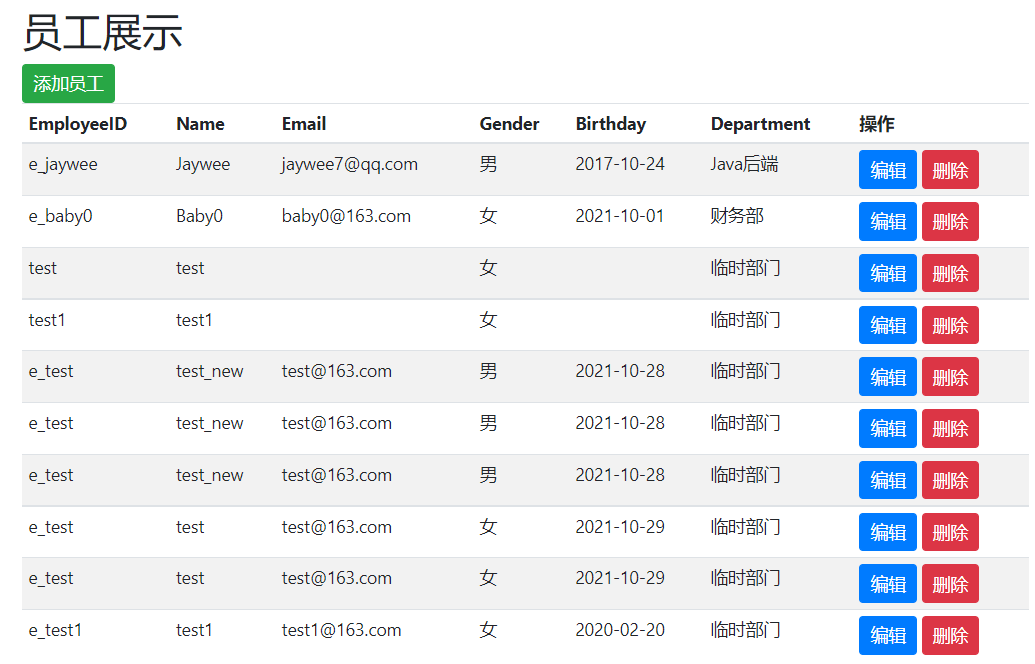
8、员工展示
业务流程
- 在
dashboard.html页,点击员工列表;- 发起请求,查询出所有员工列表;
- 跳转到员工展示页
8.1、接口
EmployeeController
- 调用 Service 层,查询所有员工列表;
- Model 设置数据
- 跳转页面:
list.html
@Controller
public class EmployeeController {

    @Resource
    EmployeeService employeeService;

    @RequestMapping("/employee/listEmployees")
    public String listEmployees(Model model) {

        List<Employee> employeeList = employeeService.listEmployees();
        model.addAttribute("employeeList", employeeList);

        return "list";
    }
}
8.2、页面
dashboard.html
- 调用接口:
/employee/listEmployees
<li class="nav-item">
   <a class="nav-link" href="/employee/listEmployees">
      <svg ...>
		...
      </svg>
      Employees
   </a>
</li>
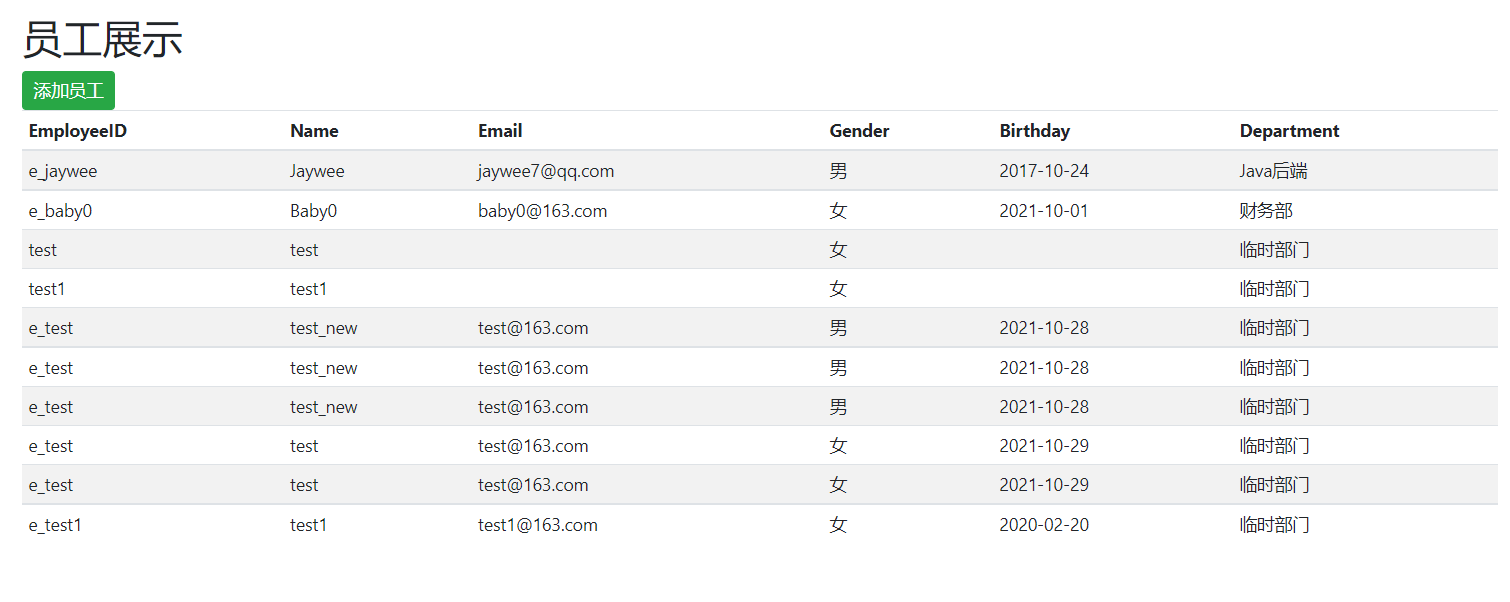
list.html
- 迭代:
th:each="xxx:${Xxx}"th:each="employee:${employeeList}"- 对于 employeeList 中的每个元素,每次循环迭代并赋给 employee
- 取属性:
${xxx.getXxx}或[[]]employee.getEmployeeId()等,要求实体类有 getter- 三元运算符:
逻辑表达式?表达式1:表达式2 - 日期工具类:
#dates.format(日期对象,格式)
- 注意
- NPE:如
getDepartment().getName(),如果有某个员工没有部门,则变成null.getName()报错
- NPE:如
<table ...>
    <thead>
    <tr>
        <th>EmployeeID</th>
        <th>Name</th>
        <th>Email</th>
        <th>Gender</th>
        <th>Birthday</th>
        <th>Department</th>
    </tr>
    </thead>
    <tbody>
    <tr th:each="employee : ${employeeList}">
        <td th:text="${employee.getEmployeeId()}"></td>
        <td th:text="${employee.getName()}"></td>
        <td th:text="${employee.getEmail()}"></td>
        <td th:text="${employee.getGender()==1?'男':'女'}"></td>
        <td th:text="${#dates.format(employee.getBirthday(),'yyyy-MM-dd')}"></td>
        <td th:text="${employee.getDepartment().getName()}"></td>
    </tr>
    </tbody>
</table>
9、添加员工
流程:
list.html:点击员工添加按钮- 发起请求,查询部门列表,跳转到
员工添加页面
- 发起请求,查询部门列表,跳转到
add.html:输入员工的属性,点击添加- 发起请求,将属性自动封装为对象,跳转到
员工展示页
- 发起请求,将属性自动封装为对象,跳转到
9.1、接口
EmployeeController
-
前往页面
- get 请求
- 查询所有部门,Model 设置
- 跳转页面
-
处理业务
- post请求
- 用实体类接收页面字段(见SpringMVC 6.1.3)
- 要求:提交的域名称和实体类属性名一致、实体类有 setter
/**
 * 前往员工添加页
 *
 * @return 员工添加页
 */
@GetMapping("/employee/addEmployee")
public String toAddEmployee(Model model) {
    List<Department> departmentList = departmentService.listDepartments();
    model.addAttribute("departmentList", departmentList);
    return "add";
}

/**
 * 员工添加业务
 *
 * @param employee 待添加员工
 * @return 重定向:员工展示页
 */
@PostMapping("/employee/addEmployee")
public String addEmployee(Employee employee) {
    employeeService.insertEmployee(employee);

    return "redirect:/employee/listEmployees";
}
9.2、页面
list.html
- 添加员工按钮:get 请求
<a class="btn btn-sm btn-success" th:href="@{/employee/addEmployee}">添加员工</a>
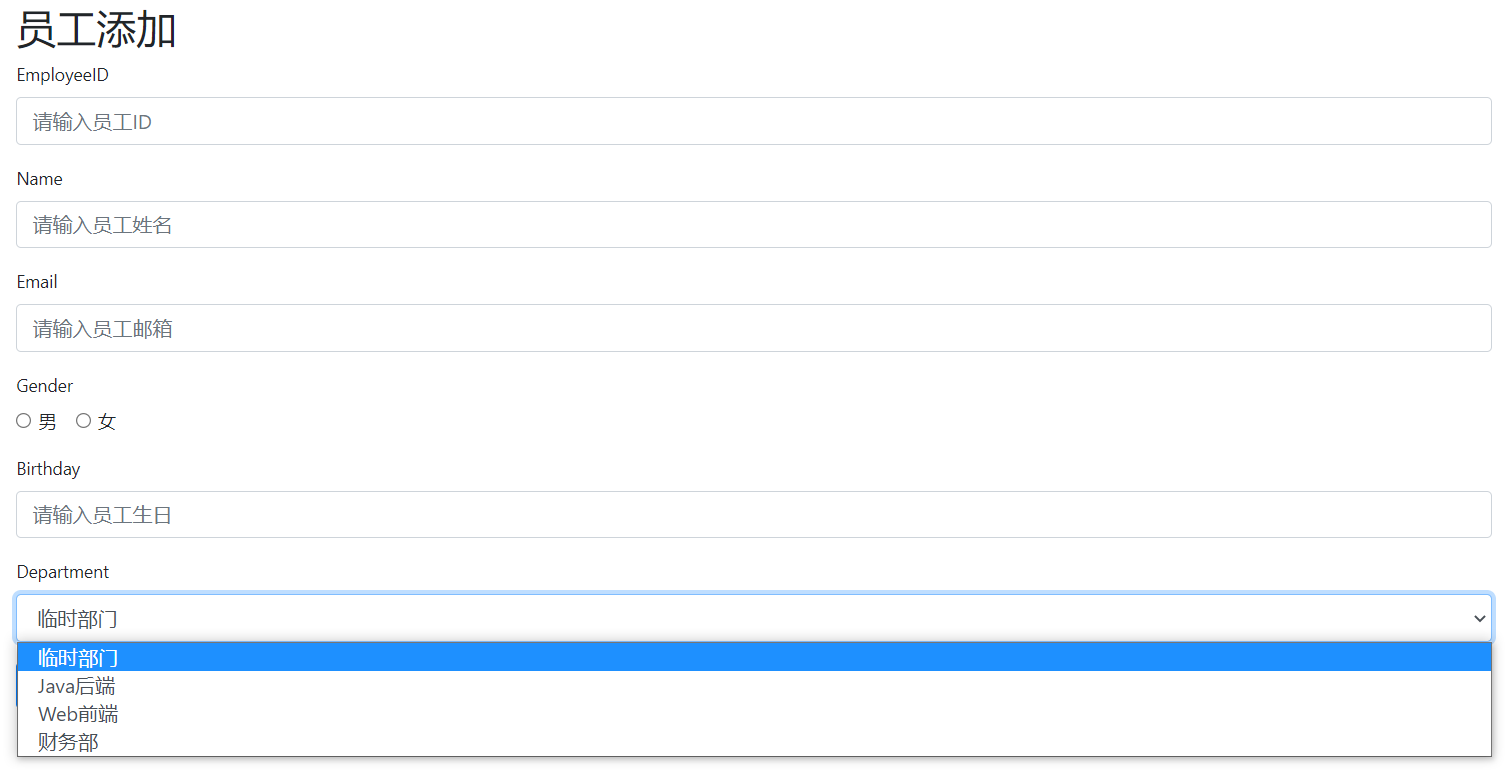
add.html
- 表单:post 请求
- name 属性:要求表单域有该属性,且属性名与实体类属性名一致;
- 日期格式:默认为
yyyy/MM/dd - department:
- 获取部门列表,迭代获取部门名,作为下拉框选项;
- 提交到后台的是
department_id,而不是整个部门;
<form action="/employee/addEmployee" method="post">

    <div class="form-group">
        <label>EmployeeID</label>
        <input type="text" class="form-control" placeholder="请输入员工ID" name="employeeId">
    </div>
    <div class="form-group">
        <label>Name</label>
        <input type="text" class="form-control" placeholder="请输入员工姓名" name="name">
    </div>
    <div class="form-group">
        <label>Email</label>
        <input type="email" class="form-control" placeholder="请输入员工邮箱" name="email">
    </div>
    <div class="form-group">
        <label>Gender</label><br>
        <div class="form-check form-check-inline">
            <input class="form-check-input" type="radio" value="1" name="gender">
            <label class="form-check-label">男</label>
        </div>
        <div class="form-check form-check-inline">
            <input class="form-check-input" type="radio" value="0" name="gender">
            <label class="form-check-label">女</label>
        </div>
    </div>
    <div class="form-group">
        <label>Birthday</label>
        <input type="text" class="form-control" placeholder="请输入员工生日" name="birthday">
    </div>
    <div class="form-group">
        <label>Department</label>
        <select class="form-control" name="department.departmentId">
            <option th:each="department:${departmentList}" th:text="${department.getName()}"
                    th:value="${department.getDepartmentId()}"></option>
        </select>
    </div>
    <button type="submit" class="btn btn-primary">添加</button>
</form>
10、修改员工(改名)
本项目中,通过修改员工名来体现修改功能。
流程:
list.html:点击编辑按钮- 发起请求,传递employeeId并查询员工,跳转到
员工编辑页面
- 发起请求,传递employeeId并查询员工,跳转到
update.html:输入需要修改的属性,点击保存- 发起请求,修改属性,跳转到
员工展示页
- 发起请求,修改属性,跳转到
10.1、接口
- 前往页面
- get 请求
- RESTful风格,携带参数employeeId
- 根据 employeeId 查询 employee,Model设置
- 跳转页面
- 处理业务
- post请求
- 用实体类接收页面字段
- 要求:提交的域名称和实体类属性名一致、实体类有 setter
/**
 * 前往员工更新页
 *
 * @param employeeId 待更新员工ID
 * @return 员工更新页
 */
@GetMapping("/employee/updateEmployee/{employeeId}")
public String toUpdateEmployee(@PathVariable String employeeId, Model model) {
    Employee employee = employeeService.getEmployee(employeeId);
    model.addAttribute("employee", employee);

    return "update";
}

/**
 * 员工更新业务
 *
 * @param employeeId 待更新员工ID
 * @param name       员工新名
 * @return 重定向:员工展示页
 */
@PostMapping("/employee/updateEmployee")
public String updateEmployee(String employeeId, String name) {
    employeeService.updateEmployee(employeeId, name);

    return "redirect:/employee/listEmployees";
}
10.2、页面
list.html
-
添加
编辑和删除按钮:get请求 -
RESTful风格,传参:
'URL/'+${参数}"@{'/employee/updateEmployee/'+${employee.getEmployeeId()}}"
<table class="table table-striped table-sm">
    <thead>
    <tr>
		...
        <th>操作</th>
    </tr>
    </thead>
    <tbody>
    <tr th:each="employee : ${employeeList}">
		...
        <td>
            <!-- 编辑 -->
            <a th:href="@{'/employee/updateEmployee/'+${employee.getEmployeeId()}}"
               class="btn btn-sm btn-primary">编辑</a>
            <!-- 删除 -->
        </td>
    </tr>
    </tbody>
</table>
update.html
- 表单:post 请求;
- 获取员工信息,展示到页面;
- name 属性:要求表单域有该属性,且属性名与接口方法参数列表一致;
<form action="/employee/updateEmployee" method="post">

    <div class="form-group">
        <label>EmployeeID</label>
        <input class="form-control" type="text" name="employeeId" th:value="${employee.getEmployeeId()}"
               placeholder="请输入员工ID"
               readonly>
    </div>

    <div class="form-group">
        <label>Name</label>
        <input class="form-control" type="text" name="name" th:placeholder="'原员工名:'+${employee.getName()}">
    </div>

    <button type="submit" class="btn btn-primary">保存</button>
</form>

11、删除员工
流程:
list.html:点击删除按钮- 发起请求,传递 employeeId,删除员工
11.1、接口
- 调用接口
- get 请求
- RESTful风格,携带参数 employeeId
- 处理业务
- 接收页面字段
- 删除员工
/**
 * 删除员工
 * @param employeeId 待删除员工ID
 * @return 重定向:员工展示页
 */
@GetMapping("/employee/deleteEmployee/{employeeId}")
public String deleteEmployee(@PathVariable String employeeId){
    employeeService.deleteEmployee(employeeId);
    return "redirect:/employee/listEmployees";
}
11.2、页面
list.html
<a class="btn btn-sm btn-danger"
   th:href="@{'/employee/deleteEmployee/'+${employee.getEmployeeId()}}">删除</a>
12、小结
到此,一个简易的 Spring Boot 员工管理系统搭建完毕。
主要技术:
- JDBC、MySQL、Druid数据源、MyBatis
- Spring Boot
- Thymeleaf模板引擎;
知识点
- 阿里巴巴编程规范;
- ORM原则、不同命名风格的映射处理;
- 常量类、工具类的使用;
- 整合Druid数据源、MyBatis;
- 一对多关系的映射处理;
- MVC模式:pojo/DAO-Service-Controller;
- 使用注解开发;
- Thymeleaf模板引擎的使用
- 视图控制器
- 链接表达式
- 循环遍历
- 页面取值
- 拦截器
- RESTful风格:GetMapping、PostMapping、@PathVariable
- 前后台传值:属性、对象
- CRUD


【推荐】国内首个AI IDE,深度理解中文开发场景,立即下载体验Trae
【推荐】编程新体验,更懂你的AI,立即体验豆包MarsCode编程助手
【推荐】抖音旗下AI助手豆包,你的智能百科全书,全免费不限次数
【推荐】轻量又高性能的 SSH 工具 IShell:AI 加持,快人一步
· Linux系列:如何用heaptrack跟踪.NET程序的非托管内存泄露
· 开发者必知的日志记录最佳实践
· SQL Server 2025 AI相关能力初探
· Linux系列:如何用 C#调用 C方法造成内存泄露
· AI与.NET技术实操系列(二):开始使用ML.NET
· 无需6万激活码!GitHub神秘组织3小时极速复刻Manus,手把手教你使用OpenManus搭建本
· C#/.NET/.NET Core优秀项目和框架2025年2月简报
· Manus爆火,是硬核还是营销?
· 终于写完轮子一部分:tcp代理 了,记录一下
· 【杭电多校比赛记录】2025“钉耙编程”中国大学生算法设计春季联赛(1)