SpringBoot:员工管理系统(基本结构)
SpringBoot_staff
写一个简单的员工管理系统,来体验 Spring Boot 开发的整个流程。
1、项目结构
-
创建 Spring Boot Web 项目:
springboot_04_staff -
导入依赖
- 数据库:JDBC、MySQL 连接、Druid 数据源、MyBatis
- 模板引擎:Thymeleaf
-
完善包结构
- pojo
- dao
- service
- controller
- config
- constant
- utils
-
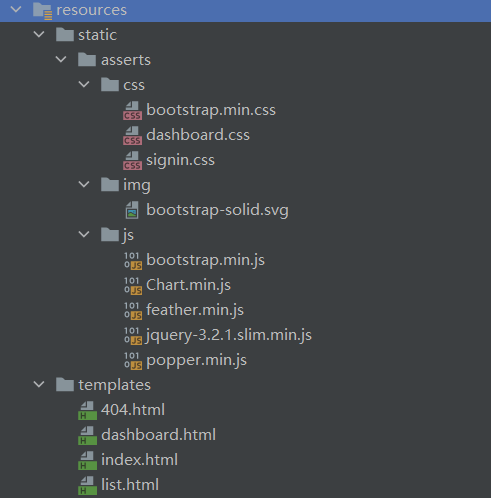
导入静态资源
- static 目录:存放资源文件,如 CSS、JS...
- templates 目录:存放 HTML 页面
2、数据库表、实体类
2.1、注意
2.1.1、编程规范
- ORM原则
- 命名风格
- 数据库:小写字母,下划线命名;
- 实体类:大驼峰命名;
- 实体类
- 不需要逻辑主键,需要创建时间和更新时间;
- 必须使用包装数据类型;
- 根据需要添加
constructor、toString()、getter/setter,可以全部添加
2.1.2、注意事项
-
多对一关系:员工对部门
-
员工实体中对部门的表示
- 数据库- employee 表:部门ID——department_id;
- 实体类- Employee 类:部门——Department;
-
映射问题
- 命名风格映射;
- department_id 和 Department 的映射。
-
关于日期时间的属性说明
- 在数据库,日期使用 date类型,时间使用 timestamp类型;
- 在后端,日期和时间均使用 java.util.Date类型
- 为了便于管理,通过后台代码完成(Service层)有关日期时间的操作,而不是直接在数据库端操作。
2.2、数据库springboot_staff
数据库表必备三字段(阿里巴巴规范)
id:逻辑主键。bigint,无符号自增;create_time:创建时间。timestamp,非空(新增记录时通过后端代码生成)update_time:更新时间。timestamp,默认为空(更新记录时通过后端代码生成)
主键
- 逻辑主键
- 无实际含义,用于唯一标识数据库表的每个记录。
- 是表的主键PK,即 id;
- 仅在数据库中体现,实体类不需要该属性;
- 业务主键
- 有实际含义,用于标识不同的业务实体;
- 是我们理解上的主键,如用户的 user_id,游戏的 game_id等。
部门表department
-
department_id:业务主键,部门ID -
name:部门名
员工表employee
部门和员工是一对多的关系
-
employee_id:业务主键,员工ID -
name:员工名 -
email:邮箱 -
gender:性别 -
birthday:生日 -
department_id:在员工数据库表中,用 ID表示部门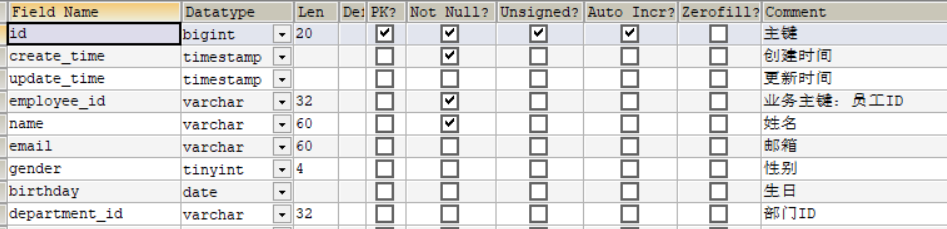
2.3、实体类
部门类Department
public class Department {
    /**
     * 创建时间
     */
    private Date createTime;
    /**
     * 更新时间
     */
    private Date updateTime;
    /**
     * 部门ID
     */
    private String departmentId;
    /**
     * 部门名
     */
    private String name;
}
员工类Employee
- 在员工实体类中,用实体类表示部门
public class Employee {
    /**
     * 创建时间
     */
    private Date createTime;
    /**
     * 更新时间
     */
    private Date updateTime;
    /**
     * 员工ID
     */
    private String employeeId;
    /**
     * 员工名
     */
    private String name;
    /**
     * 邮箱
     */
    private String email;
    /**
     * 性别
     */
    private Integer gender;
    /**
     * 生日
     */
    private Date birthday;

    /**
     * 部门
     */
    private Department department;
}
3、工具类
3.1、工具类
- 返回当前时间戳
public class TimeUtils {
    /**
     * 返回当前时间戳
     *
     * @return 当前时间戳
     */
    public static Date getCurrentTime() {
        return new Date(System.currentTimeMillis());
    }
}
3.2、常量类
- 当前时间
- 员工登录Session
- 有需要可以添加枚举类:xxxEnum
public class CommonConstant {
    /**
     * 当前时间
     */
    public static final Date CURRENT_TIME = MyDateUtils.getCurrentTime();
}

public class EmployeeConstant {
    /**
     * 员工登录Session
     */
    public static final String LOGIN_EMPLOYEE = "loginEmployee";
}
4、整合MyBatis
即整合了 MyBatis后的 DAO层 :10.3、整合 MyBatis
4.1、导入依赖
<!-- JDBC -->
<dependency>
    <groupId>org.springframework.boot</groupId>
    <artifactId>spring-boot-starter-jdbc</artifactId>
</dependency>
<!-- MySQL连接 -->
<dependency>
    <groupId>mysql</groupId>
    <artifactId>mysql-connector-java</artifactId>
    <scope>runtime</scope>
</dependency>
<!-- Druid数据源 -->
<dependency>
    <groupId>com.alibaba</groupId>
    <artifactId>druid</artifactId>
    <version>1.2.8</version>
</dependency>
<!-- SpringBoot整合MyBatis -->
<dependency>
    <groupId>org.mybatis.spring.boot</groupId>
    <artifactId>mybatis-spring-boot-starter</artifactId>
    <version>2.2.0</version>
</dependency>
<!-- log4j日志 -->
<dependency>
    <groupId>log4j</groupId>
    <artifactId>log4j</artifactId>
    <version>1.2.17</version>
</dependency>
4.2、数据库配置文件
- JDBC 数据库配置
- Druid 数据源
- MyBatis
application.yaml
spring:
  datasource:
    username: root
    password: 密码
    url: jdbc:mysql://主机地址/数据库名?useUnicode=true&characterEncoding=utf8&useSSL=false
    driver-class-name: com.mysql.cj.jdbc.Driver

    # Druid数据源
    type: com.alibaba.druid.pool.DruidDataSource
    # Druid数据源配置
    initialSize: 5
    maxActive: 20
    minIdle: 5
    maxWait: 60000
    poolPreparedStatements: true
    maxPoolPreparedStatementPerConnectionSize: 20
    validationQuery: SELECT 1 FROM DUAL
    testOnBorrow: false
    testOnReturn: false
    testWhileIdle: true
    timeBetweenEvictionRunsMillis: 60000
    minEvictableIdleTimeMillis: 300000
    # filters:stat监控统计、log4j日志记录(需要导入log4j依赖)、wall防御sql注入
    filters: stat,wall,log4j
    useGlobalDataSourceStat: true
    connectionProperties: druid.stat.mergeSql=true;druid.stat.slowSqlMillis=500

# 整合MyBatis配置
mybatis:
  type-aliases-package: indi.jaywee.pojo
  # Mapper.xml放在resources目录下与mapper同名的包下
  mapper-locations: classpath:indi/jaywee/mapper/*.xml
  # 自动映射:数据库下划线命名<-->实体类驼峰命名
  configuration:
    map-underscore-to-camel-case: true
5、DAO、service层
5.1、Mapper
- Mapper 类上方添加
@Mapper注解; - 插入语句:需要添加 create_time,该属性由 service层为对象设置,DAO层负责编写相关的SQL语句即可;
- 更新语句
- 以实体类作为参数,对象中存放业务主键和需要修改的新属性值(具体见EmployeeMapper);
- 需要修改 update_time,该属性由 service层为对象设置,DAO层负责编写相关的SQL语句即可。
- 先编写基本的CRUD,后面再根据需求来添加方法;
DepartmentMapper
@Mapper
public interface DepartmentMapper {
    /**
     * 根据ID查询部门
     *
     * @param departmentId 部门ID
     * @return 查询部门
     */
    Department getDepartment(String departmentId);

    /**
     * 查询所有部门
     *
     * @return 部门列表
     */
    List<Department> listDepartments();
}
EmployeeMapper
更新语句:改名
- 以Employee实体类作为参数
- 对象中存放业务主键employeeId和新名称name;
- 具体实现:只需要临时创建一个员工,为该员工设置employeeId和name两个属性即可;
- update_time由 service层为上述临时员工设置,DAO层负责编写相关的SQL语句即可。
/**
 * 添加员工
 *
 * @param employee 待添加员工
 * @return 受影响行数
 */
int insertEmployee(Employee employee);

/**
 * 删除员工
 *
 * @param employeeId 员工ID
 * @return 受影响行数
 */
int deleteEmployee(String employeeId);

/**
 * 更新员工:改名
 *
 * @param employee 待更新员工:主要用到员工ID和新名称
 * @return 受影响行数
 */
int updateEmployee(Employee employee);

/**
 * 根据ID查询员工
 *
 * @param employeeId 员工ID
 * @return 待查询员工
 */
Employee getEmployee(String employeeId);

/**
 * 查询所有员工
 *
 * @return 员工列表
 */
List<Employee> listEmployees();
5.2、Mapper.xml(!)
- 绑定对应接口:
namespace="xxx"; - 命名映射配置:下划线命名和驼峰命名的自动映射;
- SQL语句注意
- 区分命名风格:数据库字段用下划线,实体类属性用驼峰命名;
- 区分主键:逻辑主键id无实际含义,业务主键有业务逻辑含义;
- 不要使用
select *,要将需要查询的字段全写出来(即使是所有字段);
- 难点:Employee 的部门字段的映射
DepartmentMapper.xml
<?xml version="1.0" encoding="UTF8" ?>
<!DOCTYPE mapper
        PUBLIC "-//mybatis.org//DTD Mapper 3.0//EN"
        "http://mybatis.org/dtd/mybatis-3-mapper.dtd">
<!-- 接口绑定 -->
<mapper namespace="indi.jaywee.mapper.DepartmentMapper">
    <!-- 根据ID查询部门 -->
    <select id="getDepartment" resultType="department">
        SELECT create_time,
               update_time,
               department_id,
               name
        FROM springboot_staff.department
        WHERE department_id = #{departmentId}
    </select>
    <!-- 查询所有部门 -->
    <select id="listDepartments" resultType="department">
        SELECT create_time,
               update_time,
               department_id,
               name
        FROM springboot_staff.department
    </select>
</mapper>
EmployeeMapper.xml(!)
- insert
- 需要插入 create_time,不需要插入 update_time;
- 要求实体类Employee 具有 getDepartmentId() 方法,否则无法获取并插入departmentId;
- select
- 使用 resultMap 处理结果集映射
- 使用 association + 子查询,来映射部门字段(有关说明见MyBatis的多对一和一对多)
<?xml version="1.0" encoding="UTF8" ?>
<!DOCTYPE mapper
        PUBLIC "-//mybatis.org//DTD Mapper 3.0//EN"
        "http://mybatis.org/dtd/mybatis-3-mapper.dtd">
<!-- 接口绑定 -->
<mapper namespace="indi.jaywee.mapper.EmployeeMapper">

    <!-- 添加员工 -->
    <insert id="insertEmployee">
        INSERT INTO springboot_staff.employee(create_time, employee_id,
                                              name, email, gender, birthday, department_id)
        VALUES (#{createTime}, #{employeeId},
                #{name}, #{email}, #{gender}, #{birthday}, #{departmentId})
    </insert>

    <!-- 更新员工:改名 -->
    <update id="updateEmployee">
        UPDATE springboot_staff.employee
        SET update_time = #{updateTime},
            name        = #{name}
        WHERE employee_id = #{employeeId}
    </update>

    <!-- 删除员工 -->
    <delete id="deleteEmployee">
        DELETE
        FROM springboot_staff.employee
        WHERE employee_id = #{employeeId}
    </delete>

    <!-- 查询员工 -->
    <select id="getEmployee" resultMap="employeeMap">
        SELECT create_time,
               update_time,
               employee_id,
               name,
               email,
               gender,
               birthday,
               department_id
        FROM springboot_staff.employee
        WHERE employee_id = #{employeeId}
    </select>

    <!-- 查询所有员工-->
    <select id="listEmployees" resultMap="employeeMap">
        SELECT create_time,
               update_time,
               employee_id,
               name,
               email,
               gender,
               birthday,
               department_id
        FROM springboot_staff.employee
    </select>

    <!-- 结果映射:数据库department_id与实体类Department -->
    <resultMap id="employeeMap" type="employee">
        <association property="department" column="department_id" javaType="Department" select="getDepartment"/>
    </resultMap>
    <select id="getDepartment" resultType="department">
        SELECT create_time, update_time, name, department_id
        FROM springboot_staff.department
        WHERE department_id = #{department_id}
    </select>
</mapper>
5.3、service
- 接口类:
- 不需要添加注解;
- 方法通常和相应的Mapper接口方法相同;
- 接口实现类:
- 使用
@Service注解,将Service实现类注册到容器中; - 注入相应的Mapper接口类,用于调用DAO层方法;
- 处理时间属性
- 新增:设置 create_time属性;
- 更新:设置 update_time属性;
- 使用
DepartmentService
- 不需要添加注解;
- 接口方法:同DepartmenMapper。
public interface DepartmentService {
    /**
     * 根据ID查询部门
     *
     * @param departmentId 部门ID
     * @return 查询部门
     */
    Department getDepartment(String departmentId);

    /**
     * 查询所有部门
     *
     * @return 部门列表
     */
    List<Department> listDepartments();
EmployeeService
- 不需要添加注解;
- 接口方法:同DepartmenMapper。
/**
 * 添加员工
 *
 * @param employee 待添加员工
 * @return 受影响行数
 */
int insertEmployee(Employee employee);

/**
 * 删除员工
 *
 * @param employeeId 员工ID
 * @return 受影响行数
 */
int deleteEmployee(String employeeId);

/**
 * 更新员工:改名
 *
 * @param employee 待更新员工:主要用到员工ID和新名称
 * @return 受影响行数
 */
int updateEmployee(Employee employee);

/**
 * 根据ID查询员工
 *
 * @param employeeId 员工ID
 * @return 待查询员工
 */
Employee getEmployee(String employeeId);

/**
 * 查询所有员工
 *
 * @return 员工列表
 */
List<Employee> listEmployees();
5.4、serviceImpl
DepartmentServiceImpl
- 使用
@Service注解,将Service实现类注册到容器中; - 注入
DepartmentMapper,用于调用DAO层方法;
@Service
public class DepartmentServiceImpl implements DepartmentService {
    /**
     * Service层调用DAO层方法
     */
    @Resource
    DepartmentMapper departmentMapper;


    @Override
    public Department getDepartment(String departmentId) {
        return departmentMapper.getDepartment(departmentId);
    }

    @Override
    public List<Department> listDepartments() {
        return departmentMapper.listDepartments();
    }
}
EmployeeServiceImpl
- 使用
@Service注解,将Service实现类注册到容器中; - 注入
EmployeeMapper,用于调用DAO层方法; - 处理时间属性
- 新增:设置 create_time属性;
- 更新:设置 update_time属性;
@Service
public class EmployeeServiceImpl implements EmployeeService {
    /**
     * Service层调用DAO层方法
     */
    @Resource
    EmployeeMapper employeeMapper;

    @Override
    public int insertEmployee(Employee employee) {
        employee.setCreateTime(CommonConstant.CURRENT_TIME);

        return employeeMapper.insertEmployee(employee);
    }

    @Override
    public int deleteEmployee(String employeeId) {
        return employeeMapper.deleteEmployee(employeeId);
    }

    @Override
    public int updateEmployee(Employee employee) {
        employee.setUpdateTime(CommonConstant.CURRENT_TIME);

        return employeeMapper.updateEmployee(employee);
    }

    @Override
    public Employee getEmployee(String employeeId) {
        return employeeMapper.getEmployee(employeeId);
    }

    @Override
    public List<Employee> listEmployees() {
        return employeeMapper.listEmployees();
    }

}
编写完 Service层后,创建相应的 ServiceTest 类,测试是否能正常运行
6、首页和错误页面
6.1、模板引擎
- 导入 Thymeleaf 的 starter:
spring-boot-starter-thymeleaf
<dependency>
    <groupId>org.springframework.boot</groupId>
    <artifactId>spring-boot-starter-thymeleaf</artifactId>
</dependency>
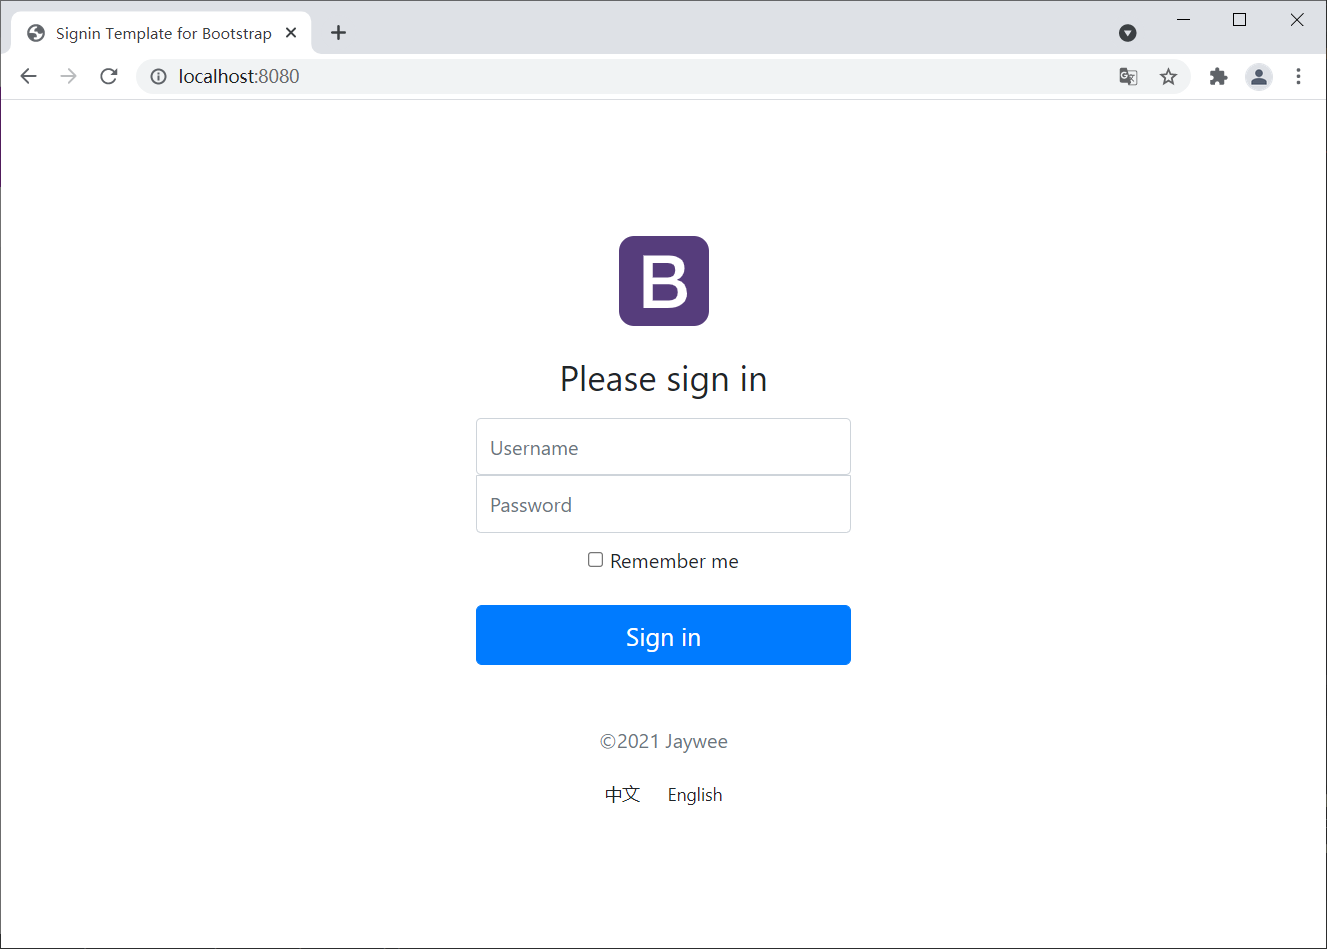
6.2、首页:视图控制器
- 默认启动 Spring Boot 项目时,在没有设置首页的情况下,打开的是错误页面 Whitelabel Error Page;
- 由于使用 Thymeleaf 模板引擎,只能映射 template 目录下的页面,因此需要显式地设置首页的视图控制器
:创建自定义 SpringMVC 配置类
- 实现
WebMvcConfigurer接口的@Configuration类 - 添加视图控制器:访问
/和/index.html,会映射到 template 目录下的index.html
@Configuration
public class MyMvcConfig implements WebMvcConfigurer {
    @Override
    public void addViewControllers(ViewControllerRegistry registry) {
        // 欢迎页面
        registry.addViewController("/").setViewName("index");
        registry.addViewController("/index.html").setViewName("index");
    }
}
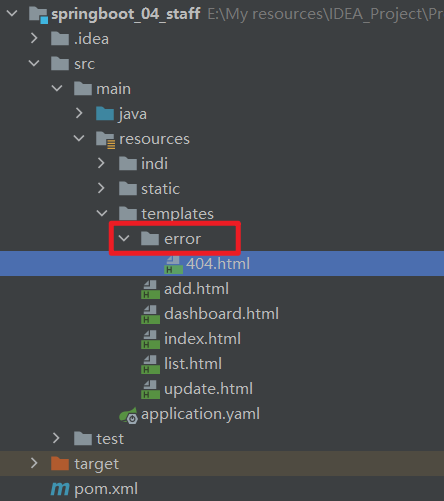
6.3、错误页面:error
- 在 template 目录下新建 error 目录
- 创建错误页面:404、500
分类:
Spring Boot
, Java学习项目


【推荐】国内首个AI IDE,深度理解中文开发场景,立即下载体验Trae
【推荐】编程新体验,更懂你的AI,立即体验豆包MarsCode编程助手
【推荐】抖音旗下AI助手豆包,你的智能百科全书,全免费不限次数
【推荐】轻量又高性能的 SSH 工具 IShell:AI 加持,快人一步
· Linux系列:如何用heaptrack跟踪.NET程序的非托管内存泄露
· 开发者必知的日志记录最佳实践
· SQL Server 2025 AI相关能力初探
· Linux系列:如何用 C#调用 C方法造成内存泄露
· AI与.NET技术实操系列(二):开始使用ML.NET
· 无需6万激活码!GitHub神秘组织3小时极速复刻Manus,手把手教你使用OpenManus搭建本
· C#/.NET/.NET Core优秀项目和框架2025年2月简报
· Manus爆火,是硬核还是营销?
· 终于写完轮子一部分:tcp代理 了,记录一下
· 【杭电多校比赛记录】2025“钉耙编程”中国大学生算法设计春季联赛(1)