Boot2️⃣运行原理
1、起步依赖
1.1、parent
通常采用 Maven 作为项目构建和管理工具。
- 传统 Spring:需要在每个项目引入依赖,重复性多。
- Spring Boot:依赖于一个 parent,定义常用依赖及其版本。
项目父依赖
-
Spring Boot 程序依赖一个父项目
spring-boot-starter-parent:<parent> <groupId>org.springframework.boot</groupId> <artifactId>spring-boot-starter-parent</artifactId> <version>2.5.4</version> <relativePath/> <!-- lookup parent from repository --> </parent> -
该父项目依赖的父项目
spring-boot-dependencies,负责 Spring Boot 依赖管理。<parent> <groupId>org.springframework.boot</groupId> <artifactId>spring-boot-dependencies</artifactId> <version>2.5.4</version> </parent>
1.2、starter
Spring Boot StarterSpring Boot的核心,相当于可拔插的插件。
- 引入 starter 后,自动导入相关依赖,且无需额外配置。
- 需要使用什么功能,就引入相应 starter。
- 支持自定义 Starter。
内置 Starter(场景启动器)
spring-boot-starter-xxx
- spring-boot-stater-web:自动导入 web 模块所依赖的组件。
- spring-boot-stater-test:自动导入 JUnit 单元测试所依赖的组件。
2、自动装配原理
主启动类使用
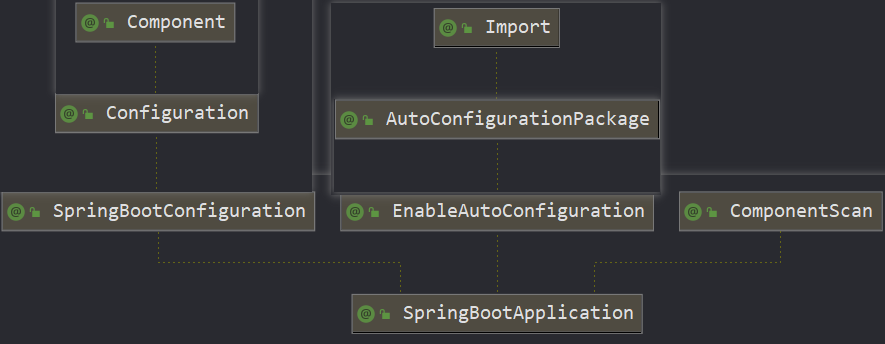
@SpringBootApplication注解,这是一个复合注解,包含了三个重要注解。
@Target(ElementType.TYPE)
@Retention(RetentionPolicy.RUNTIME)
@Documented
@Inherited
@SpringBootConfiguration
@EnableAutoConfiguration
@ComponentScan(excludeFilters = { @Filter(type = FilterType.CUSTOM, classes = TypeExcludeFilter.class),
      @Filter(type = FilterType.CUSTOM, classes = AutoConfigurationExcludeFilter.class) })
public @interface SpringBootApplication {
	...
}
注解功能:
-
@SpringBootConfiguration:Spring Boot 配置类。 -
@EnableAutoConfiguration:启动自动装配机制。 -
@ComponentScan:扫描并注册组件到容器中。
@SpringBootConfiguration
标注 Spring Boot 的配置类。
继承
@Configuration,说明是一个配置类。
@Target({ElementType.TYPE})
@Retention(RetentionPolicy.RUNTIME)
@Documented
@Configuration
@Indexed
public @interface SpringBootConfiguration {
	...
}
@EnableAutoConfiguration (❗)
开启自动配置
@Target(ElementType.TYPE)
@Retention(RetentionPolicy.RUNTIME)
@Documented
@Inherited
@AutoConfigurationPackage
@Import(AutoConfigurationImportSelector.class)	// 核心
public @interface EnableAutoConfiguration {
    ...
}
AutoConfigurationImportSelector(自动配置导入选择器)实现
ImportSelector接口,实现了selectImports()方法。
public class AutoConfigurationImportSelector
    implements DeferredImportSelector, ... {}

public interface DeferredImportSelector
    extends ImportSelector {}

public interface ImportSelector {
    String[] selectImports(AnnotationMetadata var1);
    ...
}
selectImports():获得要导入的自动配置类的全限类名。
public String[] selectImports(AnnotationMetadata annotationMetadata) {
    // 判断自动装配是否开启
    if (!this.isEnabled(annotationMetadata)) {
        return NO_IMPORTS;
    } else {
        AutoConfigurationMetadata autoConfigurationMetadata = AutoConfigurationMetadataLoader.loadMetadata(this.beanClassLoader);
        // 核心方法
        AutoConfigurationImportSelector.AutoConfigurationEntry autoConfigurationEntry = this.getAutoConfigurationEntry(autoConfigurationMetadata, annotationMetadata);
        return StringUtils.toStringArray(autoConfigurationEntry.getConfigurations());
    }
}
getAutoConfigurationEntry():获取要排除的类、要导入的类,筛选得到最终要导入的自动配置类。
protected AutoConfigurationImportSelector.AutoConfigurationEntry getAutoConfigurationEntry(AutoConfigurationMetadata autoConfigurationMetadata, AnnotationMetadata annotationMetadata) {
    // 判断自动装配是否开启
    if (!this.isEnabled(annotationMetadata)) {
        return EMPTY_ENTRY;
    } else {
        // 获取@EnableAutoConfiguration中的exclude和excludeName
        AnnotationAttributes attributes = this.getAttributes(annotationMetadata);
        // 核心方法
        List<String> configurations = this.getCandidateConfigurations(annotationMetadata, attributes);
        configurations = this.removeDuplicates(configurations);
        Set<String> exclusions = this.getExclusions(annotationMetadata, attributes);
        this.checkExcludedClasses(configurations, exclusions);
        configurations.removeAll(exclusions);
        // 根据条件过滤最终需要导入的自动配置类
        configurations = this.filter(configurations, autoConfigurationMetadata);
        this.fireAutoConfigurationImportEvents(configurations, exclusions);
        return new AutoConfigurationImportSelector.AutoConfigurationEntry(configurations, exclusions);
    }
}
getCandidateConfigurations():获取所有可能要导入的类。
protected List<String> getCandidateConfigurations(AnnotationMetadata metadata, AnnotationAttributes attributes) {
    // 核心方法
    List<String> configurations = SpringFactoriesLoader.loadFactoryNames(this.getSpringFactoriesLoaderFactoryClass(), this.getBeanClassLoader());
    Assert.notEmpty(configurations, "No auto configuration classes found in META-INF/spring.factories. If you are using a custom packaging, make sure that file is correct.");
    return configurations;
}
loadFactoryNames():读取所有 Starter 依赖下的 META-INF/spring.factories 文件。
public static List<String> loadFactoryNames(Class<?> factoryType, @Nullable ClassLoader classLoader) {
    String factoryTypeName = factoryType.getName();
    return (List)loadSpringFactories(classLoader).getOrDefault(factoryTypeName, Collections.emptyList());
}

private static Map<String, List<String>> loadSpringFactories(@Nullable ClassLoader classLoader) {
    MultiValueMap<String, String> result = (MultiValueMap)cache.get(classLoader);
    if (result != null) {
        return result;
    } else {
        try {
            // 核心代码
            Enumeration<URL> urls = classLoader != null ? classLoader.getResources("META-INF/spring.factories") : ClassLoader.getSystemResources("META-INF/spring.factories");
            LinkedMultiValueMap result = new LinkedMultiValueMap();

            while(urls.hasMoreElements()) {
                URL url = (URL)urls.nextElement();
                UrlResource resource = new UrlResource(url);
                Properties properties = PropertiesLoaderUtils.loadProperties(resource);
                Iterator var6 = properties.entrySet().iterator();

                while(var6.hasNext()) {
                    Entry<?, ?> entry = (Entry)var6.next();
                    String factoryTypeName = ((String)entry.getKey()).trim();
                    String[] var9 = StringUtils.commaDelimitedListToStringArray((String)entry.getValue());
                    int var10 = var9.length;

                    for(int var11 = 0; var11 < var10; ++var11) {
                        String factoryImplementationName = var9[var11];
                        result.add(factoryTypeName, factoryImplementationName.trim());
                    }
                }
            }

            cache.put(classLoader, result);
            return result;
        } catch (IOException var13) {
            throw new IllegalArgumentException("Unable to load factories from location [META-INF/spring.factories]", var13);
        }
    }
}
@ComponentScan
开启自动扫描
@Retention(RetentionPolicy.RUNTIME)
@Target({ElementType.TYPE})
@Documented
@Repeatable(ComponentScans.class)
public @interface ComponentScan {
    ...
}
3、启动流程
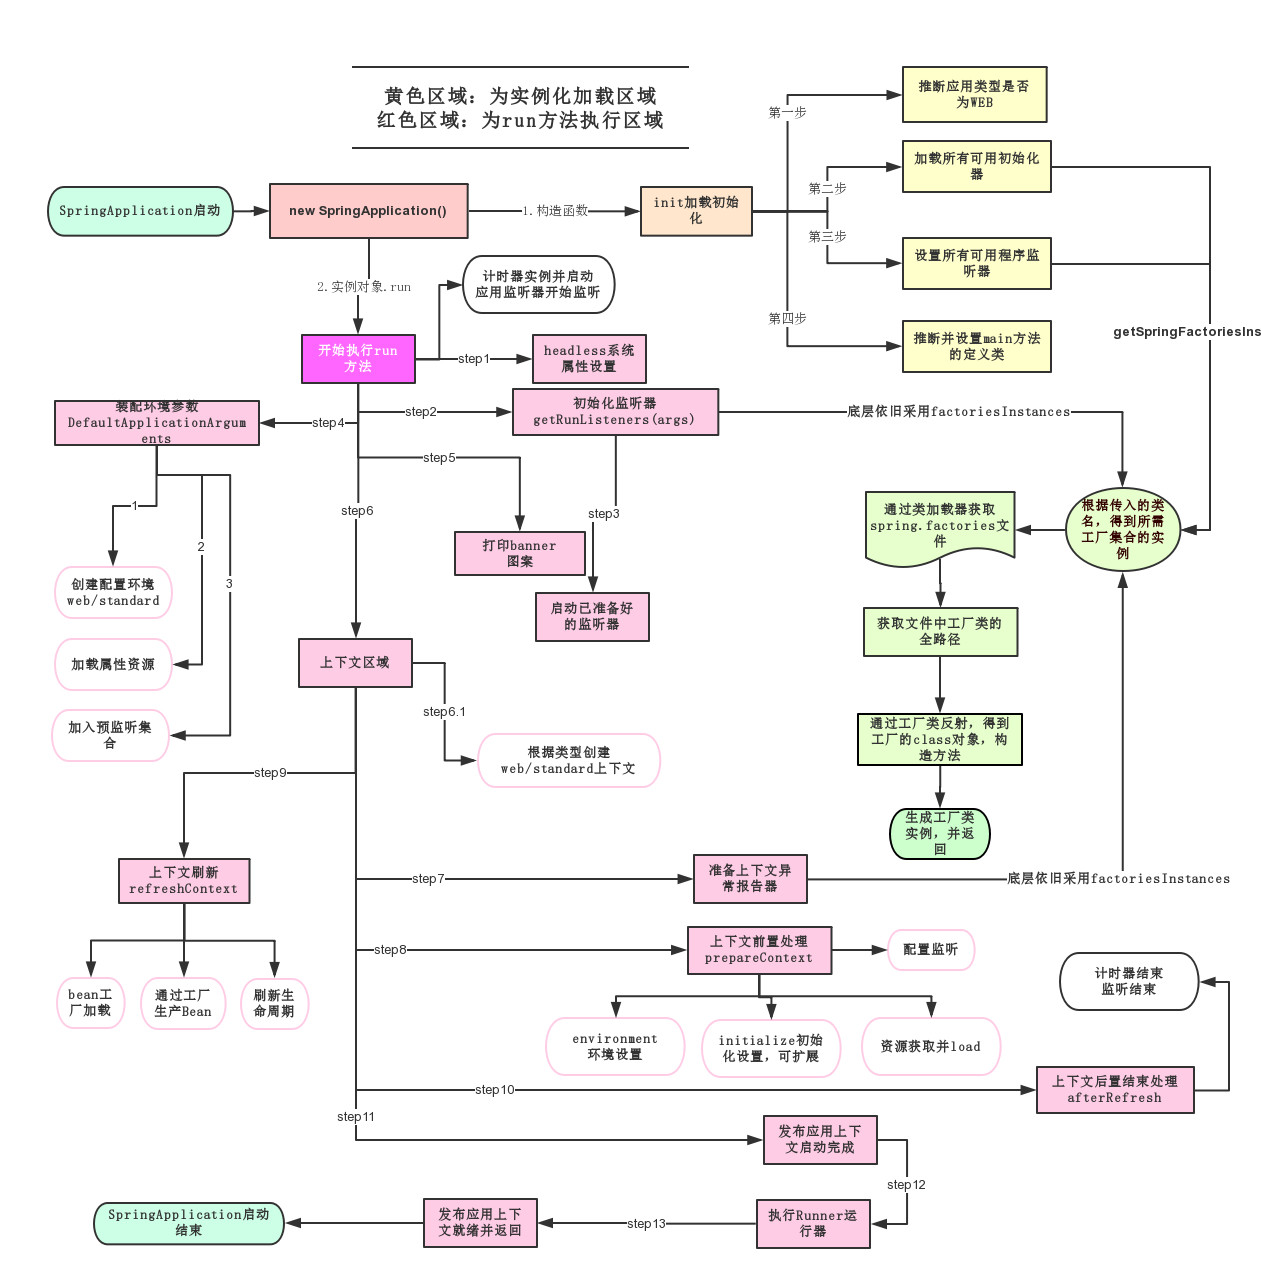
调用
SpringApplication.run()方法,启动 Spring Boot 服务。
/**
 * 程序主入口
 */
@SpringBootApplication
public class HelloworldApplication {
    public static void main(String[] args) {
        // 启动Spring Boot服务
        SpringApplication.run(HelloworldApplication.class, args);
    }
}
SpringApplication 类
构造器
public SpringApplication(ResourceLoader resourceLoader, Class<?>... primarySources) {
	...
    this.webApplicationType = WebApplicationType.deduceFromClasspath();
    this.setInitializers(this.getSpringFactoriesInstances(ApplicationContextInitializer.class));
    this.setListeners(this.getSpringFactoriesInstances(ApplicationListener.class));
    this.mainApplicationClass = this.deduceMainApplicationClass();
}
- 推断应用类型:普通项目还是 web 项目;
- 查找并加载所有可用的初始化器,设置到 initializers 属性中;
- 查找所有的应用程序监听器,设置到 listeners 属性中;
- 推断并设置 main 方法的定义类,找到运行的主类。
run() 流程


