全栈博客开发(二)添加渲染
原文链接
https://llfc.club/category?catid=20RbopkFO8nsJafpgCwwxXoCWAs#!aid/21lVoQbhTZo83drdNp10Iv2WOfc
本节目标
上一节我们添加了主页的路由和主页html模板,本节返回一个带参数渲染的模板,并从数据库中load数据添加到html中渲染返回,以及设置中间件,当有请求访问admin后台时判断其是否含有登录cookie,如果没有登录则返回登录页面
源码地址:
https://github.com/secondtonone1/bstgo-blog
添加中间件
gin支持丰富的中间件功能,我们先实现一个跨域访问的功能和检测登录cookie的功能
func Cors() gin.HandlerFunc {
	return func(c *gin.Context) {
		method := c.Request.Method

		c.Header("Access-Control-Allow-Origin", "*")
		c.Header("Access-Control-Allow-Headers", "Content-Type,AccessToken,X-CSRF-Token, Authorization, Token")
		c.Header("Access-Control-Allow-Methods", "POST, GET, OPTIONS, PUT, DELETE,UPDATE") //服务器支持的所有跨域请求的方
		c.Header("Access-Control-Expose-Headers", "Content-Length, Access-Control-Allow-Origin, Access-Control-Allow-Headers, Content-Type")
		c.Header("Access-Control-Allow-Credentials", "true")

		//放行所有OPTIONS方法
		if method == "OPTIONS" {
			c.AbortWithStatus(http.StatusNoContent)
		}
		// 处理请求
		c.Next()
	}
}

func GroupRouterAdminMiddle(c *gin.Context) {

	log.Println("=====================admin group router middle")
	//判断cookie中是否有session_id
	sessionId, err := c.Cookie(model.CookieSession)
	if err != nil {
		//没有sessionId则返回登录页面
		log.Println("no cookie sessionId ,return login")
		c.HTML(http.StatusOK, "admin/login.html", nil)
		c.Abort()
		return
	}
	sessionData, err := mongocli.GetSessionById(sessionId)
	if err != nil {
		log.Println("get sessionid ", sessionId, "failed, return login")
		c.HTML(http.StatusOK, "admin/login.html", nil)
		c.Abort()
		return
	}
	log.Println("session data is : ", sessionData)
	c.Next()
}

func CheckLogin(c *gin.Context) {
	log.Println("check login midware")
	//判断cookie中是否有session_id
	sessionId, err := c.Cookie(model.CookieSession)
	if err != nil {
		//没有sessionId则返回登录页面
		log.Println("no cookie sessionId ,return login")
		baseRsp := model.BaseRsp{}
		baseRsp.Code = model.ERR_NO_LOGIN
		baseRsp.Msg = model.MSG_NO_LOGIN
		c.JSON(http.StatusOK, baseRsp)
		c.Abort()
		return
	}
	sessionData, err := mongocli.GetSessionById(sessionId)
	if err != nil {
		log.Println("get sessionid ", sessionId, "failed, return login")
		baseRsp := model.BaseRsp{}
		baseRsp.Code = model.ERR_NO_LOGIN
		baseRsp.Msg = model.MSG_NO_LOGIN
		c.JSON(http.StatusOK, baseRsp)
		c.Abort()
		return
	}
	log.Println("session data is : ", sessionData)
	c.Next()
}
CheckLogin和GroupRouterAdminMiddle都是用来检测登录信息的中间件,只是一个返回json一个返回html模板
Cors是支持跨域访问
然后修改之前的main函数,支持中间件
func main() {
	mongocli.MongoInit()
	router := gin.Default()
	router.Use(Cors()) //默认跨域
	//加载模板文件
	router.LoadHTMLGlob("views/**/*")
	//设置资源共享目录
	router.StaticFS("/static", http.Dir("./public"))
	//用户浏览首页
	router.GET("/home", home.Home)
	//用户浏览你分类
	router.GET("/category", home.Category)

	//用户浏览单个文章
	router.GET("/articlepage", home.ArticlePage)

	//admin登录页面
	router.GET("/admin/login", admin.Login)
	//admin 登录提交
	router.POST("/admin/loginsub", admin.LoginSub)

	// 创建管理路由组
	adminGroup := router.Group("/admin")
	adminGroup.Use(GroupRouterAdminMiddle)
	{
		//管理首页
		adminGroup.GET("/", admin.Admin)
		//管理分类
		adminGroup.POST("/category", admin.Category)
	}

	// 文章编辑发布
	router.POST("admin/pubarticle", CheckLogin, admin.ArticlePub)

	router.Run(":8080")
	mongocli.MongoRelease()
}
main函数里调用了mongo的初始化函数,以及结束时调用了mongo的release函数
router.Use(Cors())对所有路由支持跨域访问
adminGroup.Use(GroupRouterAdminMiddle)对/admin访问的分组做登录校验,返回html
CheckLogin对admin/pubarticle的路由做登录校验,返回json结果
让页面显示后台内容
之前我们返回的html页面是静态的,现在我们通过gin的模板渲染功能动态返回页面,页面的内容是后台mongo查询的数据。
我们在请求文章页面逻辑中返回页面的渲染结构articleR
func ArticlePage(c *gin.Context) {
	id := c.Query("id")
	log.Println("id is ", id)
	if id == "" {
		c.HTML(http.StatusOK, "home/errorpage.html", "invalid page request , id is null, after 2 seconds return to home")
		return
	}

	article, err := mongocli.GetArticleId(id)

	if err != nil {
		c.HTML(http.StatusOK, "home/errorpage.html", "get article failed, after 2 seconds return to home")
		return
	}

	articleR := &model.ArticlePageR{}
	articleR.Author = article.Author
	articleR.Cat = article.Cat
	articleR.Content = template.HTML(article.Content)
	createtm := time.Unix(article.CreateAt, 0)
	articleR.CreateAt = createtm.Format("2006-01-02 15:04:05")

	lasttm := time.Unix(article.LastEdit, 0)
	articleR.LastEdit = lasttm.Format("2006-01-02 15:04:05")
	articleR.Id = article.Id
	articleR.Index = article.Index
	articleR.LoveNum = article.LoveNum
	articleR.ScanNum = article.ScanNum
	articleR.Subcat = article.Subcat
	articleR.Subtitle = article.Subtitle
	articleR.Title = article.Title

	c.HTML(http.StatusOK, "home/articlepage.html", articleR)
}
通过mongo中获取文章结构,传入html模板渲染并返回。文章结构定义在model模块
//文章结构
type Article struct {
	Id       string `bson:"id"`
	Cat      string `bson: "cat"`
	Title    string `bson: "title"`
	Content  string `bson: "content"`
	Subcat   string `bson: "subcat"`
	Subtitle string `bson: "subtitle"`
	ScanNum  int    `bson:"scannum"`
	LoveNum  int    `bson:"lovenum`
	CreateAt int64  `bson:"createdAt"`
	LastEdit int64  `bson:"lastedit"`
	Author   string `bson:"author"`
	Index    int    `bson:"index"`
}
mongo的增删改查之前的文章有讲解过,这里不介绍了。
测试结果
执行命令
go run ./main.go
然后在控制台输入localhost:8080/articlepage?id=21M9WdW62KbVXXrlPfZhPOCFP31
可以看到如下效果
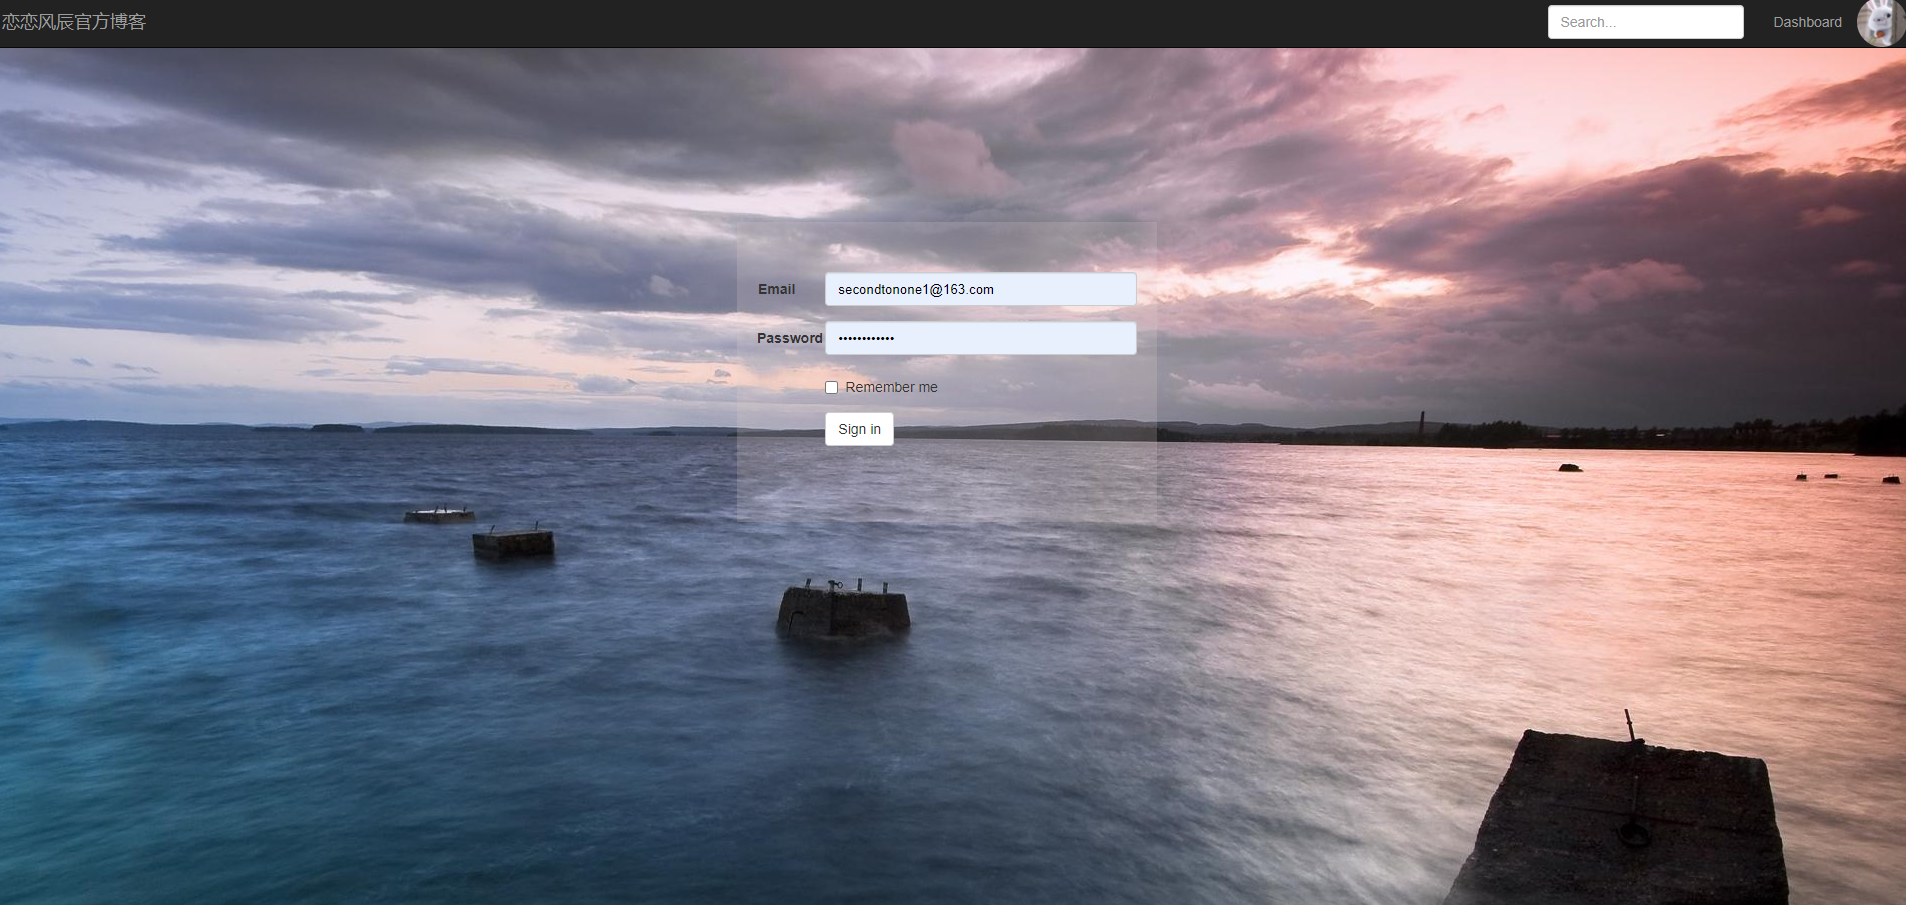
访问后台页面localhost:8080/admin
当没有登录cookie时,会返回登录界面
感谢关注我的公众号

![]()

 浙公网安备 33010602011771号