Mybatis-Plus
Mybatis_plus
简介

- 无侵入:只做增强不做改变,引入它不会对现有工程产生影响,如丝般顺滑
- 损耗小:启动即会自动注入基本 CURD,性能基本无损耗,直接面向对象操作
- 强大的 CRUD 操作:内置通用 Mapper、通用 Service,仅仅通过少量配置即可实现单表大部分 CRUD 操作,更有强大的条件构造器,满足各类使用需求
- 支持 Lambda 形式调用:通过 Lambda 表达式,方便的编写各类查询条件,无需再担心字段写错
- 支持主键自动生成:支持多达 4 种主键策略(内含分布式唯一 ID 生成器 - Sequence),可自由配置,完美解决主键问题
- 支持 ActiveRecord 模式:支持 ActiveRecord 形式调用,实体类只需继承 Model 类即可进行强大的 CRUD 操作
- 支持自定义全局通用操作:支持全局通用方法注入( Write once, use anywhere )
- 内置代码生成器:采用代码或者 Maven 插件可快速生成 Mapper 、 Model 、 Service 、 Controller 层代码,支持模板引擎,更有超多自定义配置等您来使用
- 内置分页插件:基于 MyBatis 物理分页,开发者无需关心具体操作,配置好插件之后,写分页等同于普通 List 查询
- 分页插件支持多种数据库:支持 MySQL、MariaDB、Oracle、DB2、H2、HSQL、SQLite、Postgre、SQLServer 等多种数据库
- 内置性能分析插件:可输出 Sql 语句以及其执行时间,建议开发测试时启用该功能,能快速揪出慢查询
- 内置全局拦截插件:提供全表 delete 、 update 操作智能分析阻断,也可自定义拦截规则,预防误操作
快速入门
-
导入依赖
<dependency> <groupId>org.springframework.boot</groupId> <artifactId>spring-boot-starter-web</artifactId> </dependency> <dependency> <groupId>org.springframework.boot</groupId> <artifactId>spring-boot-devtools</artifactId> <scope>runtime</scope> <optional>true</optional> </dependency> <dependency> <groupId>mysql</groupId> <artifactId>mysql-connector-java</artifactId> <scope>runtime</scope> </dependency> <dependency> <groupId>org.projectlombok</groupId> <artifactId>lombok</artifactId> <optional>true</optional> </dependency> <dependency> <groupId>org.springframework.boot</groupId> <artifactId>spring-boot-starter-test</artifactId> <scope>test</scope> </dependency> <dependency> <groupId>com.baomidou</groupId> <artifactId>mybatis-plus-boot-starter</artifactId> <version>3.4.3.1</version> </dependency> <dependency> <groupId>com.baomidou</groupId> <artifactId>mybatis-plus-generator</artifactId> <version>3.4.1</version> </dependency> -
创建User实体类
@Data @ToString public class User { private Long id; private String name; private Integer age; private String email; } -
创建实现类
@Service
public class UserServiceImpl extends ServiceImpl<UserMapper,User> implements UserService {


}
-
创建Mapper接口类
@Mapper public interface UserMapper extends BaseMapper<User> { } -
文件配置
#数据库配置 spring.datasource.password=root spring.datasource.username=root spring.datasource.url=jdbc:mysql://localhost:3306/mybatis_plus?useSSL=false&useUnicode=true&characterEncode=utf-8&serverTimeZone=GMT%2B8 spring.datasource.driver-class-name=com.mysql.cj.jdbc.Driver #mybatis_plus日志输出配置 mybatis-plus.configuration.log-impl=org.apache.ibatis.logging.stdout.StdOutImpl -
开启ScanMapper路径
@MapperScan("com.sean.mybatis_plus.mapper") @SpringBootApplication public class MybatisPlusApplication { public static void main(String[] args) { SpringApplication.run(MybatisPlusApplication.class, args); } } -
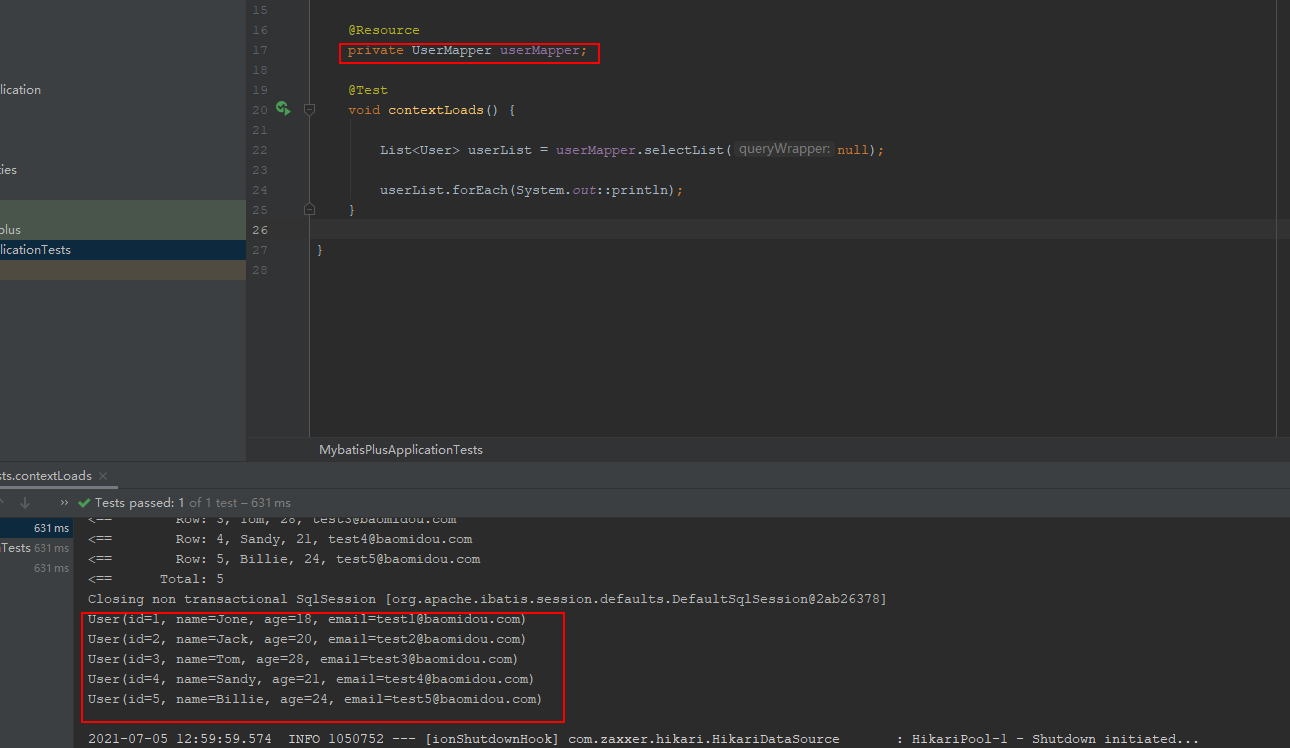
测试
CRUD扩展
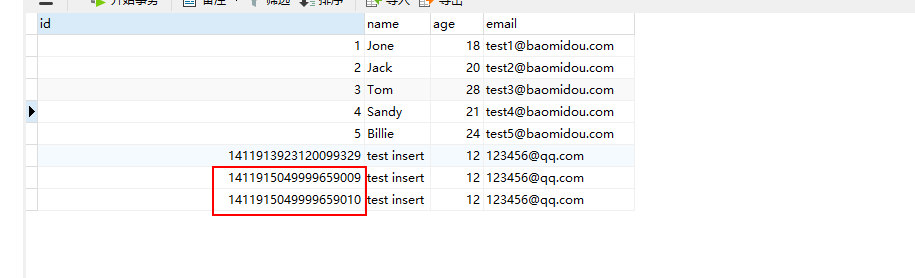
Insert
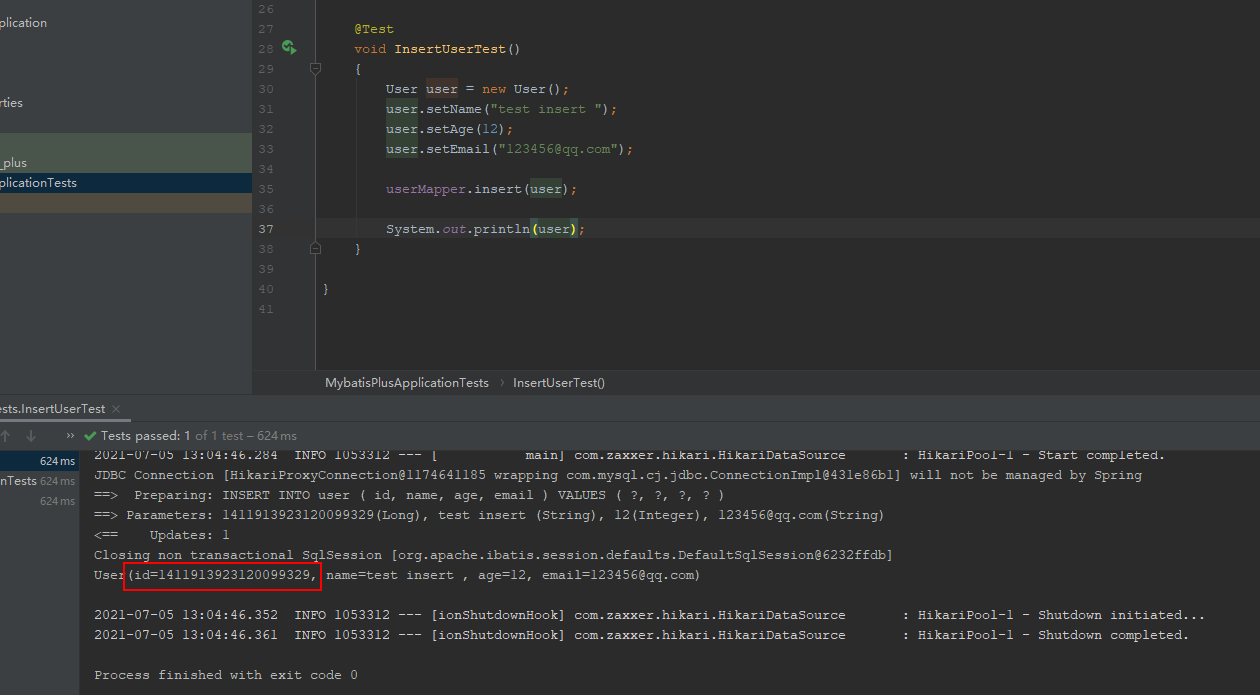
从测试结果可以看出我们的数据成功插入数据库,但是发现UserId是一串很长的数字,这个Id到底是如何生成的呢,采用哪种算法生成?
主键生成策略
分布式系统唯一Id生成: https://www.cnblogs.com/haoxinyue/p/5208136.html
雪花算法
snowflake是Twitter开源的分布式ID生成算法,结果是一个long型的ID。其核心思想是:使用41bit作为毫秒数,10bit作为机器的ID(5个bit是数据中心,5个bit的机器ID),12bit作为毫秒内的流水号(意味着每个节点在每毫秒可以产生 4096 个 ID),最后还有一个符号位,永远是0
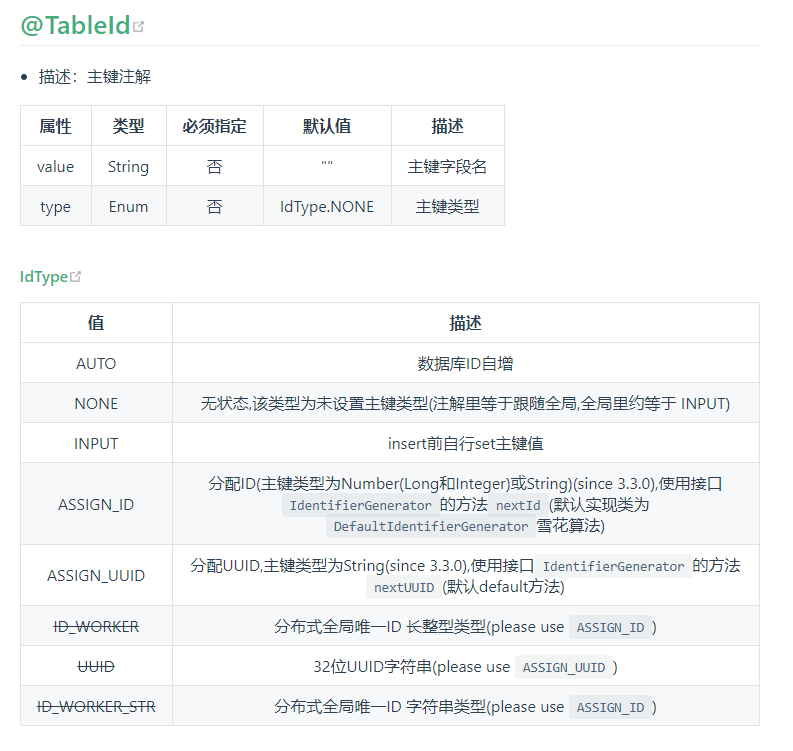
public enum IdType {
    AUTO(0),//数据库id自增
    NONE(1),//未设置主键
    INPUT(2),//手动输入
    ASSIGN_ID(3),//分配ID(主键类型为Number(Long和Integer)或String)(since 3.3.0),使用接口IdentifierGenerator的方法nextId(默认实现类为DefaultIdentifierGenerator雪花算法)
    ASSIGN_UUID(4);//分配UUID,主键类型为String(since 3.3.0),使用接口IdentifierGenerator的方法nextUUID(默认default方法)
}
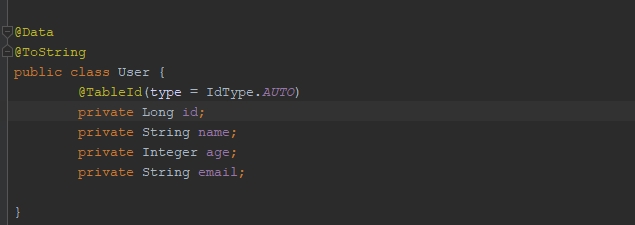
数据库Id自增
在实体类User的Id字段上添加@TableId注解,如图
测试Insert插入方法,数据库中的主键Id自增+1
在使用数据Id自增时,需要在数据库中将主键Id设置成自增才行
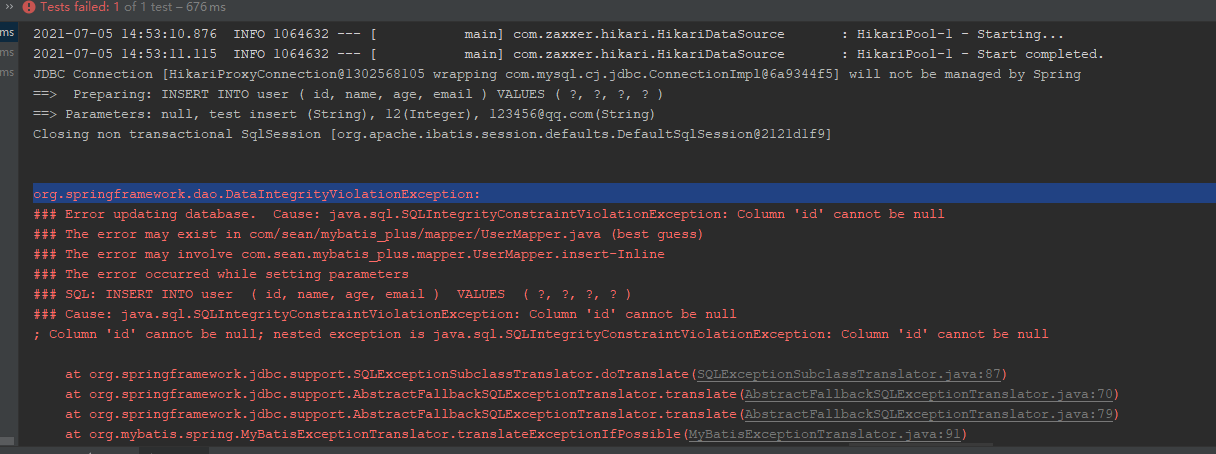
手动输入INPUT
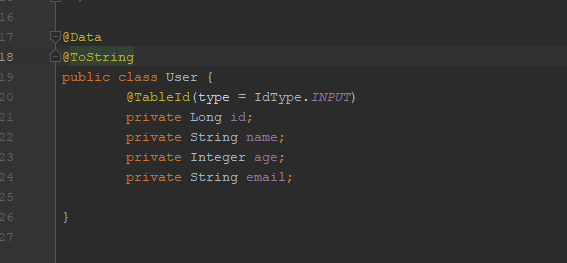
使用该模式时,需要自行设置id,否则会报错如下:
此时如果将数据库的自增主键设置成false,而且insert时也没有给User设置Id,此时就会报错
Update
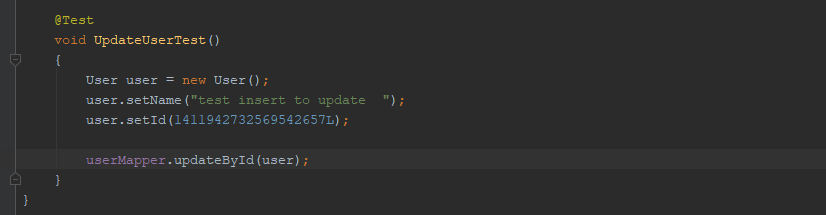

userMapper.updateById操作的也是一个对象,而不是一个主键id
自动填充
《阿里巴巴开发手册》必须有gmt_create、gmt_modified字段,且这两个字段不需要手动更新。

方式:代码级别
根据Mybatis-Plus官方文档说明,需要做以下几个步骤
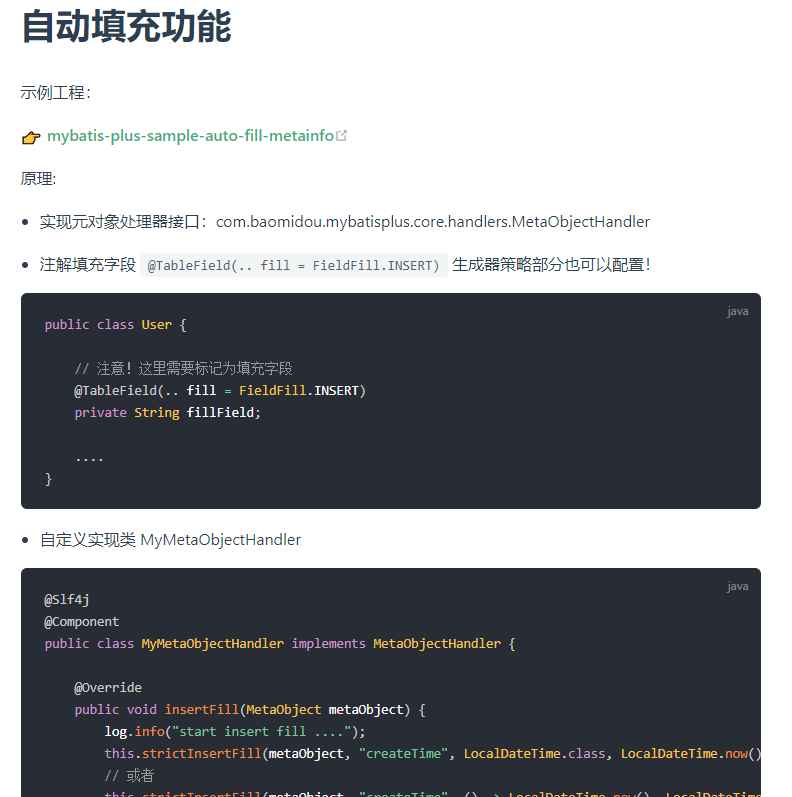
- 实体类添加注解@TableField
@Data
@ToString
public class User {
        @TableId(type = IdType.ASSIGN_ID)
        private Long id;
        private String name;
        private Integer age;
        private String email;

        @TableField(value =  "create_time",fill = FieldFill.INSERT)
        private LocalDateTime createTime;

        @TableField(value = "update_time",fill = FieldFill.INSERT_UPDATE)
        private LocalDateTime updateTime;

}
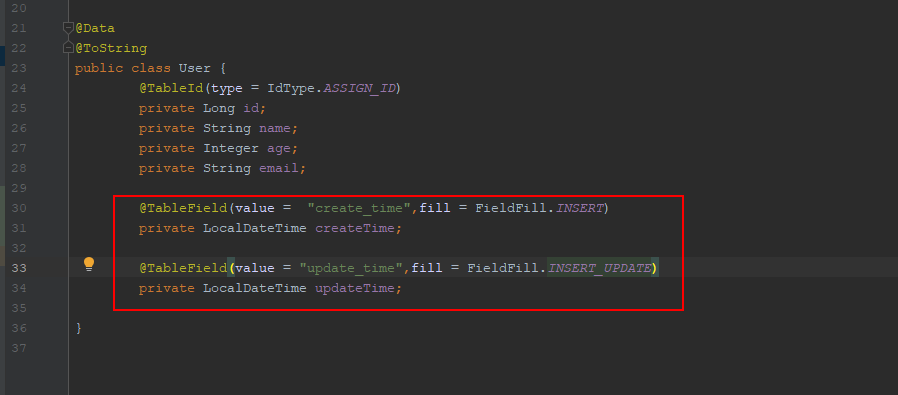
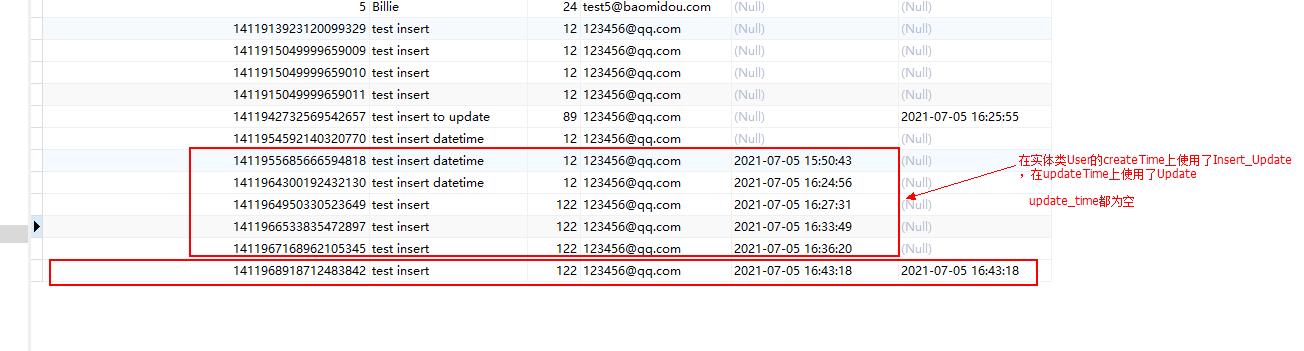
在使用@TableField注解时,在User实体类的createTime字段上使用FieldFill.Insert,在updateTime字段上使用FieldFill.Insert_update才会在insert操作时数据库creat_time和update_time才会都有值,否则update_time为空
- 添加自定义自动填充处理类
@Component
@Slf4j
public class MyMetaObjectHandler implements MetaObjectHandler {

    @Override
    public void insertFill(MetaObject metaObject) {
        this.strictInsertFill(metaObject,"createTime",()-> LocalDateTime.now(),LocalDateTime.class);
        this.strictUpdateFill(metaObject,"updateTime",()->LocalDateTime.now(),LocalDateTime.class);
    }

    @Override
    public void updateFill(MetaObject metaObject) {
        this.strictUpdateFill(metaObject,"updateTime",()->LocalDateTime.now(),LocalDateTime.class);
    }
}

乐观锁
乐观锁:
乐观锁是一种乐观的思想,即认为读多写少,遇到并发的可能性低,每次拿数据时都认为别人不会修改,所以不会上锁,但是在更新的时候会判断一下在此期间别人有没有去更新这个数据,可以使用版本号机制和 CAS 算法实现。
Java 中的乐观锁基本都是通过 CAS 操作实现的,CAS 是一种更新的原子操作,比较当前值跟传入值是否一样,一样则更新,否则失败。
悲观锁:
悲观锁就是悲观的思想,即认为写多,遇到并发的可能性高,每次拿数据时,都会认为别人会修改数据,所以在每次读数据的时候都会上锁,这样当别人想读写这个数据时就会阻塞,直到拿到锁。(共享资源每次只给一个线程使用,其它线程阻塞,用完后再把资源转让给其它线程)。传统的关系型数据库里边就用到了很多这种锁机制,比如行锁,表锁等,读锁,写锁等,都是在做操作之前先上锁。
Java 中的悲观锁就是 Synchronized,AQS 框架下的锁则是先尝试 CAS 乐观锁去获取锁,获取不到,才会转换为悲观锁,如 ReentrantLock。
Mybatis-plus 乐观锁插件
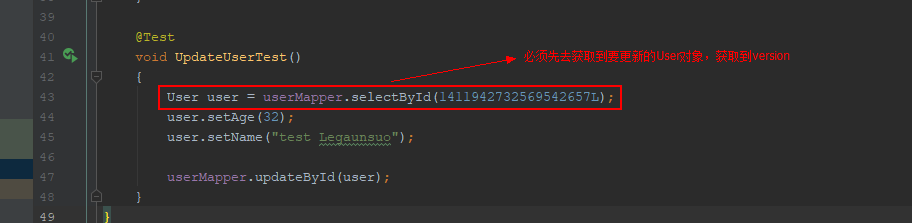
当要更新一条记录的时候,希望这条记录没有被别人更新。乐观锁实现方式:
- 取出记录时,获取当前version
- 更新时,带上这个version
- 执行更新时, set version = newVersion where version = oldVersion
- 如果version不对,就更新失败
实现步骤
-
数据库中添加version字段
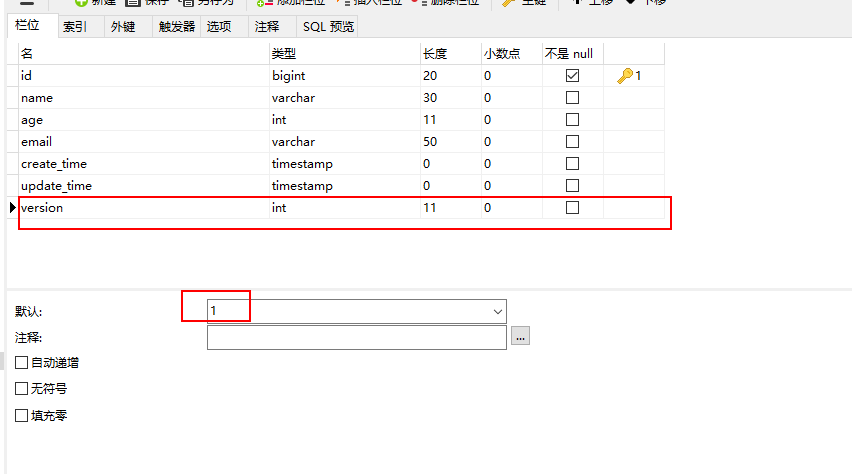
-
实体类中添加对应的version字段,并使用注解@Version
@Data@ToStringpublic class User { @TableId(type = IdType.ASSIGN_ID) private Long id; private String name; private Integer age; private String email; @TableField(value = "create_time",fill = FieldFill.INSERT) private LocalDateTime createTime; @TableField(value = "update_time",fill = FieldFill.INSERT_UPDATE) private LocalDateTime updateTime; @Version //使用乐观锁 private Integer version;} -
添加mybatis-plus配置类
@Configurationpublic
class MybatisPlusConfiguration
{
    @Bean
    public MybatisPlusInterceptor mybatisPlusInterceptor()
    {
    	MybatisPlusInterceptor mybatisPlusInterceptor = new MybatisPlusInterceptor();
  	mybatisPlusInterceptor.addInnerInterceptor(new OptimisticLockerInnerInterceptor());
    	return mybatisPlusInterceptor;
    }
}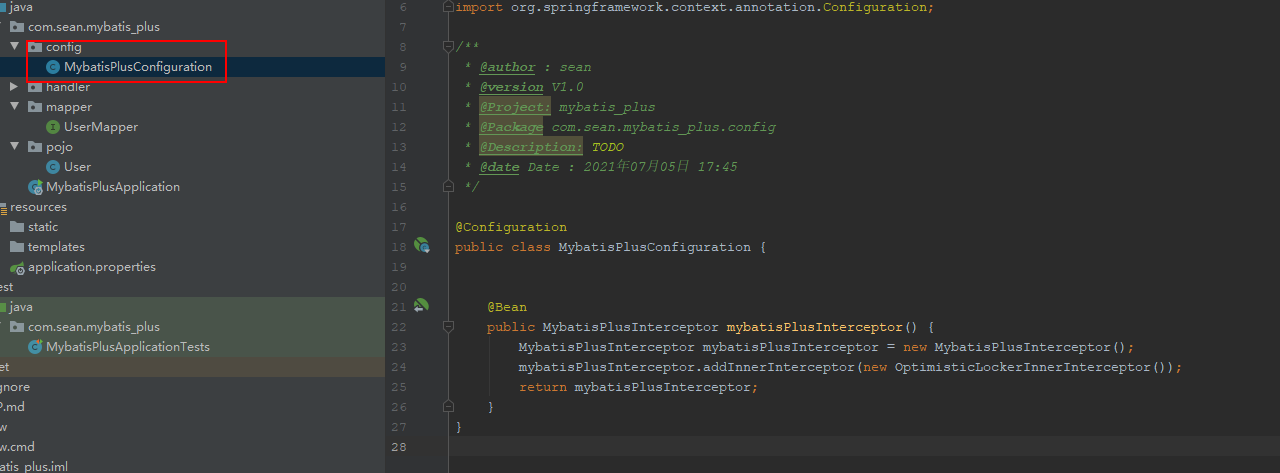
-
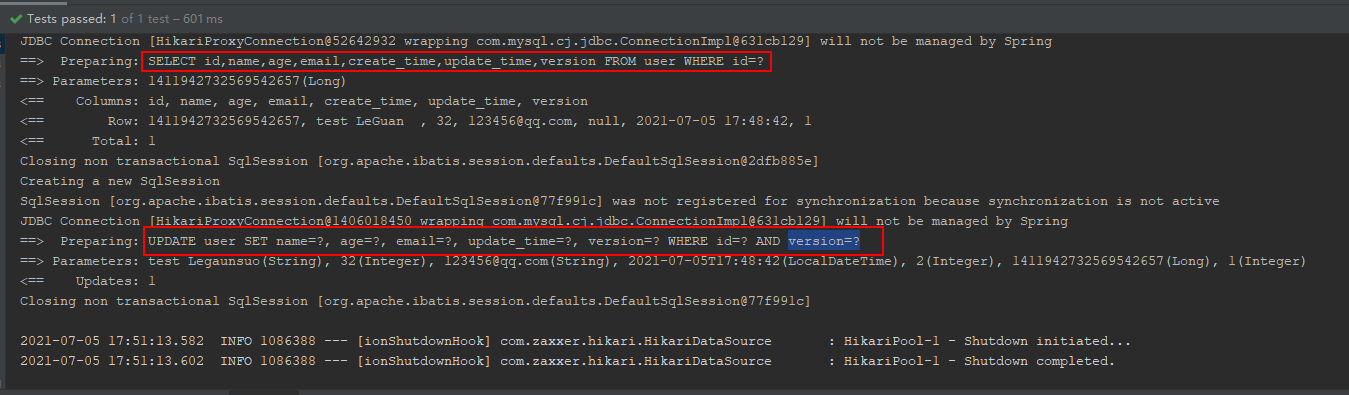
到此配置就完成了,下面进行测试
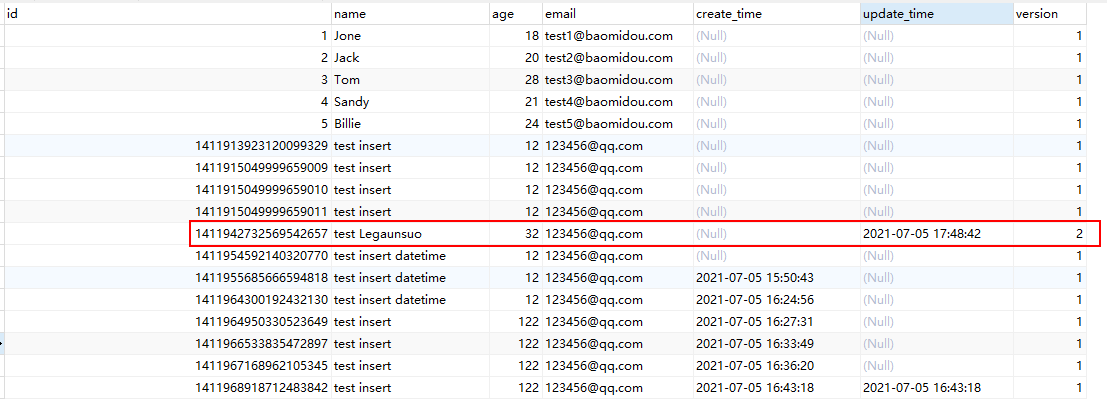
从更新结果上发现已经把version版本号更新成version=2
分页插件
配置步骤
-
在配置文件中添加分页插件
@Configurationpublic class MybatisPlusConfiguration { @Bean public MybatisPlusInterceptor mybatisPlusInterceptor() { MybatisPlusInterceptor mybatisPlusInterceptor = new MybatisPlusInterceptor();//乐观锁 mybatisPlusInterceptor.addInnerInterceptor(new OptimisticLockerInnerInterceptor()); //分页插件 mybatisPlusInterceptor.addInnerInterceptor(new PaginationInnerInterceptor(DbType.MYSQL)); return mybatisPlusInterceptor; } } -
测试
@Test
public void PageHelperTest()
{
    Page page = new Page(2,5);
    userMapper.selectPage(page,null);
}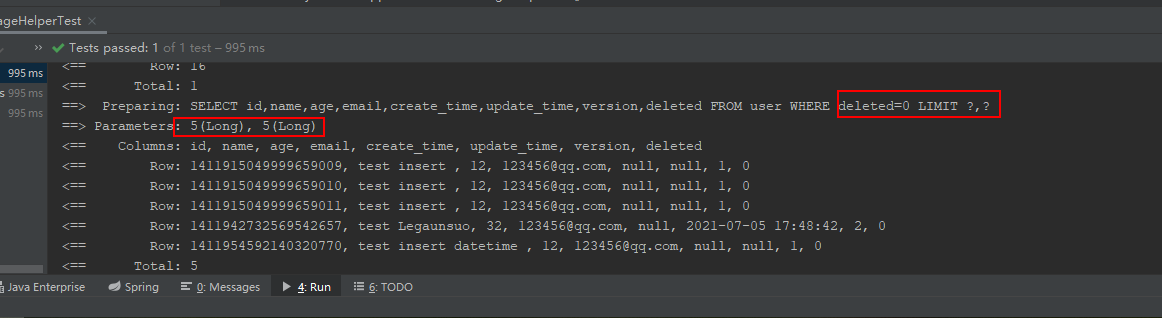
逻辑删除
说明: 只对自动注入的sql起效:
- 插入: 不作限制
- 查找: 追加where条件过滤掉已删除数据,且使用 wrapper.entity 生成的where条件会忽略该字段
- 更新: 追加where条件防止更新到已删除数据,且使用 wrapper.entity 生成的where条件会忽略该字段
- 删除: 转变为 更新
使用方法
-
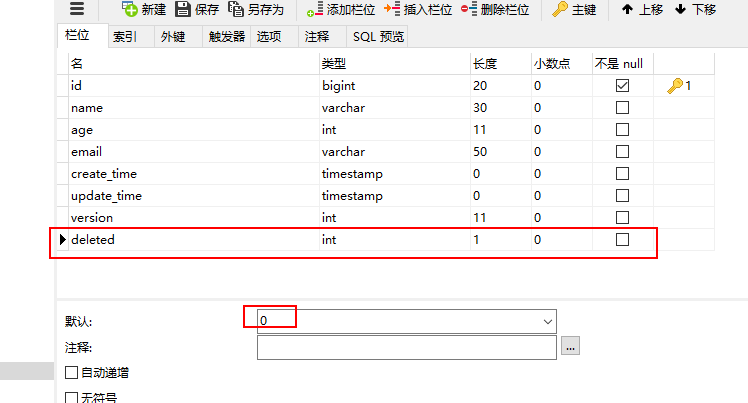
数据库中表字段添加deleted字段,并且默认值为0
-
实体类中添加deleted字段,并添加注解@TableLogic
@TableLogicprivate Integer deleted; -
配置文件application.properties中添加如下配置
#逻辑删除配置 mybatis-plus.global-config.db-config.logic-delete-field=delete dmybatis-plus.global-config.db-config.logic-delete-value=1 mybatis-plus.global-config.db-config.logic-not-delete-value=0 -
测试
-
查询测试:查询时会在SQL的where条件中添加deleted=0的条件
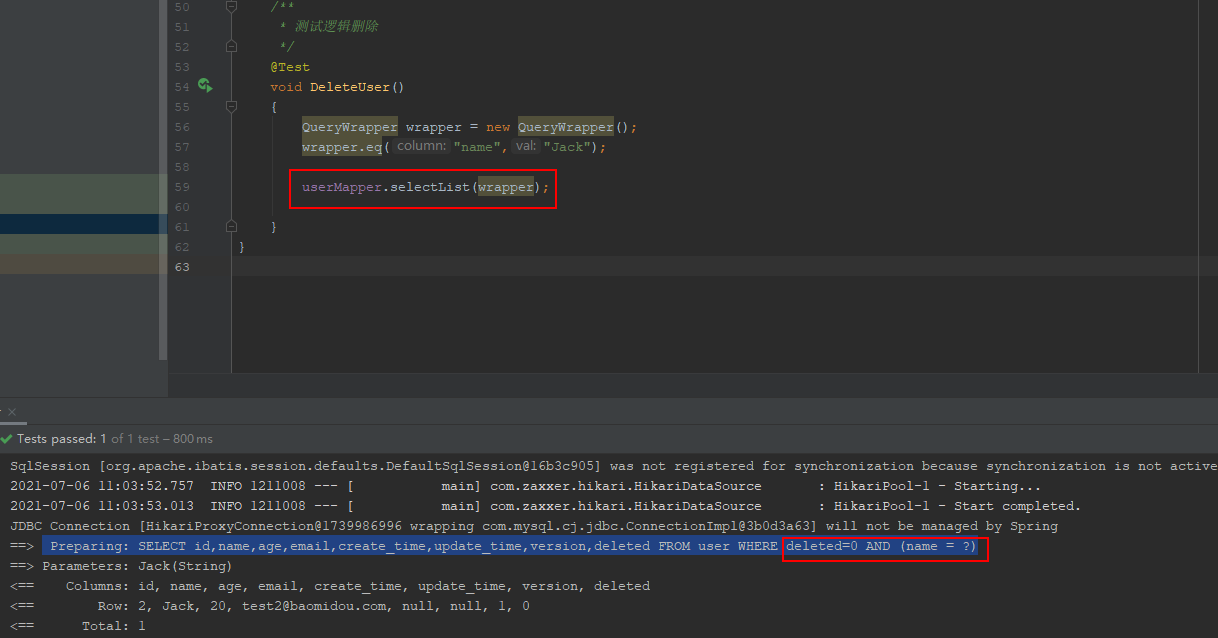
-
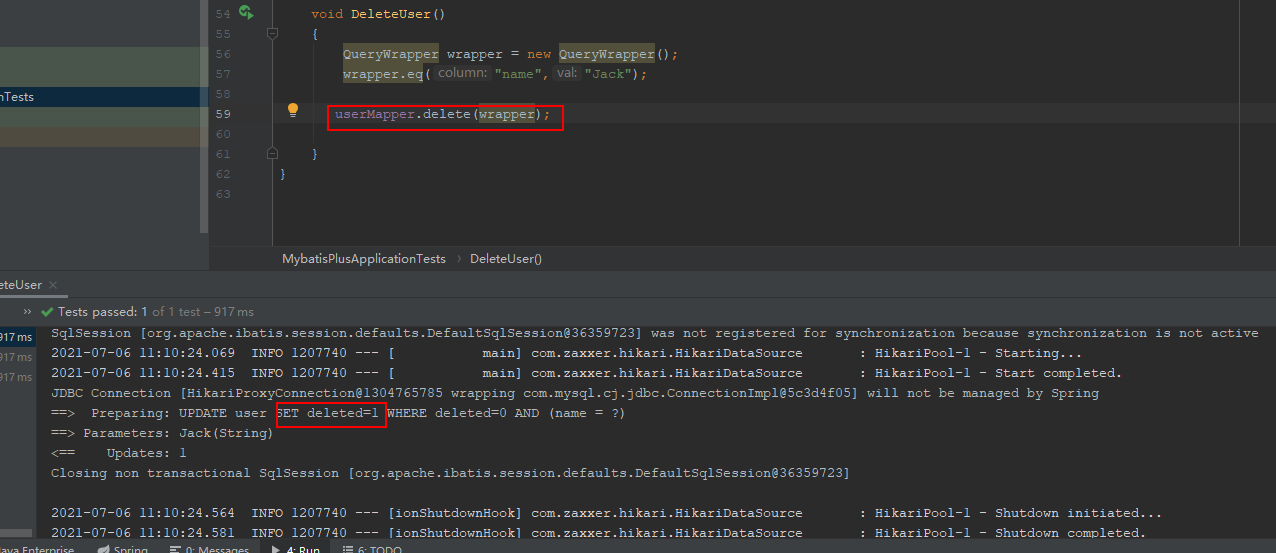
删除测试:删除会做软删除,把deleted字段的值设置成1
-
-
代码生成器
AutoGenerator 是 MyBatis-Plus 的代码生成器,通过 AutoGenerator 可以快速生成 Entity、Mapper、Mapper XML、Service、Controller 等各个模块的代码,极大的提升了开发效率。
public class MyGenerateCode
{
public static void main(String[] args)
{
AutoGenerator generator = new AutoGenerator();
//1.全局配置
GlobalConfig gc = new GlobalConfig();
gc.setAuthor("sean");
gc.setFileOverride(true);
gc.setServiceName("%sService");
gc.setIdType(IdType.AUTO);
gc.setDateType(DateType.ONLY_DATE);
String projectPath = System.getProperty("user.dir");
gc.setOutputDir(projectPath +"/src/main/java");
gc.setSwagger2(true);
gc.setOpen(false);
generator.setGlobalConfig(gc);
//2.策略配置
StrategyConfig sc = new StrategyConfig();
sc.setInclude("user");
sc.setEntityLombokModel(true);
sc.setRestControllerStyle(true);
sc.setControllerMappingHyphenStyle(true);
sc.setNaming(NamingStrategy.underline_to_camel);
sc.setColumnNaming(NamingStrategy.underline_to_camel);
sc.setLogicDeleteFieldName("deleted");//自动填充
TableFill insert = new TableFill("create_time", FieldFill.INSERT);
TableFill update = new TableFill("update_time", FieldFill.INSERT_UPDATE);
ArrayList<TableFill> list = new ArrayList<>();
list.add(insert);
list.add(update);
sc.setTableFillList(list);//乐观锁
sc.setVersionFieldName("version");
generator.setStrategy(sc);
//3.包路径配置
PackageConfig packageConfig = new PackageConfig();
packageConfig.setParent("com.sean");
packageConfig.setModuleName("generate");
packageConfig.setEntity("entity");
packageConfig.setMapper("mapper");
packageConfig.setController("controller");
packageConfig.setService("service");
generator.setPackageInfo(packageConfig);
//4.数据库配置
DataSourceConfig dataSourceConfig = new DataSourceConfig();        dataSourceConfig.setUrl("jdbc:mysql://localhost:3306/mybatis_plus?useSSL=false&useUnicode=true&characterEncode=utf-8&serverTimeZone=GMT%2B8");        dataSourceConfig.setDriverName("com.mysql.cj.jdbc.Driver");
dataSourceConfig.setUsername("root");
dataSourceConfig.setPassword("root");
dataSourceConfig.setDbType(DbType.MYSQL);
generator.setDataSource(dataSourceConfig);
/*     // 配置模板
TemplateConfig templateConfig = new TemplateConfig();
// 配置自定义输出模板
//指定自定义模板路径,注意不要带上.ftl/.vm, 会根据使用的模板引擎自动识别
// templateConfig.setEntity("templates/entity2.java");
// templateConfig.setService();
// templateConfig.setController();
templateConfig.setXml(null);
generator.setTemplate(templateConfig);*/
generator.execute();//执行    }
遇到的问题如下:
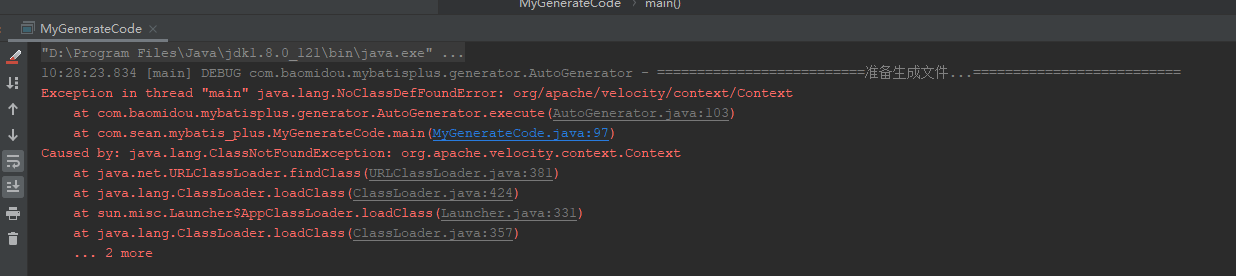
解决方法:在POM文件中添加velocity的依赖
<dependency>
	<groupId>org.apache.velocity</groupId>
	<artifactId>velocity-engine-core</artifactId>
	<version>2.0</version>
</dependency>
因为我们配置开启了Swagger2,因此还需要在POM文件中添加Swagger2的依赖

<dependency>
	<groupId>io.springfox</groupId>
	<artifactId>springfox-swagger2</artifactId>
	<version>2.6.1</version>
</dependency>
<dependency>
	<groupId>io.springfox</groupId>
	<artifactId>springfox-swagger-ui</artifactId>
	<version>2.6.1</version>
</dependency>
既然都提到了Swagger2,那么就把Swagger2的配置文件也放这里
@Configuration
@EnableSwagger2public class SwaggerConfig {
	@Bean
	public Docket api() {
	return new Docket(DocumentationType.SWAGGER_2)
	.apiInfo(apiInfo())
	.select()
	.paths(PathSelectors.any())
	.apis(RequestHandlerSelectors.withClassAnnotation(Api.class))
	.build();
	}
	private ApiInfo apiInfo()
	{
		return  new ApiInfoBuilder()
		.title("API接口文档")
		.description("API接口文档,及相关接口的说明")
		.version("1.0.0")
		.build();
	}
}
MybatisX 快速开发插件
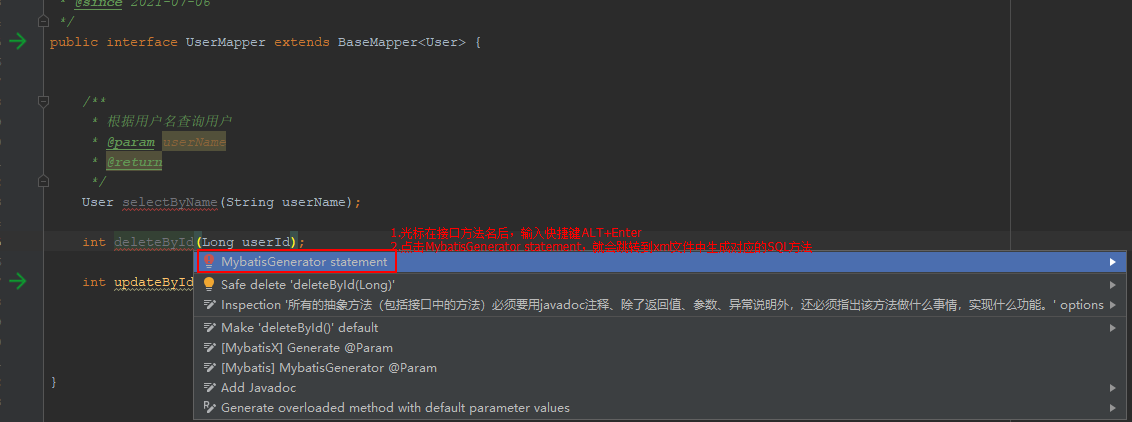
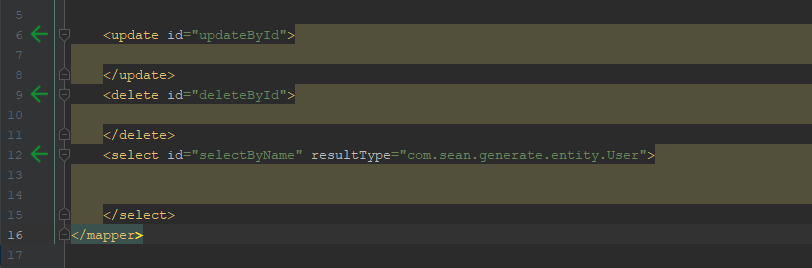
快捷键
alt+enter :在Mapper接口类中,输入接口方法后使用快捷键ALT+Enter, 会自动跳转到mapper.xml文件中生成对应的xml文件
条件查询器
这个不是太难就自行参考官方文档:https://mp.baomidou.com/guide/wrapper.html

 浙公网安备 33010602011771号