Ubuntu下搭建Hyperledger Fabric v1.0环境
一、安装Ubuntu16

二、安装基础工具
注意操作用户是自建用户,不是root,特别一些命令涉及用户目录的地方要特别注意
首先安装一些常用工具
go需要单独安装下
编辑全局变量环境,添加一下profile
生效profile,建立go目录
此时酌情重启下系统
三、安装docker 基于aliyun
sudo usermod -aG docker XXX 四、安装 Docker-Compose 从DaoClound
五.Fabric源码下载
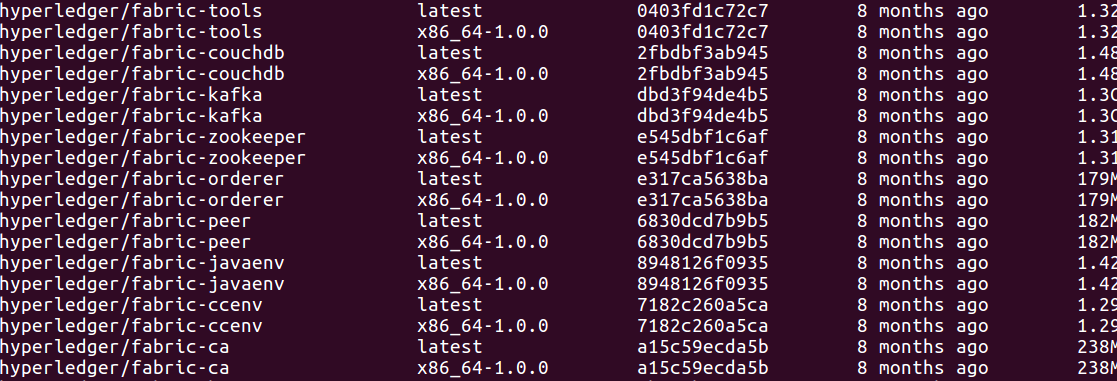
六. Fabric Docker镜像的下载

七、启动Fabric网络并完成ChainCode的测试
./network_setup.sh up
- 编译生成Fabric公私钥、证书的程序,程序在目录:fabric/release/linux-amd64/bin
- 基于configtx.yaml生成创世区块和通道相关信息,并保存在channel-artifacts文件夹。
- 基于crypto-config.yaml生成公私钥和证书信息,并保存在crypto-config文件夹中。
- 基于docker-compose-cli.yaml启动1Orderer+4Peer+1CLI的Fabric容器。
- 在CLI启动的时候,会运行scripts/script.sh文件,这个脚本文件包含了创建Channel,加入Channel,安装Example02,运行Example02等功能。
出现则表示网络运行成功,ctrl+c退出
八、手动测试Fabric网络
这里有官方提供的小例子,在官方例子中,channel名字是mychannel,链码的名字是mycc。
首先进入CLI,然后重新打开一个命令行窗口,输入: docker exec -it cli bash
这时用户为root@748dafdc900b,在/opt/gopath/src/github.com/hyperledger/fabric/peer目录下,运行以下命令可以查询a账户的余额: peer chaincode query -C mychannel -n mycc -c '{"Args":["query","a"]}'
方框内可以看见余额为:90
下面我们可以进行转账操作,操作为invoke ,由a转b 50:
现在转账完毕, 我们试一试再查询一下a账户的余额,重复之前的查询指令,结果为:
结果正确,a的余额只有40了。
最后,我们需要关闭Fabric,这里先使用exit命令退出cli容器。 exit
然后类似于启动指令: cd ~/go/src/github.com/hyperledger/fabric/examples/e2e_cli ./network_setup.sh down
最后,我们整个Fabric的环境已经测试完毕!!
Ubuntu无法解析域名的解决办法:
Could not resolve host: download.docker.com
修改文件/etc/resolvconf/resolv.conf.d/base
vim /etc/resolvconf/resolv.conf.d/base
# 在该文件加上一行:
nameserver 8.8.8.8
resolvconf -u #执行
安装过程中如果出现网络连接错误,可以将软件源改成阿里云镜像
# 编辑/etc/apt/sources.list文件, 在文件最前面添加以下条目(适用于Ubuntu18.04)
deb http://mirrors.aliyun.com/ubuntu/ bionic main restricted universe multiverse
deb http://mirrors.aliyun.com/ubuntu/ bionic-security main restricted universe multiverse
deb http://mirrors.aliyun.com/ubuntu/ bionic-updates main restricted universe multiverse
deb http://mirrors.aliyun.com/ubuntu/ bionic-proposed main restricted universe multiverse
deb http://mirrors.aliyun.com/ubuntu/ bionic-backports main restricted universe multiverse
deb-src http://mirrors.aliyun.com/ubuntu/ bionic main restricted universe multiverse
deb-src http://mirrors.aliyun.com/ubuntu/ bionic-security main restricted universe multiverse
deb-src http://mirrors.aliyun.com/ubuntu/ bionic-updates main restricted universe multiverse
deb-src http://mirrors.aliyun.com/ubuntu/ bionic-proposed main restricted universe multiverse
deb-src http://mirrors.aliyun.com/ubuntu/ bionic-backports main restricted universe multiverse
#(适用于Ubuntu16.04)

deb-src http://archive.ubuntu.com/ubuntu xenial main restricted #Added by software-properties
deb http://mirrors.aliyun.com/ubuntu/ xenial main restricted
deb-src http://mirrors.aliyun.com/ubuntu/ xenial main restricted multiverse universe #Added by software-properties
deb http://mirrors.aliyun.com/ubuntu/ xenial-updates main restricted
deb-src http://mirrors.aliyun.com/ubuntu/ xenial-updates main restricted multiverse universe #Added by software-properties
deb http://mirrors.aliyun.com/ubuntu/ xenial universe
deb http://mirrors.aliyun.com/ubuntu/ xenial-updates universe
deb http://mirrors.aliyun.com/ubuntu/ xenial multiverse
deb http://mirrors.aliyun.com/ubuntu/ xenial-updates multiverse
deb http://mirrors.aliyun.com/ubuntu/ xenial-backports main restricted universe multiverse
deb-src http://mirrors.aliyun.com/ubuntu/ xenial-backports main restricted universe multiverse #Added by software-properties
deb http://archive.canonical.com/ubuntu xenial partner
deb-src http://archive.canonical.com/ubuntu xenial partner
deb http://mirrors.aliyun.com/ubuntu/ xenial-security main restricted
deb-src http://mirrors.aliyun.com/ubuntu/ xenial-security main restricted multiverse universe #Added by software-properties
deb http://mirrors.aliyun.com/ubuntu/ xenial-security universe
deb http://mirrors.aliyun.com/ubuntu/ xenial-security multiverse
运行sudo apt install curl 安装curl,此时如果出现如下错误:
E: Could not get lock /var/lib/dpkg/lock - open (11: Resource temporarily unavailable)
E: Unable to lock the administration directory (/var/lib/dpkg/), is another process using it?
解决方案:
ps -A |grep apt # 查看进程号
sudo kill -9 [processnumber]  #结束进程
sudo apt install curl
如果出现路径权限问题,需要将路径所有者改成自建用户,例如:
sudo chown -R dsd:dsd ./bin/ # 将目录所有者改为自建用户
如果提示已经有容器在运行,发生冲突,则应停止正在运行的docker进程:
docker ps -qa | xargs docker stop
docker ps -qa | xargs docker rm
# 或者:
./ network_setup.sh down
Make 编译出错如下
make configtxgen configtxlator cryptogen
Makefile:93: *** "No go in PATH: Check dependencies".  Stop.
解决方案:重新source环境变量,如:
source /etc/profile
# 或者:
source ~/.bashrc
教程参考以下:
http://blog.csdn.net/so5418418/article/details/78355868
https://yq.aliyun.com/articles/110806
http://get.daocloud.io/
Ubuntu下搭建Hyperledger Fabric v1.0环境 2018快速国内源
一、安装Ubuntu16

二、安装基础工具
注意操作用户是自建用户,不是root,特别一些命令涉及用户目录的地方要特别注意
首先安装一些常用工具
go需要单独安装下
编辑全局变量环境,添加一下profile
生效profile,建立go目录
此时酌情重启下系统
三、安装docker 基于aliyun
sudo usermod -aG docker XXX 四、安装 Docker-Compose 从DaoClound
五.Fabric源码下载
六. Fabric Docker镜像的下载

七、启动Fabric网络并完成ChainCode的测试
./network_setup.sh up
- 编译生成Fabric公私钥、证书的程序,程序在目录:fabric/release/linux-amd64/bin
- 基于configtx.yaml生成创世区块和通道相关信息,并保存在channel-artifacts文件夹。
- 基于crypto-config.yaml生成公私钥和证书信息,并保存在crypto-config文件夹中。
- 基于docker-compose-cli.yaml启动1Orderer+4Peer+1CLI的Fabric容器。
- 在CLI启动的时候,会运行scripts/script.sh文件,这个脚本文件包含了创建Channel,加入Channel,安装Example02,运行Example02等功能。
出现则表示网络运行成功,ctrl+c退出
八、手动测试Fabric网络
这里有官方提供的小例子,在官方例子中,channel名字是mychannel,链码的名字是mycc。
首先进入CLI,然后重新打开一个命令行窗口,输入: docker exec -it cli bash
这时用户为root@748dafdc900b,在/opt/gopath/src/github.com/hyperledger/fabric/peer目录下,运行以下命令可以查询a账户的余额: peer chaincode query -C mychannel -n mycc -c '{"Args":["query","a"]}'
方框内可以看见余额为:90
下面我们可以进行转账操作,操作为invoke ,由a转b 50:
现在转账完毕, 我们试一试再查询一下a账户的余额,重复之前的查询指令,结果为:
结果正确,a的余额只有40了。
最后,我们需要关闭Fabric,这里先使用exit命令退出cli容器。 exit
然后类似于启动指令: cd ~/go/src/github.com/hyperledger/fabric/examples/e2e_cli ./network_setup.sh down
最后,我们整个Fabric的环境已经测试完毕!!
教程参考以下:
http://blog.csdn.net/so5418418/article/details/78355868
https://yq.aliyun.com/articles/110806
http://get.daocloud.io/

如果这篇文章帮助到了你,你可以请作者喝一杯咖啡


