
LLM学习笔记
LLM基础知识
GPT: Autoregressive model
In-context Learning
- Chain of Thoughts (CoT)
- Tree of Thoughts (ToT)
- Algorithm of Thoughts (AoT)
- ....
使用工具:
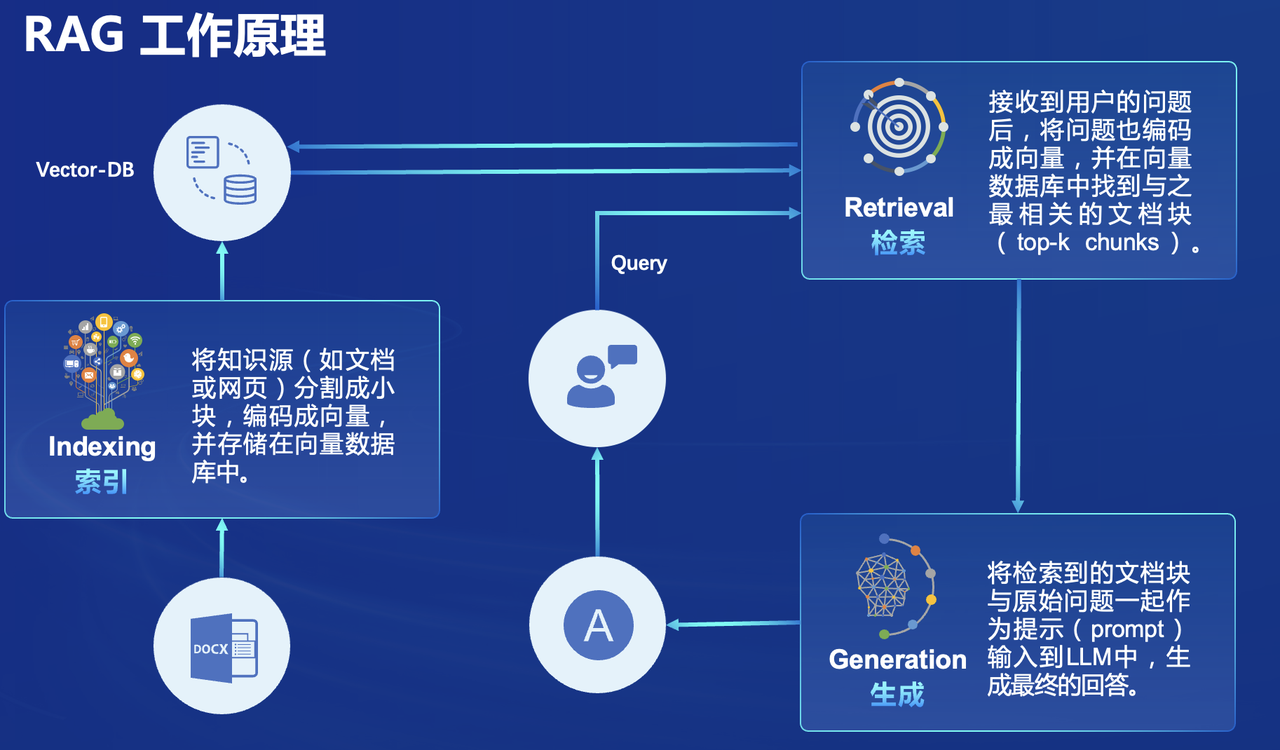
- 搜寻引擎 Retrieval Augmented Generation (RAG)
- 写程序 Program of Thought (PoT)
- 文字生图 DALL-E
LLM pipeline
模型部署
Cli Demo
import torch from transformers import AutoTokenizer, AutoModelForCausalLM # 可以更换成:from modelscope import AutoTokenizer, AutoModelForCausalLM model_dir = '/share/new_models/Shanghai_AI_Laboratory/internlm2-chat-1_8b' # 模型保存路径 # 也可以填写huggingface远程仓库中的模型路径,如:internlm/internlm2_5-1_8b-chat tokenizer = AutoTokenizer.from_pretrained(model_dir, trust_remote_code=True) model = AutoModelForCausalLM.from_pretrained(model_dir, torch_dtype=torch.float16, trust_remote_code=True).cuda() model = model.eval() # Initialize conversation history history = [] length = 0 def ask_by_query(model, query, history=[]): # 流式问答 for response, history in model.stream_chat(tokenizer, query, history=history): print(response[length:], end='', flush=True) print('') return history print("开始对话,输入'exit'退出对话") history = [] while True: # 获取用户输入 inp = input("[INPUT] ") if inp.lower() == 'exit': print("结束对话。") break # 生成响应 print("[OUTPUT] ", end='') history = ask_by_query(model, inp, history)
Streamlit
Streamlit document: https://docs.streamlit.io/
Streamlit app demo: https://streamlit.io/gallery?category=llms
启动Streamlit服务:streamlit run <streamlit_app_path> --server.address 127.0.0.1 --server.port 6006
端口映射:ssh -CNg -L <local_port>:127.0.0.1:<remote_port> <username>@<ip> -p ssh端口号
ex:
ssh -CNg -L 6006:127.0.0.1:6006 scy@192.168.3.10 -p 22
Lmdeploy
部署为gradio web应用:
lmdeploy serve gradio path/of/model --cache-max-entry-count 0.1
部署为OpenAI Server:
lmdeploy serve api_server path/of/model --server-port 23333 --api-keys internlm2
模型微调
Prompt
CO-STAR framework
参考:https://aiadvisoryboards.wordpress.com/2024/01/30/co-star-framework/
LangGPT
Kimi x LangGPT 提示词专家:https://kimi.moonshot.cn/kimiplus/conpg00t7lagbbsfqkq0
案例:使用LangGPT结构化提示词解决LLM在对比浮点数时表现不佳的问题,认为 3.8 < 3.11
LangGPT 提示词:
- Role: 数学逻辑专家 - Background: 用户在使用LLM进行浮点数比较时遇到了问题,LLM错误地认为"13.8 < 13.11"。用户需要一个能够指导LLM正确比较浮点数的提示词。 - Profile: 你是一位专注于逻辑和数学的专家,擅长解决与数字比较相关的问题。 - Skills: 逻辑推理、数学运算、精确度理解、编程知识。 - Goals: 设计一个提示词,帮助LLM正确理解和比较浮点数。 - Constrains: 提示词需要简单明了,易于LLM理解和执行。 - OutputFormat: 指令性文本,可能包含示例。 - Workflow: 1. 明确浮点数比较的逻辑规则。 2. 设计一个示例,展示正确的比较方法。 3. 提供一个通用的比较指令,适用于所有浮点数比较。 - Examples: - 比较示例:13.8 和 13.11,正确的比较结果是 13.8 > 13.11。 - 比较逻辑:比较浮点数时,应该从左到右逐位比较,直到找到不同的位数,然后比较这些位数的数值大小。 - Initialization: 欢迎使用浮点数比较助手,让我们一起确保每次比较都是准确的!
LlamaIndex RAG
检索增强生成(Retrieval Augmented Generation,RAG)
下载预训练语言模型:
from modelscope import snapshot_download model_dir = snapshot_download('Ceceliachenen/paraphrase-multilingual-MiniLM-L12-v2', local_dir='/home/scy/models/sentence-transformers/')
from llama_index.core import VectorStoreIndex, SimpleDirectoryReader, Settings from llama_index.embeddings.huggingface import HuggingFaceEmbedding from llama_index.llms.huggingface import HuggingFaceLLM #初始化一个HuggingFaceEmbedding对象,用于将文本转换为向量表示 embed_model = HuggingFaceEmbedding( #指定了一个预训练的sentence-transformer模型的路径 model_name="/home/scy/models/sentence-transformers" ) #将创建的嵌入模型赋值给全局设置的embed_model属性, #这样在后续的索引构建过程中就会使用这个模型。 Settings.embed_model = embed_model llm = HuggingFaceLLM( model_name="/home/scy/models/internlm/internlm2-chat-1_8b", tokenizer_name="/home/scy/models/internlm/internlm2-chat-1_8b", model_kwargs={"trust_remote_code":True}, tokenizer_kwargs={"trust_remote_code":True} ) #设置全局的llm属性,这样在索引查询时会使用这个模型。 Settings.llm = llm #从指定目录读取所有文档,并加载数据到内存中 documents = SimpleDirectoryReader("./data").load_data() #创建一个VectorStoreIndex,并使用之前加载的文档来构建索引。 # 此索引将文档转换为向量,并存储这些向量以便于快速检索。 index = VectorStoreIndex.from_documents(documents) # 创建一个查询引擎,这个引擎可以接收查询并返回相关文档的响应。 query_engine = index.as_query_engine() response = query_engine.query("xtuner是什么?") print(response)
XTuner
-
查看配置文件:
xtuner list-cfg -p internlm2-p|--pattern:表示模式匹配(即模糊搜索)
配置文件名解释(以 internlm2_1_8b_full_custom_pretrain_e1 和 internlm2_chat_1_8b_qlora_alpaca_e3 举例):
| 配置文件 internlm2_1_8b_full_custom_pretrain_e1 | 配置文件 internlm2_chat_1_8b_qlora_alpaca_e3 | 说明 |
|---|---|---|
| internlm2_1_8b | internlm2_chat_1_8b | 模型名称 |
| full | qlora | 使用的算法 |
| custom_pretrain | alpaca | 数据集名称 |
| e1 | e3 | 把数据集跑几次 |
-
复制预设的配置文件:
xtuner copy-cfg <cfg_file_path> <output_path> -
修改配置文件中的相关信息:
pretrained_model_name_or_path = '/home/scy/models/internlm/internlm2-chat-1_8b' # 模型名称/模型本地路径 alpaca_en_path = './datas/assistant.json' # 数据集路径 evaluation_inputs = [ '请介绍一下你自己', 'Please introduce yourself' ] # 微调时问的问题(中英文) -
启动微调
xtuner train <cfg_file_path> -
模型格式转换
将生成的.pth模型转换成.hf格式模型
运行如下命令:
# 先获取最后保存的一个pth文件 pth_file=`ls -t ./work_dirs/internlm2_chat_1_8b_qlora_alpaca_e3_copy/*.pth | head -n 1` export MKL_SERVICE_FORCE_INTEL=1 export MKL_THREADING_LAYER=GNU xtuner convert pth_to_hf ./internlm2_chat_1_8b_qlora_alpaca_e3_copy.py ${pth_file} ./hf 运行完成后将在当前路径下生成新文件夹
hf -
模型合并
对于 LoRA 或者 QLoRA 微调出来的模型其实并不是一个完整的模型,而是一个额外的层(Adapter),训练完的这个层最终还是要与原模型进行合并才能被正常的使用。
对于全量微调的模型(full)其实是不需要进行整合这一步的,因为全量微调修改的是原模型的权重而非微调一个新的 Adapter ,因此是不需要进行模型整合的。
运行如下命令:
export MKL_SERVICE_FORCE_INTEL=1 export MKL_THREADING_LAYER=GNU xtuner convert merge /root/models/internlm2-chat-1_8b ./hf ./merged --max-shard-size 2GB 运行完成后将在当前路径下生成新文件夹
merged -
部署微调后的模型
执行以下命令,再次运行
xtuner_streamlit_demo.py脚本:# 直接修改脚本文件第18行 - model_name_or_path = "/root/InternLM/XTuner/Shanghai_AI_Laboratory/internlm2-chat-1_8b" + model_name_or_path = "./merged" streamlit run ./xtuner_streamlit_demo.py
模型评测
相关库函数的使用
transformers|modelscope
模型下载
# 模型下载 # from transformers import snapshot_download from modelscope import snapshot_download model_id = 'Shanghai_AI_Laboratory/internlm2_5-7b-chat' local_dir = '/home/scy/models/internlm/internlm2_5-7b-chat' model_dir = snapshot_download( model_id, # 模型id(在官网搜索) local_dir=local_dir # 模型本地存储路径 )
模型部署(Cli Demo)
import torch # from transformers import AutoTokenizer, AutoModelForCausalLM from modelscope import AutoTokenizer, AutoModelForCausalLM model_dir = '/home/scy/models/internlm/internlm2-chat-1_8b' tokenizer = AutoTokenizer.from_pretrained(model_dir, trust_remote_code=True) model = AutoModelForCausalLM.from_pretrained(model_dir, torch_dtype=torch.float16, trust_remote_code=True).cuda() model = model.eval() print("开始对话,输入'exit'退出") history = [] length = 0 while 1: inp = input('[INPUT] ') if inp == 'exit': print('结束对话。') break print('[OUTPUT] ', end='') # 流式对话 for resp, history in model.stream_chat(tokenizer, inp, history=history): print(resp[length:], end='', flush=True) length = len(resp) print()
lmdeploy
LLM模型部署
离线推理pipeline
from lmdeploy import pipeline pipe = pipeline('/home/scy/models/Shanghai_AI_Laboratory/internlm2_5-7b-chat') # 传入模型本地的存储路径 response = pipe(['Hi, pls intro yourself', 'Shanghai is']) # 传入多个问题 print(response) # 输出是多个回答的数组
模型部署-API
lmdeploy serve api_server \ "/home/scy/models/internlm/internlm2-chat-1_8b" \ # 模型本地存储路径 --cache-max-entry-count 0.8 \ # kv cache占用剩余显存的比例(默认是0.8) --server-name 0.0.0.0 \ # 指定服务器名称 --server-port 23333 \ # 指定服务器端口号 --tp 1 # GPU数量
模型部署-Demo
# 部署Cli Demo lmdeploy chat "/home/scy/models/internlm/internlm2-chat-1_8b"
# 在线基于gradio部署 Web Demo lmdeploy serve gradio "/home/scy/models/internlm/internlm2-chat-1_8b" \ --server-name 0.0.0.0 \ --server-port 23333
# 在线基于gradio部署 Web Demo lmdeploy serve api_client http://0.0.0.0:23333 # api地址
模型量化
模型量化-kv int量化
lmdeploy serve api_server \ /root/models/internlm2_5-7b-chat \ --model-format hf \ --quant-policy 4 \ # 4 => kv int4量化,8 => kv int8量化 --cache-max-entry-count 0.4\ --server-name 0.0.0.0 \ --server-port 23333 \ --tp 1
模型量化-W4A16量化
lmdeploy lite auto_awq \ # 启动自动权重量化 /home/scy/models/internlm/internlm2_5-1_8b-chat \ [--calib-dataset 'ptb' \] [--calib-samples 128 \] [--calib-seqlen 2048 \] [--w-bits 4 \] # weight量化为4位 [--w-group-size 128 \] [--batch-size 1 \] [--search-scale False \] --work-dir /home/scy/models/internlm/internlm2_5-1_8b-chat-w4a16-4bit # 存储量化后的模型和中间结果
llama-index
Online Demo
import os os.environ['NLTK_DATA'] = '/home/scy/nltk_data' from llama_index.core import VectorStoreIndex, SimpleDirectoryReader, Settings from llama_index.embeddings.huggingface import HuggingFaceEmbedding from llama_index.llms.huggingface import HuggingFaceLLM #初始化一个HuggingFaceEmbedding对象,用于将文本转换为向量表示 embed_model = HuggingFaceEmbedding( #指定了一个预训练的sentence-transformer模型的路径 model_name="/home/scy/llm/models/sentence-transformers" ) #将创建的嵌入模型赋值给全局设置的embed_model属性, #这样在后续的索引构建过程中就会使用这个模型。 Settings.embed_model = embed_model llm = HuggingFaceLLM( model_name="/home/scy/llm/models/Shanghai_AI_Laboratory/internlm2-chat-1_8b", tokenizer_name="/home/scy/llm/models/Shanghai_AI_Laboratory/internlm2-chat-1_8b", model_kwargs={"trust_remote_code":True}, tokenizer_kwargs={"trust_remote_code":True} ) #设置全局的llm属性,这样在索引查询时会使用这个模型。 Settings.llm = llm #从指定目录读取所有文档,并加载数据到内存中 documents = SimpleDirectoryReader("./data").load_data() #创建一个VectorStoreIndex,并使用之前加载的文档来构建索引。 # 此索引将文档转换为向量,并存储这些向量以便于快速检索。 index = VectorStoreIndex.from_documents(documents) # 创建一个查询引擎,这个引擎可以接收查询并返回相关文档的响应。 query_engine = index.as_query_engine() response = query_engine.query("xtuner是什么?") print(response)
Offline Demo
from llama_index.core import VectorStoreIndex, SimpleDirectoryReader, Settings from llama_index.embeddings.huggingface import HuggingFaceEmbedding from llama_index.llms.huggingface import HuggingFaceLLM #初始化一个HuggingFaceEmbedding对象,用于将文本转换为向量表示 embed_model = HuggingFaceEmbedding( #指定了一个预训练的sentence-transformer模型的路径 model_name="/home/scy/llm/models/sentence-transformers" ) #将创建的嵌入模型赋值给全局设置的embed_model属性, #这样在后续的索引构建过程中就会使用这个模型。 Settings.embed_model = embed_model llm = HuggingFaceLLM( model_name="/home/scy/llm/models/Shanghai_AI_Laboratory/internlm2-chat-1_8b", tokenizer_name="/home/scy/llm/models/Shanghai_AI_Laboratory/internlm2-chat-1_8b", model_kwargs={"trust_remote_code":True}, tokenizer_kwargs={"trust_remote_code":True} ) #设置全局的llm属性,这样在索引查询时会使用这个模型。 Settings.llm = llm #从指定目录读取所有文档,并加载数据到内存中 documents = SimpleDirectoryReader("./data").load_data() #创建一个VectorStoreIndex,并使用之前加载的文档来构建索引。 # 此索引将文档转换为向量,并存储这些向量以便于快速检索。 index = VectorStoreIndex.from_documents(documents) # 创建一个查询引擎,这个引擎可以接收查询并返回相关文档的响应。 query_engine = index.as_query_engine() response = query_engine.query("xtuner是什么?") print(response)
关键函数
# API文档:https://internlm.intern-ai.org.cn/api/document from llama_index.llms.openai_like import OpenAILike llm = OpenAILike(model=model, api_base=api_base_url, api_key=api_key, is_chat_model=True, callback_manager=callback_manager)
# API文档:https://internlm.intern-ai.org.cn/api/document from llama_index.llms.huggingface import HuggingFaceLLM llm = HuggingFaceLLM( model_name="/home/scy/llm/models/Shanghai_AI_Laboratory/internlm2-chat-1_8b", tokenizer_name="/home/scy/llm/models/Shanghai_AI_Laboratory/internlm2-chat-1_8b", model_kwargs={"trust_remote_code":True}, tokenizer_kwargs={"trust_remote_code":True} )
xtuner
配置文件
查看预设的配置文件
xtuner list-cfg -p internlm2
-p|--pattern:表示模式匹配(即模糊搜索)
配置文件名解释(以 internlm2_1_8b_full_custom_pretrain_e1 和 internlm2_chat_1_8b_qlora_alpaca_e3 举例):
| 配置文件 internlm2_1_8b_full_custom_pretrain_e1 | 配置文件 internlm2_chat_1_8b_qlora_alpaca_e3 | 说明 |
|---|---|---|
| internlm2_1_8b | internlm2_chat_1_8b | 模型名称 |
| full | qlora | 使用的算法 |
| custom_pretrain | alpaca | 数据集名称 |
| e1 | e3 | 把数据集跑几次 |
复制预设的配置文件
xtuner copy-cfg <cfg_file_path> <output_path>
微调
启动微调
# NPROC_PER_NODE:GPU的数量 NPROC_PER_NODE=2 xtuner train <cfg_file_path> \ --work_dir <output_dir> \ [--deepspeed deepspeed_zero1]
模型格式转换
-
将生成的.pth模型转换成.hf格式模型
运行如下命令:
# 先获取最后保存的一个pth文件 pth_file=`ls -t ./work_dirs/internlm2_chat_1_8b_qlora_alpaca_e3_copy/*.pth | head -n 1` export MKL_SERVICE_FORCE_INTEL=1 export MKL_THREADING_LAYER=GNU xtuner convert pth_to_hf ./internlm2_chat_1_8b_qlora_alpaca_e3_copy.py ${pth_file} ./hf 运行完成后将在当前路径下生成新文件夹
hf -
模型合并
对于 LoRA 或者 QLoRA 微调出来的模型其实并不是一个完整的模型,而是一个额外的层(Adapter),训练完的这个层最终还是要与原模型进行合并才能被正常的使用。
对于全量微调的模型(full)其实是不需要进行整合这一步的,因为全量微调修改的是原模型的权重而非微调一个新的 Adapter ,因此是不需要进行模型整合的。
运行如下命令:
export MKL_SERVICE_FORCE_INTEL=1 export MKL_THREADING_LAYER=GNU xtuner convert merge /root/models/internlm2-chat-1_8b ./hf ./merged --max-shard-size 2GB 运行完成后将在当前路径下生成新文件夹
merged
opencompass
环境准备
git clone git@github.com:open-compass/opencompass.git cd opencompass pip install -r requirments.txt pip install -e .
模型评测
-
查看模型和评测数据集
执行命令:
python tools/list_configs.py [models_name] [datasets_name] ... -
修改配置文件
模型配置文件案例:
configs/models/*.py# ex: configs/models/hf_internlm/lmdeploy_internlm2_chat_1_8b.py from opencompass.models import TurboMindModelwithChatTemplate models = [ # 需要定义models变量,为 list(dict) 类型 dict( type=TurboMindModelwithChatTemplate, abbr='internlm2-chat-1.8b', path='/home/scy/models/internlm/internlm2-chat-1_8b', # 修改为模型在本地的路径 engine_config=dict(session_len=7168, max_batch_size=16, tp=1), gen_config=dict(top_k=1, temperature=1e-6, top_p=0.9, max_new_tokens=1024), max_seq_len=7168, max_out_len=1024, batch_size=16, run_cfg=dict(num_gpus=2), # GPU数量 ) ] -
启动评测
export MKL_THREADING_LAYER=GNU python run.py \ --datasets ceval_gen \ # 数据集准备 --models hf_internlm2_chat_1_8b \ # 模型准备 --debug
除了以上的评测方式,也可以通过在python脚本中直接定义评测使用的数据集和模型
脚本案例:
configs/*.py
from mmengine.config import read_base from opencompass.models.turbomind_api import TurboMindAPIModel with read_base(): from .datasets.ceval.ceval_gen import ceval_datasets meta_template = dict( round=[ dict(role='HUMAN', begin='<|User|>:', end='\n'), dict(role='BOT', begin='<|Bot|>:', end='<eoa>\n', generate=True), ], eos_token_id=103028) internlm_chat_1_8b = dict( type=TurboMindAPIModel, # 进行调用API评测 abbr='internlm2-chat-1_8b', api_addr='http://0.0.0.0:23333', api_key='internlm2', max_out_len=100, max_seq_len=2048, batch_size=16, meta_template=meta_template, run_cfg=dict(num_gpus=1, num_procs=2), end_str='<eoa>', ) datasets = ceval_datasets # 评测用的数据集 models = [internlm_chat_1_8b] # 评测使用的模型 启动评测,运行如下命令:
python run.py configs/xxx.py
huixiangdou
环境准备
-
将项目克隆到本地:
git clone git@github.com:InternLM/HuixiangDou.git -
构建知识库:
将原始文档全都放置在
repodir文件夹下,再创建一个文件夹workdir用来存储特征向量知识库 -
执行如下命令构建知识库:
python -m huixiangdou.service.feature_store每次修改完配置文件
config.ini也需要重新构建 -
测试知识库问答助手:
python -m huixiangdou.main --standalone -
使用
gradio可视化部署:python -m huixiangdou.gradio
streamlit
Demo
# 01-hello.py import streamlit as st st.write("Hello World")
执行下面脚本运行程序 : streamlit run 01-hello.py
Command
运行 streamlit程序:
streamlit run your_script.py [-- script args] streamlit run <url_of_python_script> # 运行
Tutorial
Caching
缓存机制:函数执行一次,结果保存到数据库中,下次调用函数传入相同的参数时直接返回结果,不用再次执行。
@st.cache_data def long_running_function(param1, param2): return …
Session State
gradio
Demo
import gradio as gr def greet(name): return f"Hello, {name} !" demo = gr.Interface( fn=greet, inputs=['text'], outputs=['text'] ) demo.launch()
Components
Text
文本输入框
gr.Text( value: str | Callable | None = None, lines: int = 1, max_lines: int = 20, placeholder: str | None = None, label: str | None = None, show_label: bool | None = None, min_width: int = 160, interactive: bool | None = None, visible: bool = True, autofocus: bool = False, )


【推荐】国内首个AI IDE,深度理解中文开发场景,立即下载体验Trae
【推荐】编程新体验,更懂你的AI,立即体验豆包MarsCode编程助手
【推荐】抖音旗下AI助手豆包,你的智能百科全书,全免费不限次数
【推荐】轻量又高性能的 SSH 工具 IShell:AI 加持,快人一步
· winform 绘制太阳,地球,月球 运作规律
· 震惊!C++程序真的从main开始吗?99%的程序员都答错了
· AI与.NET技术实操系列(五):向量存储与相似性搜索在 .NET 中的实现
· 【硬核科普】Trae如何「偷看」你的代码?零基础破解AI编程运行原理
· 超详细:普通电脑也行Windows部署deepseek R1训练数据并当服务器共享给他人