关于ganymed-ssh2版本262和build210的SCPClient类的区别
ganymed-ssh2是通过java使用ssh连接服务器的工具库,先上两个版本的pom文件配置:
<!--ssh连接linux-->
<!-- https://mvnrepository.com/artifact/ch.ethz.ganymed/ganymed-ssh2 -->
<dependency>
   <groupId>ch.ethz.ganymed</groupId>
   <artifactId>ganymed-ssh2</artifactId>
   <version>build210</version>
</dependency>
<!--ssh连接linux-->
<!-- https://mvnrepository.com/artifact/ch.ethz.ganymed/ganymed-ssh2 -->
<dependency>
   <groupId>ch.ethz.ganymed</groupId>
   <artifactId>ganymed-ssh2</artifactId>
   <version>262</version>
</dependency>
网络上大部分人使用的还是build210版本,本人之前使用262版本,无奈不想自己写文件上传下载代码,改用了build210版。
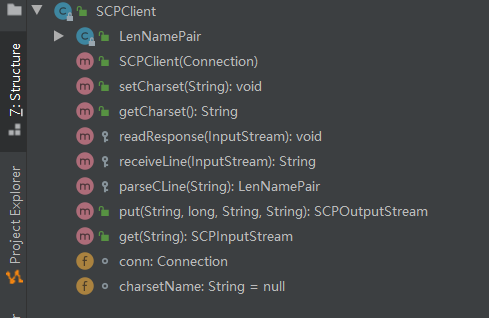
这是build210的SCPClient包括的方法,其中包括了文件的下载(get)、文件的上传(put)使用起来直接调用非常方便:

262版本的SCPClient相比build210缺少了许多方法,只能够从服务器get文件,但是put方法还需要搭配其他类使用,无法直接上传文件服务器,可能是将相应的功能移去了其他模块:

下面是build210版文件上传、下载案例:
public class ScpOpt {

    static String ip = "127.0.0.2";
    static String LiuxUser = "root";
    static String LiuxPawd = "xxxx";
public static void downloadFile() {
        Connection conn = new Connection(ip);
        Session session = null;// 打开一个会话
        try {
            conn.connect();//建立连接
            boolean login = conn.authenticateWithPassword(LiuxUser, LiuxPawd);//根据用户名密码,进行校验
            if (login) {
                System.out.println("登录成功");
            } else {
                System.out.println("登录失败");
            }
            SCPClient scpClient = conn.createSCPClient();
            //从远程机器获取文件
            scpClient.get("远程文件/root/docker-install.sh", "本地文件夹");
            conn.close();
            session.close();
        } catch (IOException e) {
            e.printStackTrace();
        }
    }


    public static void uploadFile() {
        Connection conn = new Connection(ip);
        try {
            //建立连接
            conn.connect();
            //根据用户名密码,进行校验
            boolean login = conn.authenticateWithPassword(LiuxUser, LiuxPawd);
            if (login) {
                System.out.println("登录成功");
            } else {
                System.out.println("登录失败");
            }
            SCPClient scpClient = conn.createSCPClient();
            //上传文件
            scpClient.put("本地文件docker-install.sh", "远程机器目录/root/scp");
            conn.close();
        } catch (IOException e) {
            e.printStackTrace();
        }
    }

    public static void main(String[] args) {
//        downloadFile();
        uploadFile();
    }

}


 浙公网安备 33010602011771号