画布跟js.oop
<Canvas> 是HTML5中新出现的一个元素。就是可以通过 JS绘制图形。

画布(Canvas)是一个没有内容也没有边框的矩形区域。我们可以控制里面的每一个像素。
下面我们首先定义一个 Canvas元素 :
<canvas id="cancas" width="300" height="300"></canvas>
canvas 只有两个属性,width和height,这些属性可选并且可以通过JS或者css来控制:
<script type="text/javascript">
        function draw() {
            var c = document.getElementById("cancas");
            var cxt = c.getContext("2d");
//
它可以通过canvas元素对象的getContext方法来获取,同时得到的还有一些画图需要调用的函数。
getContext() 接受一个用于描述其类型的值作为参数。也就是 后面的 “2d” 或者 “3d”
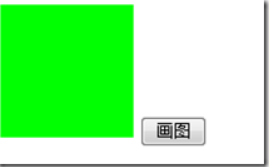
            cxt.fillStyle = "#00ff00";
            cxt.fillRect(0, 0, 150, 150);
//第一个属性时距离x轴的距离,第二个是距离y轴的距离,第三第四个是宽度跟高度

        }
</script>
在做一个复杂的图形:
 <script type="text/javascript">
        function draw() {
            var c = document.getElementById("cancas");
            var cxt = c.getContext("2d");
            //红色区域,及其坐标
            cxt.fillStyle = "rgb(240,0,0)";
            cxt.fillRect(50, 50, 160, 160);
            //在红色区域上面 添加一个灰色的区域,并且设置 透明度为 0.6
            cxt.fillStyle = "rgba(100, 100, 100, 0.6)";
            cxt.fillRect(30, 30, 200, 200);
            //设置在最外面有一个绿色的只有边框的矩形
            cxt.strokeStyle = "#00ff00";
            cxt.lineWidth = 5;   //设置边框的宽度为 5
            //最后去掉 这个图形的中心。
            cxt.strokeRect(30, 30, 200, 200);
            cxt.clearRect(80, 80, 100, 100);
        }
</script>
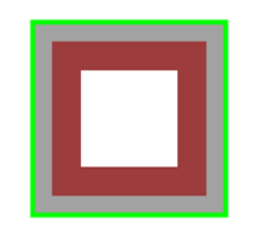
效果图
画矩形
    <body>
         <canvas id="myCanvas" width="570" height="570"
  style="border:2px solid #000000;">
</canvas>
<script>


var c=document.getElementById("myCanvas");
        //然后,创建 context 对象:getContext("2d") 对象是内建的 HTML5 对象,
        //拥有多种绘制路径、矩形、圆形、字符以及添加图像的方法。
           var ctx=c.getContext("2d");
            ctx.fillStyle="#FF0000";
        //  fillRect(x,y,width,height) 方法定义了矩形当前的填充方式。
         ctx.fillRect(200,100,300,200);

</script>


    </body>

画线
    <body>
         <canvas id="myCanvas" width="570" height="570"
  style="border:2px solid #000000;">
</canvas>
<script>


var c=document.getElementById("myCanvas");
        //然后,创建 context 对象:getContext("2d") 对象是内建的 HTML5 对象,
        //拥有多种绘制路径、矩形、圆形、字符以及添加图像的方法。
           var ctx=c.getContext("2d");
           //开始坐标
          ctx.moveTo(100,100);
          //结束坐标
          ctx.lineTo(200,100);
            ctx.strokeStyle="blue";
       ctx.stroke();
</script>


    </body>

画圆:
<body>
         <canvas id="myCanvas" width="570" height="570"
  style="border:2px solid #000000;">
</canvas>
<script>


var c=document.getElementById("myCanvas");
        //然后,创建 context 对象:getContext("2d") 对象是内建的 HTML5 对象,
        //拥有多种绘制路径、矩形、圆形、字符以及添加图像的方法。
           var ctx=c.getContext("2d");
               ctx.fillStyle="red";
    ctx.beginPath();
    ctx.arc(70,18,15,0,2*Math.PI,true);
    //画布的左上角坐标为0,0
// x:圆心在x轴上的坐标
// y:圆心在y轴上的坐标
// r:半径长度
// sAngle:起始角度,圆心平行的右端为0度
// eAngle:结束角度
//counterclockwise    可选。规定应该逆时针还是顺时针绘图。False = 顺时针,true = 逆时针。
//注意:Math.PI表示180°,画圆的方向是顺时针
    ctx.closePath();
    ctx.fill();
</script>
    </body>

文字:
<body>
         <canvas id="myCanvas" width="570" height="570"
  style="border:2px solid #000000;">
</canvas>
<script>


var c=document.getElementById("myCanvas");
        //然后,创建 context 对象:getContext("2d") 对象是内建的 HTML5 对象,
        //拥有多种绘制路径、矩形、圆形、字符以及添加图像的方法。
           var ctx=c.getContext("2d");
      ctx.font="30px 微软雅黑";
      //fillText(text,x,y) - 在 canvas 上绘制实心的文本
       ctx.fillText("Hello World",100,100);
        //strokeText(text,x,y) - 在 canvas 上绘制空心的文本
      ctx.strokeText("Hello World",100,200);
//第一个属性是文字内容,第二个第三个属性是距离x ,y 轴的距离
</script>
    </body>

填充渐变:
<body>
         <canvas id="myCanvas" width="570" height="570"
  style="border:2px solid #000000;">
</canvas>
<script>
var c=document.getElementById("myCanvas");
        //然后,创建 context 对象:getContext("2d") 对象是内建的 HTML5 对象,
        //拥有多种绘制路径、矩形、圆形、字符以及添加图像的方法。
           var ctx=c.getContext("2d");
     var grd=ctx.createLinearGradient(0,0,175,50);
     grd.addColorStop(0,"#FF0000");
     grd.addColorStop(0.5,"#00FF00");
     grd.addColorStop(1,"black");
    //范围为0-1,中间数字随便用用
    ctx.fillStyle=grd;
    ctx.fillRect(0,0,175,50);
</script>
    </body>

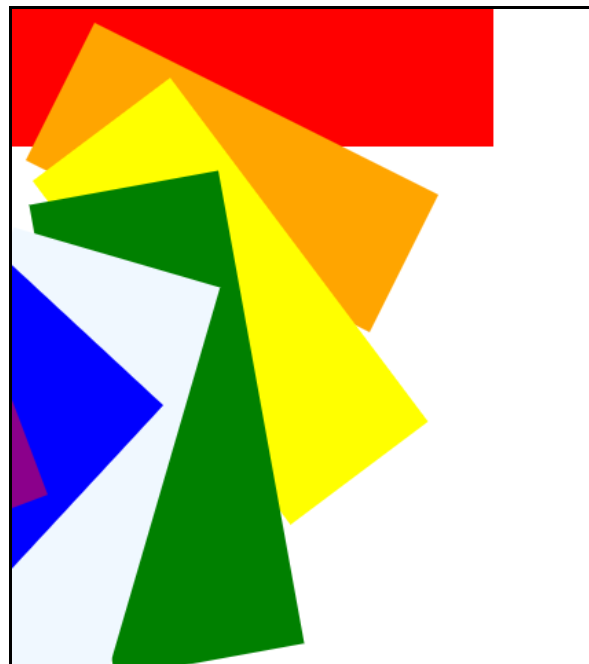
旋转属性:
<body>
         <canvas id="myCanvas" width="570" height="570"
  style="border:2px solid #000000;">
</canvas>
<script>
var c=document.getElementById("myCanvas");
        //然后,创建 context 对象:getContext("2d") 对象是内建的 HTML5 对象,
        //拥有多种绘制路径、矩形、圆形、字符以及添加图像的方法。
           var context=c.getContext("2d");

    context.fillStyle="red";
context.fillRect(0,0,250,100)

context.transform(1,0.5,-0.5,1,80,10);
context.fillStyle="orange";
context.fillRect(0,0,250,100);

context.transform(1,0.5,-0.5,1,80,10);
context.fillStyle="yellow";
context.fillRect(0,0,250,100);

context.transform(1,0.5,-0.5,1,80,10);
context.fillStyle="green";
context.fillRect(0,0,250,100);

context.transform(1,0.5,-0.5,1,80,10);
context.fillStyle="aliceblue";
context.fillRect(0,0,250,100);

context.transform(1,0.5,-0.5,1,80,10);
context.fillStyle="blue";
context.fillRect(0,0,250,100);

context.transform(1,0.5,-0.5,1,80,10);
context.fillStyle="darkmagenta";
context.fillRect(0,0,250,100);

 /*    a    水平缩放绘图。
b    水平倾斜绘图。
c    垂直倾斜绘图。
d    垂直缩放绘图。
e    水平移动绘图。
f    垂直移动绘图。*/
</script>
    </body>
做一个综合项目:
<body>
<canvas id="canvas" width="300px" height="300px" style="border: 1px solid"></canvas>
<script>
    var canvas=document.getElementById("canvas");
    var ctx=canvas.getContext("2d");
    ctx.beginPath();
//    两个大圆相交
    ctx.fillStyle="white";
    ctx.arc(150,150,150,0,180*Math.PI/180,false);
    ctx.fill();
    ctx.stroke();
    ctx.closePath();

    ctx.beginPath();
    ctx.fillStyle="black";
    ctx.arc(150,150,150,0,180*Math.PI/180,true);
    ctx.fill();
    ctx.stroke();
    ctx.closePath();
    //两个小圆
    ctx.beginPath();
    //ctx.restore(90*Math.PI/180);
    //返回之前保存过的路径状态和属性。
    ctx.fillStyle="black";
    ctx.arc(76,150,75,0,180*Math.PI/180);
    ctx.fill();
    ctx.stroke();
    ctx.closePath();
    ctx.beginPath();
   // ctx.restore(90*Math.PI/180);
    //返回之前保存过的路径状态和属性。
    ctx.fillStyle="white";
    ctx.arc(76,150,20,0,360*Math.PI/180);
    ctx.fill();
    ctx.stroke();
    ctx.closePath();

    ctx.beginPath();
    ctx.fillStyle="white";
    ctx.arc(227,150,75,0,180*Math.PI/180,true);
    ctx.fill();
    ctx.stroke();
    ctx.closePath();
    ctx.beginPath();
    ctx.fillStyle="black";
    ctx.arc(227,150,20,0,360*Math.PI/180);
    ctx.fill();
    ctx.stroke();
    ctx.closePath();
</script>
</body>
//自己插入代码,看看是什么东西
杨辉三角
/* 1 1 1 121 2 2 12321 3 3 1234321 4 4 123454321 5 5*/ for (var i=1;i<=10;i++){ for(var j=1;j<=5-i;j++){ document.write(" ") } //递增 num=1; for (var k=1;k<=i;k++){ document.write(num) num++ } //递减 num -=2; for(var l=1;l<=i-1;l++){ document.write(num) num-- } document.write("<br>") }
—————————————————————————js.oop————————————————————
4 使用类和对象的步骤:
①:创建一个类(构造函数):类名必须使用大驼峰法则,即每个单词的首字母都要大写
function 类名(属性1){
this.属性1=属性1;
this.方法=function(){
//方法中要调用自身属性,必须使用this.属性
}
}
②:通过类,实例化(new)出一个对象,
var obj=new 类名(属性1的具体指)
obj.属性(); 调用属性
obj.方法();调用方法
            function Person(name,age){
                this.name=name;
                this.age=age;
                this.say=function(content){
                    //在类中,访问类的自身的属性,必须使用this.属性调用
                    alert("我叫"+this.name+",今年"+this.age+"岁啦!我说了一句话:"+content)
                }

            }


//通过赋值打印
//var arr=new Array();
var zhangsan=new Person("张三",18);
//zhangsan.say("哈哈哈");
var lisi=new Person("李四",24);//可以在后面赋值也可以!!后面赋值会覆盖前面
lisi.name="李武";
lisi.age=25;
//lisi.say("张三白痴");
①:constructor:返回当前对象的构造函数。
>>>zhangsan.constructor==Person
②:instanceof:检测一个对象,是不是一个类的实例
>>>lisi instanceof Person √ lisi是通过Person类new出的
>>>lisi instanceof Object √ 所有对象都是Object的实例
>>>Person instanceof Object √函数本身也是对象
【静态属性跟静态方法】:
2:通过“类名.属性”。“类名.方法”声明的属性和方法。称为静态属性,静态方法
也叫类属性和类方法
类属性/类方法,是属于类的(属于构造函数)
通过"类名.属性名"调用
3 成员属性是属于实例化出的对象的,只能使用对象调用。
静态属性是属于构造函数的,只能使用类名调用
[私有属性和私有方法]
4 在构造函数中,使用var声明的变量,属于私有属性;
在构造函数中,使用function声明的函数,称为私有方法
function Person(){
var num=1;//私有属性
function func(){}//私有方法
}
私有属性跟私有方法的作用域,只鞥在构造函数内容有效,即,只能在构造函数内部使用;
在构造函数外部,无论使用对象名还是类名都无法调用。
function Person(name){
                this.name=name;//声明成员属性,
                var sex="男";//私有属性
                this.sayTime=function(){
                    alert("我说了当前时间是"+getTime());
                }
                this.writeTime=function(){
                    alert("我写了当前时间是"+getTime());
                }
                function getTime(){//私有方法
                    return new Data();
                }
            }

            var zhangsan=new Person("张三")
            zhangsan.age=14;//追加成员属性
          /*alert(zhangsan.name)
          alert(Person.name)*/
          /*alert(zhangsan.age);*///调用成员属性
          Person.count="60亿";//声明静态属性
          console.log(Person.count);//调用静态属性
          var lisi=new Person("李四");
          console.log(lisi.count)//Undefined静态属性是属于类的,只能由类名调用

          console.log(lisi.count);//undefined 静态属性时属于类的,只能用类名调用

          console.log(lisi.sex);
          console.log(Person.count);
谁最终调用函数,this就指向谁
①:this指上谁,不应该考虑函数在哪里声明,而应该考虑函数在哪里调用!
②:this指向的永远是对象,而不可能是函数
③:this指向的对象,叫做函数的上下文context,也叫函数的调用者。
function func(){
console.log(this);
}
func();//指向window
this的无大指向
①:通过函数名()调用的,this永远指向window
举个栗子:
function func(){
console.log(this);
}
func();
function func1(){
console.log(this);
}
func1();
// ①:通过函数名()调用的,this永远指向window
        func();

②:通过对象.方法调用的,this指向这个对象
//  ②:通过对象.方法调用的,this指向这个对象
        //狭义对象
        var obj={
            name:"zhangsan",
            func:func
        }
            obj.func()
③:函数作为数组中的一个元素,用数组下标调用的,this指向这个数组
eg: var arr=[1,2,3,func,4,5,6];
               arr[3]();

④:函数作为window内置函数的回调函数使用,this指向window
setTimeout(function(){
            func();
        },1000);
         // ④:函数作为window内置函数的回调函数使用,this指向window
        setTimeout(func,1000)//指向window
⑤:函数作为构造函数,使用new关键字调用,函数指向新的new出的对象
var obj1=new func()

我们来看一个栗子:
eg:
        var obj1={
            name:"obj1",
            arr:[func,1,{name:"obj2",func:func},3,4]
        }
//下面两个例子分别指向谁
        obj1.arr[0]();
        setTimeout(obj1.arr[0],2000);

第一个显而易见,符合第三条
//最终调用者是数组,this->obj.arr
第二个例子里面的
obj1.arr[0]仅仅是取到数组中的第一个值,并不是指向数组,最终的调用者是setTimeout
直截了当的写法应该是
setTimeout(
func,2000);

最终指向WINDOW
在举一个更难得例子:
var fullname = 'John Doe';
    var obj = {
       fullname: 'Colin Ihrig',
       prop: {
          fullname: 'Aurelio De Rosa',
          getFullname: function() {
            return this.fullname;
          }
       }
    };
    console.log(obj.prop.getFullname());
//可以看出最终的调用者是;
    // 函数的最终调用者 obj.prop
最终的指向结果是指向obj。prop这个数组
    var test = obj.prop.getFullname;
    console.log(test());
//显而易见使用函数()进行的调用
    // 函数的最终调用者 test()  this-> window
    obj.func = obj.prop.getFullname;
    console.log(obj.func());
    // 函数最终调用者是obj
//很明显符合对现象.方法调用指向这个obj对象
    var arr = [obj.prop.getFullname,1,2];
    arr.fullname = "JiangHao";
    console.log(arr[0]());
    // 函数最终调用者数组
【 __proto__与prototype】
1.prototype:函数的原型对象
①:只有函数才有prototype,而且所有函数必有prototype
②:prototype本身也是一个对象!
③:prototype指上了当前函数所在的引用地址!
2.__proto__:对象的原型!
①:只有对象才有__proto__,而且所有对象必有__proto__
②:__proto__也是一个对象,所以也有自己的__proto__,顺着这条线向上找的顺序,就是原型链。
③:函数,数组都是对象,都有自己的__proto__
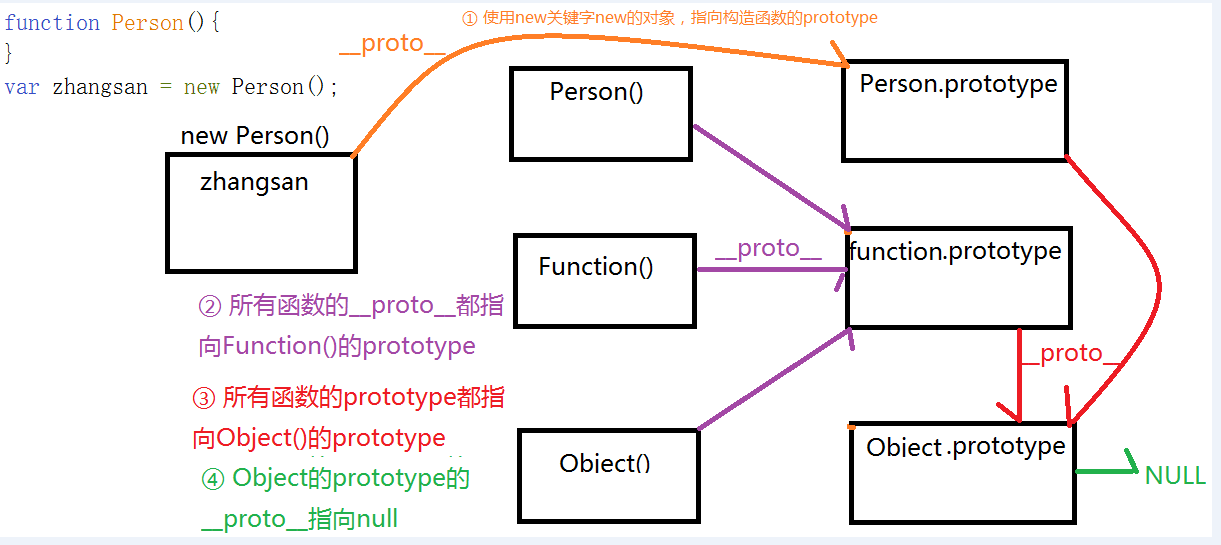
3 实例化一个类,拿到对象的原理?
实例化一个类的时候,实际上是将新对象的__proto__,指向构造函数所在的prototype
也就是说 zhangsan.__proto__==Person.prototype √
4 所有对象的__proto__延原型链向上查找,都将指向Object的prototype。
Object的prototype的原型,指向null
【原型链的指向问题】
研究原型链的指向,就是要研究各种特殊对象的__proto__的指向问题。
1.通过构造函数,new出的对象,新对象的__proto__指向构造函数的prototype
2函数的__proto__,指向Function()的prototype
3函数prototype的__proto__指向Object的prototype
(直接使用{}字面量声明,或使用new Object拿到的对象的__proto__直接指向Object的prototype)
4 Object的prototype的__proto__,指向null
(Object作为一个特殊函数,他的__proto__指向Function()的prototype)
是不是很蒙圈??没事,在我们来个图,一目了然


