OkHttp ( Android Studio )
项目配置
在build.gradle(Module)中加入依赖
implementation 'com.squareup.okhttp3:okhttp:3.14.7'
在AndroidManifest.xml中获取网络权限
<uses-permission android:name="android.permission.INTERNET" />
MainActivity中添加
// 内部变量
private static final String TAG = "MainActivity";
private OkHttpClient okHttpClient;

// 这个接口会把传递过去的参数原封不动地响应回来
private String GET_URL = "https://www.httpbin.org/get?a=1&b=2";
private String POST_URL = "https://www.httpbin.org/post";
获取okHttpClient
@Override
protected void onCreate(Bundle savedInstanceState) {
    super.onCreate(savedInstanceState);
    setContentView(R.layout.activity_main);

    okHttpClient = new OkHttpClient();

}
OkHttp 同步异步请求
测试链接🔗: https://www.httpbin.org/
GET 同步
// 与 bt_1 绑定
// GET 同步
public void getSync(View view) {
    // 安卓当中要完成网络的请求需要启动一个子线程
    new Thread(() -> {

        Request request = new Request.Builder()
                //** OKHttp 默认创建出来的 Request 是 Get 请求
                // 所以这个 .get() 可以不写
                .get()
                .url(GET_URL)
                .build();
        // 准备好请求的 Call 对象
        Call call = okHttpClient.newCall(request);
        try {
            Response response = call.execute();
            Log.i(TAG, "getSync:" + response.body().string());
        } catch (IOException e) {
            e.printStackTrace();
        }

    }).start();
}
GET 异步
// GET 异步
public void getAsync(View view) {

    Request request = new Request.Builder()
        .url(GET_URL)
        .build();
    Call call = okHttpClient.newCall(request);

    // 异步请求
    // 传递一个回调对象给 enqueue 方法
    // 这里直接会跳到下一个步骤, 不会阻塞下一个步骤的运行, 是比 getSync 要好的地方
    // 而且 OKHttp 内部会创建子线程, 不需要我们自己创建子线程
    call.enqueue(new Callback() {

        // 请求失败
        @Override
        public void onFailure(Call call, IOException e) {

        }

        // 请求结束
        // 只意味着跟服务器通信成功, 但不一定只会返回 200, 也有可能 404
        @Override
        public void onResponse(Call call, Response response) throws IOException {
            // isSuccessful() { return code >= 200 && code < 300; }
            if (response.isSuccessful()) {
                Log.i(TAG, "getAsync:" + response.body().string());
            }
        }

    });

}
POST 同步
// POST 同步
public void postSync(View view) {

    new Thread(()->{

        // Form 表单的提交
        FormBody formBody = new FormBody.Builder().add("c", "3").add("d", "4").build();
        Request request = new Request.Builder()
            .url(POST_URL)
            // 需要 RequestBody, 请求体
            .post(formBody)
            .build();
        Call call = okHttpClient.newCall(request);
        try {
            Response response = call.execute();
            Log.i(TAG, "postSync:" + response.body().string());
        } catch (IOException e) {
            e.printStackTrace();
        }

    }).start();

}
POST 异步
// POST 异步
public void postAsync(View view) {
    FormBody formBody = new FormBody.Builder().add("c", "3").add("d", "4").build();
    Request request = new Request.Builder()
        .url(POST_URL)
        // 需要 RequestBody, 请求体
        .post(formBody)
        .build();
    Call call = okHttpClient.newCall(request);

    call.enqueue(new Callback() {
        @Override
        public void onFailure(Call call, IOException e) {

        }

        @Override
        public void onResponse(Call call, Response response) throws IOException {
            if (response.isSuccessful()) {
                Log.i(TAG, "postAsync:" + response.body().string());
            }
        }
    });

}
POST 请求的数据格式
协议规定 POST 提交的数据必须放在请求体中,但协议并没有规定数据必须使用什么编码方式。
常用的数据编码方式
- Content-Type: application/x-www-form-urlencoded
- 数据被编码为
(key,value),默认类型;
- 数据被编码为
- Content-Type: multipart/form-data
- 数据被编码为一条消息,一般用于文件上传;
- 可以多个文件,不一定要一样的类型;
- Content-Type: application/octet-stream
- 提交二进制数据,如果用于文件上传,只能上传一个文件;
- Content-Type: application/json
- 提交 json 数据
更多格式查看https://www.runoob.com/http/http-content-type.html
JunitTest
okHttp 上传文件
@Test
public void uploadFileTest(){
String POST_URL = "https://www.httpbin.org/post";
OkHttpClient okHttpClient = new OkHttpClient();
File file1 = new File("E:\\Users\\Hua\\Desktop\\1.txt");
File file2 = new File("E:\\Users\\Hua\\Desktop\\2.txt");
// okHttp-4.9.0 版本参数顺序为 create( MediaType contentType, File file ) {...}
RequestBody requestBody1 = RequestBody.create(MediaType.parse("text/plain"), file1);
RequestBody requestBody2 = RequestBody.create(MediaType.parse("text/plain"), file2);
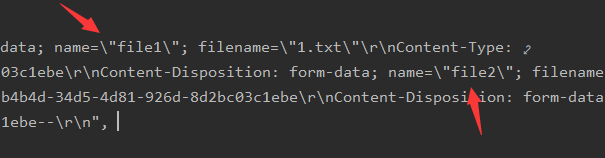
// multipart/form-data
// 数据被编码为一条消息,一般用于文件上传(可以多个, 不一定要一样的类型)
MultipartBody multipartBody = new MultipartBody.Builder()
.addFormDataPart("file1", file1.getName(), requestBody1)
.addFormDataPart("file2", file2.getName(), requestBody2)
// 还可以添加别的类型的, 键值对等等
.addFormDataPart("e", "5")
.build();
Request request = new Request.Builder()
.url(POST_URL)
.post(multipartBody)
.build();
Call call = okHttpClient.newCall(request);
try {
Response response = call.execute();
if (response.isSuccessful()) {
System.out.println(response.body().string());
}
} catch (IOException e) {
e.printStackTrace();
}
}

okHttp 传输 json 数据
@Test
public void jsonTest() {
String POST_URL = "https://www.httpbin.org/post";
OkHttpClient okHttpClient = new OkHttpClient();
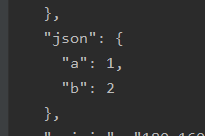
// MediaType: application/json 提交 json 数据
RequestBody requestBody = RequestBody.create(MediaType.parse("application/json"), "{\"a\":1, \"b\":2}");
Request request = new Request.Builder()
.url(POST_URL)
.post(requestBody)
.build();
Call call = okHttpClient.newCall(request);
try {
Response response = call.execute();
if(response.isSuccessful()){
System.out.println(response.body().string());
}
} catch (IOException e) {
e.printStackTrace();
}
}
OkHttp 的配置
Builder 构建者
OkHttpClient okHttpClient = new OkHttpClient.Builder().build();
拦截器
OkHttpClient okHttpClient = new OkHttpClient.Builder()
    .addInterceptor()
    .addNetworkInterceptor()	// 优先级没有 addInterceptor 高, 放在哪里都是后执行
    .build();
JunitTest
interceptorTest
@Test
public void interceptorTest() throws IOException {
OkHttpClient okHttpClient = new OkHttpClient.Builder()
// 放在这里也是比 addInterceptor 后执行
// .addNetworkInterceptor(...)
.addInterceptor(new Interceptor() {
@Override
public Response intercept(Chain chain) throws IOException {
// do nothing 直接通过
// return chain.proceed(chain.request());
// 前置处理
// 复制一个与传入 request 内容相同的 request
Request request = chain.request().newBuilder()
// 请求头中增加内容
.addHeader("os", "android")
.addHeader("version", "1.0")
.build();
// 执行 request
Response response = chain.proceed(request);
// 后置处理
// ...
return response;
}
})
// 还可以添加多个 Interceptor, 按照顺序拦截请求
// .addInterceptor()
// 优先级没有 addInterceptor 高, 放在哪里都是后执行
.addNetworkInterceptor(new Interceptor() {
@Override
public Response intercept(Chain chain) throws IOException {
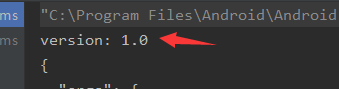
System.out.println("version: " + chain.request().header("version"));
// return null; 就是不与通过直接拦截掉了
// 这句不要忘了写
return chain.proceed(chain.request());
}
})
.build();
String GET_URL = "https://www.httpbin.org/get?a=1&b=2";
Request request = new Request.Builder()
.url(GET_URL)
.build();
Call call = okHttpClient.newCall(request);
Response response = call.execute();
System.out.println(response.body().string());
}
在addInterceptor拦截时,给请求头添加的信息。
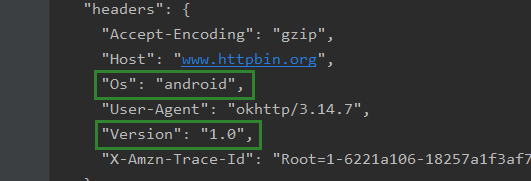
请求头里的信息被addNetworkInterceptor获取到,说明addNetworkInterceptor一定比addInterceptor拦截得要晚。(为什么会这样?以后看看文档源码)
缓存与 Cookie
OkHttp按照Http协议规则实现了缓存的处理。
测试链接🔗: https://www.wanandroid.com/blog/show/2
开启缓存
缓存是 比如:当我们发起第一次请求之后,如果后续还需要进行同样的请求,此时如果符合缓存规则,则可以减少与服务器的网络通信,直接从本地文件缓存中读取响应返回给请求者。但是默认情况下,OkHttp的缓存是关闭状态,需要我们开启。
// pathname:    缓存文件存放的文件夹的位置
// maxSize:     缓存最大容量的字节数 (文件满了就删掉最早的缓存内容)
OkHttpClient okHttpClient = new OkHttpClient.Builder()
    // 这样就开启了缓存 (1M)
    .cache( new Cache( new File("E:\\Users\\Hua\\Desktop"), 1024*1024))
    .build();
自定义 CookieJar
Cookie是某些网站为了辨别用户身份,进行会话跟踪(比如确定登陆状态)而储存在用户本地终端上的数据(通常经过加密),由用户客户端计算机暂时或永久保存的信息。
// 在不设置自定义 CookieJar 时,默认为没有 Cookie
public Builder() {      ...
    cookieJar = CookieJar.NO_COOKIES;
                  ...    }

// NO_ COOKIES 的设置如下,它是一个 CookieJar 接口的实现,在需要覆盖的两个方法中直接忽略了任何 cookie 的处理,即没有 cookie
CookieJar NO_COOKIES = new CookieJar() {
    @Override public void saveFromResponse(HttpUrl url, List<Cookie> cookies) {}

    @Override public List<Cookie> loadForRequest( HttpUrl url )
    { return Collections.emptyList(); }
};
在创建OkHttpClient对象的时候自定义CookieJar,实现接口中的方法
public class CookieUnitTest {

    // 以 host 为 key 的形式来保存 cookies
    Map<String, List<Cookie>> cookieMap = new HashMap<>();

    @Test
    public void cookieTest() throws IOException {

        OkHttpClient okHttpClient = new OkHttpClient.Builder()
            .cookieJar( new CookieJar() {

                // 从网站响应的数据中获取到 cookie (received)
                @Override
                public void saveFromResponse(HttpUrl url, List<Cookie> cookies) {
                    // 本地可校验 cookie, 并根据需要存储
                    cookieMap.put(url.host(), cookies);
                }

                // 从本地拿取需要的 cookie (local)
                @Override
                public List<Cookie> loadForRequest(HttpUrl url) {
                    // 获取本地中该 host 对应的 cookie 列表
                    List<Cookie> cookieList = CookieUnitTest.this.cookieMap.get(url.host());
                    // 如果本地没有, 则返回一个对应 cookie 类型的空 ArrayList
                    // 如果本地存有, 就返回本地的对应 cookieList
                    return cookieList == null ? new ArrayList<>() : cookieList;

                    // 这种情况下, response.body().string() 返回为
                    // {"errorCode":-1001,"errorMsg":"请先登录!"}
                 // return new ArrayList<>();
                }
            })
            .build();

        // 登录 post 请求
        String POST_URL = "https://www.wanandroid.com/user/login";

        FormBody formBody = new FormBody.Builder()
            .add("username", "YuTunan")
            .add("password", "123456")
            .build();

        Request request = new Request.Builder()
            .url(POST_URL)
            .post(formBody)
            .build();

        Call call = okHttpClient.newCall(request);
        Response response = call.execute();
        System.out.println(response.body().string());

        List<Cookie> list = cookieMap.get("www.wanandroid.com");
        System.out.println(list);

        // 使用已有的 cookie
        request = new Request.Builder()
            .url("https://www.wanandroid.com/lg/collect/list/0/json")
            .get()
            .build();
        call = okHttpClient.newCall(request);
        response = call.execute();
        System.out.println(response.body().string());

    }
}
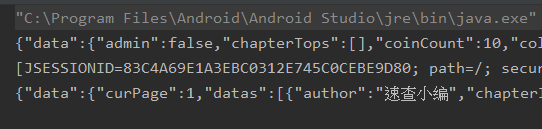
第一行是登录后返回的响应体;第二行是cookiesList的内容;
第三行是用GET和已验证的cookie获取收藏文章列表
调用已有的
cookie是return cookieList == null ? new ArrayList<>() : cookieList;
如果直接
return new ArrayList<>();则会返回未登录的回应


【推荐】国内首个AI IDE,深度理解中文开发场景,立即下载体验Trae
【推荐】编程新体验,更懂你的AI,立即体验豆包MarsCode编程助手
【推荐】抖音旗下AI助手豆包,你的智能百科全书,全免费不限次数
【推荐】轻量又高性能的 SSH 工具 IShell:AI 加持,快人一步
· 震惊!C++程序真的从main开始吗?99%的程序员都答错了
· 【硬核科普】Trae如何「偷看」你的代码?零基础破解AI编程运行原理
· 单元测试从入门到精通
· 上周热点回顾(3.3-3.9)
· Vue3状态管理终极指南:Pinia保姆级教程