ansible --- 3. 远程控制 (ad-hoc)
一. 下载安装
#下载wget
yum install -y wget


#将epel源下载到本地
wget -O /etc/yum.repos.d/epel.repo http://mirrors.aliyun.com/repo/epel-7.repo


#安装ansible
yum install -y ansible
二. ansible 命令格式
Usage: ansible <host-pattern> [options]

-a  MODULE_ARGS, #模块参数
-C, --check # 干跑,白跑
-f FORKS, --forks=FORKS #指定并发,默认5个
--list-hosts #列出主机
-m MODULE_NAME# 模块名称
--syntax-check #检查语法
-k #密码
rpm -ql ansible|more # 查看ansible生成的文件

所有文件如下:
/etc/ansible
/etc/ansible/ansible.cfg #配置文件
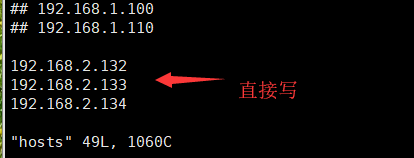
/etc/ansible/hosts # 写入被控机的ip地址 ****
/etc/ansible/roles #空文件夹
ping走什么协议  ICMP

ansible 底层是通过ssh实现的
三.配置 host
1.通过用户密码连接
① hosts 的简单配置

②连接的代码

2.通过秘钥连接
①秘钥
ssh-keygen     生成秘钥对   (一直回车就可以,)

ssh-copy-id  root@192.168.2.132    将公钥传到 被控机

ssh root@192.168.2.132     就可直接连接 被控机
② hosts 的配置

③连接的 常用命令
ansible 192.168.226.101 -m ping #单独机器的ping

ansible 192.168.226.101,192.168.226.102 -m ping #多个机器的ping

ansible all -m ping #全部机器

ansible web -m ping #单个的组

ansible web,db -m ping #多个组的并集

ansible 'web:&db' -m ping #多个组的交集

ansible 'web:!db' -m ping #多个组的差集,在前面但是不在后面
四.模块
0. ansible-doc (模块信息)
ansible-doc [-l|-F|-s] [options] [-t <plugin type> ] [plugin]
-j #以json的方式返回数据

 -l, --list #列出所有的模块

 -s, --snippet #以片段式显示模块信息
ansible-doc 模块名 #直接查看完整信息
ansible-doc -l |wc -l 所有模块的数量
片段式显示模块信息:

完整信息:
![]()
1.command (执行远程命令)
ansible web -m command -a "pwd"
ansible web -m command -a "ls"
ansible web -m command -a "chdir=/tmp pwd" #切换目录并执行命令
ansible web -m command -a "creates=/tmp pwd" #因为tmp目录存在,pwd不会执行
ansible web -m command -a "creates=/tmp2 pwd" #因为tmp2不存在,pwd执行
ansible web -m command -a "removes=/tmp2 pwd" #因为tmp2不存在pwd不执行
ansible web -m command -a "removes=/tmp pwd" #因为tmp目录存在,pwd会执行

ansible web -m command -a "useradd alex"   创建用户(查看home文件下有无此文件夹)
ansible web -m shell -a "echo '1234' |passwd --stdin alex"
#设置用户的密码 (要用shell 模块)
2.shell (支持特殊字符<>|$&)
ansible web -m shell -a "echo '1234' |passwd --stdin alex"  设置用户的密码
ansible web -m shell -a "chdir=/tmp pwd"   #shabang  用来写解释器
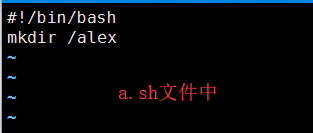
ansible 192.168.226.101 -m shell -a "bash a.sh" #执行shell脚本
ansible 192.168.226.101 -m shell -a "/root/a.sh" # 执行shell脚本,文件要有执行的权限
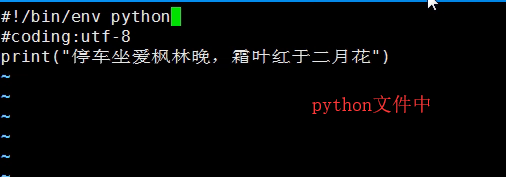
ansible 192.168.226.101 -m shell -a "/root/a.py" #执行Python文件

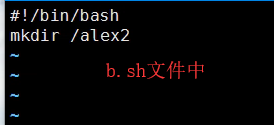
两种执行文件的方式
第一种

chmod  +X  a.sh    给文件添加权限

执行代码:
./a.sh   直接打开文件
第二种

执行代码:
bash b.sh
3.script (执行管控机文件,作用在被控机)
ansible db -m script -a "/root/a.sh" #执行本地的文件,管控机的文件

ansible db -m script -a "creates=/root/a.sh /root/a.sh"
# 判断被控机上的文件是否存在,如果不存在,就执行,如果存在,就跳过

ansible db -m script -a "creates=/tmp /root/a.sh" #判断被控机上的文件
4. copy (将本地文件复制到远程)
backup #创建一个备份文件,以时间戳结尾
content #直接往文件里面写内容(覆盖)
dest #目标地址
group #属组
mode# 文件的权限 W 2 R 4 X 1
owner #属主
src #源地址

ansible web -m copy -a "src=/etc/fstab dest=/tmp/f"
#复制本地文件到远程主机,并修改文件名,多次执行不会改变,因为checksum值是一样的

ansible web -m copy -a "src=a.sh dest=/tmp/a.sh backup=yes"
#复制本地文件,并备份

ansible web -m copy -a "src=a.sh dest=/tmp/a.sh backup=yes group=alex mode=755"
# 复制本地文件到远程主机,并指定属组和权限

ansible web -m copy -a "src=/etc/init.d dest=/tmp backup=yes group=alex mode=755"
#复制本地的目录到远程主机,修改目录权限,则目录里面的文件也会跟着变更

ansible web -m copy -a "src=/etc/init.d/ dest=/tmp backup=yes group=alex mode=755"
#复制本地目录下的所有文件,

ansible web -m copy -a "content='大弦嘈嘈如急雨,小弦切切如私语,嘈嘈切切错 杂弹,大珠小珠落玉盘' dest=/tmp/b"
#直接往文件里面写内容, 若再次写就是覆盖写,慎用
5.file (文件或者文件夹的操作)
参数:

- path 路径

- state
    - absent  删除
    - directory  目录
    - link    软连接
    - hard    硬链接
    - touch  空文件
    - file   (没有就不创建,很少用)

- group   属组

- owner   属主

- mode    权限

- src    源文件(指向被控机的文件)
    - link
    - hard
举例说明:

ansible web -m file -a "path=/alex5 state=directory owner=alex"
#创建目录,并制定属主

ansible web -m file -a "path=/tmp/wusir.txt state=touch mode=777"
#创建文件,并指定权限

ansible web -m file -a "path=/tmp/cron src=/var/log/cron state=link"
#创建软链接,链接的是自己的文件

ansible web -m file -a "path=/tmp/cron state=absent"
# 删除软连接

ansible web -m file -a "path=/alex5 state=absent"
#删除文件夹
补充:

软连接:  快捷方式  ln -s   源文件修改软连接修改  源文件删除软连接失效  可以跨分区

硬链接:  硬盘的位置 ln     源文件修改硬链接修改  源文件删除硬链接不变 不可以跨分区

复制:    开辟新空间 cp     源文件修改cp的不变   源文件删除不变 可以跨分区
6.fetch (拉取远程主机的文件)
创建一个以ip地址或者主机名为名称的目录,并且保留原来的目录结构
参数:

- dest  目标地址 (管控机)

- src   源地址(被控机)


举例说明:

ansible web -m fetch -a "src=/var/log/cron dest=/tmp"
#拉取远程主机的文件,并以主机ip地址或者主机名为目录,并且保留了原来的目录结构
7.yum (安装linux的安装包)
参数:

- name  包名 或 包组名

- state
  -install  安装
  -remove   卸载
- disablerepo #禁用某个源
- enablerepo #启用某个源
举例说明:

首先要:
ansible web -m yum -a "name=python2-pip" #安装软件包
ansible web -m yum -a "name=python2-pip,redis" #安装多个包
ansible web -m yum -a "name='@Development Tools'" #安装开发包组
rpm -q nginx (查看nginx是否安装)

ansible web -m yum -a "name=nginx state=absent" #卸载
补充(本机的配置):

1.yum跟rpm有什么关系,有什么区别
rpm redhat package manager(全称)  手动解决依赖关系
yum 可以解决依赖关系

2.yum源怎么配置

[epel]    #名称
name=Extra Packages for Enterprise Linux 7 - $basearch  #全名或者描述信息
baseurl=http://mirrors.aliyun.com/epel/7/$basearch  # 源url地址
failovermethod=priority
enabled=1  #是否启用,1启用,0不启用
gpgcheck=0  #是否检验key文件,0不校验 1校验
gpgkey=file:///etc/pki/rpm-gpg/RPM-GPG-KEY-EPEL-7


3.yum怎么安装包组
 yum grouplist #查包组信息

 yum groupinstall -y "Development Tools"  安装开发包组
![]()
8.pip (安装python的包)
参数:

- name   包名

- chdir   切换目录 (编译安装时会用到)
- requirements 导出的文件
- virtualenv 虚拟环境
举例说明:
ansible web -m pip -a "name=django==1.11" 安装django
补充:

pip freeze > a.txt #将本地环境导出
pip install -r a.txt  #安装所有的包
pip list #查看所有的包
pip uninstall flask #卸载
9.service (启动服务)
参数:

- name   服务名称

- state
  - started   启动
  - stopped   停止
  - restarted  重启
  - reloaded   平滑重启

- enabled   开机启动

- user  启动的用户

举例说明:
ansible web -m service -a "name=redis state=started" #启动
ansible web -m service -a "name=redis state=stopped" #关闭
ansible web -m service -a "name=redis enabled=yes" #设置开机自启动
补充:

1.启动
systemctl start redis    #centos7
service redis start     #centos6

2.开机自启动
systemctl enable redis   #centos7

centos6 中
chkconfig redis on    开机自动启动 #centos6
chkconfig iptables off  #关闭

chkconfig --list 所有的自启项
0 关机  1单用户 3命令行 5图形界面 6重启
举例:代码如下
  init 6   重启

3.
ps -ef|grep redis #查进程
ss -tunlp   #查端口
  -t tcp
  -u udp
  -n 以端口形式显示
  -l 显示所有已经启动的端口
  -p 显示pid

4.常见端口号:
ssh 22
http 80
https 443
mysql  3306
redis 6379
mongodb 27017
oracle 1521
tomcat 8080
windows 远程桌面 3389
ftp 20 21
django 8000
flask  5000
10.cron (定时任务)
参数:(添加时名字必须不同,不加名称为None)

- name 名字 描述信息

- minute  分钟

- hour   小时

- day   天

- month   月

- weekday  周

- job    任务

- disabled   禁用(前面加#)

- user   用户

- state (默认是创建)
  -absent   删除


举例说明:
ansible web -m cron -a "minute=12 name=touchfile job='touch /tmp/xiaoqiang.txt'"# 创建
ansible web -m cron -a "name=touchfile state=absent"#删除
ansible web -m cron -a "minute=12 name=touchfile2 job='touch /tmp/xiaoqiang.txt' disabled=yes" #注释
ansible web -m cron -a "name=None state=absent" #删除名称为空的计划任务
crontab
* * * * * job
分 时 日 月 周 任务
3/* * * * * job 每隔3分钟执行一次
4 10-12 * * * job 10点-12点第4分钟执行,包括12点
0-59 0-23 1-31 1-12 0-7

分钟最好不要用*
尽量写绝对路径

* * * * * tar zcf /tmp/etc.tar.gz /etc  每分钟进行压缩

备份
同步时间
删除文件

-e 编辑
-l 查看
-r 删除

举例:
crontab -l  查看当前有什么任务
11. user (用户)
参数:

- name  用户名

- group  属组

- groups  附加组

- home    设置家目录

- remove  删除用户并删除用户的家目录

- shell   用户登录后的shell

- system   系统用户

- uid     用户的id

- password   密码

- state  (默认是创建)
  -absent  删除


举例说明
ansible web -m user -a "name=alex10 shell=/sbin/nologin home=/opt/alex10 uid=3000 groups=root"
#创建用户,并指定用户的shell不能登录的状态,家目录,uid,以及附加组
ansible web -m user -a "name=alex11 shell=/sbin/nologin home=/opt/alex11"
ansible web -m user -a "name=alex12 system=yes" #创建系统用户
ansible web -m user -a "name=alex12 state=absent" #删除用户,但不会删除家目录
ansible web -m user -a "name=alex11 state=absent remove=yes" # 删除用户并删除用户的家目录
补充:

1.查看用户是否创建成功
tail /etc/passwd
tail /etc/shadow
id alex2

useradd
-d 设置用户家目录
useradd -d /opt/alex2 alex2
-g 设置用户的属组
useradd -g alex2 alex3
-G, --groups 附加组
useradd -G alex2,root alex4
-r, --system 系统账号
useradd -r alex5 # 系统账号没有家目录
-s, --shell #设置用户登录后的shell
useradd -s /sbin/nologin alex8
-u, --uid UID #设置用户的id
useradd -u 2000 alex9
设置了用户的id以后,在设置用户则从最大的id开始往后数
用户分类
超级管理员 root 0
普通用户
    系统用户  启动一些服务或者进程,不能登录  1-999 centos7 1-499 centos6 从大到小
    登录用户  可以登录的用户 1000-65535 centos7 500-65535 centos6
从小到大

userdel
userdel alex8 默认不删除家目录
-r 删除用户的家目录
userdel -r alex9 删除用户并删除用户的家目录
12. group (组)
参数:

- name  名称

- gid   组id

- system   系统组

- state  默认是创建
  -absent 删除


举例说明:
ansible web -m group -a "name=wusir10 system=yes gid=5000" 创建系统组
ansible web -m group -a "name=wusir11" 创建普通的组
ansible web -m group -a "name=wusir11 state=absent" #删除组
补充:

创建组
groupadd
  -g 设置id
  -r 系统组
groupadd -g 3000 wusir10
groupadd -r wusir11
超级管理员组 root 0
普通组
    系统组  1-999 centos7 1-499 centos6 从大到小
    登录用户组 1000-65535 centos7 500-65535 centos6
从小到大

查看
tail /etc/group


