
day06-文件操作相关
1.文件操作
在学习文件操作之前,先来回顾一下编码的相关以及相关数据类型的知识。
- 字符串类型,在程序中用于表示文字信息,本质上是unicode编码中的二进制
name = "武沛齐" - 字节类型
可表示文字信息,本质上是utf-8/gbk等编码的二进制name = "武沛齐" data = name.encode("utf-8") print(data)
1.1 读文件
- 读文本文件
# 1.打开文件
#    - 路径:
# 	相对路径:'info.txt'
# 	绝对路径:'/users/xxx/xxx/xxx.txt'
#    - 模式
#	rb,表示读取文件原始的二进制

# 1.打开文件
file_object = open('info.txt', mode='rb')
# 2.读取文件内容,并赋值给data
data = file_object.read()
# 3.关闭文件
file_object.close()
print(data)
text = data.decode('utf-8')
print(text)
# 1.打开文件
file_object = open('info.txt', mode='rt', encoding="utf-8")
# 2.读取文件内容,并赋值给data
data = file_object.read()
# 3.关闭文件
file_object.close()
print(data)
- 读图片等非文本内容文件
file_object = open('a1.png', mode='rb')
data = file_object.read()
file_object.close()
print(data)
注意事项:
- 路径
相对路径:先要知道你的程序到底在哪里运行的?
绝对路径:windows系统中写绝对路径容易出现转义字符的问题 - 读文件时,文件不存在程序会报错。
# 判断路径是否存在
import os
exists = os.path.exists("xxxxxx")
if exists:
	print("存在")
else:
	print("不存在")
1.2 写文件
- 写文本文件
file_object = open("t1.txt", mode="wb")	# 要求写入的内容是字节类型
file_object.write("武沛齐".encode("utf-8"))
file_object.close()
file_object = open("t1.txt", mode="wt", encoding='utf-8')	# 要求写入的内容是文本
file_object.write("武沛齐")
file_object.close()
基础案例:
# 案例1:用户注册
"""
user = input("请输入用户名:")
pwd = input("请输入密码:")
data = "{}-{}".format(user, pwd)
file_object = open("files/info.txt", mode="wt", encoding="utf-8")
file_object.write(data)
file_object.close()
"""

# 案例2:多用户注册
"""
file_object = open("files/info.txt", mode="wt", encoding="utf-8")
while True:
    user = input("请输入用户名:")
    if user.upper() == 'Q':
        break
    pwd = input("请输入密码:")
    data = "{}-{}\n".format(user, pwd)
    file_object.write(data)
file_object.close()
"""
小高级案例:
# 案例1:去网上下载一点文本,文本信息写入文件。
import requests
url = "https://movie.douban.com/j/search_subjects?type=movie&tag=%E7%83%AD%E9%97%A8&sort=recommend&page_limit=20&page_start=20"
headers = {
    "User-Agent": "Mozilla/5.0 (Windows NT 10.0; Win64; x64) AppleWebKit/537.36 (KHTML, like Gecko) Chrome/123.0.0.0 "
    "Safari/537.36"
}
resp = requests.get(url, headers=headers)
file_object = open("files/movie.txt", mode="wt", encoding="utf-8")
file_object.write(resp.text)
file_object.close()

# 案例2:去网上下载一张图片,图片写入文件。
import requests
url = "https://t11.baidu.com/it/u=3403862701,210888241&fm=30&app=106&f=JPEG?w=617&h=644&s=71B83ED1A61343D4F835154F0300D074"
headers = {
    "User-Agent": "Mozilla/5.0 (Windows NT 10.0; Win64; x64) AppleWebKit/537.36 (KHTML, like Gecko) Chrome/123.0.0.0 "
    "Safari/537.36"
}
resp = requests.get(url, headers=headers)
file_object = open("files/wcr.png", mode="wb")
file_object.write(resp.content)
file_object.close()
注意事项:
- 路径
绝对路径
相对路径 - 文件不存在时,w模式会新建然后再写入内容;文件存在时,w模式会清空文件再写入内容。
1.3 文件打开模式
上述我们基于文件操作基本实现了读、写的功能,其中涉及的文件操作模式:rt、rb、wt、wb,其实在文件操作中还有其他的很多模式。
- 只读:r、rt、rb
存在,读
不存在,报错 - 只写:w、wt、wb
存在,清空再写
不存在,创建再写 - 只写:x、xt、xb
存在,报错
不存在,创建再写 - 只写:a、at、ab
存在,尾部追加。
不存在,创建再写 - 读写
r+、rt+、rb+,默认光标位置:起始位置file_object = open("files/info.txt", mode="r+", encoding="utf-8") file_object.write("alex") data = file_object.read() print(data) # -123 file_object.close()file_object = open("files/info.txt", mode="wt+") data = file_object.read() print(data) file_object.write("你好呀") # 将光标位置重置起始 file_object.seek(0) data = file_object.read() print(data) # 你好呀 file_object.close()
a+、at+、ab+,默认光标位置:末尾file_object = open("files/info.txt", mode="at+") file_object.write("武沛齐") file_object.seek(0) data = file_object.read() print(data) # 你好呀武沛齐 file_object.close()
多用户注册案例:
while True:
    user = input("请输入用户名:")
    if user.upper() == 'Q':
        break
    pwd = input("请输入密码:")
    data = "{}-{}\n".format(user, pwd)
    file_object = open("files/info.txt", mode="at")
    file_object.write(data)
    file_object.close()
1.4 常见功能
在上述对文件的操作中,我们只使用了write和read来对文件进行读写,其实在文件操作中还有很多其他的功能来辅助实现更好的读写文件的内容。
- read,读
读所有f = open("files/info.txt", mode='r', encoding="utf-8") data = f.read() f.close()f = open("files/info.txt", mode='r', encoding="utf-8") # 读1个字符 data = f.read(1) f.close() - readline,读一行
f = open("files/info.txt", mode='r', encoding="utf-8")

# 读第一行
first_line = f.readline()
print(first_line)

# 读第二行
second_line = f.readline()
print(second_line)

f.close()
- readlines,读所有行,每行作为列表的一个元素
f = open("files/info.txt", mode='r', encoding="utf-8")

data = f.readlines()
print(data)

f.close()
- 循环,读大文件
f = open("files/info.txt", mode='r', encoding="utf-8")
for line in f:
    print(line)
f.close()
- write,写
f = open("files/info.txt", mode='a', encoding="utf-8")
f.write("武沛齐")
f.close()
f = open("files/info.txt", mode='ab')
f.write("武沛齐".encode("utf-8"))
f.close()
- flush,刷到硬盘
f = open("files/info.txt", mode='a', encoding="utf-8")
while True:
    # 不是写到了硬盘,而是写在缓冲区,系统会将缓冲区的内容刷到硬盘
    f.write("武沛齐")
    f.flush()
- 移动光标位置(字节)
f = open("files/info.txt", mode='r+', encoding="utf-8")
# 移动到指定位置
f.seek(3)
f.write("武沛齐")
f.close()
注意:在a模式下,调用write在文件中写入内容时,永远只能将内容写入到尾部,不会写到光标的位置。
- 获取当前光标位置
f = open("files/info.txt", mode='r+', encoding="utf-8")
p1 = f.tell()
print(p1)   # 0
f.read(3)   # 读3个字符
p2 = f.tell()
print(p2)   # 9
f.close()
1.5 上下文管理
之前对文件进行操作时,每次都要打开和关闭文件,比较繁琐且容易忘记关闭文件。
以后再进行文件操作时,推荐大家是有with上下文管理,它可以自动实现关闭文件。
with open("files/info.txt", mode="rb") as f:
    data = f.read()
    print(data)
在python2.7后,with又支持同时对多个文件的上下文进行管理,即:
with open("xxxx.txt", mode="rb") as f1, open("xxxx.txt", mode='rb') as f2:
    pass
练习题
- 补充代码,实现下载视频并保存到本地
import requests

res = requests.get(
    url = "xxxxx",
    headers={
        "User-Agent": "Mozilla/5.0 (Macintosh; Intel Mac OS X 10_15_7) AppleWebKit/537.36 (KHTML, like Gecko) Chrome/87.0.4280.88 Safari/537.36"
    }
)

with open("files/nba.mp4", mode="wb") as f:
    f.write(res.content)
- 日志分析,计算某用户
223.73.89.192访问次数。日志文件如下:access.log
49.89.167.91 - - [17/Dec/2020:03:43:50 +0800] "GET /wiki/detail/3/40 HTTP/1.1" 301 0 "-" "Mozilla/5.0(Linux;Android 5.1.1;OPPO A33 Build/LMY47V;wv) AppleWebKit/537.36(KHTML,link Gecko) Version/4.0 Chrome/43.0.2357.121 Mobile Safari/537.36 LieBaoFast/4.51.3" "-"
49.89.167.91 - - [17/Dec/2020:03:44:11 +0800] "GET /wiki/detail/3/40/ HTTP/1.1" 200 8033 "-" "Mozilla/5.0(Linux;Android 5.1.1;OPPO A33 Build/LMY47V;wv) AppleWebKit/537.36(KHTML,link Gecko) Version/4.0 Chrome/43.0.2357.121 Mobile Safari/537.36 LieBaoFast/4.51.3" "-"
203.208.60.66 - - [17/Dec/2020:03:47:58 +0800] "GET /media/uploads/2019/11/17/pic/s1.png HTTP/1.1" 200 710728 "-" "Googlebot-Image/1.0" "-"
223.73.89.192 - - [17/Dec/2020:03:48:26 +0800] "GET /wiki/detail/3/40/ HTTP/1.1" 200 8033 "-" "Mozilla/5.0 (Windows NT 10.0; Win64; x64) AppleWebKit/537.36 (KHTML, like Gecko) Chrome/87.0.4280.88 Safari/537.36 Edg/87.0.664.60" "-"
223.73.89.192 - - [17/Dec/2020:03:48:26 +0800] "GET /static/stark/plugins/font-awesome/css/font-awesome.css HTTP/1.1" 200 37414 "https://pythonav.com/wiki/detail/3/40/" "Mozilla/5.0 (Windows NT 10.0; Win64; x64) AppleWebKit/537.36 (KHTML, like Gecko) Chrome/87.0.4280.88 Safari/537.36 Edg/87.0.664.60" "-"
223.73.89.192 - - [17/Dec/2020:03:48:26 +0800] "GET /static/stark/plugins/bootstrap/css/bootstrap.css HTTP/1.1" 200 146010 "https://pythonav.com/wiki/detail/3/40/" "Mozilla/5.0 (Windows NT 10.0; Win64; x64) AppleWebKit/537.36 (KHTML, like Gecko) Chrome/87.0.4280.88 Safari/537.36 Edg/87.0.664.60" "-"
223.73.89.192 - - [17/Dec/2020:03:48:26 +0800] "GET /static/web/css/commons.css HTTP/1.1" 200 3674 "https://pythonav.com/wiki/detail/3/40/" "Mozilla/5.0 (Windows NT 10.0; Win64; x64) AppleWebKit/537.36 (KHTML, like Gecko) Chrome/87.0.4280.88 Safari/537.36 Edg/87.0.664.60" "-"
223.73.89.192 - - [17/Dec/2020:03:48:26 +0800] "GET /static/mdeditor/editormd/css/editormd.preview.css HTTP/1.1" 200 60230 "https://pythonav.com/wiki/detail/3/40/" "Mozilla/5.0 (Windows NT 10.0; Win64; x64) AppleWebKit/537.36 (KHTML, like Gecko) Chrome/87.0.4280.88 Safari/537.36 Edg/87.0.664.60" "-"
223.73.89.192 - - [17/Dec/2020:03:48:26 +0800] "GET /static/stark/js/jquery-3.3.1.min.js HTTP/1.1" 200 86927 "https://pythonav.com/wiki/detail/3/40/" "Mozilla/5.0 (Windows NT 10.0; Win64; x64) AppleWebKit/537.36 (KHTML, like Gecko) Chrome/87.0.4280.88 Safari/537.36 Edg/87.0.664.60" "-"
223.73.89.192 - - [17/Dec/2020:03:48:26 +0800] "GET /static/stark/plugins/bootstrap/js/bootstrap.min.js HTTP/1.1" 200 37045 "https://pythonav.com/wiki/detail/3/40/" "Mozilla/5.0 (Windows NT 10.0; Win64; x64) AppleWebKit/537.36 (KHTML, like Gecko) Chrome/87.0.4280.88 Safari/537.36 Edg/87.0.664.60" "-"
223.73.89.192 - - [17/Dec/2020:03:48:26 +0800] "GET /static/mdeditor/editormd/lib/marked.min.js HTTP/1.1" 200 19608 "https://pythonav.com/wiki/detail/3/40/" "Mozilla/5.0 (Windows NT 10.0; Win64; x64) AppleWebKit/537.36 (KHTML, like Gecko) Chrome/87.0.4280.88 Safari/537.36 Edg/87.0.664.60" "-"
223.73.89.192 - - [17/Dec/2020:03:48:27 +0800] "GET /static/mdeditor/editormd/lib/prettify.min.js HTTP/1.1" 200 17973 "https://pythonav.com/wiki/detail/3/40/" "Mozilla/5.0 (Windows NT 10.0; Win64; x64) AppleWebKit/537.36 (KHTML, like Gecko) Chrome/87.0.4280.88 Safari/537.36 Edg/87.0.664.60" "-"
223.73.89.192 - - [17/Dec/2020:03:48:27 +0800] "GET /static/mdeditor/editormd/fonts/fontawesome-webfont.woff2?v=4.3.0 HTTP/1.1" 200 56780 "https://pythonav.com/static/mdeditor/editormd/css/editormd.preview.css" "Mozilla/5.0 (Windows NT 10.0; Win64; x64) AppleWebKit/537.36 (KHTML, like Gecko) Chrome/87.0.4280.88 Safari/537.36 Edg/87.0.664.60" "-"
223.73.89.192 - - [17/Dec/2020:03:48:27 +0800] "GET /static/mdeditor/editormd/editormd.js HTTP/1.1" 200 163262 "https://pythonav.com/wiki/detail/3/40/" "Mozilla/5.0 (Windows NT 10.0; Win64; x64) AppleWebKit/537.36 (KHTML, like Gecko) Chrome/87.0.4280.88 Safari/537.36 Edg/87.0.664.60" "-"
223.73.89.192 - - [17/Dec/2020:03:48:28 +0800] "GET /static/mdeditor/mdeditor-preview-init.js HTTP/1.1" 200 261 "https://pythonav.com/wiki/detail/3/40/" "Mozilla/5.0 (Windows NT 10.0; Win64; x64) AppleWebKit/537.36 (KHTML, like Gecko) Chrome/87.0.4280.88 Safari/537.36 Edg/87.0.664.60" "-"
223.73.89.192 - - [17/Dec/2020:03:48:29 +0800] "GET /static/stark/plugins/font-awesome/fonts/fontawesome-webfont.woff2?v=4.7.0 HTTP/1.1" 200 77160 "https://pythonav.com/static/stark/plugins/font-awesome/css/font-awesome.css" "Mozilla/5.0 (Windows NT 10.0; Win64; x64) AppleWebKit/537.36 (KHTML, like Gecko) Chrome/87.0.4280.88 Safari/537.36 Edg/87.0.664.60" "-"
223.73.89.192 - - [17/Dec/2020:03:48:29 +0800] "GET /media/uploads/2019/02/22/Gobook/_book/ssl2.png HTTP/1.1" 200 203535 "https://pythonav.com/wiki/detail/3/40/" "Mozilla/5.0 (Windows NT 10.0; Win64; x64) AppleWebKit/537.36 (KHTML, like Gecko) Chrome/87.0.4280.88 Safari/537.36 Edg/87.0.664.60" "-"
count = 0
with open("files/access.log", mode="r", encoding="utf-8") as f:
    data = f.readlines()
    for line in data:
        if line.startswith("223.73.89.192"):
            count += 1
print(count)
- 日志分析升级,计算所有用户的访问次数。
dic = {}
with open("files/access.log", mode="r", encoding="utf-8") as f:
    for line in f:
        split = line.split(" ")
        if split[0] in dic.keys():
            dic[split[0]] += 1
        else:
            dic.setdefault(split[0], 1)
print(dic)
- 筛选出股票 当前价大于 20 的所有股票数据。
股票代码,股票名称,当前价,涨跌额,涨跌幅,年初至今,成交量,成交额,换手率,市盈率(TTM),股息率,市值
SH601778,N晶科,6.29,+1.92,+43.94%,+43.94%,259.66万,1625.52万,0.44%,22.32,-,173.95亿
SH688566,吉贝尔,52.66,+6.96,+15.23%,+122.29%,1626.58万,8.09亿,42.29%,89.34,-,98.44亿
SH688268,华特气体,88.80,+11.72,+15.20%,+102.51%,622.60万,5.13亿,22.87%,150.47,-,106.56亿
SH600734,实达集团,2.60,+0.24,+10.17%,-61.71%,1340.27万,3391.14万,2.58%,亏损,0.00%,16.18亿
SH900957,凌云B股,0.36,+0.033,+10.09%,-35.25%,119.15万,42.10万,0.65%,44.65,0.00%,1.26亿
SZ000584,哈工智能,6.01,+0.55,+10.07%,-4.15%,2610.86万,1.53亿,4.36%,199.33,0.26%,36.86亿
SH600599,熊猫金控,6.78,+0.62,+10.06%,-35.55%,599.64万,3900.23万,3.61%,亏损,0.00%,11.25亿
SH600520,文一科技,8.21,+0.75,+10.05%,-24.05%,552.34万,4464.69万,3.49%,亏损,0.00%,13.01亿
SH603682,锦和商业,11.73,+1.07,+10.04%,+48.29%,2746.63万,3.15亿,29.06%,29.62,-,55.42亿
SZ300831,派瑞股份,12.27,+1.12,+10.04%,+208.29%,25.38万,311.41万,0.32%,60.59,-,39.26亿
li = []
with open("files/stock.txt", mode='r', encoding="utf-8") as f:
    for line in f:
        if not line.startswith("S"):
            continue
        split = line.split(",")
        if float(split[2]) > 20:
            li.append(line)
print(li)
- 根据要求修改文件的内容,原文件内容如下:
ha.conf
global
        log 127.0.0.1 local2
        daemon
        maxconn 256
        log 127.0.0.1 local2 info
defaults
        log global
        mode http
        timeout connect 5000ms
        timeout client 50000ms
        timeout server 50000ms
        option  dontlognull

listen stats :8888
        stats enable
        stats uri       /admin
        stats auth      admin:1234

frontend oldboy.org
        bind 0.0.0.0:80
        option httplog
        option httpclose
        option  forwardfor
        log global
        acl www hdr_reg(host) -i www.luffycity.org
        use_backend www.luffycity.com if www

backend www.luffycity.com
        server 100.1.7.9 100.1.7.9 weight 20 maxconn 3000
请将文件中的 luffycity修改为 pythonav 。
"""
- 文件读到内存,再通过replace(适用于小文件,不适应大文件)
- 挨个位置读文件的内容,遇到luffycity将其替换成pythonav(不可取)
- 同时打开两个文件,读+写。(适用小文件和大文件)
"""
with open("files/ha.conf", mode='r', encoding="utf-8") as f1, open("files/new.conf", mode='w', encoding="utf-8") as f2:
    for line in f1:
        new_line = line.replace("luffycity", "pythonav")
        f2.write(new_line)

# 重命名
import shutil
shutil.move("files/new.conf", "files/ha.conf")
2.csv格式文件
逗号分隔值(Comma-Separated Values,CSV,有时也称为字符分隔值,因为分割字符也可以不是逗号),其文件以纯文本形式存储表格数据(数字和文本)。
对于这种格式的数据,我们需要利用open函数来读取文件并根据逗号分隔的特点来进行处理。
股票代码,股票名称,当前价,涨跌额,涨跌幅,年初至今,成交量,成交额,换手率,市盈率(TTM),股息率,市值
SH601778,N晶科,6.29,+1.92,+43.94%,+43.94%,259.66万,1625.52万,0.44%,22.32,-,173.95亿
SH688566,吉贝尔,52.66,+6.96,+15.23%,+122.29%,1626.58万,8.09亿,42.29%,89.34,-,98.44亿
练习题案例:下载文档中的所有图片且以用户名为图片名称存储。
ID,用户名,头像
26044585,Hush,https://hbimg.huabanimg.com/51d46dc32abe7ac7f83b94c67bb88cacc46869954f478-aP4Q3V
19318369,柒十一,https://hbimg.huabanimg.com/703fdb063bdc37b11033ef794f9b3a7adfa01fd21a6d1-wTFbnO
15529690,Law344,https://hbimg.huabanimg.com/b438d8c61ed2abf50ca94e00f257ca7a223e3b364b471-xrzoQd
18311394,Jennah·,https://hbimg.huabanimg.com/4edba1ed6a71797f52355aa1de5af961b85bf824cb71-px1nZz
18009711,可洛爱画画,https://hbimg.huabanimg.com/03331ef39b5c7687f5cc47dbcbafd974403c962ae88ce-Co8AUI
30574436,花姑凉~,https://hbimg.huabanimg.com/2f5b657edb9497ff8c41132e18000edb082d158c2404-8rYHbw
17740339,小巫師,https://hbimg.huabanimg.com/dbc6fd49f1915545cc42c1a1492a418dbaebd2c21bb9-9aDqgl
18741964,桐末tonmo,https://hbimg.huabanimg.com/b60cee303f62aaa592292f45a1ed8d5be9873b2ed5c-gAJehO
30535005,TANGZHIQI,https://hbimg.huabanimg.com/bbd08ee168d54665bf9b07899a5c4a4d6bc1eb8af77a4-8Gz3K1
31078743,你的老杨,https://hbimg.huabanimg.com/c46fbc3c9a01db37b8e786cbd7174bbd475e4cda220f4-F1u7MX
25519376,尺尺寸,https://hbimg.huabanimg.com/ee29ee198efb98f970e3dc2b24c40d89bfb6f911126b6-KGvKes
21113978,C-CLong,https://hbimg.huabanimg.com/7fa6b2a0d570e67246b34840a87d57c16a875dba9100-SXsSeY
24674102,szaa,https://hbimg.huabanimg.com/0716687b0df93e8c3a8e0925b6d2e4135449cd27597c4-gWdv24
30508507,爱起床的小灰灰,https://hbimg.huabanimg.com/4eafdbfa21b2f300a7becd8863f948e5e92ef789b5a5-1ozTKq
12593664,yokozen,https://hbimg.huabanimg.com/cd07bbaf052b752ed5c287602404ea719d7dd8161321b-cJtHss
16899164,一阵疯,https://hbimg.huabanimg.com/0940b557b28892658c3bcaf52f5ba8dc8402100e130b2-G966Uz
847937,卩丬My㊊伴er彎,https://hbimg.huabanimg.com/e2d6bb5bc8498c6f607492a8f96164aa2366b104e7a-kWaH68
31010628,慢慢即漫漫,https://hbimg.huabanimg.com/c4fb6718907a22f202e8dd14d52f0c369685e59cfea7-82FdsK
13438168,海贼玩跑跑,https://hbimg.huabanimg.com/1edae3ce6fe0f6e95b67b4f8b57c4cebf19c501b397e-BXwiW6
28593155,源稚生,https://hbimg.huabanimg.com/626cfd89ca4c10e6f875f3dfe1005331e4c0fd7fd429-9SeJeQ
28201821,合伙哼哼,https://hbimg.huabanimg.com/f59d4780531aa1892b80e0ec94d4ec78dcba08ff18c416-769X6a
28255146,漫步AAA,https://hbimg.huabanimg.com/3c034c520594e38353a039d7e7a5fd5e74fb53eb1086-KnpLaL
30537613,配䦹,https://hbimg.huabanimg.com/efd81d22c1b1a2de77a0e0d8e853282b83b6bbc590fd-y3d4GJ
22665880,日后必火,https://hbimg.huabanimg.com/69f0f959979a4fada9e9e55f565989544be88164d2b-INWbaF
16748980,keer521521,https://hbimg.huabanimg.com/654953460733026a7ef6e101404055627ad51784a95c-B6OFs4
30536510,“西辞”,https://hbimg.huabanimg.com/61cfffca6b2507bf51a507e8319d68a8b8c3a96968f-6IvMSk
30986577,艺成背锅王,https://hbimg.huabanimg.com/c381ecc43d6c69758a86a30ebf72976906ae6c53291f9-9zroHF
26409800,CsysADk7,https://hbimg.huabanimg.com/bf1d22092c2070d68ade012c588f2e410caaab1f58051-ahlgLm
30469116,18啊全阿,https://hbimg.huabanimg.com/654953460733026a7ef6e101404055627ad51784a95c-B6OFs4
17473505,椿の花,https://hbimg.huabanimg.com/0e38d810e5a24f91ebb251fd3aaaed8bb37655b14844c-pgNJBP
19165177,っ思忆゜♪,https://hbimg.huabanimg.com/4815ea0e4905d0f3bb82a654b481811dadbfe5ce2673-vMVr0B
16059616,格林熊丶,https://hbimg.huabanimg.com/8760a2b08d87e6ed4b7a9715b1a668176dbf84fec5b-jx14tZ
30734152,sCWVkJDG,https://hbimg.huabanimg.com/f31a5305d1b8717bbfb897723f267d316e58e7b7dc40-GD3e22
24019677,虚无本心,https://hbimg.huabanimg.com/6fdfa9834abe362e978b517275b06e7f0d5926aa650-N1xCXE
16670283,Y-雨后天空,https://hbimg.huabanimg.com/a3bbb0045b536fc27a6d2effa64a0d43f9f5193c177f-I2vHaI
21512483,汤姆2,https://hbimg.huabanimg.com/98cc50a61a7cc9b49a8af754ffb26bd15764a82f1133-AkiU7D
16441049,笑潇啸逍小鱼,https://hbimg.huabanimg.com/ae8a70cd85aff3a8587ff6578d5cf7620f3691df13e46-lmrIi9
24795603,v,https://hbimg.huabanimg.com/a7183cc3a933aa129d7b3230bf1378fd8f5857846cc5-3tDtx3
29819152,妮玛士珍多,https://hbimg.huabanimg.com/ca4ecb573bf1ff0415c7a873d64470dedc465ea1213c6-RAkArS
19101282,陈勇敢❤,https://hbimg.huabanimg.com/ab6d04ebaff3176e3570139a65155856871241b58bc6-Qklj2E
28337572,爱意随风散,https://hbimg.huabanimg.com/117ad8b6eeda57a562ac6ab2861111a793ca3d1d5543-SjWlk2
17342758,幸运instant,https://hbimg.huabanimg.com/72b5f9042ec297ae57b83431123bc1c066cca90fa23-3MoJNj
18483372,Beau染,https://hbimg.huabanimg.com/077115cb622b1ff3907ec6932e1b575393d5aae720487-d1cdT9
22127102,栽花的小蜻蜓,https://hbimg.huabanimg.com/6c3cbf9f27e17898083186fc51985e43269018cc1e1df-QfOIBG
13802024,LoveHsu,https://hbimg.huabanimg.com/f720a15f8b49b86a7c1ee4951263a8dbecfe3e43d2d-GPEauV
22558931,白驹过隙丶梨花泪う,https://hbimg.huabanimg.com/e49e1341dfe5144da5c71bd15f1052ef07ba7a0e1296b-jfyfDJ
11762339,cojoy,https://hbimg.huabanimg.com/5b27f876d5d391e7c4889bc5e8ba214419eb72b56822-83gYmB
30711623,雪碧学长呀,https://hbimg.huabanimg.com/2c288a1535048b05537ba523b3fc9eacc1e81273212d1-nr8M4t
18906718,西霸王,https://hbimg.huabanimg.com/7b02ad5e01bd8c0a29817e362814666a7800831c154a6-AvBDaG
31037856,邵阳的小哥哥,https://hbimg.huabanimg.com/654953460733026a7ef6e101404055627ad51784a95c-B6OFs4
26830711,稳健谭,https://hbimg.huabanimg.com/51547ade3f0aef134e8d268cfd4ad61110925aefec8a-NKPEYX
import requests
import os

with open("files/mv.csv", mode="r", encoding="utf-8") as file_object:
    file_object.readline()
    for line in file_object:
        user_id, username, url = line.strip().split(",")
        # 1.根据url下载图片
        res = requests.get(url, headers={"User-Agent": "Mozilla/5.0 (Windows NT 10.0; Win64; x64) AppleWebKit/537.36 ("
                                                  "KHTML, "
                                   "like Gecko) Chrome/123.0.0.0 Safari/537.36"})

        # 检查img路径是否存在,不存在则创建
        if not os.path.exists("img"):
            # 创建
            os.makedirs("img")

        # 2.将图片的内容写入到文件
        with open("img/{}.png".format(username), mode="wb") as img_object:
            img_object.write(res.content)
3.ini格式
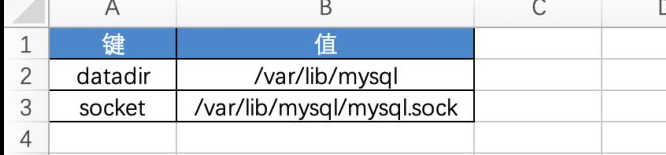
ini文件时Initialization File的缩写,平时用于存储软件的配置文件。例如:MySQL数据库的配置文件。
[mysqld]
datadir=/var/lib/mysql
socket=/var/lib/mysql/mysql.sock
log-bin=py-mysql-bin
character-set-server=utf8
collation-server=utf8_general_ci
log-error=/var/log/mysqld.log
# Disabling symbolic-links is recommended to prevent assorted security risks
symbolic-links=0

[mysqld_safe]
log-error=/var/log/mariadb/mariadb.log
pid-file=/var/run/mariadb/mariadb.pid

[client]
default-character-set=utf8
这种格式是可以直接使用open读出来,考虑到自己处理比较麻烦,所以python为我们提供了更为方便的方式。
- 读取所有节点
import configparser

config = configparser.ConfigParser()
config.read("files/my.ini", encoding="utf-8")

result = config.sections()
print(result)   # ['mysqld', 'mysqld_safe', 'client']
- 读取节点下的键值
import configparser

config = configparser.ConfigParser()
config.read("files/my.ini", encoding="utf-8")

result = config.items("mysqld_safe")
print(result)   # [('log-error', '/var/log/mariadb/mariadb.log'), ('pid-file', '/var/run/mariadb/mariadb.pid')]
- 读取节点下值(根据键)
import configparser

config = configparser.ConfigParser()
config.read("files/my.ini", encoding="utf-8")

result = config.get("mysqld", "collation-server")
print(result)   # utf8_general_ci
- 检查、删除、添加节点
import configparser

config = configparser.ConfigParser()
config.read("files/my.ini", encoding="utf-8")

# 1 是否存在节点
v1 = config.has_section("client")
print(v1)

# 2 添加一个节点
config.add_section("group")
config.set('group', 'name', 'wupeiqi')
config.set('client', 'name', 'wupeiqi')
config.write(open("files/new.ini", mode="w", encoding="utf-8"))

# 3 删除
config.remove_section('client')
config.remove_option("mysqld", "datadir")
config.write(open("files/new.ini", mode="w", encoding="utf-8"))
4.XML格式文件
可扩展标记语言,是一种简单的数据存储语言,XML被设计用来传输和存储数据。
- 存储,可用来存放配置文件,例如:java的配置文件
- 传输,网络传输时以这种格式存在,例如:早期ajax传输的数据、soap协议等。
<data>
    <country name="Liechtenstein">
        <rank updated="yes">2</rank>
        <year>2023</year>
        <gdppc>141100</gdppc>
        <neighbor direction="E" name="Austria" />
        <neighbor direction="W" name="Switzerland" />
    </country>
    <country name="Singapore">
        <rank updated="yes">5</rank>
        <year>2026</year>
        <gdppc>59900</gdppc>
        <neighbor direction="N" name="Malaysia" />
    </country>
    <country name="Panama">
        <rank updated="yes">69</rank>
        <year>2026</year>
        <gdppc>13600</gdppc>
        <neighbor direction="W" name="Costa Rica" />
        <neighbor direction="E" name="Colombia" />
    </country>
</data>
注意:在python开发中用的相对来说比较少,作为了解即可。
4.1 读取文件和内容
from xml.etree import ElementTree as ET

# 直接解析xml文件
tree = ET.parse("files/xo.xml")

# 获取跟标签
root = tree.getroot()
print(root)     # <Element 'data' at 0x000001FDF5AF3900>
from xml.etree import ElementTree as ET

content = """
<data>
    <country name="Liechtenstein">
        <rank updated="yes">2</rank>
        <year>2023</year>
        <gdppc>141100</gdppc>
        <neighbor direction="E" name="Austria" />
        <neighbor direction="W" name="Switzerland" />
    </country>
    <country name="Singapore">
        <rank updated="yes">5</rank>
        <year>2026</year>
        <gdppc>59900</gdppc>
        <neighbor direction="N" name="Malaysia" />
    </country>
    <country name="Panama">
        <rank updated="yes">69</rank>
        <year>2026</year>
        <gdppc>13600</gdppc>
        <neighbor direction="W" name="Costa Rica" />
        <neighbor direction="E" name="Colombia" />
    </country>
</data>
"""

root = ET.XML(content)
print(root)     # <Element 'data' at 0x0000022B1942B4A0>
4.2 读取节点数据
from xml.etree import ElementTree as ET

content = """
<data>
    <country name="Liechtenstein">
        <rank updated="yes">2</rank>
        <year>2023</year>
        <gdppc>141100</gdppc>
        <neighbor direction="E" name="Austria" />
        <neighbor direction="W" name="Switzerland" />
    </country>
    <country name="Singapore">
        <rank updated="yes">5</rank>
        <year>2026</year>
        <gdppc>59900</gdppc>
        <neighbor direction="N" name="Malaysia" />
    </country>
    <country name="Panama">
        <rank updated="yes">69</rank>
        <year>2026</year>
        <gdppc>13600</gdppc>
        <neighbor direction="W" name="Costa Rica" />
        <neighbor direction="E" name="Colombia" />
    </country>
</data>
"""

root = ET.XML(content)

# 获取data标签的孩子标签
for child in root:
    # tag获取标签名
    # attrib获取标签里面的属性
    # text获取标签的文本内容
    print(child.tag, child.attrib)
    for node in child:
        print(node.tag, node.attrib, node.text)
from xml.etree import ElementTree as ET

content = """
<data>
    <country name="Liechtenstein">
        <rank updated="yes">2</rank>
        <year>2023</year>
        <gdppc>141100</gdppc>
        <neighbor direction="E" name="Austria" />
        <neighbor direction="W" name="Switzerland" />
    </country>
    <country name="Singapore">
        <rank updated="yes">5</rank>
        <year>2026</year>
        <gdppc>59900</gdppc>
        <neighbor direction="N" name="Malaysia" />
    </country>
    <country name="Panama">
        <rank updated="yes">69</rank>
        <year>2026</year>
        <gdppc>13600</gdppc>
        <neighbor direction="W" name="Costa Rica" />
        <neighbor direction="E" name="Colombia" />
    </country>
</data>
"""

root = ET.XML(content)

for child in root.iter('year'):
    print(child.tag, child.text)
from xml.etree import ElementTree as ET

content = """
<data>
    <country name="Liechtenstein">
        <rank updated="yes">2</rank>
        <year>2023</year>
        <gdppc>141100</gdppc>
        <neighbor direction="E" name="Austria" />
        <neighbor direction="W" name="Switzerland" />
    </country>
    <country name="Singapore">
        <rank updated="yes">5</rank>
        <year>2026</year>
        <gdppc>59900</gdppc>
        <neighbor direction="N" name="Malaysia" />
    </country>
    <country name="Panama">
        <rank updated="yes">69</rank>
        <year>2026</year>
        <gdppc>13600</gdppc>
        <neighbor direction="W" name="Costa Rica" />
        <neighbor direction="E" name="Colombia" />
    </country>
</data>
"""

root = ET.XML(content)

v1 = root.findall('country')
print(v1)   # [<Element 'country' at 0x0000018586CA3860>, <Element 'country' at 0x0000018586CB7400>, <Element 'country' at 0x0000018586CB7590>]

v2 = root.find('country').find('rank')
print(v2)   # <Element 'rank' at 0x0000018586CA3900>
4.3 修改和删除节点
from xml.etree import ElementTree as ET

content = """
<data>
    <country name="Liechtenstein">
        <rank updated="yes">2</rank>
        <year>2023</year>
        <gdppc>141100</gdppc>
        <neighbor direction="E" name="Austria" />
        <neighbor direction="W" name="Switzerland" />
    </country>
    <country name="Singapore">
        <rank updated="yes">5</rank>
        <year>2026</year>
        <gdppc>59900</gdppc>
        <neighbor direction="N" name="Malaysia" />
    </country>
    <country name="Panama">
        <rank updated="yes">69</rank>
        <year>2026</year>
        <gdppc>13600</gdppc>
        <neighbor direction="W" name="Costa Rica" />
        <neighbor direction="E" name="Colombia" />
    </country>
</data>
"""

root = ET.XML(content)

# 修改节点内容和属性
rank = root.find('country').find('rank')
print(rank.text)
rank.text = 999
rank.set('update', '2020-11-11')
print(rank.text, rank.attrib)

# 删除节点
root.remove(root.find('country'))
print(root.findall('country'))

# 保存文件
tree = ET.ElementTree(root)
tree.write("newxml.xml", encoding="utf-8")
4.4 构建文档
from xml.etree import ElementTree as ET

# 创建根节点
root = ET.Element("home")

# 创建节点大儿子
son1 = ET.Element('son', {'name': '儿1'})
# 创建小儿子
son2 = ET.Element('son', {'name': '儿2'})

# 在大儿子中创建两个孙子
grandson1 = ET.Element('grandson', {'name': '儿11'})
grandson2 = ET.Element('grandson', {'name': '儿12'})
son1.append(grandson1)
son1.append(grandson2)

# 把儿子添加到根节点中
root.append(son1)
root.append(son2)

tree = ET.ElementTree(root)
tree.write("oooo.xml", encoding="utf-8", short_empty_elements=False)
from xml.etree import ElementTree as ET

# 创建根节点
root = ET.Element("home")

# 创建节点大儿子
son1 = root.makeelement('son', {'name': '儿1'})
# 创建小儿子
son2 = root.makeelement('son', {'name': '儿2'})

# 在大儿子中创建两个孙子
grandson1 = son1.makeelement('grandson', {'name': '儿11'})
grandson2 = son1.makeelement('grandson', {'name': '儿12'})
son1.append(grandson1)
son1.append(grandson2)

# 把儿子添加到根节点中
root.append(son1)
root.append(son2)

tree = ET.ElementTree(root)
tree.write("oooo.xml", encoding="utf-8")
from xml.etree import ElementTree as ET

# 创建根节点
root = ET.Element("home")

# 创建节点大儿子
son1 = ET.SubElement(root, "son", attrib={'name': '儿1'})
# 创建小儿子
son2 = ET.SubElement(root, "son", attrib={'name': '儿2'})

# 在大儿子中创建一个孙子
grandson1 = ET.SubElement(son1, "grandson", attrib={'name': '儿11'})
grandson1.text = "孙子"

tree = ET.ElementTree(root)
tree.write("oooo.xml", encoding="utf-8")
案例:将xml格式转换为字典格式
from xml.etree import ElementTree as ET

content = """
<xml>
    <ToUserName><![CDATA[gh_7f083739789a]]></ToUserName>
    <FromUserName><![CDATA[oia2TjuEGTNoeX76QEjQNrcURxG8]]></FromUserName>
    <CreateTime>1395658920</CreateTime>
    <MsgType><![CDATA[event]]></MsgType>
    <Event><![CDATA[TEMPLATESENDJOBFINISH]]></Event>
    <MsgID>200163836</MsgID>
    <Status><![CDATA[success]]></Status>
</xml>
"""
info = {}
root = ET.XML(content)
for node in root:
    info[node.tag] = node.text
print(info)     # {'ToUserName': 'gh_7f083739789a', 'FromUserName': 'oia2TjuEGTNoeX76QEjQNrcURxG8', 'CreateTime': '1395658920', 'MsgType': 'event', 'Event': 'TEMPLATESENDJOBFINISH', 'MsgID': '200163836', 'Status': 'success'}
5.Excel格式文件
python内部未提供处理excel文件的功能,想要在python中操作excel需要安装第三方的模块。pip install openpyxl
5.1 读excel
- 读sheet
from openpyxl import load_workbook

wb = load_workbook("files/p1.xlsx")

# sheet相关操作

# 1.获取excel文件中的所有sheet名称
"""
print(wb.sheetnames)    # ['数据导出', '用户列表', 'Sheet1', 'Sheet2']
"""

# 2.选择sheet,基于sheet名称
"""
sheet = wb["数据导出"]
cell = sheet.cell(1, 1)     # 选择第一行第一列的单元格
print(cell.value)
"""

# 3.选择sheet,基于索引位置
"""
sheet = wb.worksheets[0]
cell = sheet.cell(1, 2)
print(cell.value)
"""

# 4.循环所有的sheet
"""
for name in wb.sheetnames:
    sheet = wb[name]
    cell = sheet.cell(1, 1)
    print(cell.value)
"""
"""
for sheet in wb.worksheets:
    cell = sheet.cell(1, 1)
    print(cell.value)
"""
"""
for sheet in wb:
    cell = sheet.cell(1, 1)
    print(cell.value)
"""
- 读sheet中单元格的数据
from openpyxl import load_workbook

wb = load_workbook("files/p1.xlsx")
sheet = wb.worksheets[0]

# 1.获取第n行第n列的单元格(位置是从1开始的)
"""
cell = sheet.cell(1, 1)
print(cell.value)
print(cell.style)
print(cell.font)
print(cell.alignment)
"""

# 2.获取某个单元格
"""
c1 = sheet["A2"]
print(c1.value)

c2 = sheet["D4"]
print(c2.value)
"""

# 3.第n行所有的单元格
"""
for cell in sheet[1]:
    print(cell.value)
"""

# 4.获取所有行的数据(获取某一列数据)
"""
for row in sheet.rows:
    print(row[0].value, row[1].value)
"""

# 5.获取所有列的数据
for col in sheet.columns:
    print(col[1].value)
- 读合并的单元格
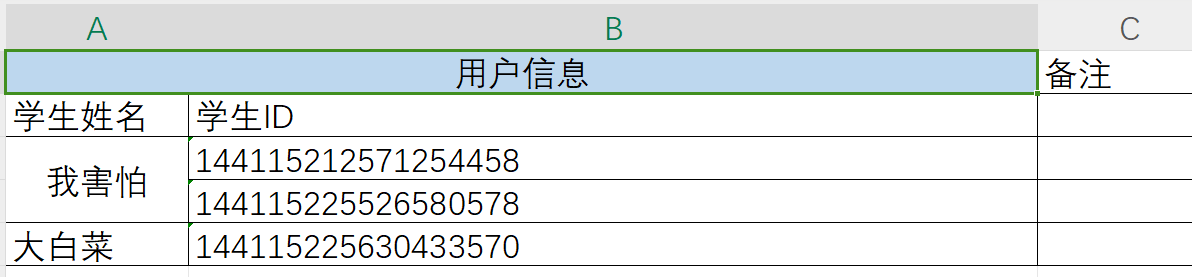
from openpyxl import load_workbook

wb = load_workbook("files/p1.xlsx")
sheet = wb.worksheets[2]

cell = sheet.cell(1, 1)
print(cell.value)   # 用户信息

cell2 = sheet.cell(1, 2)
print(cell2.value)  # None

cell3 = sheet.cell(3, 1)
print(cell3.value)  # 我害怕

cell4 = sheet.cell(4, 1)
print(cell4.value)  # None
5.2 写excel
在excel中想要写文件,大致要分为在:
- 原excel文件基础上写内容。
from openpyxl import load_workbook

wb = load_workbook("files/p1.xlsx")
sheet = wb.worksheets[0]

# 找到单元格,并修改单元格的内容
cell = sheet.cell(1, 1)
cell.value = "新的开始"

wb.save("files/p2.xlsx")
- 新创建excel文件写内容
from openpyxl import workbook

# 创建excel且默认会创建一个sheet(名称为sheet)
wb = workbook.Workbook()

sheet = wb.worksheets[0]

# 找到单元格,并修改单元格的内容
cell = sheet.cell(1, 1)
cell.value = "新的开始"

wb.save("files/p2.xlsx")
在了解了如何读取excel和创建excel之后,后续对于excel中的sheet和cell操作基本上都相同。
from openpyxl import workbook

wb = workbook.Workbook() # Sheet

# 1. 修改sheet名称
"""
sheet = wb.worksheets[0]
sheet.title = "数据集"
wb.save("p2.xlsx")
"""

# 2. 创建sheet并设置sheet颜色
"""
sheet = wb.create_sheet("工作计划", 0)
sheet.sheet_properties.tabColor = "1072BA"
wb.save("p2.xlsx")
"""

# 3. 默认打开的sheet
"""
wb.active = 0
wb.save("p2.xlsx")
"""

# 4. 拷贝sheet
"""
sheet = wb.create_sheet("工作计划")
sheet.sheet_properties.tabColor = "1072BA"

new_sheet = wb.copy_worksheet(wb["Sheet"])
new_sheet.title = "新的计划"
wb.save("p2.xlsx")
"""

# 5.删除sheet
"""
del wb["用户列表"]
wb.save('files/p2.xlsx')
"""
from openpyxl import load_workbook
from openpyxl.styles import Alignment, Border, Side, Font, PatternFill, GradientFill


wb = load_workbook('files/p1.xlsx')

sheet = wb.worksheets[1]

# 1. 获取某个单元格,修改值
"""
cell = sheet.cell(1, 1)
cell.value = "开始"
wb.save("p2.xlsx")
"""

# 2.  获取某个单元格,修改值
"""
sheet["B3"] = "Alex"
wb.save("p2.xlsx")
"""

# 3. 获取某些单元格,修改值
"""
cell_list = sheet["B2":"C3"]
for row in cell_list:
    for cell in row:
        cell.value = "新的值"
wb.save("p2.xlsx")
"""

# 4. 对齐方式
"""
cell = sheet.cell(1, 1)

# horizontal,水平方向对齐方式:"general", "left", "center", "right", "fill", "justify", "centerContinuous", "distributed"
# vertical,垂直方向对齐方式:"top", "center", "bottom", "justify", "distributed"
# text_rotation,旋转角度。
# wrap_text,是否自动换行。
cell.alignment = Alignment(horizontal='center', vertical='distributed', text_rotation=45, wrap_text=True)
wb.save("p2.xlsx")
"""

# 5. 边框
# side的style有如下:dashDot','dashDotDot', 'dashed','dotted','double','hair', 'medium', 'mediumDashDot', 'mediumDashDotDot','mediumDashed', 'slantDashDot', 'thick', 'thin'
"""
cell = sheet.cell(9, 2)
cell.border = Border(
    top=Side(style="thin", color="FFB6C1"),
    bottom=Side(style="dashed", color="FFB6C1"),
    left=Side(style="dashed", color="FFB6C1"),
    right=Side(style="dashed", color="9932CC"),
    diagonal=Side(style="thin", color="483D8B"),  # 对角线
    diagonalUp=True,  # 左下 ~ 右上
    diagonalDown=True  # 左上 ~ 右下
)
wb.save("p2.xlsx")
"""

# 6.字体
"""
cell = sheet.cell(5, 1)
cell.font = Font(name="微软雅黑", size=45, color="ff0000", underline="single")
wb.save("p2.xlsx")
"""

# 7.背景色
"""
cell = sheet.cell(5, 3)
cell.fill = PatternFill("solid", fgColor="99ccff")
wb.save("p2.xlsx")
"""

# 8.渐变背景色
"""
cell = sheet.cell(5, 5)
cell.fill = GradientFill("linear", stop=("FFFFFF", "99ccff", "000000"))
wb.save("p2.xlsx")
"""

# 9.宽高(索引从1开始)
"""
sheet.row_dimensions[1].height = 50
sheet.column_dimensions["E"].width = 100
wb.save("p2.xlsx")
"""

# 10.合并单元格
"""
sheet.merge_cells("B2:D8")
sheet.merge_cells(start_row=15, start_column=3, end_row=18, end_column=8)
wb.save("p2.xlsx")
"""
"""
sheet.unmerge_cells("B2:D8")
wb.save("p2.xlsx")
"""

# 11.写入公式
"""
sheet = wb.worksheets[3]
sheet["D1"] = "合计"
sheet["D2"] = "=B2*C2"
wb.save("p2.xlsx")
"""
"""
sheet = wb.worksheets[3]
sheet["D3"] = "=SUM(B3,C3)"
wb.save("p2.xlsx")
"""

# 12.删除
"""
# idx,要删除的索引位置
# amount,从索引位置开始要删除的个数(默认为1)
sheet.delete_rows(idx=1, amount=20)
sheet.delete_cols(idx=1, amount=3)
wb.save("p2.xlsx")
"""

# 13.插入
"""
sheet.insert_rows(idx=5, amount=10)
sheet.insert_cols(idx=3, amount=2)
wb.save("p2.xlsx")
"""

# 14.循环写内容
"""
sheet = wb["Sheet"]
cell_range = sheet['A1:C2']
for row in cell_range:
    for cell in row:
        cell.value = "xx"

for row in sheet.iter_rows(min_row=5, min_col=1, max_col=7, max_row=10):
    for cell in row:
        cell.value = "oo"
wb.save("p2.xlsx")
"""

# 15.移动
"""
# 将H2:J10范围的数据,向右移动15个位置、向上移动1个位置
sheet.move_range("H2:J10",rows=-1, cols=15)
wb.save("p2.xlsx")
"""
"""
sheet = wb.worksheets[3]
sheet["D1"] = "合计"
sheet["D2"] = "=B2*C2"
sheet["D3"] = "=SUM(B3,C3)"
sheet.move_range("B1:D3",cols=10, translate=True) # 自动翻译公式
wb.save("p2.xlsx")
"""

# 16.打印区域
"""
sheet.print_area = "A1:D200"
wb.save("p2.xlsx")
"""

# 17.打印时,每个页面的固定表头
"""
sheet.print_title_cols = "A:D"
sheet.print_title_rows = "1:3"
wb.save("p2.xlsx")
"""
6.压缩文件
基于python内置的shutil模块可以实现对压缩文件的操作
import shutil

# 1.压缩文件
"""
# base_name,压缩后的压缩包文件
# format,压缩的格式
# root_dir,要压缩的文件夹路径
shutil.make_archive(base_name=r'xxxxx', format='zip',root_dir='xxx')
"""

# 2.解压文件
"""
# filename,要解压的压缩包文件
# extract_dir,解压的路径
# format,压缩的格式
shutil.unpack_archive(filename=r'xxxxx.zip', extract_dir='xxx',format='zip')
"""
7.路径相关
7.1 转义
windows路径使用的是\,linux路径使用的是/。
特别的,在windows系统中如果有这样的一个路径 D:\nxxx\txxx\x1,程序会报错。因为在路径中存在特殊符 \n(换行符)和\t(制表符),Python解释器无法自动区分。
所以,在windows中编写路径时,一般有两种方式:
- 加转义符,例如:
"D:\\nxxx\\txxx\\x1" - 路径前加r,例如:
r"D:\\nxxx\\txxx\\x1"
7.2 程序当前路径
项目中如果使用了相对路径,那么一定要注意当前所在的位置。
例如:在/Users/wupeiqi/PycharmProjects/CodeRepository/路径下编写 demo.py文件
with open("a1.txt", mode='w', encoding='utf-8') as f:
    f.write("你好呀")
用以下两种方式去运行:
-
方式1,文件会创建在
/Users/wupeiqi/PycharmProjects/CodeRepository/目录下。cd /Users/wupeiqi/PycharmProjects/CodeRepository/ python demo.py -
方式2,文件会创建在
/Users/wupeiqi目录下。cd /Users/wupeiqi python /Users/wupeiqi/PycharmProjects/CodeRepository/demo.py
import os

"""
# 1.获取当前运行的py脚本所在路径
abs = os.path.abspath(__file__)
print(abs) # /Users/wupeiqi/PycharmProjects/luffyCourse/day09/20.路径相关.py
path = os.path.dirname(abs)
print(path) # /Users/wupeiqi/PycharmProjects/luffyCourse/day09
"""
base_dir = os.path.dirname(os.path.abspath(__file__))
file_path = os.path.join(base_dir, 'files', 'info.txt')
print(file_path)
if os.path.exists(file_path):
    file_object = open(file_path, mode='r', encoding='utf-8')
    data = file_object.read()
    file_object.close()

    print(data)
else:
    print('文件路径不存在')
7.3 文件和路径相关
import shutil
import os

# 1. 获取当前脚本绝对路径
"""
abs_path = os.path.abspath(__file__)
print(abs_path)
"""

# 2. 获取当前文件的上级目录
"""
base_path = os.path.dirname( os.path.dirname(路径) )
print(base_path)
"""

# 3. 路径拼接
"""
p1 = os.path.join(base_path, 'xx')
print(p1)

p2 = os.path.join(base_path, 'xx', 'oo', 'a1.png')
print(p2)
"""

# 4. 判断路径是否存在
"""
exists = os.path.exists(p1)
print(exists)
"""

# 5. 创建文件夹
"""
os.makedirs(路径)
"""
"""
path = os.path.join(base_path, 'xx', 'oo', 'uuuu')
if not os.path.exists(path):
    os.makedirs(path)
"""

# 6. 是否是文件夹
"""
file_path = os.path.join(base_path, 'xx', 'oo', 'uuuu.png')
is_dir = os.path.isdir(file_path)
print(is_dir) # False

folder_path = os.path.join(base_path, 'xx', 'oo', 'uuuu')
is_dir = os.path.isdir(folder_path)
print(is_dir) # True

"""

# 7. 删除文件或文件夹
"""
os.remove("文件路径")
"""
"""
path = os.path.join(base_path, 'xx')
shutil.rmtree(path)
"""

# 8. 拷贝文件夹
"""
shutil.copytree("/Users/wupeiqi/Desktop/图/csdn/","/Users/wupeiqi/PycharmProjects/CodeRepository/files")
"""

# 9.拷贝文件
"""
shutil.copy("/Users/wupeiqi/Desktop/图/csdn/WX20201123-112406@2x.png","/Users/wupeiqi/PycharmProjects/CodeRepository/")
shutil.copy("/Users/wupeiqi/Desktop/图/csdn/WX20201123-112406@2x.png","/Users/wupeiqi/PycharmProjects/CodeRepository/x.png")
"""

# 10.文件或文件夹重命名
"""
shutil.move("/Users/wupeiqi/PycharmProjects/CodeRepository/x.png","/Users/wupeiqi/PycharmProjects/CodeRepository/xxxx.png")
shutil.move("/Users/wupeiqi/PycharmProjects/CodeRepository/files","/Users/wupeiqi/PycharmProjects/CodeRepository/images")
"""
作业
- 基于csv格式实现 用户的注册 & 登录认证。详细需求如下:
- 用户注册时,新注册用户要写入文件csv文件中,输入Q或q则退出。
- 用户登录时,逐行读取csv文件中的用户信息并进行校验。
- 提示:文件路径须使用os模块构造的绝对路径的方式。
import os

base_path = os.path.dirname(os.path.abspath(__file__))

# 用户注册时,新注册用户要写入文件csv文件中,输入Q或q则退出。
while True:
    choice = input("是否进行注册")
    choice = choice.upper()
    if choice not in {"Y", 'N'}:
        print("输入有误")
        continue

    if choice == 'N':
        break

    name = input("请输入用户名:")
    if name.upper() == 'Q':
        break
    password = input("请输入密码:")
    # 文件路径
    file_path = os.path.join(base_path, 'files/')
    if not os.path.exists(file_path):
        os.mkdir(file_path)
    with open(file_path + "register.csv", mode="a", encoding="utf-8") as f:
        user_info = "{0},{1}\n".format(name, password)
        print(user_info)
        f.write(user_info)
        f.flush()

# 用户登录时,逐行读取csv文件中的用户信息并进行校验。
username = input("请输入用户名:")
password = input("请输入登陆密码:")
file_path = os.path.join(base_path, 'files/')
with open(file_path + "register.csv", mode="r") as f:
    user_info_list = f.readlines()  # 读取所有用户信息
    for user_info in user_info_list:
        name, pwd = user_info.strip().split(",")
        if name == username and pwd == password:
            print("登录成功")
            break
    else:
        print("用户名或密码错误")
- 补充代码:实现去网上获取指定地区的天气信息,并写入到Excel中。
import requests

while True:
    city = input("请输入城市(Q/q退出):")
    if city.upper() == "Q":
        break
    url = "http://ws.webxml.com.cn//WebServices/WeatherWebService.asmx/getWeatherbyCityName?theCityName={}".format(city)
    res = requests.get(url=url)
    print(res.text)

    # 1.提取XML格式中的数据
    # 2.为每个城市创建一个sheet,并将获取的xml格式中的数据写入到excel中。
import requests
from xml.etree import ElementTree as ET
from openpyxl import workbook
import os

base_path = os.path.dirname(os.path.abspath(__file__))
target_path = os.path.join(base_path, 'weather.xlsx')

wb = workbook.Workbook()    # 创建一个表格
# print(wb.sheetnames)
del wb['Sheet']     # 删除默认的sheet表

while True:
    city = input("请输入城市(Q/q退出):")
    if city.upper() == "Q":
        break
    url = "http://ws.webxml.com.cn//WebServices/WeatherWebService.asmx/getWeatherbyCityName?theCityName={}".format(city)
    res = requests.get(url=url)
    weather_xml = res.text

    sheet = wb.create_sheet("{}".format(city))      # 创建对应城市的sheet

    root = ET.XML(weather_xml)  # 解析xml数据
    for i in range(len(root)):
        cell = sheet.cell(1, i+1)
        cell.value = root[i].text

    print("天气写入成功")

wb.save(target_path)
-
读取ini文件内容,按照规则写入到Excel中。
- ini文件内容如下:
[mysqld] datadir=/var/lib/mysql socket=/var/lib/mysql/mysql.sock log-bin=py-mysql-bin character-set-server=utf8 collation-server=utf8_general_ci log-error=/var/log/mysqld.log # Disabling symbolic-links is recommended to prevent assorted security risks symbolic-links=0 [mysqld_safe] log-error=/var/log/mariadb/mariadb.log pid-file=/var/run/mariadb/mariadb.pid [client] default-character-set=utf8- 读取ini格式的文件,并创建一个excel文件,且为每个节点创建一个sheet,然后将节点下的键值写入到excel中,按照如下格式。
- 首行,字体白色 & 单元格背景色蓝色。
- 内容均居中。
- 边框。
import configparser
import os
from openpyxl import workbook
from openpyxl.styles import Alignment, Border, Side, Font, PatternFill, GradientFill

base_path = os.path.dirname(os.path.abspath(__file__))
target_path = os.path.join(base_path, "parser.xlsx")

config = configparser.ConfigParser()  # 解析xml
config.read("files/mysql.ini", encoding="utf-8")

wb = workbook.Workbook()  # 创建新的表格
del wb['Sheet']  # 删除默认的Sheet

res = config.sections()  # 获取到所有的节点
for name in res:  # 为每个节点创建一个sheet
    side = Side(style="thin", color="000000")
    border = Border(top=side, bottom=side, left=side, right=side)
    font = Font(name="微软雅黑", color="ffffff", underline="single")  # 设置字体颜色
    alignment = Alignment(horizontal='center', vertical='center')  # 内容居中
    fill = PatternFill("solid", fgColor="0000ff")  # 设置单元格背景颜色
    sheet = wb.create_sheet(name)
    sheet.cell(1, 1).value = "键"
    sheet.cell(1, 1).font = font
    sheet.cell(1, 1).fill = fill
    sheet.cell(1, 1).alignment = alignment
    sheet.cell(1, 1).border = border
    sheet.cell(1, 2).value = "值"
    sheet.cell(1, 2).font = font
    sheet.cell(1, 2).fill = fill
    sheet.cell(1, 2).alignment = alignment
    sheet.cell(1, 2).border = border
    key_value = config.items(name)  # 获取每个节点下的键值对
    for index, item in enumerate(key_value):
        sheet.cell(index + 2, 1).value = item[0]
        sheet.cell(index + 2, 1).alignment = alignment
        sheet.cell(index + 2, 1).border = border
        sheet.cell(index + 2, 2).value = item[1]
        sheet.cell(index + 2, 2).alignment = alignment
        sheet.cell(index + 2, 2).border = border

wb.save(target_path)  # 保存
- 补充代码,实现如下功能。
import requests

# 1.下载文件
file_url = 'https://files.cnblogs.com/files/wupeiqi/HtmlStore.zip'
res = requests.get(url=file_url)
print(res.content)

# 2.将下载的文件保存到当前执行脚本同级目录下 /files/package/ 目录下(且文件名为HtmlStore.zip)

# 3.在将下载下来的文件解压到 /files/html/ 目录下
import os
import requests
import shutil

base_path = os.path.dirname(os.path.abspath(__file__))
target_path = os.path.join(base_path, "files/", "package/")
if not os.path.exists(target_path):
    os.mkdir(target_path)

# 1.下载文件
file_url = 'https://files.cnblogs.com/files/wupeiqi/HtmlStore.zip'
res = requests.get(url=file_url)
# print(res.content)

# 2.将下载的文件保存到当前执行脚本同级目录下 /files/package/ 目录下(且文件名为HtmlStore.zip)
with open(os.path.join(target_path, "HtmlStore.zip"), mode="wb") as f:
    f.write(res.content)

# 3.在将下载下来的文件解压到 /files/html/ 目录下
shutil.unpack_archive(filename=os.path.join(target_path, "HtmlStore.zip"), format="zip",
                      extract_dir=os.path.join(base_path, "files/", "html/"))


【推荐】国内首个AI IDE,深度理解中文开发场景,立即下载体验Trae
【推荐】编程新体验,更懂你的AI,立即体验豆包MarsCode编程助手
【推荐】抖音旗下AI助手豆包,你的智能百科全书,全免费不限次数
【推荐】轻量又高性能的 SSH 工具 IShell:AI 加持,快人一步
· winform 绘制太阳,地球,月球 运作规律
· 震惊!C++程序真的从main开始吗?99%的程序员都答错了
· AI与.NET技术实操系列(五):向量存储与相似性搜索在 .NET 中的实现
· 超详细:普通电脑也行Windows部署deepseek R1训练数据并当服务器共享给他人
· 【硬核科普】Trae如何「偷看」你的代码?零基础破解AI编程运行原理