【Spring Framework】Spring入门教程(六)Spring AOP使用
Spring的AOP
动态代理模式的缺陷是:
-
实现类必须要实现接口 -JDK动态代理
-
无法通过规则制定拦截无需功能增强的方法。
Spring-AOP主要弥补了第二个不足,通过规则设置来拦截方法,并对方法做统一的增强。
关于代理的选择
在spring中,框架会根据目标类是否实现了接口来决定采用哪种动态代理的方式。
如果类实现类接口,那么使用JDK动态代理,否则使用CGLIB动态代理。
AOP相关术语
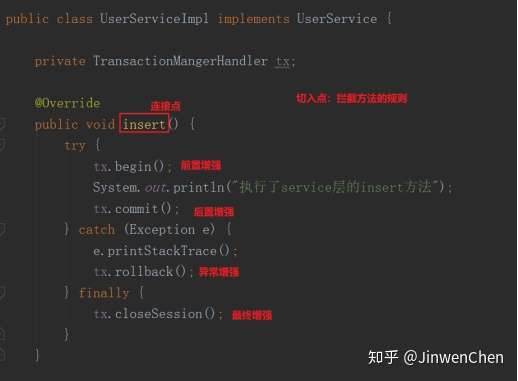
Joinpoint(连接点):
所谓连接点是指那些被拦截到的点。在spring中,这些点指的是方法,因为spring只支持方法类型的连接点。
Pointcut(切入点):
所谓的切入点,就是拦截方法设置的规则。
Advice(通知/增强):
就是可以设置在方法之前拦截或者方法执行之后拦截或者方法出异常后拦截,或者方法之前和之后都拦截。我们将这些拦截场景称为通知/增强。
通知的类型:前置通知、后置通知、异常通知、最终通知、环绕通知。
Aspect(切面):
所谓的切面就是我们的拦截处理类。
Weaving(织入):
把切面加入到对象,并创建出代理对象的过程。(该过程由Spring来完成)
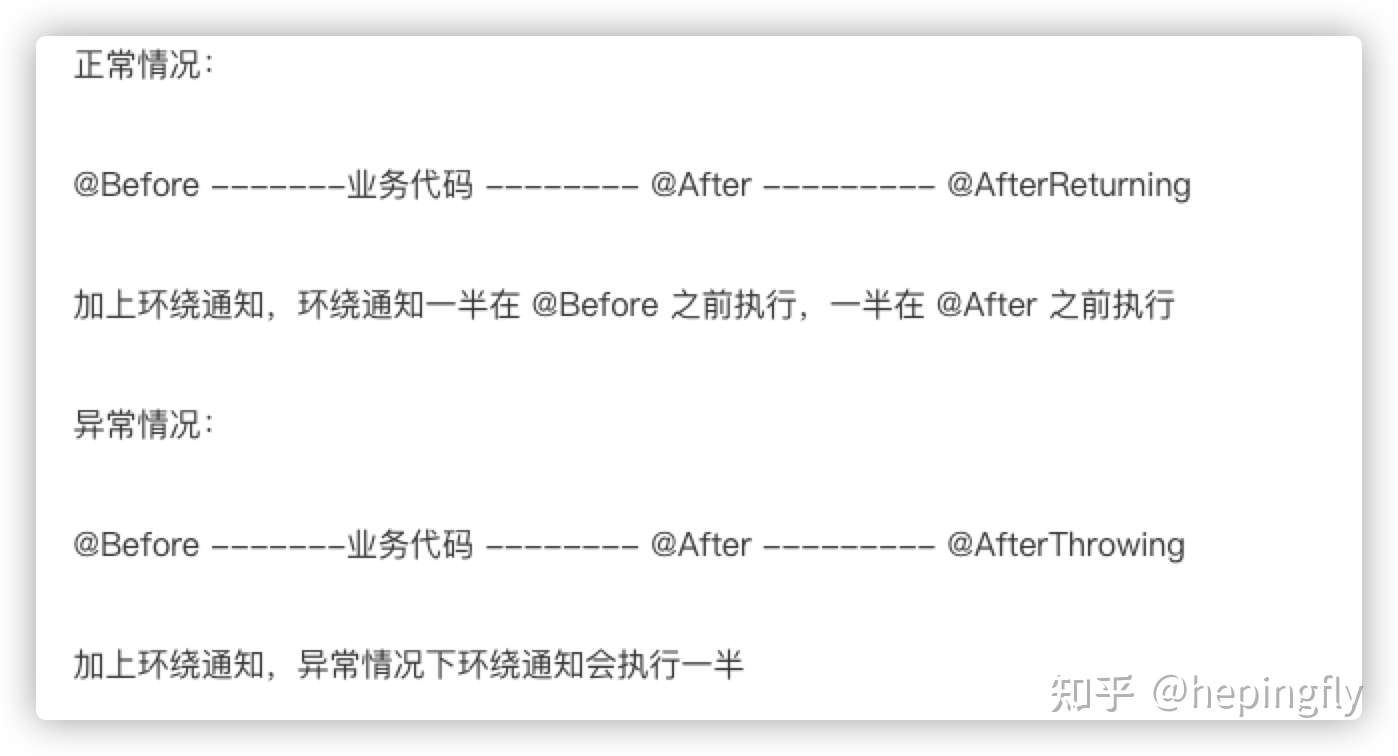
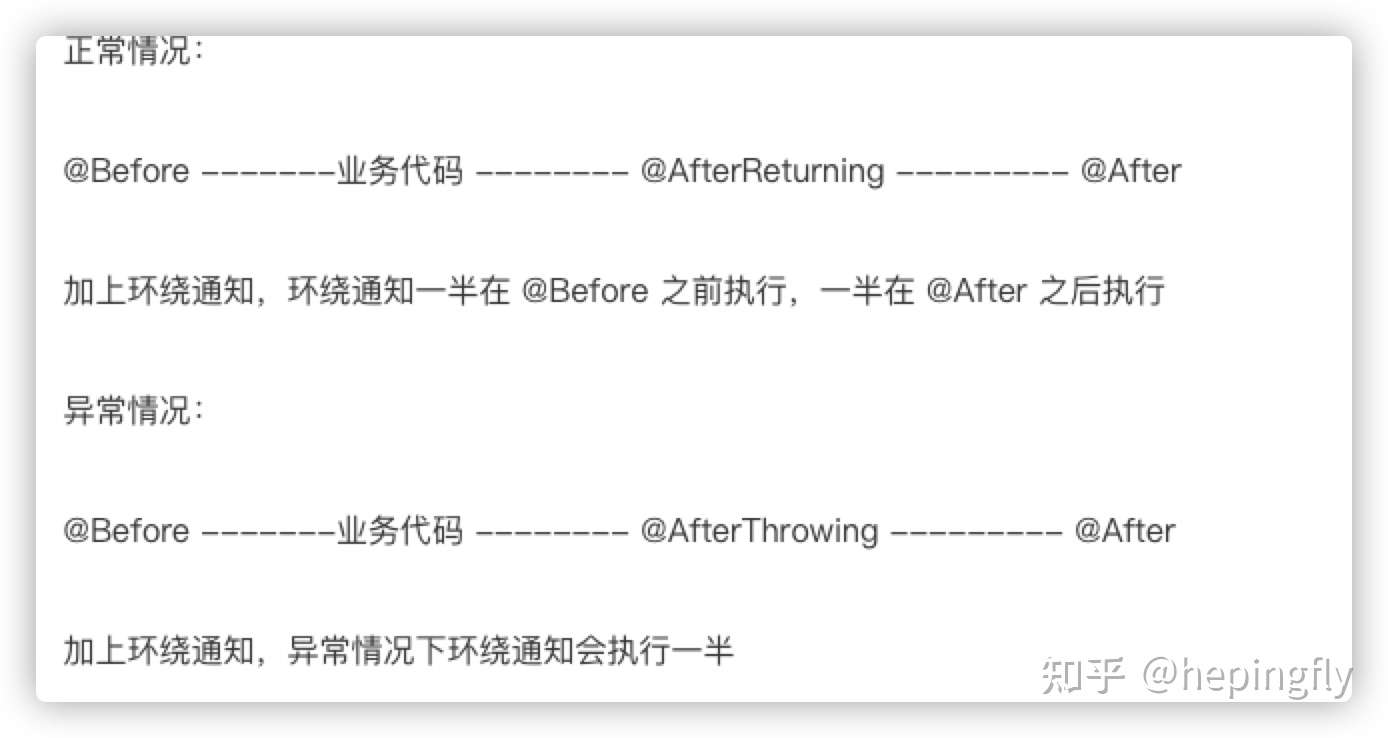
Spring AOP 执行顺序
AOP 常用注解
-
@Before
- 前置通知:目标方法之前执行
-
@After
- 后置通知:目标方法之后执行(始终执行)
-
@AfterReturning
- 返回通知:执行方法结束前执行(异常不执行)
-
@AfterThrowing
- 异常通知:出现异常的时候执行
-
@Around
- 环绕通知:环绕目标方法执行
小知识:
SpringBoot1.X 版本对应 Spring4
SpringBoot 2.X 版本对应 Spring5
在 Spring4 版本下 AOP 的执行顺序:
在 Spring5 版本下 AOP 的执行顺序:
基于XML配置AOP
首先介绍通过XML的方式配置AOP。
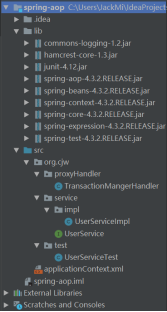
搭建环境
2.1.1. 第一步:创建一个Java项目
需求:编写一个切面类,在执行insert,update方法,分别在方法执行前、执行后、异常出现后、调用编写统一处理的代码。
--创建一个Java项目,加入Spring框架的基础支持包。
2.1.2. 第二步:编写业务层类和接口
2.1.2.1. UserService 接口
public interface UserService {

    void insert();

    void update();
}
2.1.2.2. 业务层UserServiceImpl 实现类
public class UserServiceImpl implements UserService {
@Override
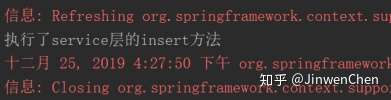
public void insert() {
System.out.println("执行了service层的insert方法");
}
@Override
public void update() {
System.out.println("执行了service层的update方法");
}
}
2.1.3. 第三步:编写Spring配置文件
引入aop的命名空间
<?xml version="1.0" encoding="UTF-8"?>
<beans xmlns="http://www.springframework.org/schema/beans"
       xmlns:xsi="http://www.w3.org/2001/XMLSchema-instance"
       xmlns:aop="http://www.springframework.org/schema/aop"
       xsi:schemaLocation="http://www.springframework.org/schema/beans
       http://www.springframework.org/schema/beans/spring-beans.xsd
       http://www.springframework.org/schema/aop
       http://www.springframework.org/schema/aop/spring-aop.xsd">

    <!-- 配置UserService -->
    <bean id="userService" class="org.cjw.service.impl.UserServiceImpl" />
</beans>
2.1.4. 第四步:测试
--测试代码
@RunWith(SpringJUnit4ClassRunner.class)
@ContextConfiguration("classpath:applicationContext.xml")
public class UserServiceTest {

    @Resource(name = "userService")
    private UserService userService;

    @Test
    public void testInsert() {
        userService.insert();
    }

    @Test
    public void testUpdate() {
        userService.update();
    }
}
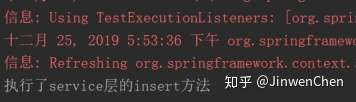
--测试结果
配置AOP
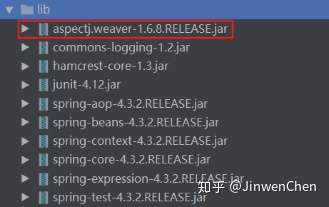
2.2.1. 第一步:加入AOP的支持包
AOP 思想必须使用AspectJ语法,而AOP思想不是Spring框架设计出来的,而是叫一个AOP联盟组织提出这种思想,所以开发者需要导入AOP联盟提供的 aspectj.weaver.jar(aspectweaver织入包)。
2.2.2. 第二步:编写一个切面类
public class TransactionMangerHandler {
// 前置增强
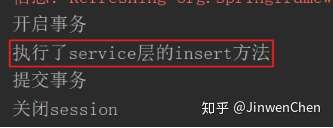
public void begin() {
System.out.println("开启事务");
}
// 后置增强
public void commit() {
System.out.println("提交事务");
}
// 异常增强
public void rollback() {
System.out.println("回滚事务");
}
// 最终增强
public void closeSession() {
System.out.println("关闭session");
}
}
2.2.3. 第三步:配置AOP配置
<?xml version="1.0" encoding="UTF-8"?>
<beans xmlns="http://www.springframework.org/schema/beans"
       xmlns:xsi="http://www.w3.org/2001/XMLSchema-instance"
       xmlns:aop="http://www.springframework.org/schema/aop"
       xsi:schemaLocation="http://www.springframework.org/schema/beans
       http://www.springframework.org/schema/beans/spring-beans.xsd
       http://www.springframework.org/schema/aop
       http://www.springframework.org/schema/aop/spring-aop.xsd">

    <!-- 配置UserService -->
    <bean id="userService" class="org.cjw.service.impl.UserServiceImpl" />

    <!-- 配置事务管理器 -->
    <bean id="txManger" class="org.cjw.proxyHandler.TransactionMangerHandler" />

    <!-- 配置aop -->
    <aop:config>
        <!-- 配置切面 -->
        <aop:aspect ref="txManger">
            <!-- 配置切入点:哪些类中的哪些方法需要做增强(where) -->
            <aop:pointcut id="pt" expression="execution(* org.cjw.service..*.*(..))" />
            <!-- 前置增强 -->
            <aop:before method="begin" pointcut-ref="pt" />
            <!-- 后置增强 -->
            <aop:after-returning method="commit" pointcut-ref="pt" />
            <!-- 异常增强 -->
            <aop:after-throwing method="rollback" pointcut-ref="pt" />
            <!-- 最终增强 -->
            <aop:after method="closeSession" pointcut-ref="pt" />
        </aop:aspect>
        <!-- 织入(Weaving):把切面加入到对象,并创建出代理对象的过程。(该过程由Spring来完成)-->
    </aop:config>
</beans>
2.2.4. 第四步:测试
测试代码
@RunWith(SpringJUnit4ClassRunner.class)
@ContextConfiguration("classpath:applicationContext.xml")
public class UserServiceTest {

    @Resource(name = "userService")
    private UserService userService;

    @Test
    public void testInsert() {
        userService.insert();
    }

    @Test
    public void testUpdate() {
        userService.update();
    }
}
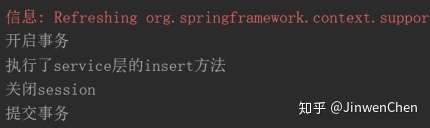
测试结果
2.2.5. 思考
问题:编写一个切面需要分别编写前置增强、后置增强、异常增强、最终增强,需要使用到4个标签,有没有办法只用一个标签就完成这4种增强呢?
答:使用环绕增强<aop:aorund>
改写切面类
public class TransactionMangerHandler {
// 环绕增强
public void allInOne(ProceedingJoinPoint pjp) {
try {
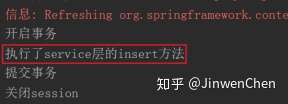
begin(); // 前置增强
pjp.proceed(); // 执行被调用的方法
commit(); // 后置增强
} catch (Throwable e) {
e.printStackTrace();
rollback(); // 异常增强
} finally {
closeSession(); // 最终增强
}
}
// 前置增强
public void begin() {
System.out.println("开启事务");
}
// 后置增强
public void commit() {
System.out.println("提交事务");
}
// 异常增强
public void rollback() {
System.out.println("回滚事务");
}
// 最终增强
public void closeSession() {
System.out.println("关闭session");
}
}
--aop配置
<?xml version="1.0" encoding="UTF-8"?>
<beans xmlns="http://www.springframework.org/schema/beans"
       xmlns:xsi="http://www.w3.org/2001/XMLSchema-instance"
       xmlns:aop="http://www.springframework.org/schema/aop"
       xsi:schemaLocation="http://www.springframework.org/schema/beans
       http://www.springframework.org/schema/beans/spring-beans.xsd
       http://www.springframework.org/schema/aop
       http://www.springframework.org/schema/aop/spring-aop.xsd">

    <!-- 配置UserService -->
    <bean id="userService" class="org.cjw.service.impl.UserServiceImpl" />

    <!-- 配置事务管理器 -->
    <bean id="txManger" class="org.cjw.proxyHandler.TransactionMangerHandler" />

    <!-- 配置aop -->
    <aop:config>
        <!-- 配置切面 -->
        <aop:aspect ref="txManger">
            <!-- 配置切入点:哪些类中的哪些方法需要做增强(where) -->
            <aop:pointcut id="pt" expression="execution(* org.cjw.service..*.*(..))" />
            <!-- 环绕增强 -->
            <aop:around method="allInOne" pointcut-ref="pt" />
        </aop:aspect>
        <!-- 织入(Weaving):把切面加入到对象,并创建出代理对象的过程。(该过程由Spring来完成)-->
    </aop:config>
</beans>
测试代码
同上
测试结果
切入点表达式说明
匹配方法的执行(常用)
execution(表达式)
表达式语法:execution([修饰符] 返回值类型 包名.类名.方法名(参数))
写法说明:
-
全匹配方式:
public void org.cjw.service.impl.CustomerServiceImpl.saveCustomer() -
访问修饰符可以省略
void org.cjw.service.impl.CustomerServiceImpl.saveCustomer() -
返回值可以使用*号,表示任意返回值
* org.cjw.service.impl.CustomerServiceImpl.saveCustomer() -
包名可以使用*号,表示任意包,但是有几级包,需要写几个*:
* *.*.*.*.CustomerServiceImpl.saveCustomer() -
使用
..来表示当前包,及其子包* org..CustomerServiceImpl.saveCustomer() -
类名可以使用*号,表示任意类
* org..*.saveCustomer() -
方法名可以使用*号,表示任意方法
* org..*.*() -
参数列表可以使用*,表示参数可以是任意数据类型,但是必须有参数
* org..*.*(*) -
参数列表可以使用
..表示有无参数均可,有参数可以是任意类型* org..*.*(..) -
全通配方式:
* *..*.*(..)
常用标签说明
- 2.4.1.
<aop:config>
作用:用于声明aop配置
- 2.4.2.
<aop:aspect>
作用: 用于配置切面。
属性:
- id:给切面一个唯一标识。
- ref:引用配置好的切面类bean的id。
- 2.4.3.
<aop:pointcut>
作用:用于配置切入点表达式
属性:
- id:用于给切入点表达式一个唯一标识。
- expression:用于定义切入点表达式。
- 2.4.4.
<aop:before>
作用:用于配置前置通知
属性:
- method:指定通知中方法的名称。
- pointct:定义切入点表达式
- pointcut-ref:指定切入点表达式的引用
- 2.4.5.
<aop:after-returning>
作用:用于配置后置通知,如果出了异常就一定不会调用切面的方法
属性:
 - method:指定通知中方法的名称。
- pointct:定义切入点表达式
- pointcut-ref:指定切入点表达式的引用
- 2.4.6.
<aop:after-throwing>
作用: 用于配置异常通知,只有出了异常才会调用切面对应的方法
属性:
- method:指定通知中方法的名称。
- pointct:定义切入点表达式
- pointcut-ref:指定切入点表达式的引用
- 2.4.7.
<aop:after>
作用:用于配置最终通知,不管出不出异常,都调用切面的方法
属性:
- method:指定通知中方法的名称。
- pointct:定义切入点表达式
- pointcut-ref:指定切入点表达式的引用
- 2.4.8.
<aop:around>
作用:用于配置环绕通知
属性:
- method:指定通知中方法的名称。
- pointct:定义切入点表达式
- pointcut-ref:指定切入点表达式的引用
基于注解配置AOP
接下来介绍基于注解的方式配置AOP。
搭建环境
3.1.1. 第一步:创建一个Java项目
同上。
3.1.2. 第二步:创建UserService接口及其实现类
public interface UserService {

    void insert();

    void update();
}
@Service
public class UserServiceImpl implements UserService {

    @Override
    public void insert() {
        System.out.println("执行了service层的insert方法");
    }
}
3.1.3. 第三步:编写Spring配置类
@Configuration
@ComponentScan(basePackages = "org.cjw")
public class SpringConfig {

}
3.1.4. 第四步:测试
测试代码
@RunWith(SpringJUnit4ClassRunner.class)
@ContextConfiguration(classes = SpringConfig.class)
public class UserServiceTest {

    @Autowired
    @Qualifier("userService")
    private UserService userService;

    @Test
    public void testInsert() {
        userService.insert();
    }
}
测试结果
配置AOP
3.2.1. 第一步:加入AOP的支持包
--注意:必须要导入加入支持AOP的包。
Spring的AOP包基于AspectJ框架,所以必须加入AspectJ-->aspectjweaver.jar。
3.2.2. 第二步:编写一个切面类
@Component
@Aspect
public class TransactionMangerHandler {

    // 环绕增强
    @Around("pointcut()")
    public void allInOne(ProceedingJoinPoint pjp) {
        try {
            begin(); // 前置增强
            pjp.proceed(); // 执行被调用的方法
            commit(); // 后置增强
        } catch (Throwable e) {
            e.printStackTrace();
            rollback(); // 异常增强
        } finally {
            closeSession(); // 最终增强
        }
    }

    @Pointcut("execution(* org.cjw..*.*(..))") // 等价于<aop:pointcut id="等价于方法名" expression="execution(* org.cjw..*.*(..))">
    public void pointcut() {}

    // 前置增强
    @Before("pointcut()") // 等价于<aop:before method="begin" pointcut-ref="pt" />
    public void begin() {
        System.out.println("开启事务");
    }

    // 后置增强
    @AfterReturning("pointcut()") // 等价于<aop:after-returning method="commit" pointcut-ref="pt" />
    public void commit() {
        System.out.println("提交事务");
    }

    // 异常增强
    @AfterThrowing("pointcut()") // 等价于<aop:after-throwing method="rollback" pointcut-ref="pt" />
    public void rollback() {
        System.out.println("回滚事务");
    }

    // 最终增强
    @After("pointcut()") // 等价于<aop:after method="closeSession" pointcut-ref="pt" />
    public void closeSession() {
        System.out.println("关闭session");
    }
}
3.2.3. 第三步:配置AOP配置
@Configuration
@ComponentScan(basePackages = "org.cjw")
@EnableAspectJAutoProxy // 开启注解配置AOP
public class SpringConfig {

}
3.2.4. 第四步:测试
--测试代码
@RunWith(SpringJUnit4ClassRunner.class)
@ContextConfiguration(classes = SpringConfig.class)
public class UserServiceTest {

    @Autowired
    @Qualifier("userService")
    private UserService userService;

    @Test
    public void testInsert() {
        userService.insert();
    }
}
测试结果
常用注解
- 3.3.1. @Aspect
作用:把当前类声明为切面类。
- 3.3.2. @Before
作用:把当前方法看成是前置通知。
属性:
value:用于指定切入点表达式,还可以指定切入点表达式的引用。
- 3.3.3. @AfterReturning
作用:把当前方法看成是最终通知。报异常,就不执行。
属性:
value:用于指定切入点表达式,还可以指定切入点表达式的引用。
- 3.3.4. @AfterThrowing
作用:把当前方法看成是异常通知。只有报异常才执行
属性:
value:用于指定切入点表达式,还可以指定切入点表达式的引用。
例子:

- 3.3.5. @After
作用:把当前方法看成是后置通知。不管报不报异常都执行
属性:
value:用于指定切入点表达式,还可以指定切入点表达式的引用。
- 3.3.6. @Around
作用:把当前方法看成是环绕通知。
属性:
value:用于指定切入点表达式,还可以指定切入点表达式的引用。
- 3.3.7. @Pointcut
作用:指定切入点表达式
属性:
value:指定表达式的内容
通知参数
- 1)JoinPoint:提供访问当前被通知方法的目标对象、代理对象、方法参数等数据
- 2)ProceedingJoinPoint:用于环绕通知,使用
proceed()方法来执行目标方法 - 3)JoinPoint.StaticPart:提供访问连接点的静态部分,如被通知方法签名、连接点类型等:
spring AOP之proceedingjoinpoint和joinpoint区别(获取各对象备忘)
现在AOP的场景越来越多,所以我们有必要理解下和AOP相关的一些概念和机制。基础知识和原理类大家搜索spring aop/aspectj,有大量现成的可以参考,基本上只要理解了jdk动态代理、cglib字节码动态生成代理就足够了,而且必须知道这个代理类是spring托管的(如果是自己创建的代理类,是无法被拦截的,此时只能使用过滤器/拦截器机制,他们本身是链式的,跟代理无关),所以这里就不重复废话了。
import org.aspectj.lang.reflect.SourceLocation;
public interface JoinPoint {
   String toString();         //连接点所在位置的相关信息
   String toShortString();     //连接点所在位置的简短相关信息
   String toLongString();     //连接点所在位置的全部相关信息
   Object getThis();         //返回AOP代理对象,也就是com.sun.proxy.$Proxy18
   Object getTarget();       //返回目标对象,一般我们都需要它或者(也就是定义方法的接口或类,为什么会是接口呢?这主要是在目标对象本身是动态代理的情况下,例如Mapper。所以返回的是定义方法的对象如aoptest.daoimpl.GoodDaoImpl或com.b.base.BaseMapper<T, E, PK>)
   Object[] getArgs();       //返回被通知方法参数列表
   Signature getSignature();  //返回当前连接点签名  其getName()方法返回方法的FQN,如void aoptest.dao.GoodDao.delete()或com.b.base.BaseMapper.insert(T)(需要注意的是,很多时候我们定义了子类继承父类的时候,我们希望拿到基于子类的FQN,这直接可拿不到,要依赖于AopUtils.getTargetClass(point.getTarget())获取原始代理对象,下面会详细讲解)
   SourceLocation getSourceLocation();//返回连接点方法所在类文件中的位置
   String getKind();        //连接点类型
   StaticPart getStaticPart(); //返回连接点静态部分
  }

 public interface ProceedingJoinPoint extends JoinPoint {
       public Object proceed() throws Throwable;
       public Object proceed(Object[] args) throws Throwable;
 }
JoinPoint.StaticPart:提供访问连接点的静态部分,如被通知方法签名、连接点类型等:
public interface StaticPart {
   Signature getSignature();    //返回当前连接点签名
   String getKind();          //连接点类型
   int getId();               //唯一标识
   String toString();         //连接点所在位置的相关信息
   String toShortString();     //连接点所在位置的简短相关信息
   String toLongString();     //连接点所在位置的全部相关信息
}
环绕通知 ProceedingJoinPoint 执行proceed方法的作用是让目标方法执行,这也是环绕通知和前置、后置通知方法的一个最大区别。
Proceedingjoinpoint 继承了 JoinPoint 。是在JoinPoint的基础上暴露出 proceed 这个方法。proceed很重要,这个是aop代理链执行的方法。
暴露出这个方法,就能支持 aop:around 这种切面(而其他的几种切面只需要用到JoinPoint,这跟切面类型有关), 能决定是否走代理链还是走自己拦截的其他逻辑。建议看一下 JdkDynamicAopProxy的invoke方法,了解一下代理链的执行原理。
典型的用法如下:
    public Object around(ProceedingJoinPoint point) throws Throwable {
        Signature signature = point.getSignature();
        // AopUtils.getTargetClass(point.getTarget())获取原始对象,例如对于Mapper而言,它获取的是具体代理的Mapper如com.b.mapper.DefaultDsMapper(如果前者继承了后者的话)而不是定义该方法的Mapper如com.b.base.BaseMapper<Info, InfoExample, InfoKey>,如下图
        Type[] types = AopUtils.getTargetClass(point.getTarget()).getGenericInterfaces(); // getGenericInterfaces方法能够获取类/接口实现的所有接口
        Annotation nologgingAnno = ((Class)types[0]).getAnnotation(Nologging.class); // type是所有类型的父接口
        MethodSignature methodSignature = (MethodSignature)signature;
        Method targetMethod = methodSignature.getMethod();

现在来补充下Java中Type接口与Class类的区别联系。
package java.lang.reflect;

/**
 * Type is the common superinterface for all types in the Java
 * programming language. These include raw types, parameterized types,
 * array types, type variables and primitive types.
 *
 * @since 1.5
 */
public interface Type {
    /**
     * Returns a string describing this type, including information
     * about any type parameters.
     *
     * @implSpec The default implementation calls {@code toString}.
     *
     * @return a string describing this type
     * @since 1.8
     */
    default String getTypeName() {
        return toString();
    }
}
其主要的子类包括:

总结来说:
- Type是一个接口。
- Type是Java中所有类型的父接口,有一些子类,如上所示。
- Type包括:raw type(原始类型,对应Class),parameterized types(参数化类型), array types(数组类型), type variables(类型变量) and primitive types(基本类型,对应Class).
- Type是JDK1.5引入的,主要是为了泛型。
Type接口与Class类的区别联系
- Type是Class的父接口。
- Class是Type的子类。
提示:因为AOP是基于动态代理生成,如果想要仔细研究生成的代理类长什么样,可以设置系统参数-Dsun.misc.ProxyGenerator.saveGeneratedFiles=true,这样就会保存所有自动生成的代理类(注:生产环境严禁使用)。
jp.getArgs() 获取到被通知方法参数
使用如下方式在通知方法上声明,必须是在第一个参数,然后使用jp.getArgs()就能获取到被通知方法参数
@Before(value="execution(* sayBefore(*))")
public void before(JoinPoint jp) {}

@Before(value="execution(* sayBefore(*))")
public void before(JoinPoint.StaticPart jp) {}
自动获取
通过切入点表达式可以将相应的参数自动传递给通知方法,例如前边章节讲过的返回值和异常是如何传递给通知方法的。
在Spring AOP中,除了execution和bean指示符不能传递参数给通知方法,其他指示符都可以将匹配的相应参数或对象自动传递给通知方法。
@Before(value="execution(* test(*)) && args(param)", argNames="param")
public void before1(String param) {
    System.out.println("===param:" + param);
}
切入点表达式execution(* test(*)) && args(param):
1)首先execution( test(*))匹配任何方法名为test,且有一个任何类型的参数;
2)args(param)将首先查找通知方法上同名的参数,并在方法执行时(运行时)匹配传入的参数是使用该同名参数类型,即java.lang.String;如果匹配将把该被通知参数传递给通知方法上同名参数。
其他指示符(除了execution和bean指示符)都可以使用这种方式进行参数绑定。
在此有一个问题: 在class文件中没生成变量调试信息是获取不到方法参数名字的。所以我们可以使用策略来确定参数名:
如果我们通过argNames属性指定了参数名,那么就是要我们指定的;
@Before(value=" args(param)", argNames="param") //明确指定了
public void before1(String param) {
    System.out.println("===param:" + param);
}
如果第一个参数类型是JoinPoint、ProceedingJoinPoint或JoinPoint.StaticPart类型,应该从argNames属性省略掉该参数名(可选,写上也对),这些类型对象会自动传入的,但必须作为第一个参数;
@Before(value=" args(param)", argNames="param") //明确指定了
public void before1(JoinPoint jp, String param) {
    System.out.println("===param:" + param);
}
Spring中argNames的含义
package aspect;

import org.aspectj.lang.annotation.Aspect;
import org.aspectj.lang.annotation.Before;
import org.aspectj.lang.annotation.Pointcut;
import org.springframework.stereotype.Component;

import java.lang.String;

@Component
@Aspect
public class HelloApiAspect2 {

    @Pointcut(value="execution(* bean.HelloApi.aspectTest(..)) && args(a1,b2)",argNames="a1,b2")
    public void pointcut1(String a1,String b2){}

    @Before(value="pointcut1(a,b)",argNames="a,b")
    public void beforecase1(String a,String b){
        System.out.println("1 a:" + a +" b:" + b);
    }
    //注意和beforecase1的区别是argNames的顺序交换了
    @Before(value="pointcut1(a,b)",argNames="b,a")
    public void beforecase2(String a,String b){
        System.out.println("2 a:" + a +" b:" + b);
    }

}
package bean;

public class HelloApi {

    public void aspectTest(String a,String b){
        System.out.println("in aspectTest:" + "a:" + a + ",b:" + b);
    }
}
args(a1,b2)另外一个作用,就是定义了aspectTest(String a,String b)方法对应表达式args(a1,b2)。定义了args(a1,b2),才能把目标方法aspectTest的参数传入到切面方法beforecase1的参数中,a参数对应a1,b参数对应b2。使用的方法是按顺序一一对应,aspectTest第一个参数对args第一个参数,aspectTest第2个参数对args第2个参数.
argNames是可选的,如果没有argNames这个参数,而编译器设置了【在class文件生成变量调试信息】,则spring可以通过反射知道方法参数的名字,通过名字配对,Spring知道args(a1,b2)表达式里面的a1和b2,对应了pointcut1(String a1,String b2)方法里面的a1和b2。
目标方法和切入方法的参数的关系是这样确立的:aspectTest(String a,String b) 与 args(a1,b2)关系是a对a1,b对b2,args(a1,b2)与pointcut1(String a1,String b2)关系是args的a1对pointcut1的a1,args的a2对pointcut1的a2。解决了目标方法参数传入到切入方法参数的问题。
但是,如果设置了argNames,Spring不再使用方法参数的名字来配对,使用argNames定义的顺序来定义pointcut1(String a1,String b2)的顺序,例如:argNames="a1,b2",a1在b2前面,表示pointcut1方法第一个参数是a1,第二个参数是b2。
既然不设置argNames,Spring可以根据参数名字进行配对,为什么还需要配置argNames?
因为Spring要知道方法的参数名,编译器必须设置了【在class文件生成变量调试信息】,如果没有设置,Spring就不知道pointcut1方法的参数名了,这个时候,Spring只知道参数的类型,Spring会使用参数的类型进行配对,如果出现2个参数都是同一个类型的情况,就会报AmbiguousBindingException异常:
如果“class文件中含有变量调试信息”将使用这些方法签名中的参数名来确定参数名;
@Before(value=" args(param)") //不需要argNames了
public void before1(JoinPoint jp, String param) {
    System.out.println("===param:" + param);
}
如果没有“class文件中含有变量调试信息”,将尝试自己的参数匹配算法,如果发现参数绑定有二义性将抛出AmbiguousBindingException异常;对于只有一个绑定变量的切入点表达式,而通知方法只接受一个参数,说明绑定参数是明确的,从而能配对成功。
@Before(value=" args(param)")
public void before1(JoinPoint jp, String param) {
    System.out.println("===param:" + param);
}
以上策略失败将抛出IllegalArgumentException。
PS:
【class文件中生成变量调试信息】在myeclipse中打开windows-》preferences,设置如下:

接下来让我们示例一下组合情况吧:
@Before(args(param) && target(bean) && @annotation(secure)",
        argNames="jp,param,bean,secure")
public void before5(JoinPoint jp, String param,
 IPointcutService pointcutService, Secure secure) {
……
}
也可以对使用命名切入点自动获取参数:
@Pointcut(value="args(param)", argNames="param")
private void pointcut1(String param){}
@Pointcut(value="@annotation(secure)", argNames="secure")
private void pointcut2(Secure secure){}

@Before(value = "pointcut1(param) && pointcut2(secure)", argNames="param, secure")
public void before6(JoinPoint jp, String param, Secure secure) {
……
}
AOP例子
@Aspect
@Component
public class NotVeryUsefulAspect {
    @AfterReturning(value="execution(* com.cn.spring.aspectj.NotVeryUsefulAspectService.*(..))")
    private void logReceiver(){
        System.out.println("切入点logReceiver...");
    }

    @Pointcut(value="execution(* com.cn.spring.aspectj.NotVeryUsefulAspectService.*(..)) && args(param)")
    private void pointcut(String param){
        System.out.println("切入点pointcut()"+param);
    }

    //方法体将不执行
    @Pointcut("within(com.cn.spring.aspectj.*)")
    public String inWebLayer() {
        System.out.println("切入点inWebLayer()");
        return "返回值加载";
    }

    @Before(value="inWebLayer()")
        private void beforeinWebLayer(){
        System.out.println("beforeinWebLayer~~");
    }

    @Before(value="pointcut(param)")
        private void beforePointcut(String param){
        System.out.println("beforePointcut:"+param);
    }


    @AfterReturning(pointcut="inWebLayer()",returning="retVal")
        public void doAccessCheck(Object retVal) {
        System.out.println("doAccessCheck:"+retVal);
    }

    @Around(value="execution(* com.cn.spring.aspectj.NotVeryUsefulAspectService.*(..))")
    private Object aroundLayer(ProceedingJoinPoint pjp) throws Throwable{
        // start stopwatch
        Object retVal = pjp.proceed();
        // stop stopwatch
        System.out.println("aroundLayer~~");
        return retVal;
    }
}
AOP小结
--为什么要有AOP 编程?
问题:service层在实际开发中要处理事务,日志等操作,这些操作是和业务无关代码,但是又不能少,而且每个方法都有,大量重复,如何把这些代码抽取出去?
解决方案:此种场景只能使用Java的动态代理技术解决。为Service层的类创建代理对象。在代理对象中为各个方法进行增强,使用的时候直接面向代理对象,调用代理对象方法。代理对象底层还是会调用真实对象的方法,但是在方法执行之前,之后,异常,最终都可以做相应增强。
--代理模式
Java中有一种设计模式,代理模式,讲解就上面问题解决方案,是一种思想。
动态代理技术:实际上就是对代理模式思想的一种具体实现。
JDK动态代理-Java官方
(1) 使用方法
① Object proxy = Proxy.newProxuInstacne(classLoader, interfaces, h)
1) classLoader: 类加载器
2) 被代理对象的接口的字节码
3) 处理器,开发者具体做增强的地方。
a. 开发需要自己创建匿名内部类
(2) 缺点:只能代理有接口的类
CGLIB 第三方代理
(1) 使用类
① Enhancer(setClassLoader、setSuperclass、setCallBack)
(2) 优点:既可以代理有接口的,又可以代理没有接口的类。
① 但是不能代理 final修饰类或者方法。
动态代理能解决主要问题:代码重复问题,但是引来新的小问题(所有方法都代理,不能按照指定规则配置代理方法等等)。
--SpringAOP
Spring的AOP在代理的基础之上,通过指定规则代理指定的方法。
使用SpringAOP后,开发者不需要编写过多的java代码,主要编写 Spring配置代码。
SpringAOPxml配置
(1) 在xml配置文件中引入新的aop命名空间。
(2) Springaop XML配置标签
① <aop:config> 开启aop配置,aop所有配置都在此标签内部配置
-
<aop:ponitcut exepression=”切入点语法” id=””>配置切入点 -
<aop:apect ref=”引入要增强的bean(事务管理器)” >配置切面
a. <aop:before>前置通知
b. <aop:aftereturning>后置通知
c. <aop:afterthrowing>异常通知
d. <aop:after>最终通知
e. <aop:around>环绕通知
SpringAOP注解配置
(1) 在配置文件/配置类开启注解配置。
① xml:<aop:aspectj-autoproxy/>
② annotation:在java配置类中贴上@EnableAspectJAutoProxt注解,作用等同于在xml配置文件中编写<aop:aspectj-autoproxy>
(2) @Aspect 在类贴上这个注解,把对应的类当前切面配置类。
(3) @Pointcut 切入点注解
(4)@Before前置通知注解
(5) @After 后置通知注解
(6)@Aftertrhowing异常通知注解
(7) @Afterreturing 最终通知注解
(8) @Around 环绕通知注解
参考自:
?https://www.mekau.com/4880.html
https://blog.csdn.net/xiaoyiaoyou/article/details/45972363

 浙公网安备 33010602011771号