JDK源码分析(11)之 BlockingQueue 相关
本文将主要结合源码对 JDK 中的阻塞队列进行分析,并比较其各自的特点;
一、BlockingQueue 概述
说到阻塞队列想到的第一个应用场景可能就是生产者消费者模式了,如图所示;

根据上图所示,明显在入队和出队的时候,会发生竞争;所以一种很自然的想法就是使用锁,而在 JDK 中也的确是通过锁来实现的;所以 BlockingQueue 的源码其实可以当成锁的应用示例来查看;同时 JDK 也为我们提供了多种不同功能的队列:
- ArrayBlockingQueue :基于数组的有界队列;
- LinkedBlockingQueue :基于链表的无界队列(可以设置容量);
- PriorityBlockingQueue :基于二叉堆的无界优先级队列;
- DelayQueue :基于 PriorityBlockingQueue 的无界延迟队列;
- SynchronousQueue :无容量的阻塞队列(Executors.newCachedThreadPool() 中使用的队列);
- LinkedTransferQueue :基于链表的无界队列;
接下来我们就对最常用的 ArrayBlockingQueue 和 LinkedBlockingQueue 进行分析;
二、 ArrayBlockingQueue 源码分析
1. 结构概述
public class ArrayBlockingQueue<E> extends AbstractQueue<E> implements BlockingQueue<E>, java.io.Serializable {
    final Object[] items;               // 容器数组
    int takeIndex;                      // 出队索引
    int putIndex;                       // 入队索引
    int count;                          // 排队个数
    final ReentrantLock lock;           // 全局锁
    private final Condition notEmpty;   // 出队条件队列
    private final Condition notFull;    // 入队条件队列
    ...
}
ArrayBlockingQueue 的结构如图所示:

如图所示,
ArrayBlockingQueue的数组其实是一个逻辑上的环状结构,在添加、取出数据的时候,并没有像ArrayList一样发生数组元素的移动(当然除了removeAt(final int removeIndex));- 并且由
takeIndex和putIndex指示读写位置; - 在读写的时候还有两个读写条件队列;
下面我们就读写操作,对源码简单分析:
2. 入队
public void put(E e) throws InterruptedException {
  checkNotNull(e);
  final ReentrantLock lock = this.lock;
  lock.lockInterruptibly();
  try {
    while (count == items.length)  // 当队列已满的时候放入 putCondition 条件队列
      notFull.await();
    enqueue(e);  // 入队
  } finally {
    lock.unlock();
  }
}
private void enqueue(E x) {
  // assert lock.getHoldCount() == 1;
  // assert items[putIndex] == null;
  final Object[] items = this.items;
  items[putIndex] = x;  // 插入队列
  if (++putIndex == items.length) putIndex = 0;  // 指针走一圈的时候复位
  count++;
  notEmpty.signal();  // 唤醒 takeCondition 条件队列中等待的线程
}
3. 出队
public E take() throws InterruptedException {
  final ReentrantLock lock = this.lock;
  lock.lockInterruptibly();
  try {
    while (count == 0)  // 当队列为空的时候,放入 takeCondition 条件
      notEmpty.await();
    return dequeue();   // 出队
  } finally {
    lock.unlock();
  }
}
private E dequeue() {
  // assert lock.getHoldCount() == 1;
  // assert items[takeIndex] != null;
  final Object[] items = this.items;
  @SuppressWarnings("unchecked")
  E x = (E) items[takeIndex];  // 取出元素
  items[takeIndex] = null;
  if (++takeIndex == items.length)
    takeIndex = 0;
  count--;
  if (itrs != null)
    itrs.elementDequeued();
  notFull.signal();  // 取出元素后,队列空出一位,所以唤醒 putCondition 中的线程
  return x;
}
三、LinkedBlockingQueue 源码分析
1. 结构概述
public class LinkedBlockingQueue<E> extends AbstractQueue<E> implements BlockingQueue<E>, java.io.Serializable {

  private final int capacity; // 默认 Integer.MAX_VALUE
  private final AtomicInteger count = new AtomicInteger(); // 容量
  transient Node<E> head;          // 头结点 head.item == null
  private transient Node<E> last;  // 尾节点 last.next == null
  private final ReentrantLock takeLock = new ReentrantLock();  // 出队锁
  private final Condition notEmpty = takeLock.newCondition();  // 出队条件
  private final ReentrantLock putLock = new ReentrantLock();   // 入队锁
  private final Condition notFull = putLock.newCondition();    // 入队条件

  static class Node<E> {
    E item;
    Node<E> next;
    Node(E x) { item = x; }
  }
}
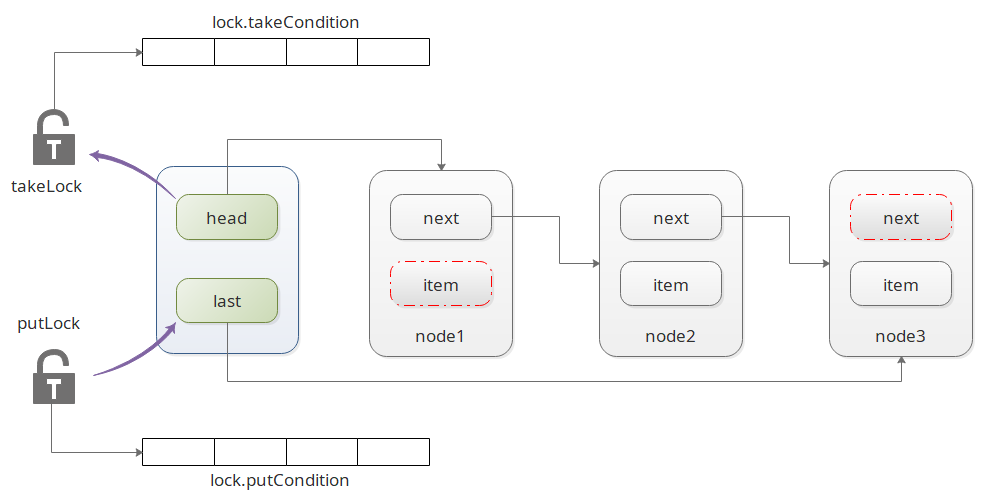
LinkedBlockingQueue 的结构如图所示:

如图所示,
LinkedBlockingQueue其实就是一个简单的单向链表,其中头部元素的数据为空,尾部元素的 next 为空;- 因为读写都有竞争,所以在头部和尾部分别有一把锁;同时还有对应的两个条件队列;
下面我们就读写操作,对源码简单分析:
2. 入队
public boolean offer(E e) {
  if (e == null) throw new NullPointerException();
  final AtomicInteger count = this.count;
  if (count.get() == capacity) return false;  // 如果队列已满,直接返回失败
  int c = -1;
  Node<E> node = new Node<E>(e);              // 将数据封装为节点
  final ReentrantLock putLock = this.putLock;
  putLock.lock();
  try {
    if (count.get() < capacity) {
      enqueue(node);                          // 入队
      c = count.getAndIncrement();
      if (c + 1 < capacity)                   // 如果队列未满,则继续唤醒 putCondition 条件队列
        notFull.signal();
    }
  } finally {
    putLock.unlock();
  }
  if (c == 0)           // 如果添加之前的容量为0,说明在出队的时候有竞争,则唤醒 takeCondition
    signalNotEmpty();   // 因为是两把锁,所以在唤醒 takeCondition的时候,还需要获取 takeLock
  return c >= 0;
}
private void enqueue(Node<E> node) {
  // assert putLock.isHeldByCurrentThread();
  // assert last.next == null;
  last = last.next = node;  // 连接节点,并设置尾节点
}
3. 出队
public E take() throws InterruptedException {
  E x;
  int c = -1;
  final AtomicInteger count = this.count;
  final ReentrantLock takeLock = this.takeLock;
  takeLock.lockInterruptibly();
  try {
    while (count.get() == 0) {   // 如果队列为空,则加入 takeCondition 条件队列
      notEmpty.await();
    }
    x = dequeue();               // 出队
    c = count.getAndDecrement();
    if (c > 1)
      notEmpty.signal();         // 如果队列还有剩余,则继续唤醒 takeCondition 条件队列
  } finally {
    takeLock.unlock();
  }
  if (c == capacity)             // 如果取之前队列是满的,说明入队的时候有竞争,则唤醒 putCondition
    signalNotFull();             // 同样注意是两把锁
  return x;
}
private E dequeue() {
  // assert takeLock.isHeldByCurrentThread();
  // assert head.item == null;
  Node<E> h = head;
  Node<E> first = h.next;
  h.next = h; // help GC   // 将next引用指向自己,则该节点不可达,在下一次GC的时候回收
  head = first;
  E x = first.item;
  first.item = null;
  return x;
}
四、ABQ、LBQ 对比
根据以上的讲解,我们可以逐步分析出一些不同,以及在不同场景队列的选择:
- 结构不同
- ABQ:基于数组,有界,一把锁;
- LBQ:基于链表,无界,两把锁;
- 内存分配
- ABQ:队列空间预先初始化,受堆空间影响小,稳定性高;
- LBQ:队列空间动态变化,受对空间影响大,稳定性差;
- 入队、出队效率
- ABQ:数据直接赋值,移除;队列空间重复使用,效率高;
- LBQ:数据需要包装为节点;需开辟新空间,效率低;
- 竞争方面
- ABQ:出入队共用一把锁,相互影响;竞争严重时效率低;
- LBQ:出入队分用两把锁,互不影响;竞争严重时效率影响小;
所以在这里并不能简单的给出详细的数据,证明哪个队列更适合什么场景,最好是结合实际使用场景分析;
