centos9上布置pxe+kickstart多系统
实验环境:vmware esxi6.7.0
纳管平台:vmware vcenter
说明:部署环境centos9,被引导系统以centos9为例,其他的系统自行扩充
参考:https://www.cnblogs.com/santia-god/p/17003150.html
环境准备
systemctl disable firewalld.service --now
setenforce 0

sed -i 's/^SELINUX=.*/SELINUX=disabled/'/etc/selinux/config
1. 装包
yum -y install dhcp-server tftp httpd
2. 配置dhcp

[root@centos9 ~]# cat /etc/dhcp/dhcpd.conf
# DHCP Server Configuration file.
#   see /usr/share/doc/dhcp*/dhcpd.conf.example
#

log-facility local7;

# A slightly different configuration for an internal subnet.
subnet 192.168.116.0 netmask 255.255.255.0 {
  range 192.168.116.10 192.168.116.20;
  option domain-name-servers ks.pxe.dhcp;  #域名,一般写入被dhcp分配IP的服务器hosts文件中
  option domain-name "pxe.dhcp";    #域
  option routers 192.168.116.1;
  option domain-name-servers 8.8.8.8;
  option broadcast-address 192.168.116.255;
  default-lease-time 600;  #默认租期
  max-lease-time 7200;       #最大租期,无默认租期时使用
  next-server 192.168.116.90;  #tftp服务器
  filename "pxe/pxelinux.0";   #pxe文件目录
}
3. 配置httpd
[root@centos9 ~]# mkdir /var/www/html/{centos9,ks}
[root@centos9 ~]# mount /dev/sr0 /var/www/html/centos9
mount: /var/www/html/centos9: WARNING: source write-protected, mounted read-only.
[root@centos9 ~]# cat /var/www/html/ks/c9_ks.cfg
#version=RHEL
# Use graphical/text install  #图形化/字符安装界面
#text
graphical

#使用系统上的第一个光驱执行安装
#cdrom
#装机使用的yum源
#repo --name="AppStream" --baseurl=file:///run/install/sources/mount-0000-cdrom/AppStream

#要实际运行安装,必须指定 cdrom、harddrive、hmc、nfs、liveimg 或 url 之一
url --url=http://192.168.116.90/centos9

#最小化安装,及其他预装应用
%packages
@^minimal-environment
kexec-tools
bash-completion

%end

#使用美式键盘
keyboard --xlayouts='us'
#系统默认语言设置,即环境变量$LANG,--addsupport添加对附加语言的支持
lang en_US.UTF-8 --addsupport=zh_CN

#设置主机名
network  --hostname=santiagod.ks
#IP设置,需指明device,否则会取消后续所有network指令
#network --bootproto=static --ip=192.168.122.10 --netmask=255.255.255.0 --gateway=192.168.122.1 --nameserver=8.8.8.8,114.114.114.114 --device=ens192


#enable时,系统第一次引导时启动 Initial Setup,设置语言、鼠标、键盘、root 密码、安全级别、时区以及默认网络配置。默认为disable
firstboot --disable

#使用这个选项在没有用户互动的情况下接受最终用户许可证协议(End User License Agreement,EULA)。指定这个选项可防止 Initial Setup 在完成安装并第一次重启系统后提示您接受该许可证
eula --agreed

#系统时区上海,使用UTC时间,不开启时间同步
timezone Asia/Shanghai --isUtc --nontp

# Root password: Admin123! #centos9默认会禁用root的ssh远程
rootpw --iscrypted --allow-ssh $6$uMfDCfQnqrZgk/yL$F.DkU0TF2k14QNqLUv.cc8X16ZUXGe/8Q./rspkY1tKnmOywrgcBx.eEA7u9oWT/u2T6jzNM410EL1Uy5oPk9/

#禁用selinux与firewalld
firewall --disabled
selinux  --disabled

#安装完成后,重启系统
#--eject - 在重新启动前尝试弹出可引导介质(DVD、USB 或其他介质)
reboot --eject

%include /tmp/part-include

#禁用kdump
%addon com_redhat_kdump --disable --reserve-mb='auto'

%end

%anaconda
pwpolicy root --minlen=6 --minquality=1 --notstrict --nochanges --notempty
pwpolicy user --minlen=6 --minquality=1 --notstrict --nochanges --emptyok
pwpolicy luks --minlen=6 --minquality=1 --notstrict --nochanges --notempty
%end


#------------------------------------------------------------------------------------------------------------------------------------------------------
%pre

###设置系统盘
#找到大于10G的盘
disk=$(while read line;do awk 'BEGIN{} {if ($3 >= "10485760" && $2 == "0") print $4} END{}';done < /proc/partitions|grep -Ew 'sda|vda|hda')
#disk=sda,vda,hda

cat > /tmp/part-include << EOF_PART
#ignoredisk --only-use=$disk
clearpart --drives=$disk --all --initlabel

#基于 UEFI 的 AMD64、Intel 64 和 64 位 ARM 需要 200 MiB EFI 系统分区。推荐的最小值是 200 MiB,默认大小为 600 MiB,最大为 600 MiB。BIOS 系统不需要 EFI 系统分区
part /boot/efi --fstype="efi" --ondisk=$disk --size=600 --fsoptions="umask=0077,shortname=winnt"
#将sda创建为ID:311的物理卷,最小10G,若磁盘大于10G,也全部做成物理卷
#--grow 自增长
part pv.311 --fstype="lvmpv" --ondisk=$disk --size=10240 --grow
#boot分区,建议大小1G
part /boot --fstype="xfs" --ondisk=$disk --size=1024
#将pv.311加入卷组,默认pe大小4M
volgroup santiagod --pesize=4096 pv.311
#逻辑卷-交换空间,视磁盘大小而定,为安装时的系统盘大小10%
logvol swap --fstype="swap" --recommended --name=swap --vgname=santiagod
#逻辑卷-根分区,虽然 5 GiB 根文件系统允许您最小安装,但建议至少分配 10 GiB,以便可以尽可能安装您想要的软件包组
logvol / --fstype="xfs" --size=10240 --grow --name=root --vgname=santiagod

EOF_PART
#-------------------------------------------------------------------------------------------------------------

%end
4. 配置tftp+pxe
[root@centos9 ~]# mkdir -p /var/lib/tftpboot/pxe/pxelinux.cfg/
[root@centos9 ~]# ls /usr/share/syslinux/
altmbr.bin    cpuid.c32      elf.c32       ifcpu64.c32     isolinux.bin        libutil.c32  meminfo.c32   reboot.c32      vesainfo.c32
altmbr_c.bin  cpuidtest.c32  ethersel.c32  ifcpu.c32       isolinux-debug.bin  linux.c32    menu.c32      rosh.c32        vesamenu.c32
altmbr_f.bin  debug.c32      gfxboot.c32   ifmemdsk.c32    kbdmap.c32          lpxelinux.0  pci.c32       sanboot.c32     vpdtest.c32
cat.c32       dhcp.c32       gptmbr.bin    ifplop.c32      kontron_wdt.c32     ls.c32       pcitest.c32   sdi.c32         whichsys.c32
chain.c32     diag           gptmbr_c.bin  isohdpfx.bin    ldlinux.c32         lua.c32      pmload.c32    sysdump.c32     zzjson.c32
cmd.c32       dir.c32        gptmbr_f.bin  isohdpfx_c.bin  lfs.c32             mboot.c32    poweroff.c32  syslinux64.exe
cmenu.c32     disk.c32       gpxecmd.c32   isohdpfx_f.bin  libcom32.c32        mbr.bin      prdhcp.c32    syslinux.c32
config.c32    dmi.c32        hdt.c32       isohdppx.bin    libgpl.c32          mbr_c.bin    pwd.c32       syslinux.com
cptime.c32    dmitest.c32    hexdump.c32   isohdppx_c.bin  liblua.c32          mbr_f.bin    pxechn.c32    syslinux.exe
cpu.c32       dosutil        host.c32      isohdppx_f.bin  libmenu.c32         memdisk      pxelinux.0    vesa.c32
[root@centos9 ~]# cp /usr/share/syslinux/{pxelinux.0,ldlinux.c32,libcom32.c32,vesamenu.c32,libutil.c32} /var/lib/tftpboot/pxe/
[root@centos9 ~]# cat /var/lib/tftpboot/pxe/pxelinux.cfg/default

timeout 60
default vesamenu.c32
timeout 60

display boot.msg

# Clear the screen when exiting the menu, instead of leaving the menu displayed.
# For vesamenu, this means the graphical background is still displayed without
# the menu itself for as long as the screen remains in graphics mode.
menu clear
menu background splash.png
menu title CentOS Linux
menu vshift 8
menu rows 18
menu margin 8
#menu hidden
menu helpmsgrow 15
menu tabmsgrow 13

# Border Area
menu color border * #00000000 #00000000 none

# Selected item
menu color sel 0 #ffffffff #00000000 none

# Title bar
menu color title 0 #ff7ba3d0 #00000000 none

# Press [Tab] message
menu color tabmsg 0 #ff3a6496 #00000000 none

# Unselected menu item
menu color unsel 0 #84b8ffff #00000000 none

# Selected hotkey
menu color hotsel 0 #84b8ffff #00000000 none

# Unselected hotkey
menu color hotkey 0 #ffffffff #00000000 none

# Help text
menu color help 0 #ffffffff #00000000 none

# A scrollbar of some type? Not sure.
menu color scrollbar 0 #ffffffff #ff355594 none

# Timeout msg
menu color timeout 0 #ffffffff #00000000 none
menu color timeout_msg 0 #ffffffff #00000000 none

# Command prompt text
menu color cmdmark 0 #84b8ffff #00000000 none
menu color cmdline 0 #ffffffff #00000000 none

# Do not display the actual menu unless the user presses a key. All that is displayed is a timeout message.

menu tabmsg Press Tab for full configuration options on menu items.

menu separator # insert an empty line
menu separator # insert an empty line


label Install linux 9 [auto]
  menu label ^Install centos Linux 9 [auto]
  menu default
  kernel centos9/vmlinuz
  append initrd=centos9/initrd.img  inst.ks=http://192.168.116.90/ks/c9_ks.cfg inst.stage2=http://192.168.116.90/centos9 quit


label Install linux 9 [manual]
  menu label ^Install centos Linux 9 [manual]
  kernel centos9/vmlinuz
  append initrd=centos9/initrd.img  inst.stage2=http://192.168.116.90/centos9 quit
注:splash.png 在
[root@centos9 ~]# cp /var/www/html/centos9/isolinux/ /var/lib/tftpboot/pxe/centos9
[root@centos9 ~]# cp /var/www/html/centos9/isolinux/splash.png /var/lib/tftpboot/pxe/
[root@centos9 ~]# tree /var/lib/tftpboot/pxe/
/var/lib/tftpboot/pxe/
├── centos9
│   ├── boot.cat
│   ├── boot.msg
│   ├── grub.conf
│   ├── initrd.img
│   ├── isolinux.bin
│   ├── isolinux.cfg
│   ├── ldlinux.c32
│   ├── libcom32.c32
│   ├── libutil.c32
│   ├── memtest
│   ├── splash.png
│   ├── TRANS.TBL
│   ├── vesamenu.c32
│   └── vmlinuz
├── ldlinux.c32
├── libcom32.c32
├── libutil.c32
├── pxelinux.0
├── pxelinux.cfg
│   └── default
├── splash.png
└── vesamenu.c32

2 directories, 21 files
[root@centos9 ~]# ls /var/www/html/
centos9  ks
[root@centos9 ~]# ls /var/www/html/*
/var/www/html/centos9:
AppStream  BaseOS  EFI  EULA  extra_files.json  images  isolinux  LICENSE  media.repo  TRANS.TBL

/var/www/html/ks:
c9_ks.cfg
5. 启服务
systemctl restart tftp dhcpd httpd
最后从vcenter上创建一个同网段(同vlan,保证网络畅通)的空白虚拟机,从bios启动,启服务后,由于没有系统盘和安装介质,会自动遍历所有启动项,直到网络启动,进入pxe启动。
注:按照正常启动顺序
先dhcp分配IP,然后dhcp的next server 引导到tftp目录,然后tftp目录下pxe的default文件引导到装机镜像挂载目录(httpd提供),然后ks自动装机。
注:实验时,请保证该网段只有自己的一台dhcp服务器
附:dhcp完成后截图
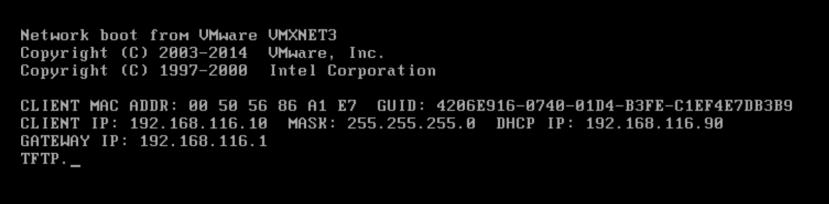
现象1:tftp读取文件失败
原因:防火墙问题或者目录错误
分析:防火墙或selinux策略导致tftp,http等服务访问失败;或者提供的vmlinux或initrd.img目录错误(以tftp目录为根目录的绝对路径)。
现象2:tftp识别正常后,卡在 'boot:' 界面
原因:default文件读取异常
分析:c32文件必须从本地拷贝到tftp目录,如果从iso中拷贝可能造成本地系统无法正常识别该文件,导致后续任务失败,一般会卡在boot界面,没有任何输出
注:当存在多个dhcp服务器时(如vmware workstation NAT模式自带dhcp服务【需要禁用】),也可能出现如下现象,可修改自己的DHCP的IP池,查看服务器被分配的IP是否为池内的第一个IP(默认从IP池内第一个IP开始分配)。
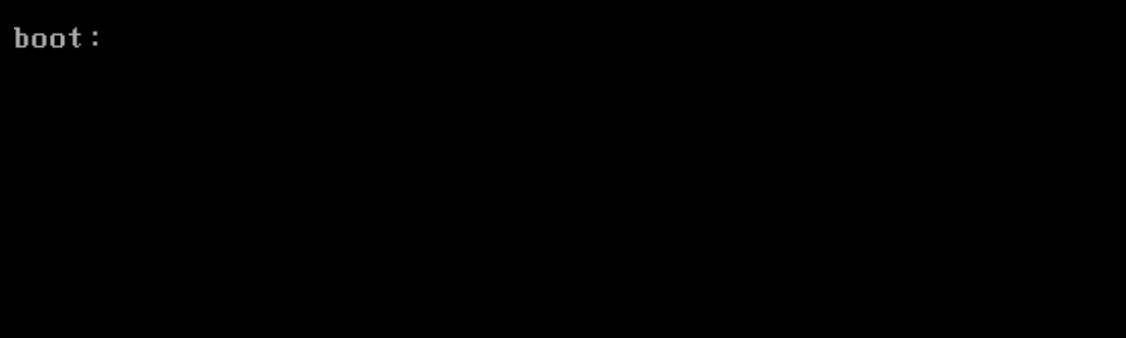
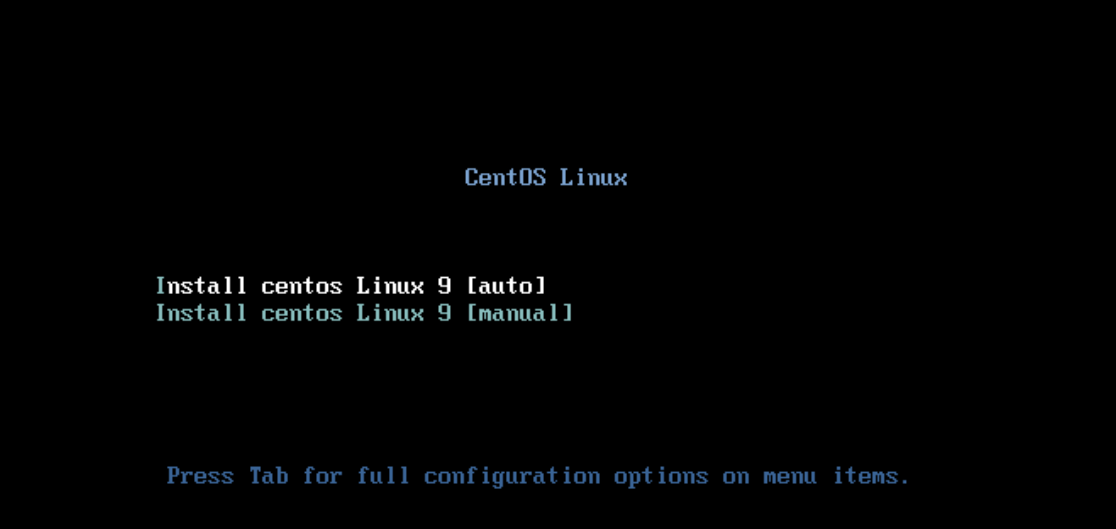
以下为default文件引导正常的界面
问题3:http读取文件失败
原因:防火墙或者目录错误或权限不足
分析:查看对应目录的权限和文件内容,请保证浏览器http可正常访问该目录,且保证至少有读取和执行权限:555
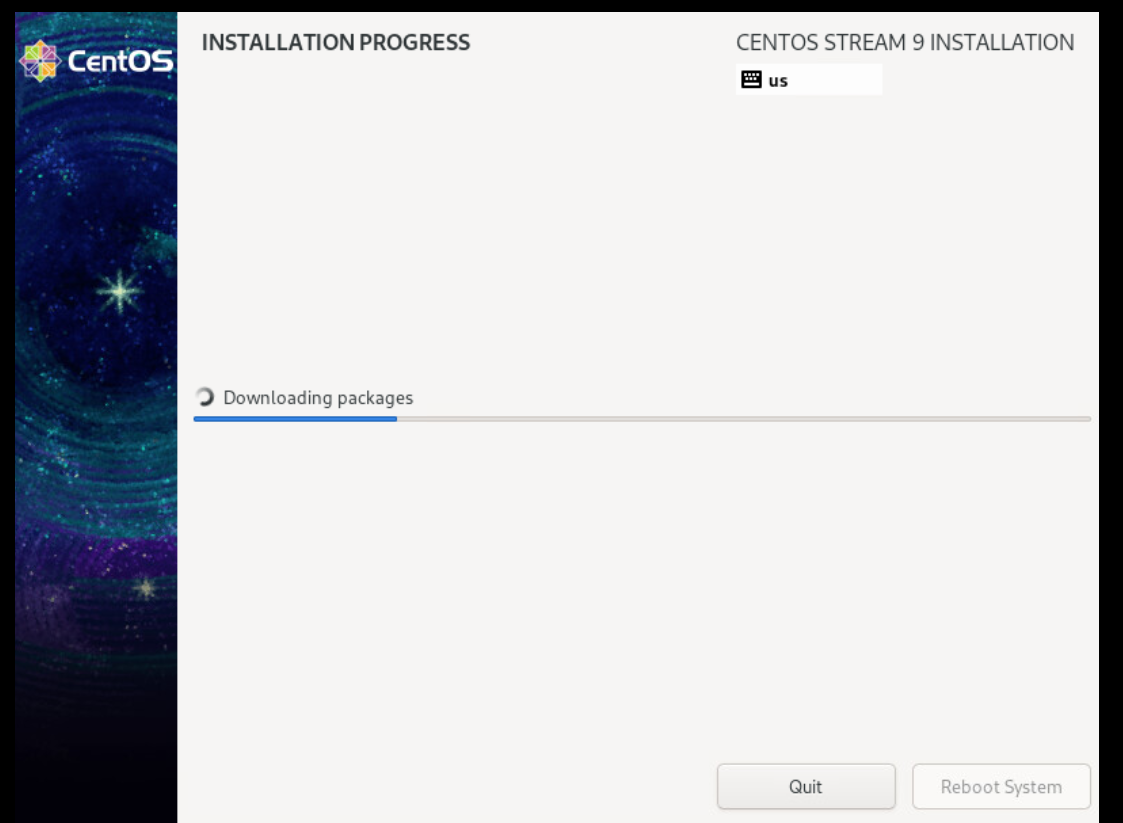
正常安装画面,ks应答会自动跳过手动交互:


【推荐】国内首个AI IDE,深度理解中文开发场景,立即下载体验Trae
【推荐】编程新体验,更懂你的AI,立即体验豆包MarsCode编程助手
【推荐】抖音旗下AI助手豆包,你的智能百科全书,全免费不限次数
【推荐】轻量又高性能的 SSH 工具 IShell:AI 加持,快人一步
· TypeScript + Deepseek 打造卜卦网站:技术与玄学的结合
· 阿里巴巴 QwQ-32B真的超越了 DeepSeek R-1吗?
· 【译】Visual Studio 中新的强大生产力特性
· 10年+ .NET Coder 心语 ── 封装的思维:从隐藏、稳定开始理解其本质意义
· 【设计模式】告别冗长if-else语句:使用策略模式优化代码结构