wireshark 中使用lua解析自定义协议
简述利用 wireshark + lua 实现自定义协议实时解析,保存分析结果
1.找到版本和init.lua的位置:C:\Program Files\Wireshark
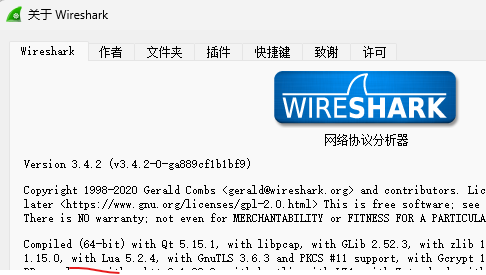
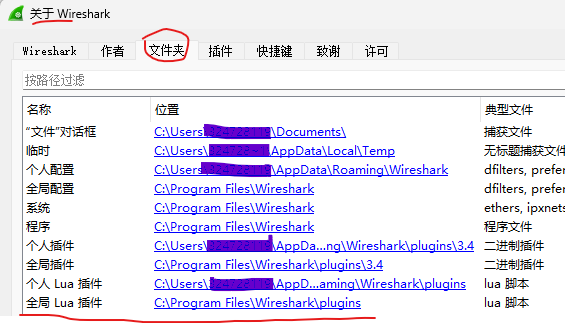
2.修改init.lua(该版本是默认打开的,用管理员打开)

最后一行添加
dofile(DATA_DIR.."hello.lua")
3.创建 hello.lua 文件,放到init.lua同级目录

  1 print ("Hello XXXXXX!")
  2
  3 -- Define the menu entry's callback
  4 local function dialog_menu()
  5     local function dialog_func(person,eyes,hair)
  6         local window = TextWindow.new("Person Info");
  7         local message = string.format("Person %s with %s eyes and %s hair.", person, eyes, hair);
  8         window:set(message);
  9     end
 10
 11     new_dialog("Dialog Test",dialog_func,"A Person","Eyes","Hair")
 12 end
 13
 14 -- Create the menu entry
 15 register_menu("Lua Dialog Test",dialog_menu,MENU_TOOLS_UNSORTED)
 16
 17 -- Notify the user that the menu was created
 18 if gui_enabled() then
 19    local splash = TextWindow.new("Hello!");
 20    splash:set("Wireshark has been enhanced with a useless feature.\n")
 21    splash:append("Go to 'Tools->Lua Dialog Test' and check it out!")
 22 end
 23
 24 do
 25     --协议名称为DT,在Packet Details窗格显示为Nselab.Zachary DT
 26     local p_DT = Proto("DT","Nselab.Zachary DT")
 27
 28     --协议的各个字段
 29     local f_identifier = ProtoField.uint8("DT.identifier","Identifier", base.HEX)
 30
 31     --这里的base是显示的时候的进制,详细可参考https://www.wireshark.org/docs/wsdg_html_chunked/lua_module_Proto.html#lua_class_ProtoField
 32     local f_speed = ProtoField.uint8("DT.speed", "Speed", base.HEX)
 33
 34     --这里把DT协议的全部字段都加到p_DT这个变量的fields字段里
 35     p_DT.fields = {f_identifier, f_speed}
 36
 37     --这里是获取data这个解析器
 38     local data_dis = Dissector.get("data")
 39
 40     local function DT_dissector(buf,pkt,root)
 41         local buf_len = buf:len();
 42         --先检查报文长度,太短的不是我的协议
 43         if buf_len < 16 then return false end
 44
 45         --验证一下identifier这个字段是不是0x12,如果不是的话,认为不是我要解析的packet
 46         local v_identifier = buf(0, 1)
 47         if (v_identifier:uint() ~= 0x12)
 48         then return false end
 49
 50         --取出其他字段的值
 51         local v_speed = buf(1, 1)
 52
 53         --现在知道是我的协议了,放心大胆添加Packet Details
 54         local t = root:add(p_DT,buf)
 55         --在Packet List窗格的Protocol列可以展示出协议的名称
 56         pkt.cols.protocol = "DT"
 57         --这里是把对应的字段的值填写正确,只有t:add过的才会显示在Packet Details信息里. 所以在之前定义fields的时候要把所有可能出现的都写上,但是实际解析的时候,如果某些字段没出现,就不要在这里add
 58         t:add(f_identifier,v_identifier)
 59         t:add(f_speed,v_speed)
 60
 61         return true
 62     end
 63
 64     --这段代码是目的Packet符合条件时,被Wireshark自动调用的,是p_DT的成员方法
 65     function p_DT.dissector(buf,pkt,root)
 66         if DT_dissector(buf,pkt,root) then
 67             --valid DT diagram
 68         else
 69             --data这个dissector几乎是必不可少的;当发现不是我的协议时,就应该调用data
 70             data_dis:call(buf,pkt,root)
 71         end
 72     end
 73
 74     local udp_encap_table = DissectorTable.get("udp.port")
 75     --因为我们的DT协议的接受端口肯定是50002,所以这里只需要添加到"udp.port"这个DissectorTable里,并且指定值为50002即可。
 76     udp_encap_table:add(50002, p_DT)
 77 end
 78
 79
 80 mongodb_protocol = Proto("MongoDB",  "MongoDB Protocol")
 81
 82 message_length = ProtoField.int32 ("mongodb.message_length", "messageLength", base.DEC)
 83 request_id     = ProtoField.uint16("mongodb.requestid"     , "requestID"    , base.HEX)
 84 response_to    = ProtoField.int32 ("mongodb.responseto"    , "responseTo"   , base.DEC)
 85 opcode         = ProtoField.int32 ("mongodb.opcode"        , "opCode"       , base.DEC)
 86
 87 mongodb_protocol.fields = { message_length, request_id, response_to, opcode }
 88
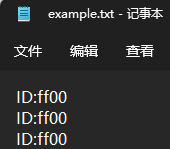
 89 --写入文本
 90 function exgest(file,str)
 91    local f = io.open(file, "a")
 92    io.output(f)
 93    io.write(str)
 94    io.close(f)
 95 end
 96
 97 function mongodb_protocol.dissector(buffer, pinfo, tree)
 98   length = buffer:len()
 99   if length == 0 then return end
100
101   exgest("example.txt",string.format("ID:%s\r\n",buffer(4,2)))
102
103   pinfo.cols.protocol = mongodb_protocol.name
104
105   local subtree = tree:add(mongodb_protocol, buffer(), "MongoDB Protocol Data")
106
107   subtree:add_le(message_length, buffer(0,4))
108   subtree:add_le(request_id,     buffer(4,2))
109   subtree:add_le(response_to,    buffer(6,4))
110   subtree:add_le(opcode,         buffer(10,4))
111
112 end
113
114 local tcp_port = DissectorTable.get("udp.port")
115 tcp_port:add(60000, mongodb_protocol)
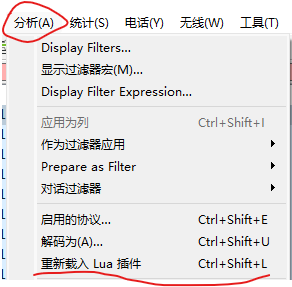
4.使其生效的方法
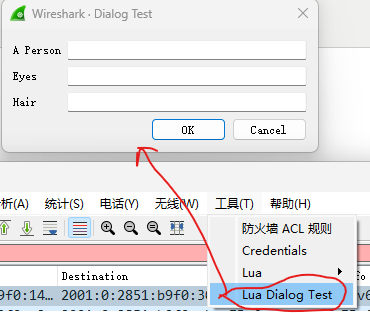
5.测试lua的方法(显示抓蓝牙连接没关系,现在的接口方式很多,如何命令行指定某个没查)

6.菜单成功的效果
7.解析成功效果(自定义协议)

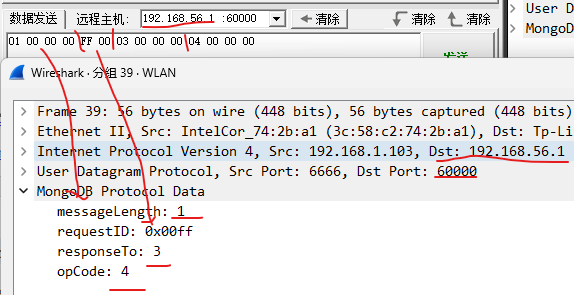
8.写入文件
备注:
wireshark:不能抓包,用管理员打开试试
参考:
Wireshark User's Guide
Creating a Wireshark dissector in Lua - part 1 (the basics) | Mika’s tech blog (mika-s.github.io) ---- 推荐


 浙公网安备 33010602011771号