
ISTIO 学习笔记(三)之 管理kubernetes集群外的vm服务流量
一、背景
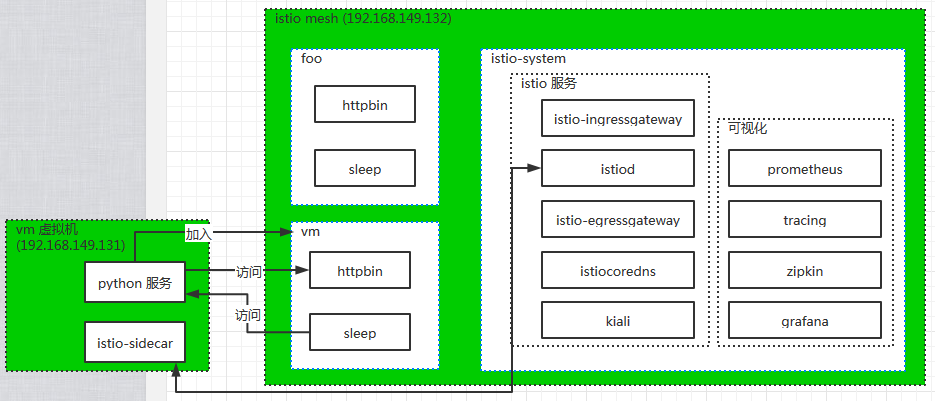
Istio 是基于 kubernetes 进行实现,因此其与 kubernetes 是强耦合的。它使用的根本场景是对云上的微服务进行治理。但实际的多数场景是产品均部署在虚拟机或物理机上,针对这种 istio 实际上是不适用的。 云上场景中,也存在基础组件安装在 vm (虚拟机或物理机)上,云上的微服务需要使用 vm 上的微服务,此时就需要将 vm 加入到 istio mesh,本文介绍,如何将 vm 上的微服务加入到 istio mesh 中。
二、部署架构
三、实操
环境信息:
# 使用 的kubernets 版本为 1.19.2
[root@k8s-1 certs]# kubectl version --short
Client Version: v1.19.2
Server Version: v1.19.2
# 准备安装的istio版本为 1.7.3
[root@k8s-1 certs]# istioctl version --short
client version: 1.7.3
control plane version: 1.7.3
data plane version: 1.7.3 (4 proxies), 1.7.0 (1 proxies)
1、常规安装操作
PS:在 kubernetes 安装 istio 之前就 创建 istio-system,并将证书准备好(生成根证书、根key、中间CA证书、中间CA key),将证书导入到 istio,供 istio 使用。
(1) 在 安装 kubernets 的 Node 结点上操作(可以直接是 master node)
a) 生成证书
|
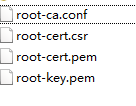
cd /home/opt/istio-1.7.3/tools/certs # 在当前目录下生成 root 根证书;root-ca.conf\root-cert.csr\root-cert.pem\root-key.pem #可以将这几个文件备份下 make root-ca #由于准备将虚拟机上的所有服务添加到vm命名空间下,所以为vm创建证书 #会发现之前在当前目录生成的4个根证书文件消失,多了一个vm目录,在vm目录中存在如下文件:root-cert.pem、selfSigned-ca-cert-chain.pem、selfSigned-ca-cert.pem、selfSigned-ca-key.pem # 执行 make 命令可以看到 相关生成证书的方式 make vm-cacerts-selfSigned (其中的vm 可以换成对应的命名空间名称) |
生成的根证书
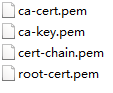
b) 生成 vm 命名空间 、istio-system命名空间,并导入证书
将 vm 目录下刚刚生成的4个文件,更改成如下名字:
|
kubectl create ns vm kubectl create ns istio-system # 在 istio-system中生成 secret,该 secret 名称必须是 cacerts,否则 istio无法正常加载该证书 kubectl create secret generic cacerts -n istio-system \ --from-file=vm/root-cert.pem \ --from-file=vm/cert-chain.pem \ --from-file=vm/ca-cert.pem \ --from-file=vm/ca-key.pem # 查看 secret 是否创建成功 kubectl get secret -n istio-system |
c) 安装 istio
| istioctl manifest generate --set profile=demo --set components.cni.enabled=true --set values.global.meshExpansion.enabled=true --set addonComponents.istiocoredns.enabled=true |
d) 安装 第三方监控软件及配置可浏览器访问 kiali
|
kubectl apply -f /home/opt/istio-1.7.3/samples/addon # 查看 istio-system 命名空间中已安装的 istio 相关服务,找到 istio-ingressgateway 80/15012 映射到宿主机上的端口 kubectl get svc -n istio-system # kiali-virtualservice.yaml 文件中配置了 网关(和 istio 的 istio-ingressgateway服务挂钩) 和 虚拟服务,网关将 80 的流量经过路由转发给kiali服务 kubectl apply -f kubectl apply -f /home/opt/istio-1.7.3/samples/addons/kiali-virtualservice.yaml skubectl apply -f / |
其中 kiali-virtualservice.yaml 内容如下
apiVersion: networking.istio.io/v1alpha3
kind: VirtualService
metadata:
  name: kiali
  namespace: istio-system
spec:
  gateways:
  - kiali-gateway
  hosts:
  - "*"
  http:
  - match:
    - uri:
        prefix: /
    route:
    - destination:
        host: kiali
        port:
          number: 20001
---
apiVersion: networking.istio.io/v1alpha3
kind: Gateway
metadata:
  name: kiali-gateway
  namespace: istio-system
spec:
  selector:
    istio: ingressgateway
  servers:
  - port:
      number: 80
      name: http
      protocol: HTTP
    hosts:
    - "*"
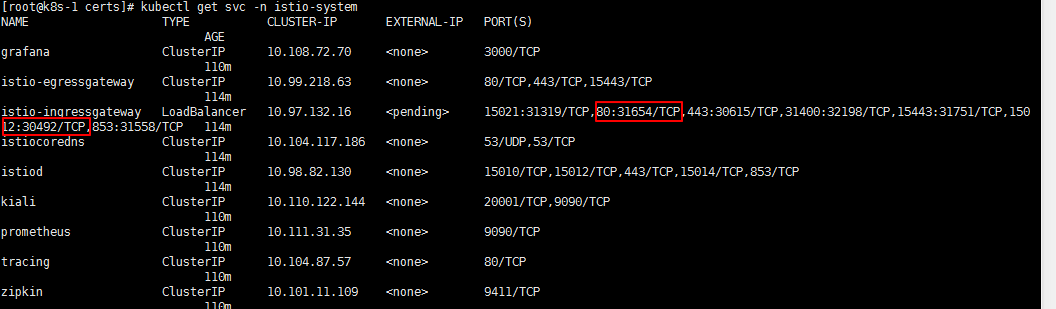
根据以上配置,31654 端口上接收的请求会转给 istio-ingressgateway 的 80 ,然后该请求根据 路由会转给 kiali;
30492 端口上接收的请求会转给 istio-ingressgateway的 15012,该端口上的请求会被转给 istiod 的 15012 端口。
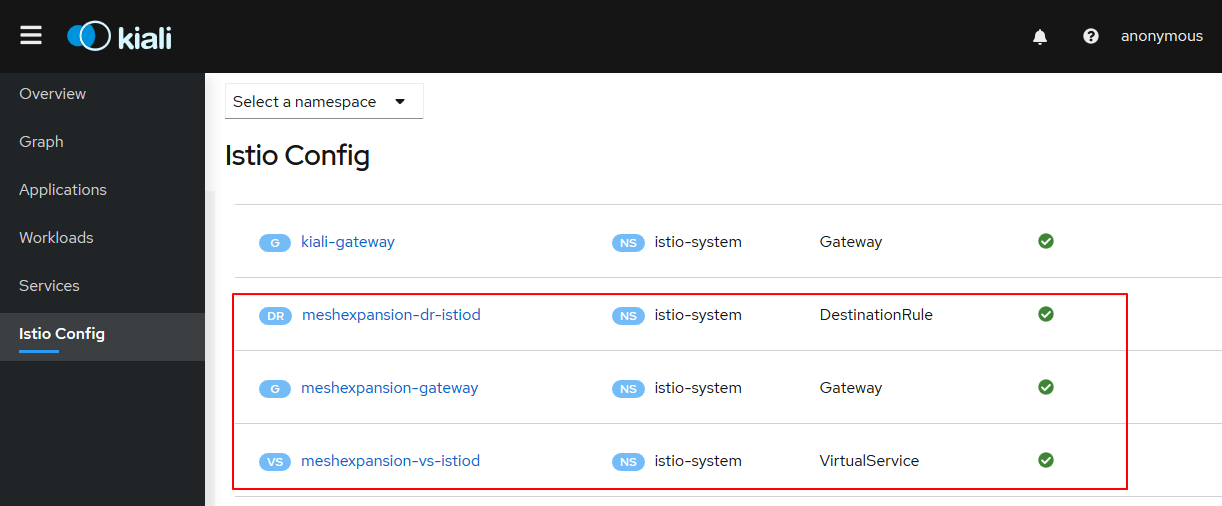
在浏览器上输入 http://x.x.x.x:31654 可以看到 kiali 的界面,选择 istio Config ,在右侧可以看到 30492 对应的 gateway 及 virtualservice(这两个显然是 istio 内置的)
e) 生成 vm 虚拟机加入到 istio Mesh需要的配置
|
# 设置 vm 命名空间自动注入sidecar kubectl label n vm istio-injection=enabled # 将 vm 命名空间 设置成需要 mtls 双向认证 kubectl apply -n vm -f - <<EOF # 查看 vm 命名空间的 secret,此时只有默认的 secret kubectl get sercet -n vm # 将 默认的 secret 中的 token 取出并放到 当前目录的 istio-token文件中 kubectl -n vm get secret default-token-bdhs7 \ # 生成 cluster.env 文件内容
# 设置 vm 中的 sidecar 需要将指定端口流出的请求发送给 istio
# 在当前目录中生成 hosts-addendum文件,该文件中存放 istio 安装所属服务器 IP 与 istiod 服务域名的映射
|
(2) 在 VM 虚拟机上操作
a) 在 VM 虚拟机上 安装 istio-sidecar
下载 地址:https://storage.googleapis.com/istio-release/releases/1.7.3/rpm/istio-sidecar.rpm

使用 rpm 命令进行安装

b) 将 之前准备的文件放到 vm 对应目录
将 istio 所属服务器准备的 hosts-addendum、clsuter.env、root-cert.pem、ca-cert.pem、ca-key.pem、cert-chain.pem 、istio-token 拷贝到 vm 服务器上的 /home/certs 目录下
|
cd /home/certs mkdir -p /var/run/secrets/istio # 拷贝证书到指定目录 cp root-cert.pem ca-cert.pem ca-key.pem cert-chain.pem /var/run/secrets/istio mkdir -p /var/run/secrets/tokens # 拷贝token 到指定位置 cp istio-token /var/run/secrets/tokens/istio-token # 拷贝集群相关信息到指定位置 cp cluster.env /var/lib/istio/envoy/cluster.env # 编辑 sidecar.env vi /var/lib/istio/envoy/sidecar.env # 将istiod.istio-system.svc 域名与IP的映射关系写入到 hosts文件中
cat hosts-addendum >>/etc/hosts # 授权 chown -R istio-proxy /var/run/secrets /var/lib/istio/envoy |
sidecar.env 编辑之后的内容如下,红色部分表示修改的:
# Environment variables used to configure istio startup

# Comma separated list of CIDRs used for services. If set, iptables will be run to allow istio
# sidecar to intercept outbound calls to configured addresses. If not set, outbound istio sidecar
# will not be used via iptables.
# ISTIO_SERVICE_CIDR=

# Name of the service exposed by the machine.
ISTIO_SERVICE=vm

# The mode used to redirect inbound connections to Envoy. This setting
# has no effect on outbound traffic: iptables REDIRECT is always used for
# outbound connections.
# If "REDIRECT", use iptables REDIRECT to NAT and redirect to Envoy.
# The "REDIRECT" mode loses source addresses during redirection.
# If "TPROXY", use iptables TPROXY to redirect to Envoy.
# The "TPROXY" mode preserves both the source and destination IP
# addresses and ports, so that they can be used for advanced filtering
# and manipulation.
# The "TPROXY" mode also configures the sidecar to run with the
# CAP_NET_ADMIN capability, which is required to use TPROXY.
# If not set, defaults to "REDIRECT".
# ISTIO_INBOUND_INTERCEPTION_MODE=REDIRECT

# When the interception mode is "TPROXY", the iptables skb mark that is set on
# every inbound packet to be redirected to Envoy.
# If not set, defaults to "1337".
# ISTIO_INBOUND_TPROXY_MARK=1337

# When the interception mode is "TPROXY", the number of the routing table that
# is configured and used to route inbound connections to the loopback interface
# in order to be redirected to Envoy.
# If not set, defaults to "133".
# ISTIO_INBOUND_TPROXY_ROUTE_TABLE=133

# Comma separated list of local ports that will use Istio sidecar for inbound services.
# If set, iptables rules will be configured to intercept inbound traffic and redirect to sidecar.
# If not set, no rules will be enabled
# ISTIO_INBOUND_PORTS=

# List of ports to exclude from inbound interception, if ISTIO_INBOUND_PORTS is set to *
# Port 22 is automatically excluded
# ISTIO_INBOUND_EXCLUDE_PORTS=

# Namespace of the cluster.
ISTIO_NAMESPACE=vm

# Specify the IP address used in endpoints. If not set, 'hostname --ip-address' will be used.
# Needed if the host has multiple IP.
# ISTIO_SVC_IP=

# If istio-pilot is configured with mTLS authentication (--controlPlaneAuthPolicy MUTUAL_TLS ) you must
# also configure the mesh expansion machines:
ISTIO_PILOT_PORT=30492    // 值为 istio-ingressgateway 15012 端口映射到宿主机上的端口
ISTIO_CP_AUTH=MUTUAL_TLS

# Fine tunning - useful if installing/building binaries instead of using the .deb file, or running
# multiple instances.

# Port used by Envoy. Defaults to 15001, used in the autogenerated config
# ENVOY_PORT=15001

# User running Envoy. For testing you can use a regular user ID - however running iptables requires
# root or netadmin capability. The debian file creates user istio.
# ENVOY_USER=istio-proxy

# Uncomment to enable debugging
 ISTIO_AGENT_FLAGS="--proxyLogLevel debug --log_output_level default:debug --proxyComponentLogLevel misc:debug"

# Directory for stdout redirection. The redirection is required because envoy attempts to open
# /dev/stdout - must be a real file. Will be used for access logs. Additional config for logsaver
# needs to be made, envoy reopens the file on SIGUSR1
# ISTIO_LOG_DIR=/var/log/istio

# Installation directory for istio binaries, customize in case you're using a binary.
# This is likely to change - current path matches the docker layout in 0.1
# ISTIO_BIN_BASE=/usr/local/bin

# Location of istio configs.
# ISTIO_CFG=/var/lib/istio

# Ignore Istio iptables custom rules
# Enable this flag if you would like to manage iptables yourself. Default to false (true/false)
# ISTIO_CUSTOM_IP_TABLES=false

# Location of provisioning certificates. VM provisioning tools must generate a certificate with
# the expected SAN. Istio-agent will use it to connect to istiod and get fresh certificates.
PROV_CERT=/var/run/secrets/istio

# Location to save the certificates from the CA. Setting this to the same location with PROV_CERT
# allows rotation of the secrets. Users may also use longer-lived PROV_CERT, rotated under the control
# of the provisioning tool.
# Istiod may return a certificate with additional information and shorter lived, to be used for
# workload communication. In order to use the certificate with applications not supporting SDS, set this
# environment variable. If the value is different from PROV_CERTS the workload certs will be saved, but
# the provisioning cert will remain under control of the VM provisioning tools.
OUTPUT_CERTS=/var/run/secrets/istio
# OUTPUT_CERTS=/etc/certs

# Address of the CA. The CA must implement the Istio protocol, accepting the provisioning certificate
# and returning workload certificates. Istiod is implementing the protocol, and is the default value
# if CA_ADDR is not set.
# CA_ADDR
# set CA_ADDR if your istiod.istio-system.svc is on port other than 15012
CA_ADDR=istiod.istio-system.svc:30492
c) 启动 istio
|
systemctl start istio |
打开日志,若日志内容为下面,则表示成功
2020-10-24T07:37:37.697566Z    info    sds    SDS gRPC server for workload UDS starts, listening on "./etc/istio/proxy/SDS"

2020-10-24T07:37:37.697603Z    info    Starting proxy agent
2020-10-24T07:37:37.697810Z    warn    citadelclient    cannot load key pair, using token instead : open /var/run/secrets/istio/key.pem: no such file or directory
2020-10-24T07:37:37.698209Z    info    sds    Start SDS grpc server
2020-10-24T07:37:37.698304Z    info    Received new config, creating new Envoy epoch 0
2020-10-24T07:37:37.698311Z    info    Epoch 0 starting
2020-10-24T07:37:37.699122Z    info    Opening status port 15020

2020-10-24T07:37:37.708289Z    warn    failed to read pod labels: open ./etc/istio/pod/labels: no such file or directory
2020-10-24T07:37:37.709351Z    info    Envoy command: [-c etc/istio/proxy/envoy-rev0.json --restart-epoch 0 --drain-time-s 45 --parent-shutdown-time-s 60 --service-cluster istio-proxy --service-node sidecar~192.168.149.131~192.vm~vm.svc.cluster.local --local-address-ip-version v4 --log-format-prefix-with-location 0 --log-format %Y-%m-%dT%T.%fZ    %l    envoy %n    %v -l debug --component-log-level misc:debug]
2020-10-24T07:37:37.804099Z    info    sds    resource:default new connection
2020-10-24T07:37:37.804157Z    info    sds    Skipping waiting for gateway secret
2020-10-24T07:37:38.397953Z    error    cache    cannot load key pair from /var/run/secrets/istio: open /var/run/secrets/istio/key.pem: no such file or directory
2020-10-24T07:37:38.421423Z    info    cache    Root cert has changed, start rotating root cert for SDS clients
2020-10-24T07:37:38.421468Z    info    cache    GenerateSecret default
2020-10-24T07:37:38.422145Z    info    sds    resource:default pushed key/cert pair to proxy
2020-10-24T07:37:39.507809Z    info    sds    resource:ROOTCA new connection
2020-10-24T07:37:39.507965Z    info    sds    Skipping waiting for gateway secret
2020-10-24T07:37:39.508055Z    info    cache    Loaded root cert from certificate ROOTCA
2020-10-24T07:37:39.508347Z    info    sds    resource:ROOTCA pushed root cert to proxy
(3) 虚拟 vm 上安装的服务添加到 istio mesh 中
a) vm 上通过 python 启动一个占用 8080 的 进程
b) 进程模拟的 服务放到 kubernetes 的 vm 命名空间中
|
# 将 python 对应的进程程序模拟成一个服务添加vm中 cat <<EOF | kubectl -n vm apply -f - # 将 python 对应的进程程序模拟成一个负载实例添加到vm中 cat <<EOF | kubectl -n vm apply -f - |
c) 在 kubernetes 的 sleep 容器中访问 python 模拟的服务进程
|
#部署 sleep 到 vm 命名空间中 kubectl apply -f /home/opt/istio-1.7.3/samples/sleep/sleep.yaml -n vm # 其中 python-vm.vm.svc.cluster.local 是之前将 python 进程模拟服务添加到 kubernetes 中,服务对应的域名,默认域名格式为:服务名+命名空间名+svc.cluster.local kubectl exec -it sleep-854565cb79-8wx9n -c sleep -n vm -- curl python-vm.vm.svc.cluster.local:8080 |
进入 sleep 容器进行访问 vm 上的服务,效果如下图:

打开 vm 服务器上 istio-sidecar 对应的日志(var/log/istio/istio.log),可以看到如下内容,表示 进入 vm 8080 端口的流量 被 iptables 转发给 sidecar,其进行了处理

d) 在 vm 上访问 istio-mesh 中的 httpbin 服务(目前还没有调通,待补充)
五、遇到的问题
(1) 设置 vm 命名空间中 vm serviceaccount 中关联secrect 的 token 失败

解决办法:
直接使用如下命令,获取 已有 secret 中的 token
kubectl -n vm get secret default-token-bdhs7 \
-o jsonpath='{.data.token}' |base64 --decode > istio-token
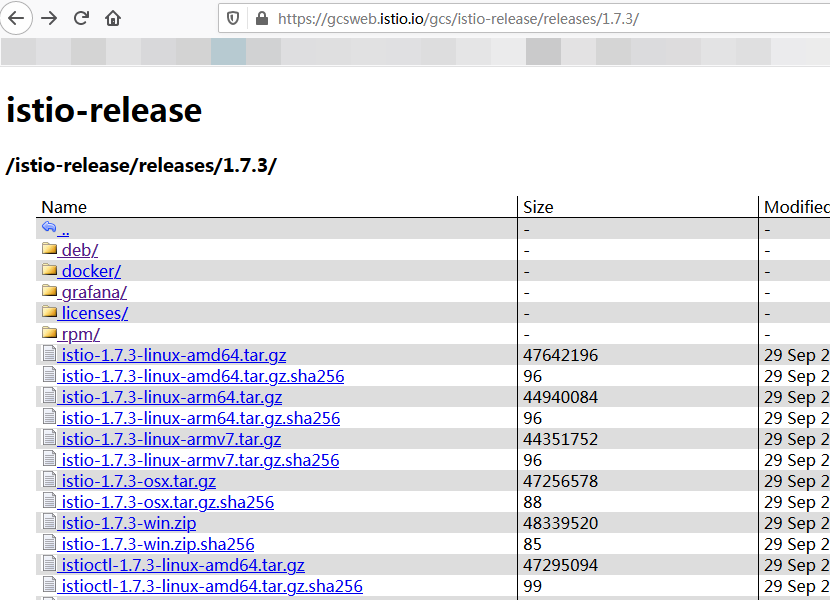
(2) 在虚拟机中安装 istio-sidecar.deb 包
该包在centos上不支持安装,基于此,需要在 https://gcsweb.istio.io/gcs/istio-release/releases 地址上下载对应的 rpm 包进行安装
该网页上列举出了所有成果物
(3) systemctl start istio 启动失败
日志路径在 /var/log/istio,打开日志查看错误
a) Invalid path: /etc/certs/root-cert.pem
2020-10-22T16:12:48.688987Z    critical    envoy main    error initializing configuration 'etc/istio/proxy/envoy-rev0.json': Invalid path: /etc/certs/root-cert.pem
Invalid path: /etc/certs/root-cert.pem
将证书拷贝到 /etc/certs/root-cert.pem
b) 日志显示访问 istio 不通
2020-10-22T17:17:54.418797Z warning envoy config StreamSecrets gRPC config stream closed: 14, connection error: desc = "transport: Error while dialing dial tcp: lookup istiod.istio-system.svc on 192.168.149.2:53: no such host"
- 将 x.x.x.x istiod.istio-system.svc 写到 /etc/hosts 中
- 将 istiod 端口对外开放,将 istio-ingressgateway 中的 15012 对应的宿主机端口 填写到 sidecar.env中
- 修改 vm 上 /var/lib/istio/envoy/sidecar.env 文件
CA_ADDR=istiod.istio-system.svc:30431
OUTPUT_CERTS=/var/run/secrets/istio
PROV_CERT=/var/run/secrets/istio
ISTIO_PILOT_PORT=30492
ISTIO_CP_AUTH=MUTUAL_TL
同时,k8s 上的 vm 要设置开启 mtls 双向认证。
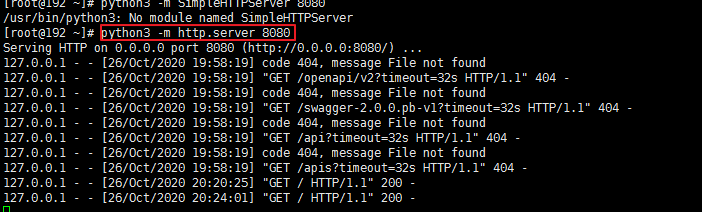
(3) 在 vm 上通过 python 启动一个进程启动不了

解决办法:
换成 python3 -m http.server 8080 (python3 与 python2 的该命令不一样)
(4) 在 sleep 容器中访问 vm 中的服务访问不了

产生原因:
sleep 容器中未自动注入 sidecar (若注入,ready 值应该是 2/2);
解决办法:
卸载 sleep,将 vm 命名空间 加入 istio-injection=enabled 标签,再安装 sleep 到 vm 命名空间,最后再次进入 sleep 容器调用 vm 上的服务
参开资料:
https://copr.fedorainfracloud.org/coprs/g/maistra/istio/
https://www.cnblogs.com/charlieroro/p/13299942.html

 浙公网安备 33010602011771号