安装ceph (快速) 步骤一:预检
官网地址:http://docs.ceph.org.cn/start/

预检
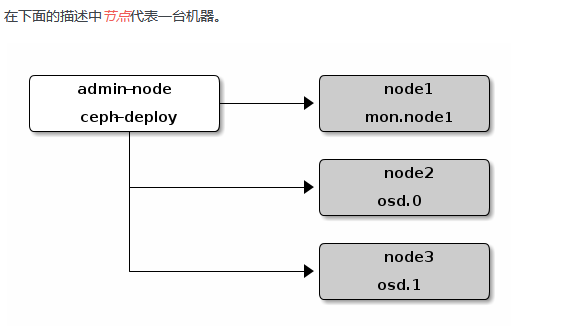
安装一个 ceph-deploy 管理节点和一个三节点的Ceph 存储集群来研究 Ceph 的基本特性。这篇预检会帮你准备一个 ceph-deploy 管理节点、以及三个Ceph 节点(或虚拟机),以此构成 Ceph 存储集群。
在下面的描述中节点代表一台机器。

注意:三个Ceph 节点中有一个Monitors节点,俩OSD节点,没有元数据服务器( Metadata Server )

环境准备
主机名  ip
admin-node 10.16.16.110
node1 10.16.16.111
node2 10.16.16.112
node3 10.16.16.113

主机配置:
主机系统:CentOS Linux release 7.9.2009 (Core)
内核版本:3.10.0-1160.45.1.el7.x86_64 (需要升级内核版本,具体下面有步骤)
2核2G,100G (需要添加新磁盘,等需要的时候再添加)
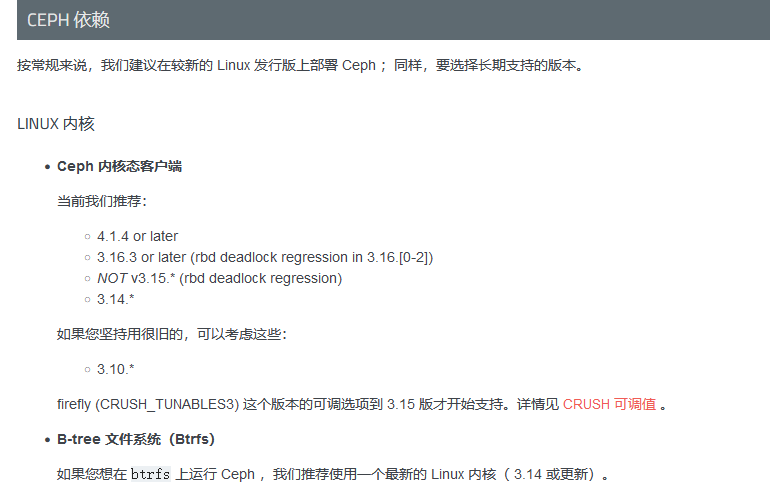
官方推荐使用的内核版本

安装一个 ceph-deploy 管理节点和一个三节点的Ceph 存储集群来研究 Ceph 的基本特性。这篇预检会帮你准备一个 ceph-deploy 管理节点、以及三个Ceph 节点(或虚拟机),以此构成 Ceph 存储集群。

根据上面的图片修改各主机名

每个主机都需要添加hosts解析
10.16.16.110  admin-node
10.16.16.111  node1
10.16.16.112  node2
10.16.16.113  node3
根据官方文档实践操作而来:http://docs.ceph.org.cn/start/quick-start-preflight/
每个主机都升级内核版本
rpm --import https://www.elrepo.org/RPM-GPG-KEY-elrepo.org
yum install -y https://www.elrepo.org/elrepo-release-7.el7.elrepo.noarch.rpm

yum install -y kernel-lt-5.4.162-1.el7.elrepo --enablerepo=elrepo-kernel
yum install -y kernel-lt-headers-5.4.162-1.el7.elrepo --enablerepo=elrepo-kernel

# 或者使用:yum install -y kernel-lt-* --enablerepo=elrepo-kernel --skip-broken
# 安装后查看安装的内核版本,然后修改如下的命令

grub2-set-default "CentOS Linux (5.4.162-1.el7.elrepo.x86_64) 7 (Core)"
reboot
安装 Ceph 部署工具
把 Ceph 仓库添加到 ceph-deploy 管理节点,然后安装 ceph-deploy 。
高级包管理工具(APT)
Debian 和 Ubuntu 发行版,步骤略
红帽包管理工具(RPM)
在 Red Hat (rhel6、rhel7)、CentOS (el6、el7)和 Fedora 19-20 (f19 - f20) 上执行下列步骤:
把 Ceph 仓库添加到 ceph-deploy 管理节点,然后安装 ceph-deploy 。
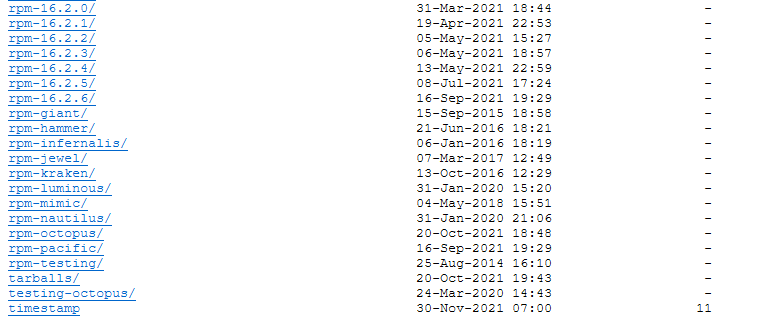
访问网站:http://download.ceph.com/ 查看最新版本

yum -y install epel-release
wget -O /etc/yum.repos.d/CentOS-Base.repo https://repo.huaweicloud.com/repository/conf/CentOS-7-reg.repo

vim /etc/yum.repos.d/ceph.repo
[ceph-noarch]
name=Ceph noarch packages
baseurl=http://download.ceph.com/rpm-octopus/el7/noarch
enabled=1
gpgcheck=1
type=rpm-md
gpgkey=https://download.ceph.com/keys/release.asc

yum clean all && yum makecache && yum update
yum -y install ceph-deploy
Ceph 节点安装
管理节点必须能够通过 SSH 无密码地访问各 Ceph 节点。如果 ceph-deploy 以某个普通用户登录,那么这个用户必须有无密码使用 sudo 的权限。
安装NTP
建议在所有 Ceph 节点上安装 NTP 服务(特别是 Ceph Monitor 节点),以免因时钟漂移导致故障.
确保在各 Ceph 节点上启动了 NTP 服务,并且要使用同一个 NTP 服务器
yum install ntp ntpdate ntp-doc -y

vim /etc/chrony.conf

# 删除原有的,增加如下
server ntp.aliyun.com minpoll 4 maxpoll 10 iburst
server ntp1.aliyun.com minpoll 4 maxpoll 10 iburst
server ntp2.aliyun.com minpoll 4 maxpoll 10 iburst
server ntp2.aliyun.com minpoll 4 maxpoll 10 iburst

systemctl start chronyd.service
systemctl enable chronyd.service

ntpdate ntp.aliyun.com
创建部署 Ceph 的用户
ceph-deploy 工具必须以普通用户登录 Ceph 节点,且此用户拥有无密码使用 sudo 的权限,因为它需要在安装软件及配置文件的过程中,不必输入密码。
较新版的 ceph-deploy 支持用 --username 选项提供可无密码使用 sudo 的用户名(包括 root ,虽然不建议这样做)。
使用 ceph-deploy --username {username} 命令时,指定的用户必须能够通过无密码 SSH 连接到 Ceph 节点,因为 ceph-deploy 中途不会提示输入密码。
我们建议在集群内的所有 Ceph 节点上给 ceph-deploy 创建一个特定的用户,但不要用 “ceph” 这个名字。全集群统一的用户名可简化操作(非必需),然而你应该避免使用知名用户名,因为黑客们会用它做暴力破解(如 root 、 admin)。后续步骤描述了如何创建无 sudo 密码的用户,你要用自己取的名字替换,比如:ceph_user 。
从 Infernalis 版起,用户名 “ceph” 保留给了 Ceph 守护进程。如果 Ceph 节点上已经有了 “ceph” 用户,升级前必须先删掉这个用户。
- 创建部署 Ceph 的用户(每个主机上都操作,包含ceph-deploy主机)
useradd -d /home/ceph_user  -m ceph_user
passwd ceph_user  # 12345678
echo "ceph_user  ALL = (root) NOPASSWD:ALL" | tee /etc/sudoers.d/ceph_user  && chmod 0440 /etc/sudoers.d/ceph_user
2.允许无密码 SSH 登录
因为 ceph-deploy 不支持输入密码,你必须在管理节点上生成 SSH 密钥并把其公钥分发到各 Ceph 节点。 ceph-deploy 会尝试给初始 monitors 生成 SSH 密钥对。
生成 SSH 密钥对,但不要用 sudo 或 root 用户。提示 “Enter passphrase” 时,直接回车,口令即为空:
# su - ceph_user
$ ssh-keygen

# 把公钥拷贝到各 Ceph 节点

$ ssh-copy-id ceph_user@node1
$ ssh-copy-id ceph_user@node2
$ ssh-copy-id ceph_user@node3

$ vim ~/.ssh/config
Host node1
   Hostname node1
   User ceph-admin
Host node2
   Hostname node2
   User ceph-admin
Host node3
   Hostname node3
   User ceph-admin

$ sudo chmod 600 ~/.ssh/config
3.引导时联网
条件允许的话可以配置俩网卡,一个对外,一个对内
需进入 /etc/sysconfig/network-scripts 目录并确保 ifcfg-{iface} 文件中的 ONBOOT 设置成了 yes 。
4.确保联通性
主机名应该解析为网络 IP 地址,而非回环接口 IP 地址(即主机名应该解析成非 127.0.0.1 的IP地址)。如果你的管理节点同时也是一个 Ceph 节点,也要确认它能正确解析自己的主机名和 IP 地址(即非回环 IP 地址)。
5.开放所需端口
Ceph Monitors 之间默认使用 6789 端口通信, OSD 之间默认用 6800:7300 这个范围内的端口通信。
firewalld ,要对公共域开放 Ceph Monitors 使用的 6789 端口和 OSD 使用的 6800:7300 端口范围,并且要配置为永久规则,这样重启后规则仍有效。
sudo firewall-cmd --zone=public --add-port=6789/tcp --permanent
sudo firewall-cmd --zone=public --add-port=6800-7300/tcp --permanent
sudo firewall-cmd --reload
或者直接卸载
systemctl stop firewalld && systemctl disable firewalld && yum remove firewalld -y
6.终端( TTY )
在 CentOS 和 RHEL 上执行 ceph-deploy 命令时可能会报错。如果你的 Ceph 节点默认设置了 requiretty ,执行 sudo visudo 禁用它,并找到 Defaults requiretty 选项,把它改为 Defaults:ceph !requiretty 或者直接注释掉,这样 ceph-deploy 就可以用之前创建的用户(创建部署 Ceph 的用户 )连接了。
编辑配置文件 /etc/sudoers 时,必须用 sudo visudo 而不是文本编辑器。
7.SELinux
把 SELinux 设置为 Permissive 或者完全禁用
setenforce 0
sed -i "s/SELINUX=enforcing/SELINUX=disabled/g" /etc/selinux/config


