第九章:画布
第九章:画布
画布元素
QML的优势之一是其与JavaScript生态的密切关系。这可以利用页面开发技术栈中的现成方案,并能结合QML图形显示能力的原生性能。然而,有时我们也想要利用web技术栈中的图形绘制方案。这就是Canvas派上用场的地方。画布元素有着与HTML同名元素非常相似的绘制API。
画布元素的基本思想是使用2D上下文对象(context 2D object)来渲染路径。2D上下文对象,包含必要的图形函数,函数中画布充当绘图画布。2D 上下文支持粗细、填充渐变、文本和一组不同的路径创建命令。
一起来看下简单的路径绘制:
import QtQuick

Canvas {
    id: root
    // canvas size
    width: 200; height: 200
    // handler to override for drawing
    onPaint: {
        // get context to draw with
        var ctx = getContext("2d")
        // setup the stroke
        ctx.lineWidth = 4
        ctx.strokeStyle = "blue"
        // setup the fill
        ctx.fillStyle = "steelblue"
        // begin a new path to draw
        ctx.beginPath()
        // top-left start point
        ctx.moveTo(50,50)
        // upper line
        ctx.lineTo(150,50)
        // right line
        ctx.lineTo(150,150)
        // bottom line
        ctx.lineTo(50,150)
        // left line through path closing
        ctx.closePath()
        // fill using fill style
        ctx.fill()
        // stroke using line width and stroke style
        ctx.stroke()
    }
}
这将生成一个填充矩形,其起点为 50,50,大小为 100,并在边框画线装饰。
边框线宽度被设置为4,并使用strokeStyle来定义了使用蓝色。最后完成的形状是通过fillStyle来填充成了 “steel blue” 颜色。只有通过调用 stroke 或 fill 才能绘制实际路径,并且它们可以相互独立使用。调用 stroke 或 fill 将绘制当前路径。无法存储路径以供以后重用,只能存储和恢复绘图状态。
在 QML 中,Canvas 元素充当绘图的容器。2D 上下文对象提供了实际的绘画操作。实际的绘制是在onPaint事件中完成的。
Canvas {
    width: 200; height: 200
    onPaint: {
        var ctx = getContext("2d")
        // setup your path
        // fill or/and stroke
    }
}
画布自身提供了二维坐标系,左上角是原点(0,0)。Y值向下增大,X值向右增大。
调用基于API的路径绘制命令的典型顺序如下:
1、设置线条或设置填充
2、创建路径
3、画线或填充
onPaint: {
    var ctx = getContext("2d")

    // setup the stroke
    ctx.strokeStyle = "red"

    // create a path
    ctx.beginPath()
    ctx.moveTo(50,50)
    ctx.lineTo(150,50)

    // stroke path
    ctx.stroke()
}这生成了从点P1(50,50)到点P2(150,50)的横向线条。
注意
通常,您总是希望在重置路径时设置起点,因此beginPath之后的第一个操作通常是moveTo。
便捷的API
对于矩形的操作,更方便的API是提供直接去画的操作而无须调用线条或填充函数。
import QtQuick

Canvas {
    id: root
    width: 120; height: 120
    onPaint: {
        var ctx = getContext("2d")
        ctx.fillStyle = 'green'
        ctx.strokeStyle = "blue"
        ctx.lineWidth = 4

        // draw a filles rectangle
        ctx.fillRect(20, 20, 80, 80)
        // cut our an inner rectangle
        ctx.clearRect(30,30, 60, 60)
        // stroke a border from top-left to
        // inner center of the larger rectangle
        ctx.strokeRect(20,20, 40, 40)
    }
}

注意
线条区域在路径两侧各扩展一半的线条宽度。4象素的线宽将在路径外侧画2象素,内侧画两象素。
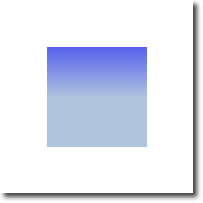
渐变
画布可以使用颜色填充形状,也可以用渐变或图片填充。
onPaint: {
    var ctx = getContext("2d")

    var gradient = ctx.createLinearGradient(100,0,100,200)
    gradient.addColorStop(0, "blue")
    gradient.addColorStop(0.5, "lightsteelblue")
    ctx.fillStyle = gradient
    ctx.fillRect(50,50,100,100)
}本例中的渐变是从超点(100,0)到终点(100,200)定义的,在画布中间画了一条垂直线。渐变点可以定义为从0.0(渐变起点)到1.0(渐变终点)的颜色。这里我们在起点0.0(100,0)使用blue,在终点0.5(100,200)使用lightsteelblue。渐变可以定义得比要绘制的矩形大,所以矩形会裁剪渐变到其定义的形状内。
注意
渐变定义在画布坐标系而非路径要绘制的相对坐标。画布没有相对坐标的概念,就像我们已经习惯的QML那样(也没有相对坐标)。
阴影
路径可以使用2D上下文对象绘制阴影的方式来增强视觉效果。阴影是沿路径发生一定位移的一块区域,填充颜色,做了模糊处理。为此你可以指定shadowColor, shadowOffsetX, shadowOffsetY 以及 shadowBlur。以上这些的定义都需要使用2D上下文对象。2D上下文对象是用于绘制操作的唯一的API。
阴影可以用于制作沿路径的发光效果。下面的例子中,我们可以创建一个有白色发光环绕的文本“Canvas”。为了更好的显示效果,选用黑色背景。
首先,来画一个黑色的背景:
// setup a dark background
ctx.strokeStyle = "#333"
ctx.fillRect(0,0,canvas.width,canvas.height);
然后,定义阴影配置,下步的路径会用到:
// setup a blue shadow
ctx.shadowColor = "#2ed5fa";
ctx.shadowOffsetX = 2;
ctx.shadowOffsetY = 2;
ctx.shadowBlur = 10;最后,我们从Ubuntu 字体库选用大的80px粗体来写“Canvas”文本。
// render green text
ctx.font = 'bold 80px sans-serif';
ctx.fillStyle = "#24d12e";
ctx.fillText("Canvas!",30,180);

图片
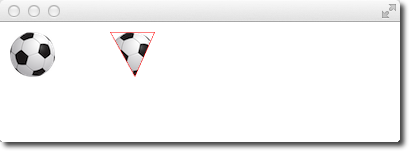
QML画布支持从多个途径来绘制图片。要在画布中使用图片,就要先加载图片。下例中我们使用Component.onCompleted函数来加载图片。
onPaint: {
    var ctx = getContext("2d")

    // draw an image
    ctx.drawImage('assets/ball.png', 10, 10)

    // store current context setup
    ctx.save()
    ctx.strokeStyle = '#ff2a68'
    // create a triangle as clip region
    ctx.beginPath()
    ctx.moveTo(110,10)
    ctx.lineTo(155,10)
    ctx.lineTo(135,55)
    ctx.closePath()
    // translate coordinate system
    ctx.clip()  // create clip from the path
    // draw image with clip applied
    ctx.drawImage('assets/ball.png', 100, 10)
    // draw stroke around path
    ctx.stroke()
    // restore previous context
    ctx.restore()

}

Component.onCompleted: {
    loadImage("assets/ball.png")
}左边呈现了足球图片,其左上角坐标是(10,10)。右边显示了应用裁剪路径裁剪后的图象。图片或路径可以被其它路径剪裁。可能通过定义路径并调用clip()为应用剪裁。接下去的绘制操作都会被这条路径裁剪。恢复之前的状态或将剪裁区域设为整个画布,都将禁用裁剪。
过渡
画布允许以多种方式转换坐标系。这与QML项目的过滤很相似。可以缩放scale, 旋转rotate,变换 translate坐标系。与 QML 无关,变换原点始终是画布原点。例如,要围绕其中心缩放路径,您需要将画布原点转换为路径的中心。也可以使用变换函数进行更复杂的过渡。
import QtQuick

Canvas {
    id: root
    width: 240; height: 120
    onPaint: {
            var ctx = getContext("2d");
            ctx.lineWidth = 4;
            ctx.strokeStyle = "blue";

            // translate x/y coordinate system
            ctx.translate(root.width/2, root.height/2);

            // draw path
            ctx.beginPath();
            ctx.rect(-20, -20, 40, 40);
            ctx.stroke();

            // rotate coordinate system
            ctx.rotate(Math.PI/4);
            ctx.strokeStyle = "green";

            // draw path
            ctx.beginPath();
            ctx.rect(-20, -20, 40, 40);
            ctx.stroke();
    }
}
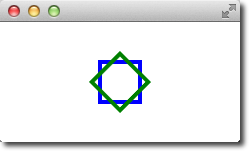
除了移动画布外,还允许使用
scale(x,y)围绕 x 和 y 轴进行缩放,使用 rotate(angle) 进行旋转,其中角度以半径 (360 度 = 2*Math.PI) 给出并使用setTransform(m11, m12, m21, m22, dx, dy)的矩阵变换。
注意
可以调用resetTransform()函数以重置过渡,将过渡矩阵设置回单位矩阵
ctx.resetTransform()构图模式
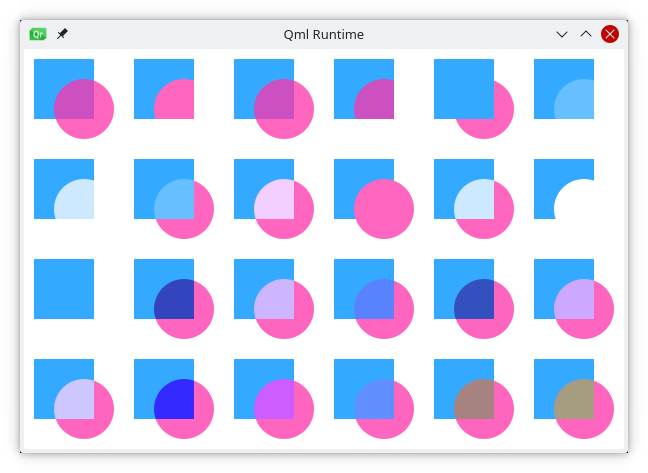
合成构图允许您绘制形状并将其与现有像素混合。画布允许使用globalCompositeOperation(mode)操作来支持几种合成构图模式。比如:
- source-over
- source-in
- source-out
- source-atop
我们以一个小例子来演示一下异或合成构图:
onPaint: {
    var ctx = getContext("2d")
    ctx.globalCompositeOperation = "xor"
    ctx.fillStyle = "#33a9ff"

    for(var i=0; i<40; i++) {
        ctx.beginPath()
        ctx.arc(Math.random()*400, Math.random()*200, 20, 0, 2*Math.PI)
        ctx.closePath()
        ctx.fill()
    }
}
下面的例子通过矩形和圆形的组合演示所有构图模式。代码后面可以看到其组合结果。
property var operation : [
    'source-over', 'source-in', 'source-over',
    'source-atop', 'destination-over', 'destination-in',
    'destination-out', 'destination-atop', 'lighter',
    'copy', 'xor', 'qt-clear', 'qt-destination',
    'qt-multiply', 'qt-screen', 'qt-overlay', 'qt-darken',
    'qt-lighten', 'qt-color-dodge', 'qt-color-burn',
    'qt-hard-light', 'qt-soft-light', 'qt-difference',
    'qt-exclusion'
    ]

onPaint: {
    var ctx = getContext('2d')

    for(var i=0; i<operation.length; i++) {
        var dx = Math.floor(i%6)*100
        var dy = Math.floor(i/6)*100
        ctx.save()
        ctx.fillStyle = '#33a9ff'
        ctx.fillRect(10+dx,10+dy,60,60)
        ctx.globalCompositeOperation = root.operation[i]
        ctx.fillStyle = '#ff33a9'
        ctx.globalAlpha = 0.75
        ctx.beginPath()
        ctx.arc(60+dx, 60+dy, 30, 0, 2*Math.PI)
        ctx.closePath()
        ctx.fill()
        ctx.restore()
    }
}
象素缓存
使用画布时,可以从画布中检索像素数据,以读取或操作画布的像素。使用createImageData(sw,sh) 或getImageData(sx,sy,sw,sh)读取图象数据。两个函数都会返回一个ImageData图象数据,其带有width、height和一个data变量。数据变量包含以RGBA格式检索的像素数据的一维数组,其中每个值在0到255之间变化。要在画布上设置像素,可以使用 putImageData(imagedata, dx, dy) 函数。
另外一种检索画布内容的方式是将数据存储到图片里。这可以通过Canvas的save(path)或toDataURL(mimeType)函数实现,而第二个函数返回一个图片URL,被Image元素用来加载图片。
import QtQuick

Rectangle {
    width: 240; height: 120
    Canvas {
        id: canvas
        x: 10; y: 10
        width: 100; height: 100
        property real hue: 0.0
        onPaint: {
            var ctx = getContext("2d")
            var x = 10 + Math.random(80)*80
            var y = 10 + Math.random(80)*80
            hue += Math.random()*0.1
            if(hue > 1.0) { hue -= 1 }
            ctx.globalAlpha = 0.7
            ctx.fillStyle = Qt.hsla(hue, 0.5, 0.5, 1.0)
            ctx.beginPath()
            ctx.moveTo(x+5,y)
            ctx.arc(x,y, x/10, 0, 360)
            ctx.closePath()
            ctx.fill()
        }
        MouseArea {
            anchors.fill: parent
            onClicked: {
                var url = canvas.toDataURL('image/png')
                print('image url=', url)
                image.source = url
            }
        }
    }

    Image {
        id: image
        x: 130; y: 10
        width: 100; height: 100
    }

    Timer {
        interval: 1000
        running: true
        triggeredOnStart: true
        repeat: true
        onTriggered: canvas.requestPaint()
    }
}
在这个小例子里,每秒钟在左侧的画布上绘制一个小圆圈。当用户在鼠标区域点击鼠标时,画布内容被存在图片里,且返回其URL。在例子的右侧用来显示图片。
画布绘画
在这个例子里,将使用画布Canvas元素创建一个小的绘画应用。
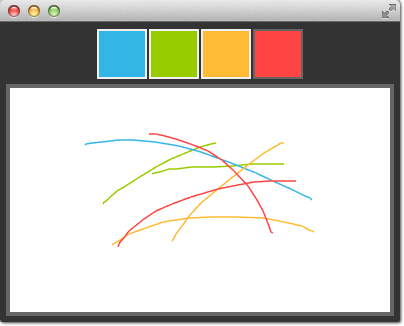
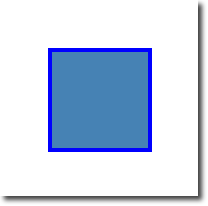
先用行定位器在屏幕顶部放置4个色块。一个色块是一个填充了能检测点击事件的鼠标区域的简单矩形。
Row {
    id: colorTools
    anchors {
        horizontalCenter: parent.horizontalCenter
        top: parent.top
        topMargin: 8
    }
    property color paintColor: "#33B5E5"
    spacing: 4
    Repeater {
        model: ["#33B5E5", "#99CC00", "#FFBB33", "#FF4444"]
        ColorSquare {
            color: modelData
            active: parent.paintColor == color
            onClicked: {
                parent.paintColor = color
            }
        }
    }
}颜色存储于一个数组和当前绘画颜色中。当用户点击一个色块时,色块颜色被赋值给行元素colorTools的一个paintColor属性。
为了跟踪画布上的鼠标事件,我们让鼠标区域MouseArea覆盖画布元素,监听并处理点击和位置变化事件。
Canvas {
    id: canvas
    anchors {
        left: parent.left
        right: parent.right
        top: colorTools.bottom
        bottom: parent.bottom
        margins: 8
    }
    property real lastX
    property real lastY
    property color color: colorTools.paintColor

    onPaint: {
        var ctx = getContext('2d')
        ctx.lineWidth = 1.5
        ctx.strokeStyle = canvas.color
        ctx.beginPath()
        ctx.moveTo(lastX, lastY)
        lastX = area.mouseX
        lastY = area.mouseY
        ctx.lineTo(lastX, lastY)
        ctx.stroke()
    }
    MouseArea {
        id: area
        anchors.fill: parent
        onPressed: {
            canvas.lastX = mouseX
            canvas.lastY = mouseY
        }
        onPositionChanged: {
            canvas.requestPaint()
        }
    }
}鼠标按下后会存储初始的鼠标位置到lastX和lastY属性里。每当鼠标位置发生变化时,会触发画布的绘制请求,即调用到onPaint函数。
最终线条的绘制,在onPaint函数中,开始一个新的路径并移动到末次位置。然后在鼠标区域收集新的位置并使用选中的颜色绘制一条线到新的位置。鼠标位置被存储为新的末次last位置。
从HTML5画布移植
从H5画布移植到QML画布非常简单。本节将从下例中观察如何转换。
- https://developer.mozilla.org/en-US/docs/Web/API/Canvas_API/Tutorial/Transformations
- http://en.wikipedia.org/wiki/Spirograph (本链接需要kexue上网)
螺旋
我们从Mozilla工程的spirograph例子为基础展开。原生HTML5代码是画布教程 canvas tutorial里的一部分。
有几行代码需要修改:
- Qt Quick要求定义变量,所以要添加 var 声明:
for (var i=0;i<3;i++) {
    ...
}- 绘画方法要接收2D上下文对象
function draw(ctx) {
    ...
}- 由于尺寸不同,我们需要调整每个螺旋
ctx.translate(20+j*50,20+i*50);最后,完成onPaint函数,在函数里获取上下文并调用绘图函数。
onPaint: {
    var ctx = getContext("2d");
    draw(ctx);
}
结果是使用 QML 画布运行的移植螺旋图图形。
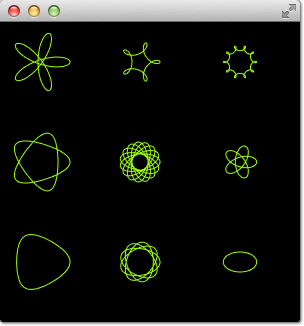
如你所见,在不改变实际逻辑,仅改动相对较少的代码格式,就可以完成从HTML5到QML的移植。
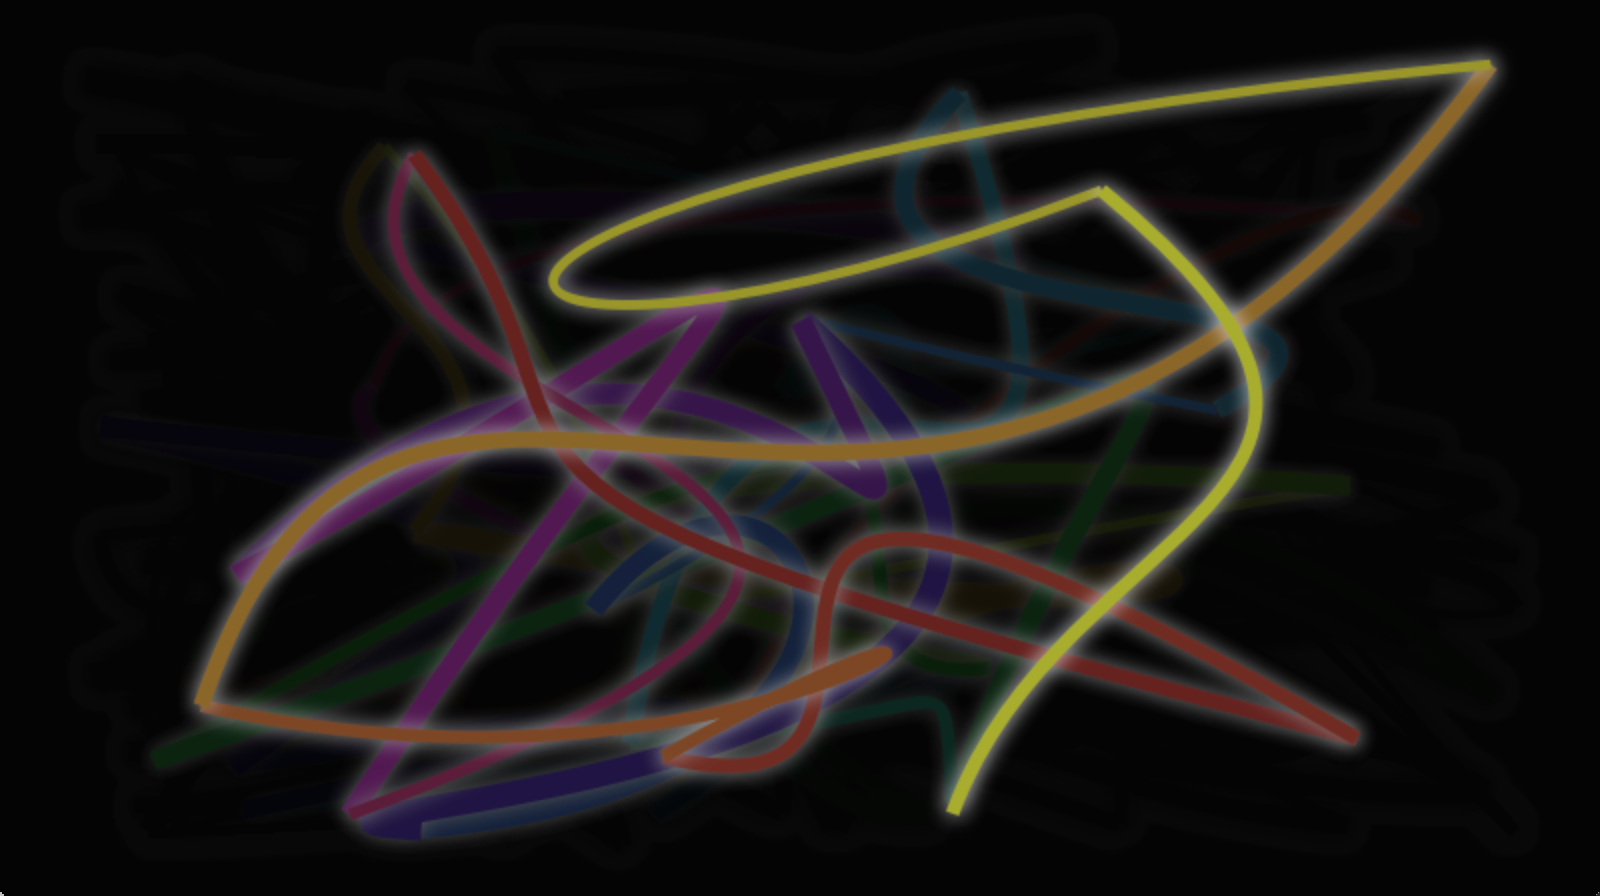
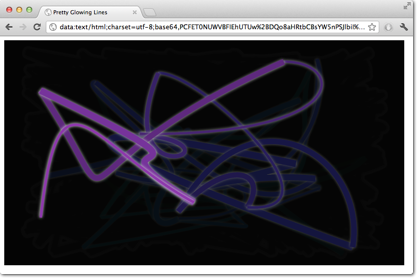
发光线
这是一个从W3C组织移植过来的更复杂的例子。移植前的pretty glowing lines有着非常棒的特性,这让移植更具挑战性。
<!DOCTYPE HTML>
<html lang="en">
<head>
    <title>Pretty Glowing Lines</title>
</head>
<body>

<canvas width="800" height="450"></canvas>
<script>
var context = document.getElementsByTagName('canvas')[0].getContext('2d');

// initial start position
var lastX = context.canvas.width * Math.random();
var lastY = context.canvas.height * Math.random();
var hue = 0;

// closure function to draw
// a random bezier curve with random color with a glow effect
function line() {

    context.save();

    // scale with factor 0.9 around the center of canvas
    context.translate(context.canvas.width/2, context.canvas.height/2);
    context.scale(0.9, 0.9);
    context.translate(-context.canvas.width/2, -context.canvas.height/2);

    context.beginPath();
    context.lineWidth = 5 + Math.random() * 10;

    // our start position
    context.moveTo(lastX, lastY);

    // our new end position
    lastX = context.canvas.width * Math.random();
    lastY = context.canvas.height * Math.random();

    // random bezier curve, which ends on lastX, lastY
    context.bezierCurveTo(context.canvas.width * Math.random(),
    context.canvas.height * Math.random(),
    context.canvas.width * Math.random(),
    context.canvas.height * Math.random(),
    lastX, lastY);

    // glow effect
    hue = hue + 10 * Math.random();
    context.strokeStyle = 'hsl(' + hue + ', 50%, 50%)';
    context.shadowColor = 'white';
    context.shadowBlur = 10;
    // stroke the curve
    context.stroke();
    context.restore();
}

// call line function every 50msecs
setInterval(line, 50);

function blank() {
    // makes the background 10% darker on each call
    context.fillStyle = 'rgba(0,0,0,0.1)';
    context.fillRect(0, 0, context.canvas.width, context.canvas.height);
}

// call blank function every 50msecs
setInterval(blank, 40);

</script>
</body>
</html>在HTML5里,上下文2D对象可以在画布上随时随处绘制。在QML里,只能在onPaint的处理函数处理。HTML5里使用setInterval定时器触发画线和清空背景。由于QML的不同处理方式,不能仅调用这些函数,因为需要通过onPaint函数来处理。而颜色展现也需要调整。一起逐个修改吧。
一切从画布元素开始。简单起见,直接使用Canvas 元素做为QML文件的根元素。
import QtQuick

Canvas {
   id: canvas
   width: 800; height: 450

   ...
}为了解耦setInterval对函数的直接调用,我们将对setInterval的调用替换为两个会请求重绘的定时器。Timer定时器定时触发并执行我们设定的代码。因为我们无法区分哪个绘制函数将被触发,我们为每个操作定义一个请求操作的布尔型的标记,然后触发一个重绘请求。
这是画线操作的代码。清空背景的操作是类似的。
...
property bool requestLine: false

Timer {
    id: lineTimer
    interval: 40
    repeat: true
    triggeredOnStart: true
    onTriggered: {
        canvas.requestLine = true
        canvas.requestPaint()
    }
}

Component.onCompleted: {
    lineTimer.start()
}
...现在我们就知道了哪此操作(画线、清空或二者都)需要在onPaint函数中进行。当我们为每个绘制请求进入onPaint时,我们需要将变量的初始化放在画布元素中。
Canvas {
    ...
    property real hue: 0
    property real lastX: width * Math.random();
    property real lastY: height * Math.random();
    ...
}
现在,我们的绘制函数应该象这样:
onPaint: {
    var context = getContext('2d')
    if(requestLine) {
        line(context)
        requestLine = false
    }
    if(requestBlank) {
        blank(context)
        requestBlank = false
    }
}line函数被抽象出来,将画布作为其参数。
function line(context) {
    context.save();
    context.translate(canvas.width/2, canvas.height/2);
    context.scale(0.9, 0.9);
    context.translate(-canvas.width/2, -canvas.height/2);
    context.beginPath();
    context.lineWidth = 5 + Math.random() * 10;
    context.moveTo(lastX, lastY);
    lastX = canvas.width * Math.random();
    lastY = canvas.height * Math.random();
    context.bezierCurveTo(canvas.width * Math.random(),
        canvas.height * Math.random(),
        canvas.width * Math.random(),
        canvas.height * Math.random(),
        lastX, lastY);

    hue += Math.random()*0.1
    if(hue > 1.0) {
        hue -= 1
    }
    context.strokeStyle = Qt.hsla(hue, 0.5, 0.5, 1.0);
    // context.shadowColor = 'white';
    // context.shadowBlur = 10;
    context.stroke();
    context.restore();
}最大的改动是QML函数Qt.rgba()和Qt.hsla()的使用,其要求采用QML中使用的0.0...0.1范围内的值。
同样应用到清屏函数blank
function blank(context) {
    context.fillStyle = Qt.rgba(0,0,0,0.1)
    context.fillRect(0, 0, canvas.width, canvas.height);
}
最后的效果类似下图:

 浙公网安备 33010602011771号