第八章:模型视图
第八章:模型视图
模型-视图-委托
随着数据量越来越大,为界面保存一份数据拷备的方式越来越不可行。这意味着,用户可见的界面表现层,需要与委托操作的实际内容的数据层分离。Qt Quick中的数据与视图分离正是通过所谓的模型-视图分离机制。Qt Quick提供一系列的预定义视图,视图中的数据元素由委托来呈现。使用这一套机制,你必须理解这些类,以及如何恰当地创建委托以提供正确的视图及用户体验。
基础概念
当开发用户界面时,通常的模式是将界面数据与视图分开单独保存。这使得同样的数据,在用户不同操作下有不同的呈现方式。比如,电话号码簿可以是竖向的文本列表,也可以是联系人照片的网格布局。两种方式,数据是一样的:同样的电话簿数据,但界面呈现方式不同。这是模型视图的典型特征。这种模式下,数据被称为模型,而界面由视图来呈现/处理。
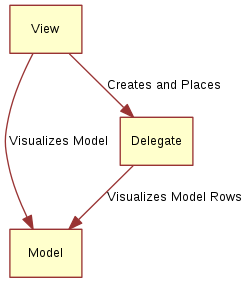
在QML,模型与视图是由委托来联系起来的。这三者之间的分工如下:模型提供数据。每个数据项,可以有很多值。在上面的例子中 ,电话簿中的每一项都有名字、照片、电话号码。数据被罗列在视图中,而视图中的每一项都是由委托来组织呈现的。视图的任务是排列好委托,而委托负责将模型里的每个数据项呈现给用户。
这意味着,委托了解模型的内容并负责将其以一定格式呈现出来。视图知道委托的概念并负责布局委托。模型仅知道哪些数据将要被展示。
基础模型
显示一个模型的数据的最基础的控件是Repeater。它用于实例化一组有序的项目,以填充部分用户界面。Repeater使用的模型,可以是将要初始化的模型实例的数量,也可以是从网上获取数据的模型。
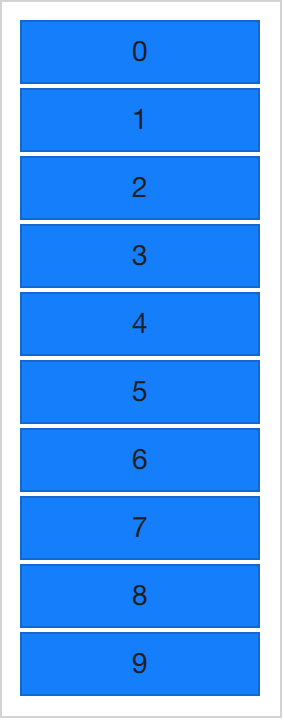
以最简单的方式,Repeater可以用于初始化一定数量的模型实例。每个实例都可以访问绑定的属性变量index,以用于区分实例。以下的例子中,Repeater创建了模型的10个实例。实例的数量是由model属性控制的。对于Repeater里的每个实例项,包含一个Rectangle,里面有一个Text元素。如你所见,text属性被赋值为index属性的值,这样实例项的文本从0显示到9。
import QtQuick 6.2
import "../common"

Column {
    spacing: 2

    Repeater {
        model: 10
        BlueBox {
            width: 120
            height: 32
            text: index
        }
    }
}
象上面展示数字那样,有时显示一些复杂些的数据集也很有趣。通过将
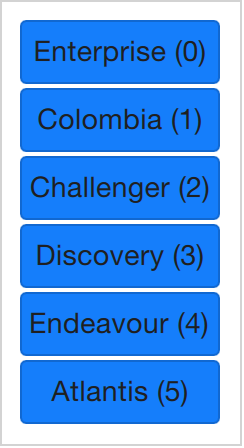
model的值从数字换为JavaScript数组,就能做到更有趣的效果。数组的内容可以是字符串、数值、对象。下面例子中使用了字符串。我们仍然可以使用index属性值,也可以访问modelData,它包含了数组中每个元素的数据。
import QtQuick 6.2
import "../common"

Column {
    spacing: 2

    Repeater {
        model: ["Enterprise", "Columbia", "Challenger", "Discovery", "Endeavour", "Atlantis"]

        BlueBox {
            width: 100
            height: 32
            radius: 3

            text: modelData + ' (' + index + ')'
        }
    }
}
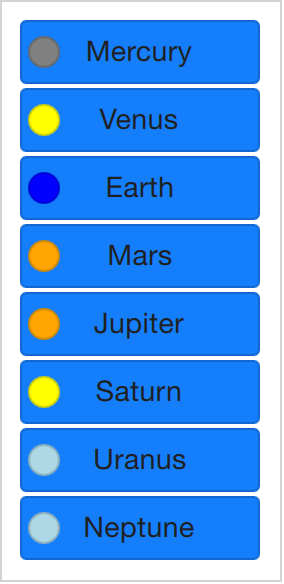
可以展示一组数据时,你就会想要为数组的每个实例上展示多段数据。这就是引入模型的原因。最简单最常用的是列表模型ListModel。列表模型由ListElement项的集合组成。列表模型内部的一系列属性可以绑定上值。比如,下例中,每个ListElement元素都由名字和颜色属性。
模型中的每个元素的属性,都关联在Repeater实例化的每个项目中,可直接使用。这意味着在每个模型实例项中的Rectangle和Text都可以直接使用name和surfaceColor的值。这不仅更方便了访问数据,代码也更有可读性。用surfaceColor就简洁直观地表示名字左边圆圈的颜色,而不是象 j行i列的数据 那样的不直观的表示法。
import QtQuick 6.2
import "../common"

Column {
    spacing: 2

    Repeater {
        model: ListModel {
            ListElement { name: "Mercury"; surfaceColor: "gray" }
            ListElement { name: "Venus"; surfaceColor: "yellow" }
            ListElement { name: "Earth"; surfaceColor: "blue" }
            ListElement { name: "Mars"; surfaceColor: "orange" }
            ListElement { name: "Jupiter"; surfaceColor: "orange" }
            ListElement { name: "Saturn"; surfaceColor: "yellow" }
            ListElement { name: "Uranus"; surfaceColor: "lightBlue" }
            ListElement { name: "Neptune"; surfaceColor: "lightBlue" }
        }

        BlueBox {
            width: 120
            height: 32

            radius: 3
            text: name

            Box {
                anchors.left: parent.left
                anchors.verticalCenter: parent.verticalCenter
                anchors.leftMargin: 4

                width: 16
                height: 16

                radius: 8

                color: surfaceColor
            }
        }
    }
}
Reapter的内容的每一项的初例化操作,实际上被绑定到了默认的委托属性
delegate上。这意味着第一个例子中的代码与以下代码是一样的。注意,唯一的不同是,下面的代码中的委托属性delegate被显式的写了出来。
import QtQuick 6.2
import "../common"

Column {
    spacing: 2

    Repeater {
        model: 10

        delegate: BlueBox {
            width: 100
            height: 32
            text: index
        }
    }
}
动态视图
Repeater适用于静态和有限数据集,但实际生产环境中,模型数据更复杂,且更大。因而这里需要更好的方案。为此,Qt Quick提供了ListView和GridView元素。它们都是基于可翻转区域Flickable,用户可以在大数据量下来回翻转移动。同时,它们限制了并行初始化委托的数量。对于含有大数据量的模型,这意味着一次只能显示一定数量的模型数据元素。

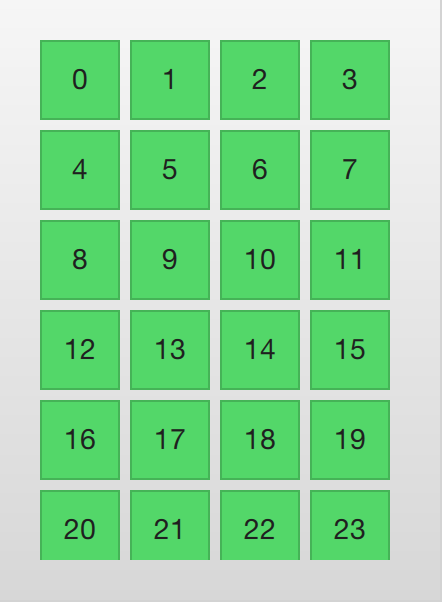
这两个元素在用法上很相似。我们先从ListView开始讲起,然后是GridView,并将二者做对比。注意GridView将数据列表放在二维网格上,从左到右,从上到下。如果你想要以表格形式展示数据,应该使用TableView,这会在表格模型一节讲到。
ListView与Repeater很类似。它使用一个model模型数据,来初始化委托delegate,而委托之间,可以有spacing间隔。以下代码展示了其用法。
import QtQuick 6.2
import "../common"

Background {
    width: 80
    height: 300

    ListView {
        anchors.fill: parent
        anchors.margins: 20

        clip: true

        model: 100

        delegate: numberDelegate
        spacing: 5
    }

    Component {
        id: numberDelegate

        GreenBox {
            width: 40
            height: 40
            text: index
        }
    }
}

如果模型中包含的数量超过屏幕能够显示的数量,则
ListView仅会显示列表部分数据。尽管如此,Qt Quick的默认行为,并不限制委托所呈现的屏幕区域。也就是说,在列表视图展示给用户的区域外,委托仍然可以呈现数据,并负责这部分数据的创建与销毁。要阻止这样的处理逻辑,必须激活ListView元素的剪切,即将clip属性值设置为true,下图(左图)展示了其效果,右图是将clip设置为false的效果。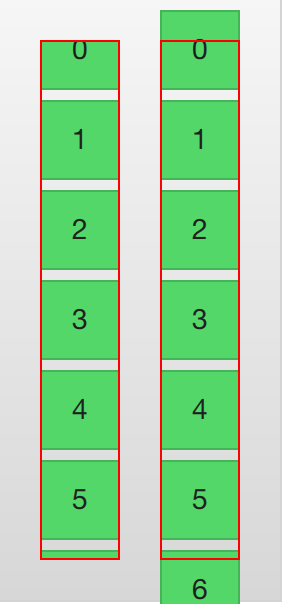
对用户来说,
ListView列表视图是可滚动的区域。它支持惯性滚动,也就是可以快速翻动内容。默认地,当内容结束时,它会被拉扯,然后回弹,向用户表明数据已经到底了。视图滚动到底时的表现,可以由属性
boundsBehavior来控制,这是一个枚举值,可以用来形象化其默认表现,Flickable.DragAndOvershootBounds表示视图可以被拖拉或翻动到边界外,Flickable.StopAtBounds表示视图两头严格不可以超出边界外,居于二者之间,Flickable.DragOverBounds允许用户将数据拖出边界外,但翻动时的视图底部必须停止在边界上。可以限制视图允许停止的位置,这由快照模式
snapMode属性来控制。默认值是ListView.NoSnap,允许视图停在任何位置。将snapMode属性值置为ListView.SnapToItem,视图顶部将会与模型数据项的顶部对齐。最后,ListView.SnapOneItem表示,当鼠标按键或手指松开时,视图将会停在模型的第一个数据项上。最后这个模式非常适合于翻书的场景。
滚动方向
列表视图默认提供了竖向滚动列表,但横向滚动也同样有用。列表视图的滚动方向是由orientation属性来决定的。它可以设为默认值、ListView.Vertical、ListView.Horizontal。横向视图的实现例子如下:
import QtQuick 6.2
import "../common"

Background {
    width: 480
    height: 80

    ListView {
        anchors.fill: parent
        anchors.margins: 20
        spacing: 4
        clip: true
        model: 100
        orientation: ListView.Horizontal
        delegate: numberDelegate
    }

    Component {
        id: numberDelegate

        GreenBox {
            width: 40
            height: 40
            text: index
        }
    }
}

可以看到, 视图横向流的滚动方向默认是从左向右的,这可以通过属性
layoutDirection,依据流动方向需要,设置为Qt.LeftToRight或Qt.RightToLeft。
键盘导航与突出显示
在触摸设备上使用ListView时,滚动操作是够用的。但在使用键盘,或仅是通过箭头来选择数据项的场景下,就需要一种机制来指示当前数据项。在QML里,这被称为突出显示highlighting。
视图支持一个突出显示的委托与视图中的其它委托一起显示。它可被视为一个附加的委托,只是它只被实例化一次,并且被移动到与当前项目相同的位置。
下例可以证明。这里牵涉有两个属性,首先是focus要设为true,这使得ListView可以获得键盘焦点。基准是highlighting属性,指明了将要实现突出显示的委托。突出显示委托给出了当前选中数据项的x、y和height。如果width没有显式赋值,则使用当前项目的宽度。
在示例中,ListView.view.width 附加属性用于宽度。可用于委托的附加属性将在本章的委托部分进一步讨论,但相同的属性也可用于突出显示委托。
import QtQuick 6.2
import "../common"

Background {
    width: 240
    height: 300

    ListView {
        id: view
        anchors.fill: parent
        anchors.margins: 20

        clip: true

        model: 100

        delegate: numberDelegate
        spacing: 5

        highlight: highlightComponent
        focus: true
    }

    Component {
        id: highlightComponent

        GreenBox {
            width: ListView.view.width
        }
    }

    Component {
        id: numberDelegate

        Item {
            width: ListView.view.width
            height: 40

            Text {
                anchors.centerIn: parent

                font.pixelSize: 10

                text: index
            }
        }
    }
}
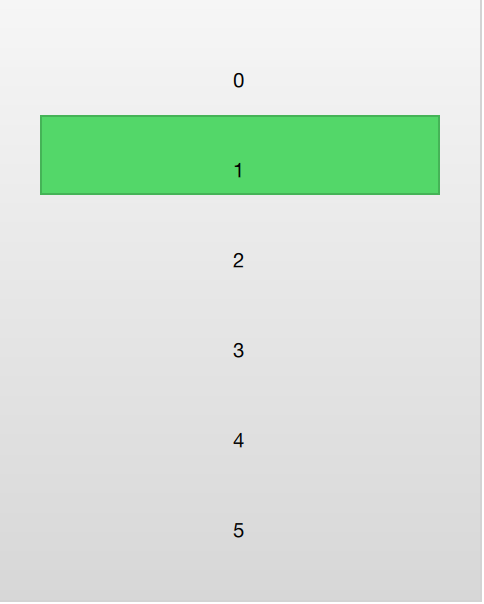
当列表视图结合突出显示使用时,一系列的属性可用来控制其表现。
highlightRangeMode控制如何在视图中影响突出显示。默认值ListView.NoHighlightRange意味着视图的可视范围与突出显示的区域完全没关系。属性值
ListView.StrictlyEnforceRange表示突出显示永远可见。如果尝试将突出显示的项目移出视图可见区域,当前项目将相应改变,以确保实现显示可见。居于二者之间的值是
ListView.ApplyRange。它试图保持突出显示但不强制修改当前项,而是在可行的情况下,将突出显示移出视图。在默认配置中,视图负责将突出显示移动到适当位置。尺寸和位置可以被控制,包括其速度和时间。这些属性包括:
highlightMoveSpeed,highlightMoveDuration,highlightResizeSpeed 和 highlightResizeDuration。默认的速度为400象速/秒,时间为-1,表示由距离和速度来决定时间。如果速度和时间都设置了,将使用最快完成动画的那个属性。可以更细致地控制突出显示的移动,属性
highlightFollowCurrentItem可以设为false。这意味着视图不再负责突出显示委托的移动,而是Behavior或由动画来控制其移动。下例中,突出显示的y属性绑定到了
ListView.view.currentItem.y的附加属性上。这样使得突出显示紧随当前选项。但是,由于不允许视图移动突出显示,因此可以控制元素的移动方式。可以通过y轴上的行为Behavior on y来实现。下例中,移动为分解为三步:淡出、移动、前置淡入。注意观察SequentialAnimation和PropertyAnimation如何结合NumberAnimation来应用,以创建更复杂的移动。
Component {
    id: highlightComponent

    Item {
        width: ListView.view.width
        height: ListView.view.currentItem.height

        y: ListView.view.currentItem.y

        Behavior on y {
            SequentialAnimation {
                PropertyAnimation { target: highlightRectangle; property: "opacity"; to: 0; duration: 200 }
                NumberAnimation { duration: 1 }
                PropertyAnimation { target: highlightRectangle; property: "opacity"; to: 1; duration: 200 }
            }
        }

        GreenBox {
            id: highlightRectangle
            anchors.fill: parent
        }
    }
}
头部与底部
在ListView列表视图的两端,可以分别插入header和footer元素。 这可以在列表的头和尾部放置特殊的委托。对于横向列表,它们不会出现在头部或底部,而是在列表视图的开始和结束,这取取决于layoutDirection的使用。
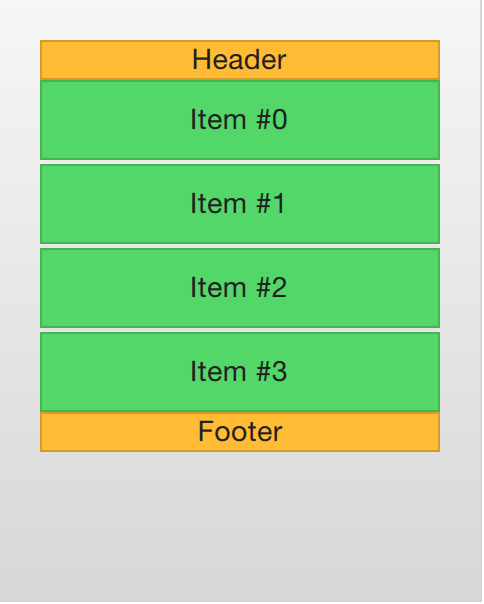
下例演示了头部和底部如何增强对一个列表的开始与结束的感知。头部底部列表元素也有其它用处,比如,可用于显示按钮,以加载更多内容。
import QtQuick 6.2
import "../common"

Background {
    width: 240
    height: 300

    ListView {
        anchors.fill: parent
        anchors.margins: 20

        clip: true

        model: 4

        delegate: numberDelegate
        spacing: 2

        header: headerComponent
        footer: footerComponent
    }

    Component {
        id: headerComponent

        YellowBox {
            width: ListView.view.width
            height: 20
            text: 'Header'

        }
    }

    Component {
        id: footerComponent

        YellowBox {
            width: ListView.view.width
            height: 20
            text: 'Footer'
        }
    }

    Component {
        id: numberDelegate

        GreenBox {
            width: ListView.view.width
            height: 40
            text: 'Item #' + index
        }
    }
}
提示
ListView的spacing属性对头部底部元素不起作用,头部底部委托直接被放在列表中其它委托的相邻位置。这意味着想要间隔的话需要在头部与底部项委托里显式声明。
网格视图
GridView的用法与ListView非常类似。唯一的不同在于列表视图将委托放在二维表中而不是线性列表中。

相比列表视图来说,网格视图不依赖于委托的间隔和尺寸。而是使用单元格的高度与宽度cellWidth和cellHeight属性来控制内容委托的尺寸。每个委托项被放在每个单元格的左上角。
import QtQuick 2.5
import "../common"

Background {
    width: 220
    height: 300

    GridView {
        id: view
        anchors.fill: parent
        anchors.margins: 20

        clip: true

        model: 100

        cellWidth: 45
        cellHeight: 45

        delegate: numberDelegate
    }

    Component {
        id: numberDelegate

        GreenBox {
            width: 40
            height: 40
            text: index
        }
    }
}GridView网格视图有头部和底部,也可以使用突出显示委托并支持快照模式和各种边界操作。还可以以不同的方向和方式进行导航。
使用flow来控制数据展示方向,可以设置为GridView.LeftToRight 或 GridView.TopToBottom。GridView.LeftToRight表示从左到右填充网格,一行满时就从上到下增加行,视图可以竖向滚动。GridView.TopToBottom表示从上到下添加项目到网格,一列满了时,从在向右添加一列,可以横向滚动。
除了 flow 属性,layoutDirection 属性还可以根据相应值将网格的方向调整为从左到右或从右到左。
委托
当在用户界面使用模型和视图时,委托在创建其样式与行为方面扮演了很重要的角色。因为模型中的每个项目都是通过委托来呈现出来的,用户实际上看到的是委托。
每个委托都有一些关联属性(可直接使用),一些是来自于模型,其它来自于视图。从模型来看,每个项目的属性数据被传给了委托。从视图来看,属性传递了视图内跟委托相关的状态信息。我们从视图的角度来分析下这些属性。
最常用到的视图关联属性是ListView.isCurrentItem和ListView.view。前者取布尔值,指示项目是否为当前选中项,后者是只读的,代表当前视图。通过访问视图,可以创建通用的、可重用的委托,以适应包含它们的视图的大小和性质。下例中,每个委托的width都关联到了视图的width属性,而每个委托的背景色color,依赖于所关联的ListView.isCurrentItem属性。
import QtQuick 6.2

Rectangle {
    width: 120
    height: 300

    gradient: Gradient {
        GradientStop { position: 0.0; color: "#f6f6f6" }
        GradientStop { position: 1.0; color: "#d7d7d7" }
    }

    ListView {
        anchors.fill: parent
        anchors.margins: 20

        clip: true

        model: 100

        delegate: numberDelegate
        spacing: 5

        focus: true
    }

    Component {
        id: numberDelegate

        Rectangle {
            width: ListView.view.width
            height: 40

            color: ListView.isCurrentItem?"#157efb":"#53d769"
            border.color: Qt.lighter(color, 1.1)

            Text {
                anchors.centerIn: parent

                font.pixelSize: 10

                text: index
            }
        }
    }
}
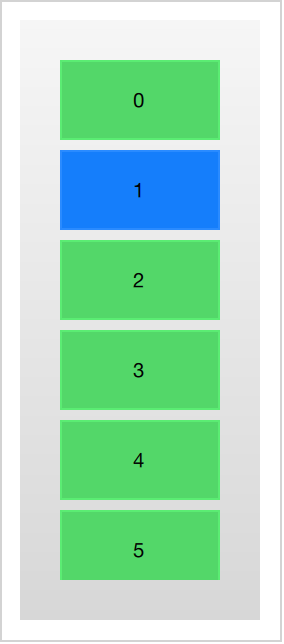
如果模型中的每个项目关联上动作,比如,当点击某项时对其进行某操作,那操作逻辑的实现就应是委托的一部分。这在视图上划出了事件管理,处理视图各项目之间的导航,而委托处理特定项上的动作。
最基本的实现方式是在每个委托内创建
MouseArea,并对onClicked信号进行响应。本章的下一节中将会有例子对此演示。
添加动画及删除项目
在某些情况下,视图中显示的内容会随时间而变化。随着底层数据模型的改变,项目被添加和删除。在这些情况下,使用视觉提示为用户提供方向感并帮助用户了解添加或删除的数据通常是一个好方式。
方便的是,QML 视图将两个信号 onAdd 和 onRemove 附加到每个项目委托。通过从这些触发动画,很容易创建必要的动作来帮助用户了解正在发生的事情。
以下的例子通过使用动态填充ListModel来演示如何做到。在屏幕底部有一个添加新项目的按钮,当点击它时,新的项目通过append方法被添加到模型中。这触发了在视图中新创建一个委托,并发出了GridView.onAdd信号 。被信号启动的SequentialAnimation调用了addAnimation,导致数据项目通过委托里scale属性的动画在视图中被放大。
当视图中的委托被点击,则通过调用remove方法移除了模型中的相应项目 。这会导致发出GridView.onRemove,并启动removeAnimation``SequentialAnimation(移除的顺序动画)。然而,委托的销毁必须延后到动画完成。PropertyAction元素将其GridView.delayRemove属性设置为true,则在动画完成前移除模型数据项,false则在动画完成后移除。这样确保动画在委托移除前完成。
import QtQuick 6.2

Rectangle {
    width: 480
    height: 300

    gradient: Gradient {
        GradientStop { position: 0.0; color: "#dbddde" }
        GradientStop { position: 1.0; color: "#5fc9f8" }
    }

    ListModel {
        id: theModel

        ListElement { number: 0 }
        ListElement { number: 1 }
        ListElement { number: 2 }
        ListElement { number: 3 }
        ListElement { number: 4 }
        ListElement { number: 5 }
        ListElement { number: 6 }
        ListElement { number: 7 }
        ListElement { number: 8 }
        ListElement { number: 9 }
    }

    Rectangle {
        anchors.left: parent.left
        anchors.right: parent.right
        anchors.bottom: parent.bottom
        anchors.margins: 20

        height: 40

        color: "#53d769"
        border.color: Qt.lighter(color, 1.1)

        Text {
            anchors.centerIn: parent

            text: "Add item!"
        }

        MouseArea {
            anchors.fill: parent

            onClicked: {
                theModel.append({"number": ++parent.count});
            }
        }

        property int count: 9
    }

    GridView {
        anchors.fill: parent
        anchors.margins: 20
        anchors.bottomMargin: 80

        clip: true

        model: theModel

        cellWidth: 45
        cellHeight: 45

        delegate: numberDelegate
    }

    Component {
        id: numberDelegate

        Rectangle {
            id: wrapper

            width: 40
            height: 40

            gradient: Gradient {
                GradientStop { position: 0.0; color: "#f8306a" }
                GradientStop { position: 1.0; color: "#fb5b40" }
            }

            Text {
                anchors.centerIn: parent

                font.pixelSize: 10

                text: number
            }

            MouseArea {
                anchors.fill: parent

                onClicked: {
                    theModel.remove(index);
                }
            }

            GridView.onRemove: removeAnimation.start();

            SequentialAnimation {
                id: removeAnimation

                PropertyAction { target: wrapper; property: "GridView.delayRemove"; value: true }
                NumberAnimation { target: wrapper; property: "scale"; to: 0; duration: 250; easing.type: Easing.InOutQuad }
                PropertyAction { target: wrapper; property: "GridView.delayRemove"; value: false }
            }

            GridView.onAdd: addAnimation.start();

            SequentialAnimation {
                id: addAnimation
                NumberAnimation { target: wrapper; property: "scale"; from: 0; to: 1; duration: 250; easing.type: Easing.InOutQuad }
            }
        }
    }
}
变形委托
列表的一种通常用法是当项目选中时,当前项目被展开。这可用于将选中项目动态展开来填充屏幕,以进入新的用户界面,或者用于为列表中的当前项提供更我的信息展示。
在下例中,每个数据项在被点击时会在包含它的ListView视图中全部展开。额外的空间用于添加更多信息。控制的方法就是每个展开的委托都可访问到的expanded状态,在这个状态里,一些属性被改变。
首先,wapper的高度height被设置为列表视图ListView的高度。然后将缩略图图像放大并向下移动以使其从较小的位置移动到较大的位置。除此之外,两个隐藏的项目factsView和closeButton,可以通过修改opacity属性来展示。最后,列表视图就完成了。
创建ListView列表视图包括设定contentsY,这是视图可视部分的顶部,委托的y值。另外的变动是把视图的interactive设置为false。这阻止视图移动。用户不能再滚动列表或改变当前项。
当项目第一次被点击时,进入到展开expanded状态,导致项目委托来填充ListView以及重排其内容。当关闭按钮被点击,状态被清除,导致委托重新回来之前的状态,并重回ListView视图。
import QtQuick 6.2

Item {
    width: 300
    height: 480

    Rectangle {
        anchors.fill: parent
        gradient: Gradient {
            GradientStop { position: 0.0; color: "#4a4a4a" }
            GradientStop { position: 1.0; color: "#2b2b2b" }
        }
    }

    ListView {
        id: listView

        anchors.fill: parent

        delegate: detailsDelegate
        model: planets
    }

    ListModel {
        id: planets

        ListElement { name: "Mercury"; imageSource: "images/mercury.jpeg"; facts: "Mercury is the smallest planet in the Solar System. It is the closest planet to the sun. It makes one trip around the Sun once every 87.969 days." }
        ListElement { name: "Venus"; imageSource: "images/venus.jpeg"; facts: "Venus is the second planet from the Sun. It is a terrestrial planet because it has a solid, rocky surface. The other terrestrial planets are Mercury, Earth and Mars. Astronomers have known Venus for thousands of years." }
        ListElement { name: "Earth"; imageSource: "images/earth.jpeg"; facts: "The Earth is the third planet from the Sun. It is one of the four terrestrial planets in our Solar System. This means most of its mass is solid. The other three are Mercury, Venus and Mars. The Earth is also called the Blue Planet, 'Planet Earth', and 'Terra'." }
        ListElement { name: "Mars"; imageSource: "images/mars.jpeg"; facts: "Mars is the fourth planet from the Sun in the Solar System. Mars is dry, rocky and cold. It is home to the largest volcano in the Solar System. Mars is named after the mythological Roman god of war because it is a red planet, which signifies the colour of blood." }
    }

    Component {
        id: detailsDelegate

        Item {
            id: wrapper

            width: listView.width
            height: 30

            Rectangle {
                anchors.left: parent.left
                anchors.right: parent.right
                anchors.top: parent.top

                height: 30

                color: "#333"
                border.color: Qt.lighter(color, 1.2)
                Text {
                    anchors.left: parent.left
                    anchors.verticalCenter: parent.verticalCenter
                    anchors.leftMargin: 4

                    font.pixelSize: parent.height-4
                    color: '#fff'

                    text: name
                }
            }


            Rectangle {
                id: image

                width: 26
                height: 26

                anchors.right: parent.right
                anchors.top: parent.top
                anchors.rightMargin: 2
                anchors.topMargin: 2

                color: "black"


                Image {
                    anchors.fill: parent

                    fillMode: Image.PreserveAspectFit

                    source: imageSource
                }
            }

            MouseArea {
                anchors.fill: parent
                onClicked: parent.state = "expanded"
            }

            Item {
                id: factsView

                anchors.top: image.bottom
                anchors.left: parent.left
                anchors.right: parent.right
                anchors.bottom: parent.bottom

                opacity: 0

                Rectangle {
                    anchors.fill: parent

                    gradient: Gradient {
                        GradientStop { position: 0.0; color: "#fed958" }
                        GradientStop { position: 1.0; color: "#fecc2f" }
                    }
                    border.color: '#000000'
                    border.width: 2

                    Text {
                        anchors.fill: parent
                        anchors.margins: 5

                        clip: true
                        wrapMode: Text.WordWrap
                        color: '#1f1f21'

                        font.pixelSize: 12

                        text: facts
                    }
                }
            }

            Rectangle {
                id: closeButton

                anchors.right: parent.right
                anchors.top: parent.top
                anchors.rightMargin: 2
                anchors.topMargin: 2

                width: 26
                height: 26

                color: "#157efb"
                border.color: Qt.lighter(color, 1.1)

                opacity: 0

                MouseArea {
                    anchors.fill: parent
                    onClicked: wrapper.state = ""
                }
            }

            states: [
                State {
                    name: "expanded"

                    PropertyChanges { target: wrapper; height: listView.height }
                    PropertyChanges { target: image; width: listView.width; height: listView.width; anchors.rightMargin: 0; anchors.topMargin: 30 }
                    PropertyChanges { target: factsView; opacity: 1 }
                    PropertyChanges { target: closeButton; opacity: 1 }
                    PropertyChanges { target: wrapper.ListView.view; contentY: wrapper.y; interactive: false }
                }
            ]

            transitions: [
                Transition {
                    NumberAnimation {
                        duration: 200;
                        properties: "height,width,anchors.rightMargin,anchors.topMargin,opacity,contentY"
                    }
                }
            ]
        }
    }
}
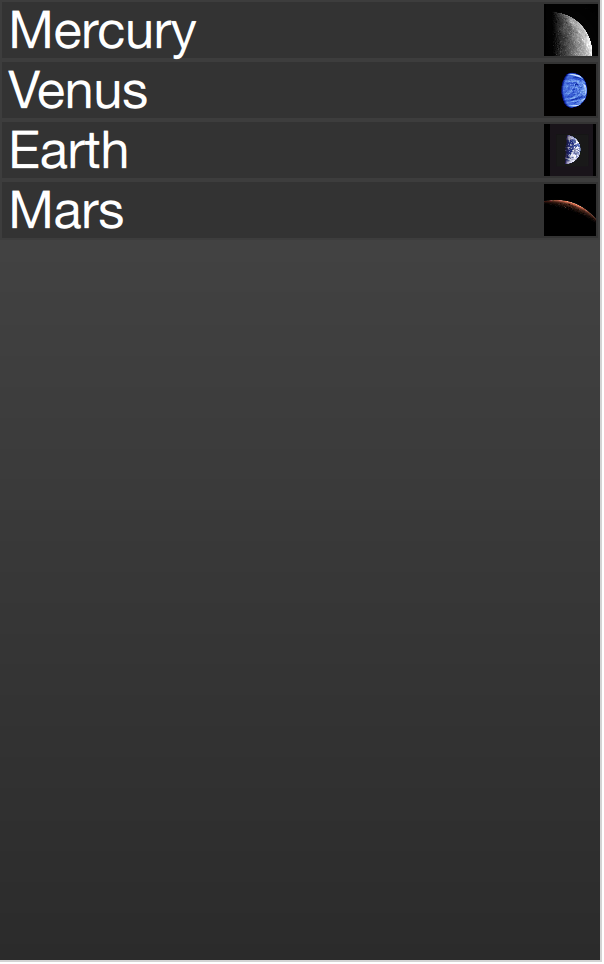
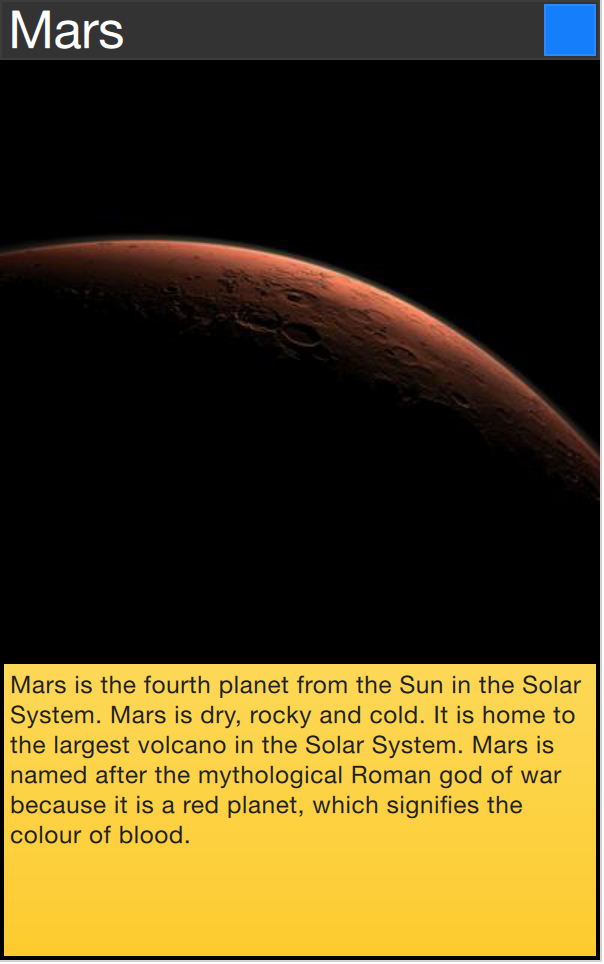
此处演示的扩展委托以填充整个视图的技术可用于使项目委托以更小的方式移动形状。例如,在浏览歌曲列表时,当前项目可能会稍大一些,以容纳有关该特定项目的更多信息。
高级技术
路径视图
PathView路径视图是Qt Quick提供的最灵活的元素,但也是最复杂的。它可以创建在任意路径上摆放数据项的视图。在这条路径上,象缩放、透明度等更多属性可以进行更细致的设置。
当使用PathView时,需要定义一个委托和一条路径。除此之外,PathView本身可以通过一系列属性进行自定义。最常见的是pathItemCount,控制一次可见项的数量,还有突出显示范围控制的属性:preferredHighlightBegin,preferredHighlightEnd 和 highlightRangeMode,控制着从路径上的哪一段进行当前项的显示。
在深入了解突出显示范围控制属性前,必须先了解下path属性。path属性需要一个Path元素,来定义,当路径视图PathView被滚动时,委托所遵循的路径。路径是startX和startY属性以及路径元素如PathLine,PathQuad,PathCubic来定义的。这些元素结合在一起形成了二维的路径。
路径被定义后,还可以使用PathPercent和PathAttribute元素来进一步调整。它们被放在路径元素之间,以为路径和其间的委托提供更精细的控制。PathPercent控制被每个元素遮盖部分的大小。这样一来,也就控制了路径之上的委托的分布,因为它们被恰当地分配了路径的百分比。
这时该轮到路径视图PathView的preferredHighlightBegin和preferredHighligntEnd属性出场了。他们的取值为从0到1的小数。末端取值要大于或等于始端的值。将二者都赋值0.5,当前项将显示在路径的中间位置。
在Path里,PathAttribute元素被放在其它元素之间,就象PathPercent元素那样。通过它们,可以指定沿路径插值的特性值。这些属性被关联到委托里,可以用来控制任何可访问的属性。
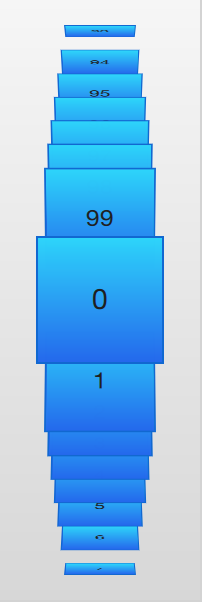
下例演示了PathView如何创建了可翻动的卡片视图。它使用了一点小技巧。路径由三个PathLine组成。使用PathPercent元素,中间的元素被恰当地居中,并被给予了足够的间隔以免被其它元素干扰。使用PathAttribute元素,控制了旋转、尺寸和z值。
除path以外,PathView还用到了pathItemCout属性。它控制了路径密度。PathView.onPath所用到的preferredHighlightBegin和preferredHighlightEnd控制了委托的可见性。
PathView {
    anchors.fill: parent

    delegate: flipCardDelegate
    model: 100

    path: Path {
        startX: root.width/2
        startY: 0

        PathAttribute { name: "itemZ"; value: 0 }
        PathAttribute { name: "itemAngle"; value: -90.0; }
        PathAttribute { name: "itemScale"; value: 0.5; }
        PathLine { x: root.width/2; y: root.height*0.4; }
        PathPercent { value: 0.48; }
        PathLine { x: root.width/2; y: root.height*0.5; }
        PathAttribute { name: "itemAngle"; value: 0.0; }
        PathAttribute { name: "itemScale"; value: 1.0; }
        PathAttribute { name: "itemZ"; value: 100 }
        PathLine { x: root.width/2; y: root.height*0.6; }
        PathPercent { value: 0.52; }
        PathLine { x: root.width/2; y: root.height; }
        PathAttribute { name: "itemAngle"; value: 90.0; }
        PathAttribute { name: "itemScale"; value: 0.5; }
        PathAttribute { name: "itemZ"; value: 0 }
    }

    pathItemCount: 16

    preferredHighlightBegin: 0.5
    preferredHighlightEnd: 0.5
}以下例子中的委托,利用了PathAttribute的关联属性itemZ, itemAngle 和 itemScale。要注意,委托中的关联属性在wrapper中可以直接使用。如此一来,自定义的rotX属性可以在Rotation元素中访问相应的关联属性了。
另一个PathView特有的值得注意的细节是关联属性PathView.onPath的用法。通常将可见性绑定到PathView.onPath,因为这样可以使PathView缓存不可见元素。这此不可见元素不能通过剪切来处理,因为PathView的项目委托比ListView或GridView视图里的项目委托更频繁被替换。
Component {
    id: flipCardDelegate

    BlueBox {
        id: wrapper

        width: 64
        height: 64
        antialiasing: true

        gradient: Gradient {
            GradientStop { position: 0.0; color: "#2ed5fa" }
            GradientStop { position: 1.0; color: "#2467ec" }
        }


        visible: PathView.onPath

        scale: PathView.itemScale
        z: PathView.itemZ

        property variant rotX: PathView.itemAngle
        transform: Rotation {
            axis { x: 1; y: 0; z: 0 }
            angle: wrapper.rotX;
            origin { x: 32; y: 32; }
        }
        text: index
    }
}当在PathView里进行图形或其它复杂元素的过渡变换时,一个常被用到的性能优化技术是,将Image元素的smooth属性绑定到关联属性PathView.view.moving,这意味着图像在移动时不那么漂亮,但到停止过程会平滑过滤。当视图处于运动状态时,将处理能力花费在平滑缩放上是没有意义的,因为用户无法看到这一点。
当使用 PathView 以编程方式更改 currentIndex 时,你或许想控制移动的路径方向。可以使用movementDirection来实现。可以被设置为PathView.Shortest,这也是默认值。这意味着移动可以是任一方向,具体取决于哪种方式最接近目标值。可以通过将movementDirection设置为 PathView.Negative 或 PathView.Positive 来限制方向。
表格模型
目前为止所涉及的视图只是用不同方式呈现一维数组。即便是网格视图GridView也是由模型提供一维的数据列表。对于二维表格数据需要使用TableView表格视图。
TableView与其它视图很相似,都是配合一个模型和委托来形成网格。如果给定一个面向列表的模型,仅展示一列数据,这就跟ListView列表视图很相似。但它也能展示显式定义行与列的二维模型。
下例中,我们使用从 C++ 生成的模型来构建一个TableView表格视图。目前,还不能直接从QML创建表格数据,但在‘Qt 和 C++ ’ 一章将会讲到。例子运行效果如下。
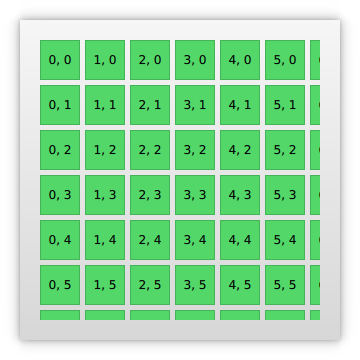
下面的代码里,我们创建了TableView并设置了rowSpacing和columnSpacing来控制横向与竖向之间的委托间隙。其它的属性设置与其它视图用法相同。
TableView {
    id: view
    anchors.fill: parent
    anchors.margins: 20

    rowSpacing: 5
    columnSpacing: 5

    clip: true

    model: tableModel

    delegate: cellDelegate
}委托自身也可以通过implicitWidth和implicitHeight隐式地设置尺寸。以下代码就是这么做的。实际数据内容,是由模型的display返回的。
Component {
    id: cellDelegate

    GreenBox {
        implicitHeight: 40
        implicitWidth: 40

        Text {
            anchors.centerIn: parent
            text: display
        }
    }
}
可能根据模型数据来实现委托的不同尺寸,如下:
GreenBox {
    implicitHeight: (1+row)*10
    // ...
}
注意,宽和高必须大于0。
当在委托中实现隐式尺寸时,每行中的最高委托和每列中最宽的委托决定了视图的尺寸。 如果视图中项目的宽度取决于行,或者高度取决于列,这会产生有趣的现象。这是因为并非所有委托都始终被实例化,因此列的宽度可能会随着用户滚动表格而改变。
为了避免使用隐式委托大小指定列宽和行高的问题,您可以提供计算这些大小的函数。这是使用 columnWidthProvider 和 rowHeightProvider 实现的。这些函数分别返回宽度和行的大小,如下所示:
TableView {
    columnWidthProvider: function (column) { return 10*(column+1); }
    // ...
}
如果需要动态更改列宽或行高,您必须通过调用 forceLayout 方法通知视图。这将使视图重新计算所有单元格的大小和位置。
XML获取模型
由于XML是一种通用数据格式,QML提供了XmlListModel元素从XML中提取模型数据。这个元素可以从本地或远程获取XML数据并使用XPath表达式来处理数据。
下例演示了从RSS流获取图象。source属性指向一个远程HTTP地址,数据被自动下载下来。
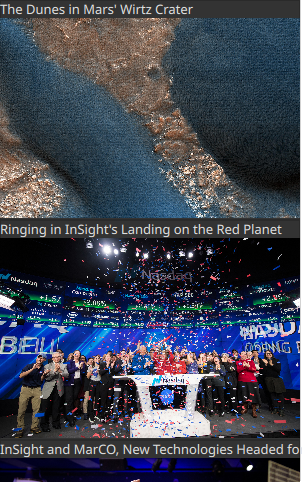
下载数据后,将其处理为模型项和其它角色。XmlListModel 的query属性是一个 XPath,表示用于创建模型项的基本查询。本例中,路径是/rss/channel/item,因此,对于每个项目标签,在频道标签内,在 RSS 标签内,都会创建一个模型项目。
对于每个模型项,都会提取多个角色。这些由 XmlListModelRole 元素表示。每个角色都有一个名称,委托可以通过附加属性访问该名称。每个此类属性的实际值是通过每个角色的 elementName 和(可选)attributeName 属性确定的。例如,title 属性对应于 title XML 元素,返回 <title> 和 </title> 标记之间的内容。
imageSource属性提取了tag的属性值,而不是tag标记对之间的内容。在这种情况下,enclosure的url属性被取为字符串,imageSource属性可以直接用于Image元素的source,可以从给定的URL里加载图片。
import QtQuick 6.2
import QtQml.XmlListModel
import "../common"

Background {
    width: 300
    height: 480

    Component {
        id: imageDelegate

        Box {
            width: listView.width
            height: 220
            color: '#333'

            Column {
                Text {
                    text: title
                    color: '#e0e0e0'
                }
                Image {
                    width: listView.width
                    height: 200
                    fillMode: Image.PreserveAspectCrop
                    source: imageSource
                }
            }
        }
    }

    XmlListModel {
        id: imageModel

        source: "https://www.nasa.gov/rss/dyn/image_of_the_day.rss"
        query: "/rss/channel/item"

        XmlListModelRole { name: "title"; elementName: "title" }
        XmlListModelRole { name: "imageSource"; elementName: "enclosure"; attributeName: "url"; }
    }

    ListView {
        id: listView
        anchors.fill: parent
        model: imageModel
        delegate: imageDelegate
    }
}
分段列表
有时,列表中的数据可以分为多个部分。它可以像按字母划分联系人列表或按专辑划分音乐曲目一样简单。可以将ListView单一的列表分成目录,以提供更好的体验。
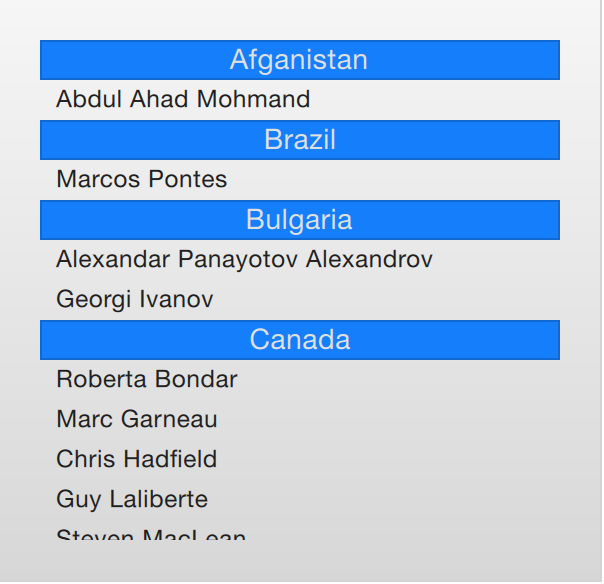
要使用分段,必须设置section.property和section.criteria。section.property定义使用哪个属性将内容分段。这里,很重要的是将模型排序,以便在每段里都是连续的元素,否则,相同属性名的元素可能出现在多个不同位置。
section.criteria可以被设置为ViewSection.FullString或ViewSection.FirstCharacter。前者是默认值,用于有清晰分段的模型,比如,音乐专辑曲目。后者使用属性名的第一个字母,这意味着所有属性都可以被用于分段条件。常见的例子是使用电话薄联系人的姓,作为分段条件。
当分段被定义后,就可以从每个项目的关联属性ListView.section, ListView.previousSection 和 ListView.nextSection来访问分段。使用这些属性,可以检测到每段的第一个和最后一个项目,并执行相应操作。
可以给ListView的 section.delegate属性指定一个委托组件。这会在一段的所有项目前创建一个分段头委托。这个委托组件可以使用关联属性section来访问当前段的名字。
以下例子用国籍来划分宇航员列表,以演示分段的概念。国籍nation被用于分段属性section.property。分段委托section.delegate,sectionDelegate为每个段显示一个段头,显示国籍名。每个段内,使用spaceManDelegate来显示宇航员的名字。
import QtQuick 6.2
import "../common"

Background {
    width: 300
    height: 290

    ListView {
        anchors.fill: parent
        anchors.margins: 20

        clip: true

        model: spaceMen

        delegate: spaceManDelegate

        section.property: "nation"
        section.delegate: sectionDelegate
    }

    Component {
        id: spaceManDelegate

        Item {
            width: ListView.view.width
            height: 20
            Text {
                anchors.left: parent.left
                anchors.verticalCenter: parent.verticalCenter
                anchors.leftMargin: 8
                font.pixelSize: 12
                text: name
                color: '#1f1f1f'
            }
        }
    }

    Component {
        id: sectionDelegate

        BlueBox {
            width: ListView.view.width
            height: 20
            text: section
            fontColor: '#e0e0e0'
        }
    }


    ListModel {
        id: spaceMen

        ListElement { name: "Abdul Ahad Mohmand"; nation: "Afganistan"; }
        ListElement { name: "Marcos Pontes"; nation: "Brazil"; }
        ListElement { name: "Alexandar Panayotov Alexandrov"; nation: "Bulgaria"; }
        ListElement { name: "Georgi Ivanov"; nation: "Bulgaria"; }
        ListElement { name: "Roberta Bondar"; nation: "Canada"; }
        ListElement { name: "Marc Garneau"; nation: "Canada"; }
        ListElement { name: "Chris Hadfield"; nation: "Canada"; }
        ListElement { name: "Guy Laliberte"; nation: "Canada"; }
        ListElement { name: "Steven MacLean"; nation: "Canada"; }
        ListElement { name: "Julie Payette"; nation: "Canada"; }
        ListElement { name: "Robert Thirsk"; nation: "Canada"; }
        ListElement { name: "Bjarni Tryggvason"; nation: "Canada"; }
        ListElement { name: "Dafydd Williams"; nation: "Canada"; }
    }
}
对象模型
有些时候需要使用列表视图来显示包含大量不同项目的列表数据。这可以使用动态QML和Loader来解决,但另一个方法是使用QtQml.Models模块的ObjectModel。对象模型不同于其它模型,它允许在模型旁放置实际的可视元素。这样视图就不需要委托了。
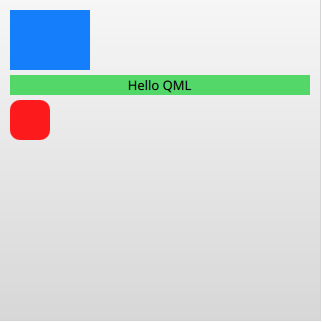
下面的例子中,在ObjectModel里放置了3个矩形Rectangle元素。一个矩形里放了一个Text子元素,而最后一个矩形有圆角。这将导致使用类似于 ListModel 的表样式模型。它还会导致模型中的文本元素text为空。
import QtQuick 6.2
import QtQml.Models

Rectangle {
    width: 320
    height: 320

    gradient: Gradient {
        GradientStop { position: 0.0; color: "#f6f6f6" }
        GradientStop { position: 1.0; color: "#d7d7d7" }
    }

    ObjectModel {
        id: itemModel

        Rectangle { height: 60; width: 80; color: "#157efb" }
        Rectangle { height: 20; width: 300; color: "#53d769"
            Text { anchors.centerIn: parent; color: "black"; text: "Hello QML" }
        }
        Rectangle { height: 40; width: 40; radius: 10; color: "#fc1a1c" }
    }

    ListView {
        anchors.fill: parent
        anchors.margins: 10
        spacing: 5

        model: itemModel
    }
}另外,可以通过get, insert, move, remove和 clear来动态填充ObjectModel。这样一来,模型数据可以从各种渠道动态创建,且仍然在易于在单个视图中呈现。
动作模型
ListElement类型支持Javascript脚本函数绑定到属性。这意味着你可以将函数放在模型中。这在构建带有动作和类似结构的菜单时非常有用。
下例通过一个以不同的方式欢迎你的城市数据模型证明了这一点。actionModel是一个有四个城市的模型,hello被绑定到了函数上。每个函数都有一个value参数,但实际上可以有多个参数。
在actionDelegate委托里,MouseArea把hello当成普通函数那样调用,这实际上导致对模型的hello属性的调用。
import QtQuick 6.2

Rectangle {
    width: 120
    height: 300

    gradient: Gradient {
        GradientStop { position: 0.0; color: "#f6f6f6" }
        GradientStop { position: 1.0; color: "#d7d7d7" }
    }

    ListModel {
        id: actionModel

        ListElement {
            name: "Copenhagen"
            hello: function(value) { console.log(value + ": You clicked Copenhagen!"); }
        }
        ListElement {
            name: "Helsinki"
            hello: function(value) { console.log(value + ": Helsinki here!"); }
        }
        ListElement {
            name: "Oslo"
            hello: function(value) { console.log(value + ": Hei Hei fra Oslo!"); }
        }
        ListElement {
            name: "Stockholm"
            hello: function(value) { console.log(value + ": Stockholm calling!"); }
        }
    }

    ListView {
        anchors.fill: parent
        anchors.margins: 20

        clip: true

        model: actionModel

        delegate: actionDelegate
        spacing: 5

        focus: true
    }

    Component {
        id: actionDelegate

        Rectangle {
            width: ListView.view.width
            height: 40

            color: "#157efb"

            Text {
                anchors.centerIn: parent
                font.pixelSize: 10
                text: name
            }

            MouseArea {
                anchors.fill: parent
                onClicked: hello(index);
            }
        }
    }
}
性能调试
模型视图的感知性能在很大程度上取决于准备新委托所需的时间。比如,当向下滚动列表视图时,视图外的委托从底部被添加进来,当从顶部离开视图时被移除。当clip被设置为false时很明显能看出来。如果委托耗费太多时间来初始化,当用户滚动过快时,卡顿体验会更明显。
要解决此问题,可以调整滚动视图侧面的边距(以像素为单位)。这是使用cacheBuffer属性完成的。上述情况,竖向滚动,它将控制ListView视图的预备委托包含上下多少象素。结合异步加载Image元素,可以在视图显示前,为图象加载提供时间。
更多的委托会占用更多的内存,影响流畅体验,也会耗用更多时间来初始化每个委托。这并不能解决复杂委托的问题。每当一个委托被初始化时,都会编译和计算。这会耗费时间,而且如果耗用太多时间,会影响滚动的体验。委托中有太多元素也将降低滚动性能。移动很多元素更加耗费性能。
修复后面两个问题,推荐使用Loader元素。这些可用于在需要时实例化其他元素。例如,扩展委托可以使用 Loader 将其详细视图的实例化推迟到需要时。同样的原因,最好在每个委托中保留最小javaScript脚本数量。最好让他们调用驻留在每个委托之外的复杂 JavaScript 片段。这减少了每次创建委托时编译 JavaScript 所花费的时间。
注意
请注意,使用Loader推迟初始化就是这样做的 - 它推迟了性能问题。这意味着滚动性能会有所提高,但实际内容仍然需要耗费时间才能出现。
总结
本章,我们深入了解了模型、视图和委托。对模型中的每个数据,视图初始化一个委托来呈现数据。这将数据与展示逻辑分离。
模型可以是单个数值,它们会给委托的index属性提供值。如果模型是JavaScript数组,则modelData变量就代表了数据当前索引所代表的数据,index代表索引。对于更复杂的场景,每个数据项有多个值时,更好的解决方案是使用ListElement数据项来填充ListModel 。
对于静态模型,可以用Repeater作为视图。很容易结合定位器如Row, Column, Grid 或 Flow来创建用户界面。对于动态或大数据模型,更适合使用ListView、GridView、TableView视图。它们会根据需要动态创建委托实例,从而减少场景中同时存在的元素数量。
GridView 和 TableView之间的不同在于表视图需要具有多列数据的表类型模型,而网格视图则是将列表类型的模型显示在网格上。
视图中的委托可以是从模型数据中绑定属性的静态项目,也可以是动态的,其状态取决于项目是否被选中。使用视图的onAdd和onRemove信号,甚至可以实现其出现与消失时的动画效果。


 浙公网安备 33010602011771号