.NET桌面程序混合开发之二:在原生WinFrom程序中使用WebView2
.NET桌面程序混合开发之二:在原生WinFrom程序中使用WebView2
本文将介绍如何在WinForms中嵌入WebView2,并讲到WebView2的主要特征。点击了解更多WebView2的API。
1. 准备
- Visual Studio 2017 及以上版本
- WebView2运行时,或者安装Beta,Dev,Canary任一版本的 Microsoft Edge 预览版。受支持的操作系统有:Windows 11\10\8.1\7
- 推荐使用82.0.488.0以上的Canary(日更)版本。
2. 创建单窗体应用
创那一个只包括主窗体的桌面项目:
- 打开Visual Studio
- 依次点 文件->新建->工程
- 点 创建新的工程

- 选择 C# Windows Forms App (.NET Framework) ,然后点 Next

- 输入 工程名称 和 位置 ,在 Framework下拉列表中,选择 ** .NET Framework 4.7.2** 或以上版本

- 点 创建
3. 安装 WebView2 SDK
使用 NuGet 为工程添加 WebView2 SDK
- 在 Solution Explorer 右键点击工程名,在弹出菜单中选择 Manage NuGet Packages

- 点 Browse
- 选择 Include prerelease(包含预览版)
- 在查找框中,输入WebView2,在结果中选择 Microsoft.Web.WebView2

- 选择默认版本并点 Install

- 点 Ok
- 点 File > Save All (Ctrl+Shift+S) ,保存工程
- 点 F5 编译并运行后,程序的运行结果是一个空窗体

4. 创建一个WebView
在你的应用中添加一个WebView2控件。
- 点 Project > Add Form (Windows Forms)
- 在 Add New Item 窗口中,依次点 Visual C# Items > Web > Windows Forms > Form (Windows Forms) ,然后点 Add
- 点 View > Toolbox
- 在 Toolbox ,点开 WebView2 Windows Forms Control
注意:如果你用的是Visual Studio 2017,在Toolbox中默认是找不到WebView2控件的。若想让其显示,则需要依次选 Tools > Options > General 并且将 Automatically Populate Toolbox 设置为 true- 把 WebView2 控件拖到 Form 窗体上。

- 在 Properties 工具框中,将 Name 属性设置为 webView。可以使用 分类- 按字母排序 来找到需要的属性

- WebView2的 Source 属性用于初始化页面的URI。将其值设置为:https://www.microsoft.com
- 点 File > Save All (Ctrl+Shift+S) 保存工程
- F5 编译运行工程
- WebView2 控件中显示如下:

注意:如果你的是高分辨率显示器,你需要为窗体应用设置置高分辨率支持
5. 添加控件及处理窗体resize事件
从Toolbox中添加更多控件,并处理窗体的resize事件。
- 点 View > Toolbox
- 在 Toolbox 点 Common Controls
- 把 TextBox 拖动到窗体上
- 在 Properties属性设置窗口,将Name 属性设置为 addressBar
- 从 Toolbox 中拖动 Button 控件到窗体上
- 在Properties属性设置窗口,将Name 属性设置为 goButton
- 将Text属性设置为 Go!
- 调整Button大小以适应文字
- 将文本框放在Button左侧,并与按钮文字对齐如下

- 重置窗体大小

- 点 View > Code 打开窗体代码文件。编写
Form_Resize函数处理窗体大小改变时,控件在恰当的位置。 - 删除如下代码
public Form1()
{
    InitializeComponent();
}- 拷贝如下代码到刚删除的代码的相同位置
public Form1()
{
    InitializeComponent();
    this.Resize += new System.EventHandler(this.Form_Resize);
}

private void Form_Resize(object sender, EventArgs e)
{
    webView.Size = this.ClientSize - new System.Drawing.Size(webView.Location);
    goButton.Left = this.ClientSize.Width - goButton.Width;
    addressBar.Width = goButton.Left - addressBar.Left;
}- 点**File > Save All (Ctrl+Shift+S) **保存工程
- F5编译运行,效果如下:

6. 地址导航
在应用中添加地址栏,让用户可以通过改变地址栏来改变WebView2展示的内容。
- 在
Form1.cs中添加CoreWebView2命名空间,代码如下:
using Microsoft.Web.WebView2.Core;- 在窗体设计界面,双击Go按钮,以在
Form1.cs中添加goButton_Click事件响应方法,将以下代码拷到方法中:
private void goButton_Click(object sender, EventArgs e)
{
    if (webView != null && webView.CoreWebView2 != null)
    {
        webView.CoreWebView2.Navigate(addressBar.Text);
    }
}这样,```goButton_Click```方法就实现了当用户在地址栏输入地址并点击Go按钮时,WebView2就将显示址址栏中的地址所代表的页面内容。- 点 **File > Save All (Ctrl+Shift+S) **保存工程
- F5编译并运行
- 在地址栏中输入你想访问的地址关点Go,验证下窗口上显示的是不是你想要的内容吧。
注意:在地址栏中应输入完整的URL,如果址址不是以http://或https://开头的话,会遇到ArgumentException异常
7. Navigation(导航) 事件
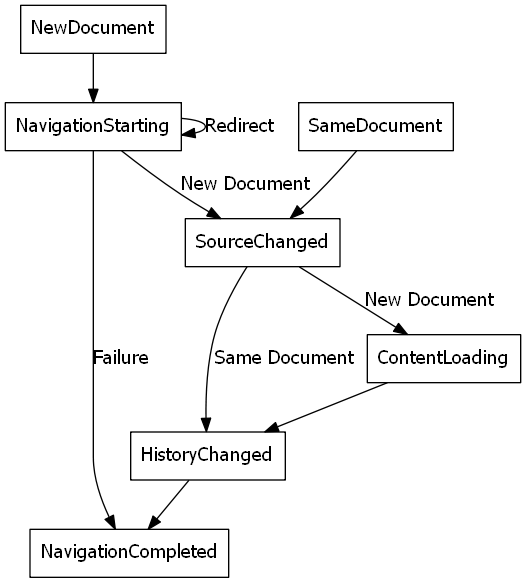
在页面跳转过程中,WebView2控件会发起一系列事件。而嵌入WebView2的应用会监听到以下事件:
- NavigationStarting
- SourceChanged
- ContentLoading
- HistoryChanged
- NavigationCompleted
了解更多关于WebView2的导航事件

当一个错误发生时,会引发以下事件,可能取决于对错误网页的导航 - SourceChanged
- ContentLoading
- HistoryChanged
以下操作,将为NavigationStarting委托注册一个处理方法,处理当地址不是Https时,取消页面请求。通过此例来展示如何使用这些事件。 - 在
Form1.cs中,做如下代码更改,添加一个EnsureHttps方法
public Form1()
{
    InitializeComponent();
    this.Resize += new System.EventHandler(this.Form_Resize);

    webView.NavigationStarting += EnsureHttps;
}

void EnsureHttps(object sender, CoreWebView2NavigationStartingEventArgs args)
{
    String uri = args.Uri;
    if (!uri.StartsWith("https://"))
    {
        args.Cancel = true;
    }
}在构造函数中,EnsureHttps被注册为WebView2控件的NavigationStarting 的事件处理方法。
- File > Save All (Ctrl+Shift+S) 保存工程
- F5 编译运行
- 如果访问HTTPS会打开正常的页面,如果是HTTP则不会正常访问
8. 脚本
主程序可以在运行时向WebView2注入JavaScript脚本。可以让WebView2运行任意的JavaScript,或者添加初始化脚本。注入的JavaScript适用于所有新的顶层文档和任何子框架,直到JavaScript被删除。注入的 JavaScript 以特定的时间运行。
- 在创建全局对象后运行注入的JavaScript。
- 在运行HTML文档中包含的任何其他脚本之前运行注入的JavaScript。
1.例如,在用户导航到非 HTTPS 站点时,添加发送警报的脚本。修改EnsureHttps函数,使用ExecuteScriptAsync方法将脚本注入到网页内容中,如下图所示
void EnsureHttps(object sender, CoreWebView2NavigationStartingEventArgs args)
{
    String uri = args.Uri;
    if (!uri.StartsWith("https://"))
    {
        webView.CoreWebView2.ExecuteScriptAsync($"alert('{uri} is not safe, try an https link')");
        args.Cancel = true;
    }
}- File > Save All (Ctrl+Shift+S) 保存工程
- F5 编译运行
- 应用在访问非 HTTPS 的网站时显示警报

9. 宿主程序与页面之间的通讯
宿主程序和页面内容可以使用 postMessage 进行通信如下:
- WebView2 控件中的 Web 内容可以使用
window.chrome.webview.postMessage向宿主程序发布消息。宿主程序使用任何注册到WebMessageReceived委托方法处理消息。 - 主程序使用
CoreWebView2.PostWebMessageAsString或CoreWebView2.PostWebMessageAsJSON将消息发布到 WebView2 控件中的 Web 内容。这些消息由添加到window.chrome.webview.addEventListener的处理程序捕获。
通信机制使用原生功能将消息从 Web 内容传递到宿主程序。
在项目中,当 WebView2 控件(通过页面链接)导航到一个页面时,它会在地址栏中显示新网页的 URL 并弹出新网页的 URL。
- 在
Form1.cs文件中,更新构造函数并创建InitializeAsync函数,代码片段如下:
public Form1()
{
   InitializeComponent();
   this.Resize += new System.EventHandler(this.Form_Resize);
   webView.NavigationStarting += EnsureHttps;
   InitializeAsync();
}

async void InitializeAsync()
{
   await webView.EnsureCoreWebView2Async(null);
}在InitializeAsync 函数里,要用EnsureCoreWebView2Async awaits 调用方式,因为CoreWebView2 的初始化是异步的。
- CoreWebView2 初始化后,注册一个事件处理方法来响应
WebMessageReceived事件。在Form1.cs文件中,使用以下代码替换InitializeAsync并添加UpdateAddressBar。
async void InitializeAsync()
{
    await webView.EnsureCoreWebView2Async(null);
    webView.CoreWebView2.WebMessageReceived += UpdateAddressBar;
}

void UpdateAddressBar(object sender, CoreWebView2WebMessageReceivedEventArgs args)
{
    String uri = args.TryGetWebMessageAsString();
    addressBar.Text = uri;
    webView.CoreWebView2.PostWebMessageAsString(uri);
}-
为了让WebView2发送和响应web消息,
CoreWebView2初始化后,宿主程序在web内容中注入一个脚本:
a. 使用postMessage将 URL 发送到宿主程序。
b. 注册一个事件处理程序以打印从宿主程序发送的消息。 -
在
Form1.cs文件中,用以下代码段修改InitializeAsync:
async void InitializeAsync()
{
    await webView.EnsureCoreWebView2Async(null);
    webView.CoreWebView2.WebMessageReceived += UpdateAddressBar;

    await webView.CoreWebView2.AddScriptToExecuteOnDocumentCreatedAsync("window.chrome.webview.postMessage(window.document.URL);");
    await webView.CoreWebView2.AddScriptToExecuteOnDocumentCreatedAsync("window.chrome.webview.addEventListener(\'message\', event => alert(event.data));");
}- File > Save All (Ctrl+Shift+S) 保存工程
- F5 编译运行
- 当通过页面链接访问到新的URI时,WebView2 控件便会将新页面地址显示到地址栏。
至此,一个 WebView2 应用就完成了。


【推荐】国内首个AI IDE,深度理解中文开发场景,立即下载体验Trae
【推荐】编程新体验,更懂你的AI,立即体验豆包MarsCode编程助手
【推荐】抖音旗下AI助手豆包,你的智能百科全书,全免费不限次数
【推荐】轻量又高性能的 SSH 工具 IShell:AI 加持,快人一步
· DeepSeek 开源周回顾「GitHub 热点速览」
· 物流快递公司核心技术能力-地址解析分单基础技术分享
· .NET 10首个预览版发布:重大改进与新特性概览!
· AI与.NET技术实操系列(二):开始使用ML.NET
· 单线程的Redis速度为什么快?