
虚拟机磁盘扩容
1. 前言
现在做开发时,虚拟机的使用很多,经常遇到这样的问题:当初创建虚拟机的时候开辟的磁盘空间比较小,随着虚拟机安装的软件越来越多所占的空间也越来越大,导致虚拟机的磁盘空间越来越少,甚至不够用。此时我们便可以对虚拟机的磁盘大小进行扩容,简单的说就是为虚拟机再添加一个磁盘。
2. 虚拟机扩容步骤
Linux系统是通过fdisk命令来对磁盘进行操作的。
2.1 当前虚拟机磁盘使用情况
# fdisk -l
Disk /dev/sda: 100 GiB, 107374182400 bytes, 209715200 sectors  第一块磁盘信息
Units: sectors of 1 * 512 = 512 bytes
Sector size (logical/physical): 512 bytes / 512 bytes
I/O size (minimum/optimal): 512 bytes / 512 bytes
Disklabel type: dos
Disk identifier: 0xb7a127db

Device     Boot     Start       End   Sectors  Size Id Type    第一块磁盘分为三个扇区
/dev/sda1  *         2048 207620095 207618048   99G 83 Linux
/dev/sda2       207622142 209713151   2091010 1021M  5 Extended
/dev/sda5       207622144 209713151   2091008 1021M 82 Linux swap / Solaris


Disk /dev/sdb: 300 GiB, 322122547200 bytes, 629145600 sectors  第二块磁盘信息
Units: sectors of 1 * 512 = 512 bytes
Sector size (logical/physical): 512 bytes / 512 bytes
I/O size (minimum/optimal): 512 bytes / 512 bytes
Disklabel type: dos
Disk identifier: 0x9b2ba102

Device     Boot Start       End   Sectors  Size Id Type		第二块磁盘只有一个扇区
/dev/sdb1        2048 629145599 629143552  300G 83 Linux
#
从上述信息可以看出当前的虚拟机包含两个磁盘,一个为100G,另一个为300G,且每个磁盘分为不同数目的扇区(单元)。这个信息我们可以在VMware上的“虚拟机设置”中看到,这里的两个磁盘就是我们在虚拟机里看到的:“硬盘”="/dev/sda" , “硬盘2”=“/dev/sdb”
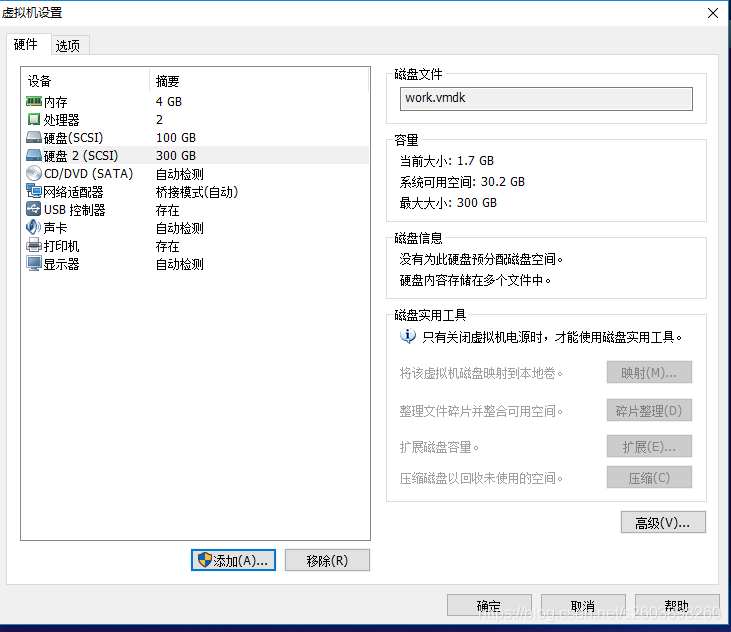
但是没有空闲的分区可以使用,因此首先需要在物理机系统上给虚拟机分配一定大小的磁盘空间。也就是在上图中再添加一个“磁盘3”,这样虚拟机中变出现了一个尚未使用的磁盘,我们对新分配的磁盘进行操作。
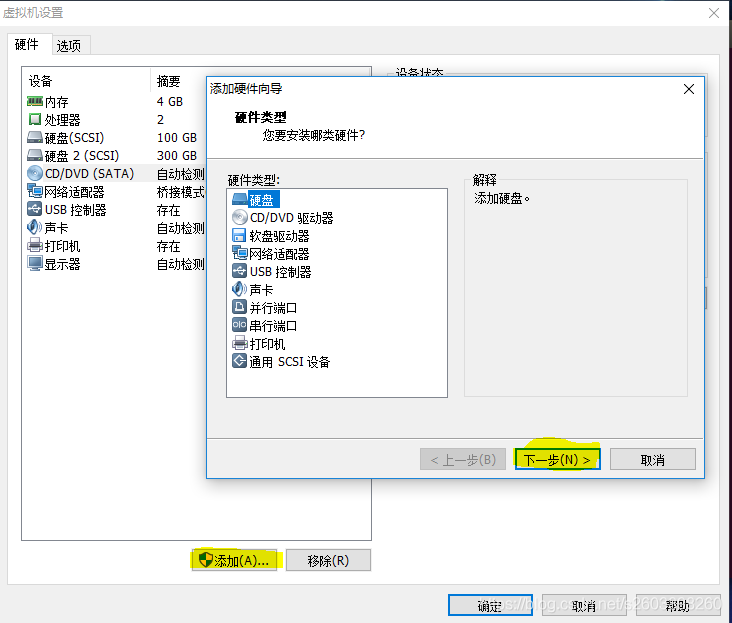
2.2 为虚拟机分配磁盘空间
在物理机上(实体机,主机)的VMware软件上添加一个新的磁盘:一路’next’即可
创建完毕后,可以在页面上看到新建的磁盘信息(我创建的磁盘大小为20G):
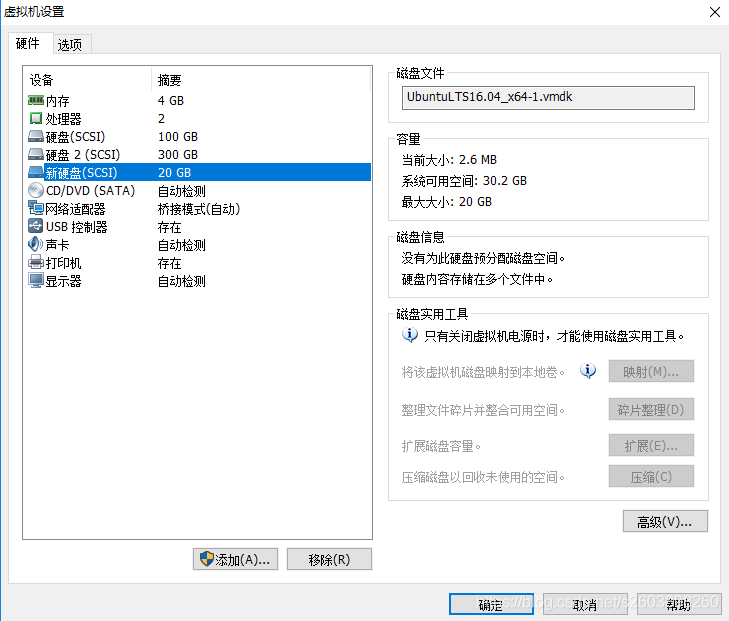
- 磁盘已经创建完毕,后续步骤都是在虚拟机中进行操作
2.3 当前虚拟机磁盘使用情况
经过上述步骤在windows物理机上创建了一个新磁盘,为了对该磁盘进行操作,首先需要查看最新的磁盘分配使用情况:
# fdisk -l
Disk /dev/sda: 100 GiB, 107374182400 bytes, 209715200 sectors  第一块磁盘
Units: sectors of 1 * 512 = 512 bytes
Sector size (logical/physical): 512 bytes / 512 bytes
I/O size (minimum/optimal): 512 bytes / 512 bytes
Disklabel type: dos
Disk identifier: 0xb7a127db

Device     Boot     Start       End   Sectors  Size Id Type
/dev/sda1  *         2048 207620095 207618048   99G 83 Linux
/dev/sda2       207622142 209713151   2091010 1021M  5 Extended
/dev/sda5       207622144 209713151   2091008 1021M 82 Linux swap / Solaris


Disk /dev/sdb: 300 GiB, 322122547200 bytes, 629145600 sectors  第二块磁盘
Units: sectors of 1 * 512 = 512 bytes
Sector size (logical/physical): 512 bytes / 512 bytes
I/O size (minimum/optimal): 512 bytes / 512 bytes
Disklabel type: dos
Disk identifier: 0x9b2ba102

Device     Boot Start       End   Sectors  Size Id Type
/dev/sdb1        2048 629145599 629143552  300G 83 Linux

Disk /dev/sdc: 20 GiB, 21474836480 bytes, 41943040 sectors   第三块磁盘
Units: sectors of 1 * 512 = 512 bytes
Sector size (logical/physical): 512 bytes / 512 bytes
I/O size (minimum/optimal): 512 bytes / 512 bytes
#
相比于2.1时的查看结果,多了一块磁盘**/dev/sdc**,大小为20G, 而这块磁盘就是我们在2.2时新分配的磁盘。但是还无法使用,需要对它进行后续操作才可以使用。
- 后续操作的都是新分配的磁盘,我这里的叫做/dev/sdc, 有的虚拟机可能只有最初的一块磁盘,那么新创建的可能就是/dev/sdb; 而如果已经有三个磁盘又新加一个磁盘,那么可能就是/dev/sdd。也就是说这个只是磁盘名,根据自己虚拟机查询结果来确定后续操作的磁盘名。
2.3 创建分区
磁盘/dev/sdc已经存在,但还无法使用,我们使用fdisk命令来在/dev/sdc上创建分区:
虽然看上去信息量比较多,其实只需要输入几个字母即可:‘m’、‘p’、‘n’、‘p’、‘1’、‘w’。而且有几个命令是有默认值的,如果还不需要查看帮助信息,那么只需要输入【‘n’ : 创建分区】, 【‘w’: 写入磁盘并推出】两个字母即可,其余使用回车键系统使用默认值来进行分区的创建
# fdisk /dev/sdc
Welcome to fdisk (util-linux 2.27.1).
Changes will remain in memory only, until you decide to write them.
Be careful before using the write command.
Device does not contain a recognized partition table.
Created a new DOS disklabel with disk identifier 0x5063a350.

Command (m for help): m     【m用来查看有哪些命令】
Help:
  DOS (MBR)
   a   toggle a bootable flag
   b   edit nested BSD disklabel
   c   toggle the dos compatibility flag
  Generic
   d   delete a partition
   F   list free unpartitioned space
   l   list known partition types
   n   add a new partition
   p   print the partition table
   t   change a partition type
   v   verify the partition table
   i   print information about a partition
  Misc
   m   print this menu
   u   change display/entry units
   x   extra functionality (experts only)
  Script
   I   load disk layout from sfdisk script file
   O   dump disk layout to sfdisk script file
  Save & Exit
   w   write table to disk and exit
   q   quit without saving changes
  Create a new label
   g   create a new empty GPT partition table
   G   create a new empty SGI (IRIX) partition table
   o   create a new empty DOS partition table
   s   create a new empty Sun partition table

Command (m for help): p    【查询当前磁盘分区情况】
Disk /dev/sdc: 20 GiB, 21474836480 bytes, 41943040 sectors
Units: sectors of 1 * 512 = 512 bytes
Sector size (logical/physical): 512 bytes / 512 bytes
I/O size (minimum/optimal): 512 bytes / 512 bytes
Disklabel type: dos
Disk identifier: 0x5063a350


Command (m for help): n    【创建一个新分区】
Partition type
   p   primary (0 primary, 0 extended, 4 free)
   e   extended (container for logical partitions)
Select (default p): p      【分区类型默认主分区】
Partition number (1-4, default 1): 1   【分区编号】
First sector (2048-41943039, default 2048):   【分区大小】
Last sector, +sectors or +size{K,M,G,T,P} (2048-41943039, default 41943039):

Created a new partition 1 of type 'Linux' and of size 20 GiB.

Command (m for help): w		【写入磁盘并推出】
The partition table has been altered.
Calling ioctl() to re-read partition table.
Syncing disks.

# 已经退出fdisk命令
2.4 查看分区是否创建成功
查看分区信息,依然使用命令fdisk:
# fdisk -l
Disk /dev/sda: 100 GiB, 107374182400 bytes, 209715200 sectors
Units: sectors of 1 * 512 = 512 bytes
Sector size (logical/physical): 512 bytes / 512 bytes
I/O size (minimum/optimal): 512 bytes / 512 bytes
Disklabel type: dos
Disk identifier: 0xb7a127db

Device     Boot     Start       End   Sectors  Size Id Type
/dev/sda1  *         2048 207620095 207618048   99G 83 Linux
/dev/sda2       207622142 209713151   2091010 1021M  5 Extended
/dev/sda5       207622144 209713151   2091008 1021M 82 Linux swap / Solaris


Disk /dev/sdb: 300 GiB, 322122547200 bytes, 629145600 sectors
Units: sectors of 1 * 512 = 512 bytes
Sector size (logical/physical): 512 bytes / 512 bytes
I/O size (minimum/optimal): 512 bytes / 512 bytes
Disklabel type: dos
Disk identifier: 0x9b2ba102

Device     Boot Start       End   Sectors  Size Id Type
/dev/sdb1        2048 629145599 629143552  300G 83 Linux


Disk /dev/sdc: 20 GiB, 21474836480 bytes, 41943040 sectors
Units: sectors of 1 * 512 = 512 bytes
Sector size (logical/physical): 512 bytes / 512 bytes
I/O size (minimum/optimal): 512 bytes / 512 bytes
Disklabel type: dos
Disk identifier: 0x5063a350

Device     Boot Start      End  Sectors Size Id Type
/dev/sdc1        2048 41943039 41940992  20G 83 Linux

#
从最后一行信息,可以看出已经/dev/sdc1已经创建完毕, 大小正好为20G。
2.5 格式化分区
创建完毕磁盘分区**/dev/sdc1后,依然不能立即使用该分区,需要使用mkfs来对分区/dev/sdc1**进行文件系统格式化:个人使用的为ext4文件系统
# mkfs.ext4 /dev/sdc1
mke2fs 1.42.13 (17-May-2015)
Creating filesystem with 5242624 4k blocks and 1310720 inodes
Filesystem UUID: 1cf52965-51df-451e-ae80-404cdf6a1568
Superblock backups stored on blocks:
	32768, 98304, 163840, 229376, 294912, 819200, 884736, 1605632, 2654208,
	4096000

Allocating group tables: done
Writing inode tables: done
Creating journal (32768 blocks): done
Writing superblocks and filesystem accounting information: done

#
2.6 挂载文件系统
分区格式化完毕后,便可以使用了,但使用时我们需要将该分区挂载到某一文件下(“一切皆文件”),这样我们可以将需要的文件等放到该目录下,这样也就实现了将文件放到新的磁盘上了。挂在命令如下:
# mkdir /sunzd
# mount /dev/sdc1 /sunzd
通过上述命令,便将磁盘/dev/sdc1挂载到/sunzd这个目录上。正常的做法是将上述挂在命令放到系统初始化脚本中,这样每次虚拟机启动后会自动挂在磁盘到指定目录。
以后对目录**/sunzd ** 的操作便是对磁盘**/dev/sdc1 ** 进行操作。
本人将挂载命令放在了**/etc/rc.local**脚本中:
root@book-virtual-machine:/home/book# cat /etc/rc.local
#!/bin/sh -e
#
# rc.local
#
# This script is executed at the end of each multiuser runlevel.
# Make sure that the script will "exit 0" on success or any other
# value on error.
#
# In order to enable or disable this script just change the execution
# bits.
#
# By default this script does nothing.
ifconfig ens33 192.168.1.54
mount /dev/sdc1 /home/sunzd/
exit 0
2.7 查看分区挂在情况
使用df命令可以对当前的磁盘挂在情况进行查看:
root@book-virtual-machine:/home/book# df -l
Filesystem     1K-blocks      Used Available Use% Mounted on
udev             1977632         0   1977632   0% /dev
tmpfs             401628      6380    395248   2% /run
/dev/sda1      102049120   7139108  89703180   8% /
tmpfs            2008124       216   2007908   1% /dev/shm
tmpfs               5120         4      5116   1% /run/lock
tmpfs            2008124         0   2008124   0% /sys/fs/cgroup
/dev/sdb1      309505024    951480 292808572   1% /work
vmhgfs-fuse    131853484 113761468  18092016  87% /mnt/hgfs
tmpfs             401628        68    401560   1% /run/user/1000
/dev/sdc1       20510332     44992  19400432   1% /home/sunzd
#

