

MyBatis学习存档(4)——进行CRUD操作
使用MyBatis进行数据库的CRUD操作有2种方式:一种如之前所说的接口+xml,而另一种是通过对接口上的方法加注解(@Select @Insert @Delete @Update)
但是通常情况下不建议使用注解进行操作,原因在于MyBatis最强大的特性在于其动态sql,若使用注解则无法使用动态sql
因此此处仅仅对注解进行简单的举例
一、注解


<?xml version="1.0" encoding="UTF-8" ?>
<!DOCTYPE mapper PUBLIC "-//mybatis.org//DTD Mapper 3.0//EN" "http://mybatis.org/dtd/mybatis-3-mapper.dtd" >
<mapper namespace="com.mapper.UsersMapper" >
  <resultMap id="BaseResultMap" type="com.pojo.Users" >
    <id column="id" property="id" jdbcType="INTEGER" />
    <result column="name" property="name" jdbcType="VARCHAR" />
    <result column="password" property="password" jdbcType="VARCHAR" />
  </resultMap>
  <sql id="Base_Column_List" >
    id, name, password
  </sql>
  <select id="selectByPrimaryKey" resultMap="BaseResultMap" parameterType="java.lang.Integer" >
    select
    <include refid="Base_Column_List" />
    from users
    where id = #{id,jdbcType=INTEGER}
  </select>
  <update id="updateByPrimaryKeySelective" parameterType="com.pojo.Users" >
    update users
    <set >
      <if test="name != null" >
        name = #{name,jdbcType=VARCHAR},
      </if>
      <if test="password != null" >
        password = #{password,jdbcType=VARCHAR},
      </if>
    </set>
    where id = #{id,jdbcType=INTEGER}
  </update>
  <update id="updateByPrimaryKey" parameterType="com.pojo.Users" >
    update users
    set name = #{name,jdbcType=VARCHAR},
      password = #{password,jdbcType=VARCHAR}
    where id = #{id,jdbcType=INTEGER}
  </update>
</mapper>
package com.mapper;

import org.apache.ibatis.annotations.Select;

import com.pojo.Users;

public interface UsersMapper {
    @Select("select id, name, password from users where id = #{id}")
    Users selectByPrimaryKey(Integer id);

    int updateByPrimaryKeySelective(Users record);
}
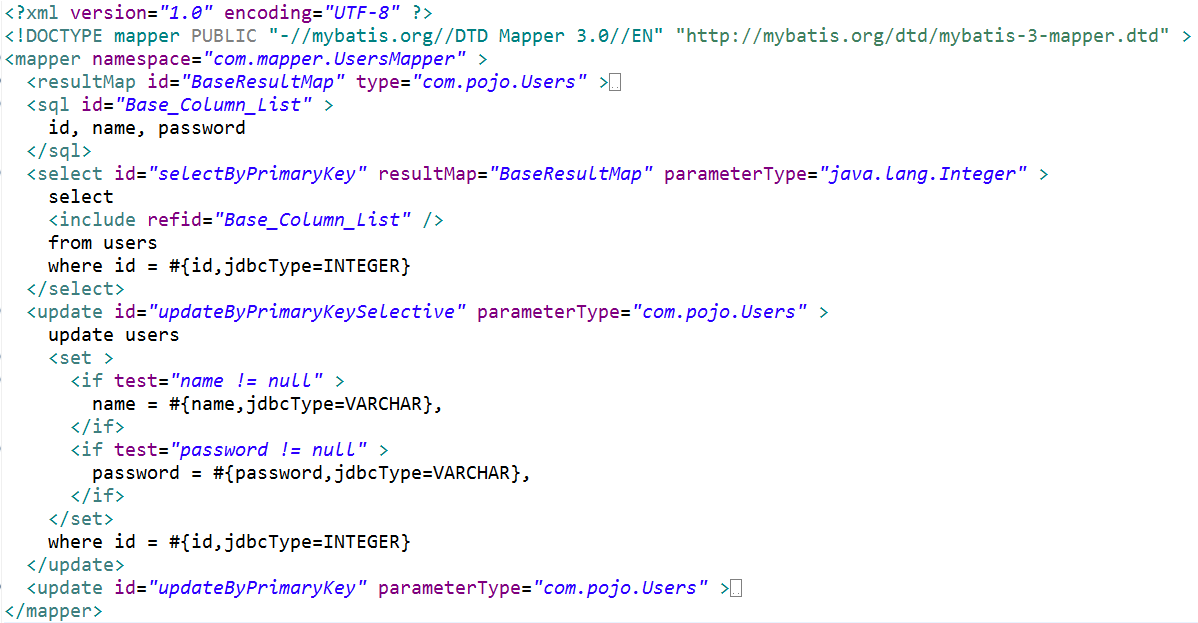
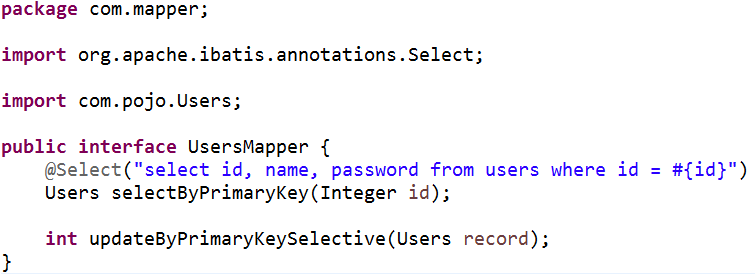
依旧以之前反向生成的UsersMapper为例,为显得简洁些,仅保留了2个方法:selectByPrimaryKey和updateByPrimaryKeySelective
打上注解的方法selectByPrimaryKey,其注解效果和xml中的一致,但updateByPrimaryKeySelective方法却无法打上注解,原因无它,该方法使用了动态sql,而注解中无法使用动态sql
二、接口+xml
为了之后好举例,此处重新创建了一个名为student的表,并反向生成了映射文件和实体类,并进行了些许改动
2.1 创建student表并反向生成映射文件和实体类
sql语句如下:
CREATE TABLE student(id INT PRIMARY KEY identity(1,1), name VARCHAR(20), class VARCHAR(20));
反向生成步骤不再多说
2.2 更改映射文件和实体类
反向生成后会发现实体类Student报错了,点开发现在class处报错——class是java的关键字
所以我们应当将class改成clazz,这样就不会报错了
仅仅更改实体类是不够的,还需将映射xml中对应的字段进行修改
最后对接口及xml进行一定的更改,最终结果如下
package com.mapper;

import com.pojo.Student;

public interface StudentMapper {
    //通过id删除学生
    int deleteById(Integer id);
    //添加学生
    int insertStudent(Student record);
    //通过id查找学生
    Student selectById(Integer id);
}
<?xml version="1.0" encoding="UTF-8" ?>
<!DOCTYPE mapper PUBLIC "-//mybatis.org//DTD Mapper 3.0//EN" "http://mybatis.org/dtd/mybatis-3-mapper.dtd" >
<mapper namespace="com.mapper.StudentMapper" >
  <resultMap id="BaseResultMap" type="com.pojo.Student" >
    <id column="id" property="id" jdbcType="INTEGER" />
    <result column="name" property="name" jdbcType="VARCHAR" />
    <result column="class" property="clazz" jdbcType="VARCHAR" />
  </resultMap>
  <sql id="Base_Column_List" >
    id, name, class
  </sql>
  <!-- 通过id查找学生 -->
  <select id="selectById" resultMap="BaseResultMap" parameterType="java.lang.Integer" >
    select
    <include refid="Base_Column_List" />
    from student
    where id = #{id,jdbcType=INTEGER}
  </select>
  <!-- 通过id删除学生 -->
  <delete id="deleteById" parameterType="java.lang.Integer" >
    delete from student
    where id = #{id,jdbcType=INTEGER}
  </delete>
  <!-- 添加学生 -->
  <insert id="insertStudent" parameterType="com.pojo.Student" >
    insert into student (name, class)
    values (#{name,jdbcType=VARCHAR}, #{clazz,jdbcType=VARCHAR})
  </insert>
</mapper>
package com.pojo;

public class Student {
    private Integer id;

    private String name;

    private String clazz;

    public Integer getId() {
        return id;
    }

    public void setId(Integer id) {
        this.id = id;
    }

    public String getName() {
        return name;
    }

    public void setName(String name) {
        this.name = name == null ? null : name.trim();
    }

    public String getClazz() {
        return clazz;
    }

    public void setClazz(String clazz) {
        this.clazz = clazz == null ? null : clazz.trim();
    }

    @Override
    public String toString() {
        return "Student [id=" + id + ", name=" + name + ", clazz=" + clazz + "]";
    }
}
2.3 对数据库进行CRUD操作
1、首先添加一个学生,代码如下:
package com.test;

import java.io.InputStream;

import org.apache.ibatis.io.Resources;
import org.apache.ibatis.session.SqlSession;
import org.apache.ibatis.session.SqlSessionFactory;
import org.apache.ibatis.session.SqlSessionFactoryBuilder;

import com.mapper.StudentMapper;
import com.pojo.Student;

public class TestInsert {

    public static void main(String[] args) throws Exception {
        //mybatis的核心配置文件
        String resource = "mybatis-config.xml";
        //使用MyBatis提供的Resources类加载mybatis的配置文件
        InputStream  is = Resources.getResourceAsStream(resource);
        //构建SqlSession的工厂
        SqlSessionFactory factory = new SqlSessionFactoryBuilder().build(is);
        //开启SqlSession
        SqlSession session = factory.openSession();
        //通过映射接口执行操作
        StudentMapper mapper = session.getMapper(StudentMapper.class);
        //new一个名叫张三 一年1班的学生
        Student stu = new Student();
        stu.setName("张三");
        stu.setClazz("一年1班");
        try {
            mapper.insertStudent(stu);
            //提交
            session.commit();
        } catch (Exception e){
            //回滚
            session.rollback();
            System.out.println("添加失败");
        } finally {
            session.close();
        }
        System.out.println("添加成功");
    }

}
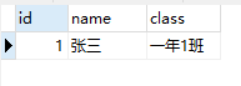
结果:可以从日志中看到sql语句及传入的参数,最后输出“添加成功”

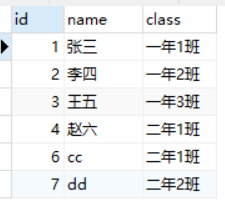
在数据库里查看下添加的结果:确实多了一条数据
为了之后方便操作,在此可以多添加几条数据:

2、查询指定id的学生,代码如下:
package com.test;

import java.io.InputStream;

import org.apache.ibatis.io.Resources;
import org.apache.ibatis.session.SqlSession;
import org.apache.ibatis.session.SqlSessionFactory;
import org.apache.ibatis.session.SqlSessionFactoryBuilder;

import com.mapper.StudentMapper;
import com.pojo.Student;

public class TestSelect {

    public static void main(String[] args) throws Exception {
        //mybatis的核心配置文件
        String resource = "mybatis-config.xml";
        //使用MyBatis提供的Resources类加载mybatis的配置文件
        InputStream  is = Resources.getResourceAsStream(resource);
        //构建SqlSession的工厂
        SqlSessionFactory factory = new SqlSessionFactoryBuilder().build(is);
        //开启SqlSession
        SqlSession session = factory.openSession();
        //通过映射接口执行操作
        StudentMapper mapper = session.getMapper(StudentMapper.class);
        Student student = mapper.selectById(1);
        System.out.println(student);
        session.close();
    }

}
结果如下:

3、删除指定id的学生,代码如下:
package com.test;

import java.io.InputStream;

import org.apache.ibatis.io.Resources;
import org.apache.ibatis.session.SqlSession;
import org.apache.ibatis.session.SqlSessionFactory;
import org.apache.ibatis.session.SqlSessionFactoryBuilder;

import com.mapper.StudentMapper;

public class TestDelete {

    public static void main(String[] args) throws Exception {
        //mybatis的核心配置文件
        String resource = "mybatis-config.xml";
        //使用MyBatis提供的Resources类加载mybatis的配置文件
        InputStream  is = Resources.getResourceAsStream(resource);
        //构建SqlSession的工厂
        SqlSessionFactory factory = new SqlSessionFactoryBuilder().build(is);
        //开启SqlSession
        SqlSession session = factory.openSession();
        //通过映射接口执行操作
        StudentMapper mapper = session.getMapper(StudentMapper.class);
        try {
            mapper.deleteById(5);
            //提交
            session.commit();
        } catch (Exception e){
            //回滚
            session.rollback();
            System.out.println("删除失败");
        } finally {
            session.close();
        }
        System.out.println("删除成功");
    }

}
结果如下:

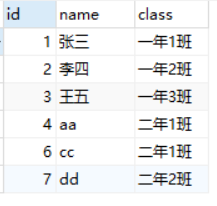
现在再看数据库中的数据,发现id为5的学生已经不见了:
4、更改指定id的学生姓名
此时,StudentMapper里并没有update相关的方法,所以需要手动添加方法。现在接口中定义updateStudentById方法,然后在xml中编写相应的节点:使用update节点,id与方法名一致,传入参数类型为Student类,节点内为sql语句
package com.mapper;

import com.pojo.Student;

public interface StudentMapper {
    //通过id删除学生
    int deleteById(Integer id);
    //添加学生
    int insertStudent(Student record);
    //通过id查找学生
    Student selectById(Integer id);
    //更改指定id学生的姓名
    int updateStudentById(Student student);
}
<?xml version="1.0" encoding="UTF-8" ?>
<!DOCTYPE mapper PUBLIC "-//mybatis.org//DTD Mapper 3.0//EN" "http://mybatis.org/dtd/mybatis-3-mapper.dtd" >
<mapper namespace="com.mapper.StudentMapper" >
  <resultMap id="BaseResultMap" type="com.pojo.Student" >
    <id column="id" property="id" jdbcType="INTEGER" />
    <result column="name" property="name" jdbcType="VARCHAR" />
    <result column="class" property="clazz" jdbcType="VARCHAR" />
  </resultMap>
  <sql id="Base_Column_List" >
    id, name, class
  </sql>
  <!-- 通过id查找学生 -->
  <select id="selectById" resultMap="BaseResultMap" parameterType="java.lang.Integer" >
    select
    <include refid="Base_Column_List" />
    from student
    where id = #{id,jdbcType=INTEGER}
  </select>
  <!-- 通过id删除学生 -->
  <delete id="deleteById" parameterType="java.lang.Integer" >
    delete from student
    where id = #{id,jdbcType=INTEGER}
  </delete>
  <!-- 添加学生 -->
  <insert id="insertStudent" parameterType="com.pojo.Student" >
    insert into student (name, class)
    values (#{name,jdbcType=VARCHAR}, #{clazz,jdbcType=VARCHAR})
  </insert>
  <!-- 更改指定id学生的姓名 -->
  <update id="updateStudentById" parameterType="com.pojo.Student">
    update student set name = #{name} where id = #{id}
  </update>
</mapper>
编写测试类,先从数据库中查询获得需要修改的学生信息,再更改其姓名,最后提交
package com.test;

import java.io.InputStream;

import org.apache.ibatis.io.Resources;
import org.apache.ibatis.session.SqlSession;
import org.apache.ibatis.session.SqlSessionFactory;
import org.apache.ibatis.session.SqlSessionFactoryBuilder;

import com.mapper.StudentMapper;
import com.pojo.Student;

public class TestUpdate {

    public static void main(String[] args) throws Exception {
        //mybatis的核心配置文件
        String resource = "mybatis-config.xml";
        //使用MyBatis提供的Resources类加载mybatis的配置文件
        InputStream  is = Resources.getResourceAsStream(resource);
        //构建SqlSession的工厂
        SqlSessionFactory factory = new SqlSessionFactoryBuilder().build(is);
        //开启SqlSession
        SqlSession session = factory.openSession();
        //通过映射接口执行操作
        StudentMapper mapper = session.getMapper(StudentMapper.class);
        Student student = mapper.selectById(4);
        System.out.println(student);
        student.setName("赵六");
        try{
            mapper.updateStudentById(student);
            //提交
            session.commit();
        } catch (Exception e){
            //回滚
            session.rollback();
            System.out.println("更改失败");
        }
        System.out.println("更改成功");
        session.close();
    }

}
结果和数据库如下:

5、现更改需求:更改指定id学生所在的班级
又多了一个update的需求,需要再新增一个方法吗?并不需要,只需在updateStudentById方法对应的映射sql中进行更改就可以了,这时就可以用到动态sql了
<!-- 更改指定id学生的姓名 -->
  <update id="updateStudentById" parameterType="com.pojo.Student">
    update student
    <set>
      <if test="name != null">
          name = #{name} ,
      </if>
      <if test="clazz != null">
          class = #{clazz} ,
      </if>
    </set>
    where id = #{id}
  </update>
将update节点改为上述,再编写测试类
package com.test;

import java.io.InputStream;

import org.apache.ibatis.io.Resources;
import org.apache.ibatis.session.SqlSession;
import org.apache.ibatis.session.SqlSessionFactory;
import org.apache.ibatis.session.SqlSessionFactoryBuilder;

import com.mapper.StudentMapper;
import com.pojo.Student;

public class TestUpdate {

    public static void main(String[] args) throws Exception {
        //mybatis的核心配置文件
        String resource = "mybatis-config.xml";
        //使用MyBatis提供的Resources类加载mybatis的配置文件
        InputStream  is = Resources.getResourceAsStream(resource);
        //构建SqlSession的工厂
        SqlSessionFactory factory = new SqlSessionFactoryBuilder().build(is);
        //开启SqlSession
        SqlSession session = factory.openSession();
        //通过映射接口执行操作
        StudentMapper mapper = session.getMapper(StudentMapper.class);
        Student student = new Student();
        student.setId(4);
        student.setClazz("三年1班");
        System.out.println(student);
        try{
            mapper.updateStudentById(student);
            //提交
            session.commit();
        } catch (Exception e){
            //回滚
            session.rollback();
            System.out.println("更改失败");
        }
        System.out.println("更改成功");
        session.close();
    }

}
先new一个Student,再set它的id和class,此时name为null,执行update操作

可以看见执行的sql为update student SET class = ? where id = ?
如果我们将name的值set为aaa,再看执行的sql语句:

可以看见执行的sql为update student SET name = ? , class = ? where id = ?
这就是动态sql,除了if外,还有choose (when, otherwise),trim (where, set),foreach,这些节点的使用方式与JSTL标签的使用类似
三、动态sql
3.1 if
最简单的节点,只需配置test属性即可,test内为布尔表达式,为true时if语句块中的sql语句才会存在,且不会对sql进行任何变动,因此有时会出现多逗号、and、or、where的情况,通常与对应的节点使用,如set、where等
3.2 choose (when, otherwise)
choose节点下有2个子节点when和otherwise,when节点中有1个属性test,和if的类似
该节点的语法与if...else if...else类似
<choose>
   <when test="表达式1">
      sql语句1
   </when>
   <when test="表达式2">
      sql语句2
   </when>
   <otherwise>
      sql语句3
   </otherwise>
</choose>
例如上述例子,当表达式1为true时,有且仅有sql语句1会被执行,不会有2和3;当表达式1、2都不满足时,就会执行sql语句3
3.3 trim
有4个属性:prefix、suffix、prefixOverrides、suffixOverrides。它可以更灵活地去除多余关键字,可以替代where和set
以2.5中的sql语句为例,可变更如下,效果是一样的:
  <!-- 更改指定id学生的姓名 -->
  <update id="updateStudentById" parameterType="com.pojo.Student">
    update student
    <trim prefix="set" suffixOverrides="," suffix="where id = #{id}">
      <if test="name != null">name = #{name},</if>
      <if test="clazz != null">class = #{clazz},</if>
    </trim>
  </update>
3.4 foreach
用于迭代一个集合,通常用于in条件,其属性如下:
item:集合名称(传入的变量名)
index:指定迭代次数的名称
collection:必须指定,表示传入的集合是什么类型的
list
array
map-key
open:语句的开始
separator:每次循环的分割符
close:语句的结束

