腾讯云点播 服务端 API使用httpclient获取视频信息
前言
继上次更新腾讯云点播已有两个月了
由于在weblogic部署项目的jdk版本是1.7, 所以使用腾讯云的SDK根本用不了,而且每次已修改代码都是要重新打个war把修改到的class替换上去,麻烦死了
使用更换成http去请求信息#
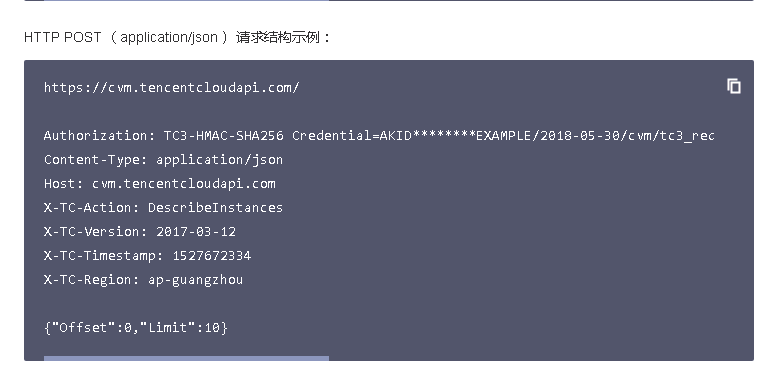
官方推荐使用post
支持的 HTTP 请求方法:
请求结构#
https://vod.tencentcloudapi.com/?Action=DescribeMediaInfos
&FileIds.0=5285485487985271487
&FileIds.1=5285485487985271488
&<公共请求参数>
签名方法参考地址#
https://cloud.tencent.com/document/product/266/31757#Java
demo参考#
public class a {
    private final static Charset UTF8 = StandardCharsets.UTF_8;
    private final static String SECRET_ID = "";
    private final static String SECRET_KEY = "";
    private final static String CT_JSON = "application/json; charset=utf-8";

    public static byte[] hmac256(byte[] key, String msg) throws Exception {
        Mac mac = Mac.getInstance("HmacSHA256");
        SecretKeySpec secretKeySpec = new SecretKeySpec(key, mac.getAlgorithm());
        mac.init(secretKeySpec);
        return mac.doFinal(msg.getBytes(UTF8));
    }

    public static String sha256Hex(String s) throws Exception {
        MessageDigest md = MessageDigest.getInstance("SHA-256");
        byte[] d = md.digest(s.getBytes(UTF8));
        return DatatypeConverter.printHexBinary(d).toLowerCase();
    }


    public static void main(String[] args) throws Exception {
        requestToBaiDu();
    }

    public static void requestToBaiDu() throws Exception {
        String fileId = "";
        String service = "vod";
        String host = "vod.tencentcloudapi.com";
        String region = "";
        String action = "DescribeMediaInfos";
        String version = "2018-07-17";
        String algorithm = "TC3-HMAC-SHA256";
        String timestamp = String.valueOf(System.currentTimeMillis() / 1000);
        SimpleDateFormat sdf = new SimpleDateFormat("yyyy-MM-dd");
        // 注意时区,否则容易出错
        sdf.setTimeZone(TimeZone.getTimeZone("UTC"));
        String date = sdf.format(new Date(Long.valueOf(timestamp + "000")));


        // ************* 步骤 1:拼接规范请求串 *************
        String httpRequestMethod = "POST";
        String canonicalUri = "/";
        String canonicalQueryString = "";
        String canonicalHeaders = "content-type:application/json; charset=utf-8\n" + "host:" + host + "\n";
        String signedHeaders = "content-type;host";

        StringBuilder payload = new StringBuilder();
        payload.append("{\"FileIds\":[\"");
        payload.append(fileId);
        payload.append("\"]}");

        System.out.println("payload======>" + payload.toString());
        String hashedRequestPayload = sha256Hex(payload.toString());
        String canonicalRequest =
                httpRequestMethod + "\n" +
                        canonicalUri + "\n" +
                        canonicalQueryString + "\n" +
                        canonicalHeaders + "\n" +
                        signedHeaders + "\n" +
                        hashedRequestPayload;
        System.out.println(canonicalRequest);

        // ************* 步骤 2:拼接待签名字符串 *************
        String credentialScope = date + "/" + service + "/" + "tc3_request";
        String hashedCanonicalRequest = sha256Hex(canonicalRequest);
        String stringToSign =
                algorithm + '\n' +
                        timestamp + '\n' +
                        credentialScope + '\n' +
                        hashedCanonicalRequest;


        // ************* 步骤 3:计算签名 *************

        byte[] secretDate = hmac256(("TC3" + SECRET_KEY).getBytes(UTF8), date);
        byte[] secretService = hmac256(secretDate, service);
        byte[] secretSigning = hmac256(secretService, "tc3_request");
        String signature = DatatypeConverter.printHexBinary(hmac256(secretSigning, stringToSign)).toLowerCase();


        // ************* 步骤 4:拼接 Authorization *************
        String authorization = algorithm + " " + "Credential=" + SECRET_ID + "/" + credentialScope + ", "
                + "SignedHeaders=" + signedHeaders + ", " + "Signature=" + signature;
        System.out.println(authorization);

        //发送请求的URL
        StringBuffer url = new StringBuffer();
        url.append("https://vod.tencentcloudapi.com");
        //使用帮助类HttpClients创建CloseableHttpClient对象
        CloseableHttpClient client = HttpClients.createDefault();
        //HTTP请求类型创建HttpPost实例
        HttpPost post = new HttpPost(url.toString());
        post.setHeader("Authorization", authorization);
        post.setHeader("Content-Type", CT_JSON);
        post.setHeader("Host", host);
        post.setHeader("X-TC-Action", action);
        post.setHeader("X-TC-Timestamp", timestamp);
        post.setHeader("X-TC-Version", version);
        post.setHeader("X-TC-Region", region);
        CloseableHttpResponse response = null;
        //string是一个json字符串
        StringEntity params = new StringEntity(payload.toString(), "UTF-8");
        params.setContentType("application/json;charset=UTF-8");
        post.setEntity(params);
        try {
            //通过执行HttpPost请求获取CloseableHttpResponse实例 ,从此CloseableHttpResponse实例中获取状态码,错误信息,以及响应页面等等.
            response = client.execute(post);
            HttpEntity entity = response.getEntity();
            Header headers[] = response.getAllHeaders();
            int i = 0;
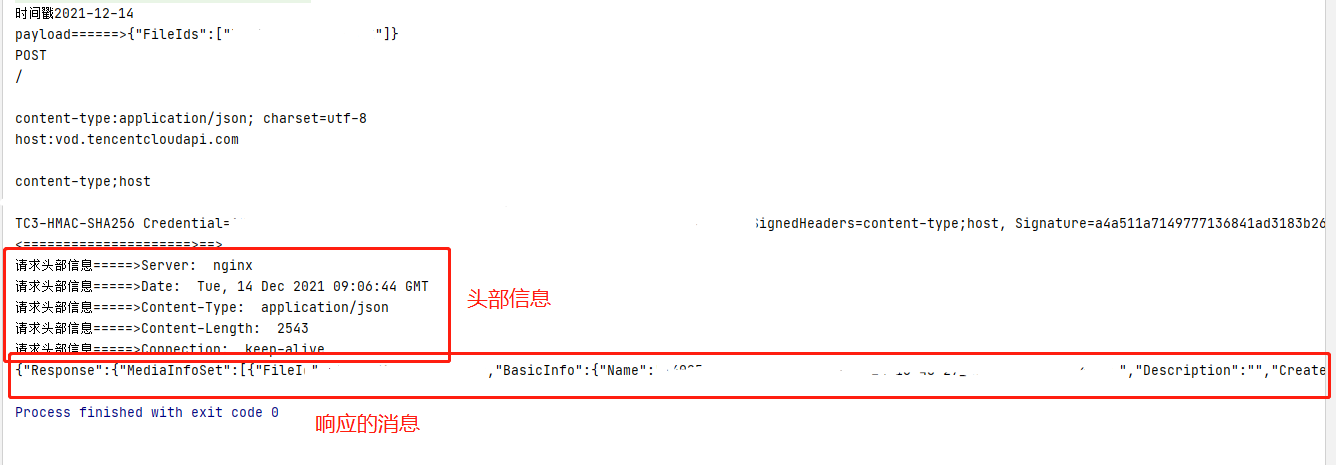
            System.out.println("<=====================>==>");

            while (i < headers.length) {
                System.out.println("请求头部信息=====>" + headers[i].getName() + ":  " + headers[i].getValue());
                i++;
            }
            String resData = EntityUtils.toString(entity, UTF8);
            com.alibaba.fastjson.JSONObject jsonObject = com.alibaba.fastjson.JSONObject.parseObject(resData);
            String resultResponse = String.valueOf(jsonObject.get("Response"));
            com.alibaba.fastjson.JSONObject resultResponses = com.alibaba.fastjson.JSONObject.parseObject(resultResponse);
            JSONArray mediaInfoSetArray = (JSONArray) resultResponses.getJSONArray("MediaInfoSet");
            System.out.println(resData);
            EntityUtils.consume(entity);
        } catch (
                UnsupportedEncodingException e) {
            e.printStackTrace();
        } catch (
                IOException e) {
            e.printStackTrace();
        } finally {//最后关闭HttpClient资源.
            if (client != null) {
                try {
                    client.close();
                } catch (IOException e) {
                    e.printStackTrace();
                }
            }
            if (response != null) {
                try {
                    response.close();
                } catch (IOException e) {
                    e.printStackTrace();
                }
            }
        }
    }
}
具体流程#
->首先需要获取签名(官方文档已有示例 1、拼接规范请求串,2、拼接待签名字符串,3、计算签名,4、拼接 Authorization)
->传入相关视频id
->HTTP请求类型创建HttpPost实例发送请求,返回相关数据
分类:
腾讯云各种接入
, HttpClient


【推荐】编程新体验,更懂你的AI,立即体验豆包MarsCode编程助手
【推荐】凌霞软件回馈社区,博客园 & 1Panel & Halo 联合会员上线
【推荐】抖音旗下AI助手豆包,你的智能百科全书,全免费不限次数
【推荐】轻量又高性能的 SSH 工具 IShell:AI 加持,快人一步
· 深入理解 Mybatis 分库分表执行原理
· 如何打造一个高并发系统?
· .NET Core GC压缩(compact_phase)底层原理浅谈
· 现代计算机视觉入门之:什么是图片特征编码
· .NET 9 new features-C#13新的锁类型和语义
· 《HelloGitHub》第 106 期
· Spring AI + Ollama 实现 deepseek-r1 的API服务和调用
· 数据库服务器 SQL Server 版本升级公告
· 深入理解Mybatis分库分表执行原理
· 使用 Dify + LLM 构建精确任务处理应用
2019-12-14 eclipse启动tomcat警告 [SetPropertiesRule]{Server/Service/Engine/Host/Context}