【OpenXml】Pptx的边框虚线转为WPF的边框虚线
安装Openxml sdk
首先,我们先安装nuget的需要的有关的Openxml sdk,我们开源了解析pptx的Openxml拍平层,下面两种方式都可以安装:
- nuget包管理器控制台:
Install-Package dotnetCampus.DocumentFormat.OpenXml.Flatten -Version 2.0.0
- csproj引用:
<PackageReference Include="dotnetCampus.DocumentFormat.OpenXml.Flatten" Version="2.0.0" />
解析Pptx
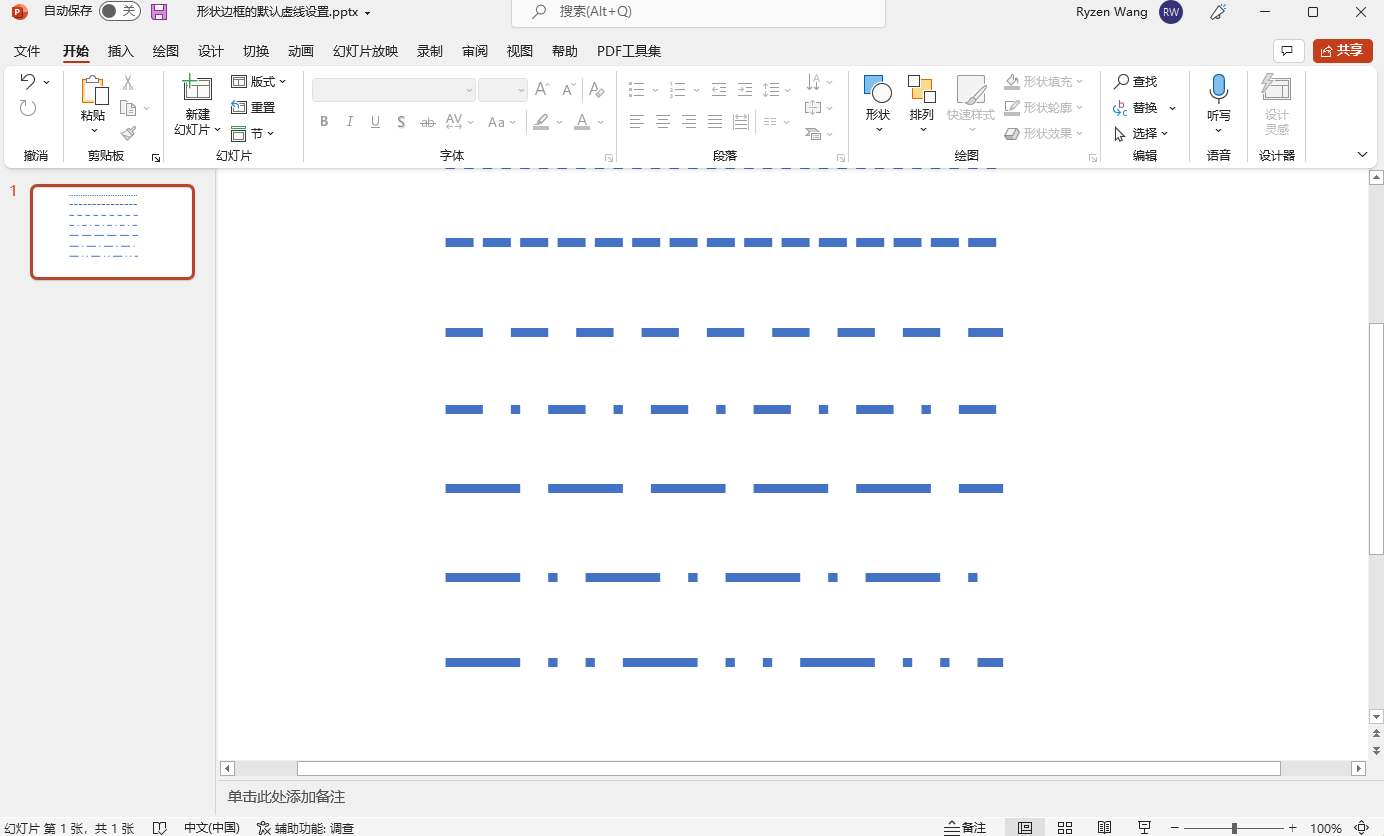
我这里用PPTX的7种直线,分别设置7种能够设置的虚线类型,PPTX的显示效果是这样的:
然后解析代码如下,解析主要逻辑部分:
        private void PptxToGeometry(string filePath)
        {
            if (!File.Exists(filePath) || !filePath.EndsWith(".pptx", StringComparison.OrdinalIgnoreCase))
            {
                return;
            }

            var lines = new List<Line>();
            using var presentationDocument = PresentationDocument.Open(filePath, false);
            var presentationPart = presentationDocument.PresentationPart;
            var presentation = presentationPart?.Presentation;
            var slideIdList = presentation?.SlideIdList;
            if (slideIdList == null)
            {
                return;
            }
            foreach (var slideId in slideIdList.ChildElements.OfType<SlideId>())
            {
                var slidePart = (SlidePart)presentationPart.GetPartById(slideId.RelationshipId);
                var slide = slidePart.Slide;
                foreach (var shapeProperties in slide.Descendants<ShapeProperties>())
                {
                    var presetGeometry = shapeProperties.GetFirstChild<PresetGeometry>();
                    if (presetGeometry != null && presetGeometry.Preset.HasValue)
                    {
                        if (presetGeometry.Preset == ShapeTypeValues.StraightConnector1)
                        {
                            var transform2D = shapeProperties.GetFirstChild<Transform2D>();
                            var extents = transform2D?.GetFirstChild<Extents>();
                            if (extents != null)
                            {
                                var width = new Emu(extents.Cx!.Value).ToPixel().Value;
                                var height = new Emu(extents.Cy!.Value).ToPixel().Value;


                                var presetDash = shapeProperties.GetFirstChild<Outline>()?.GetFirstChild<PresetDash>()?.Val;
                                var dashArray = GetDashArrayByPresetLineDashValues(presetDash);
                                var line = ConverterToGeometry( width, height, dashArray);
                                lines.Add(line);
                            }
                        }
                    }
                }
            }

            this.ListBox.ItemsSource = lines;
        }
PPTX映射成WPF虚线的方法:
        private DoubleCollection GetDashArrayByPresetLineDashValues(PresetLineDashValues presetLineDashValues)
        {
            DoubleCollection dashStyle = presetLineDashValues switch
            {
                PresetLineDashValues.Solid => new(),
                PresetLineDashValues.Dot => new() { 0, 2 },
                PresetLineDashValues.Dash => new() { 3, 3 },
                PresetLineDashValues.LargeDash => new() { 8, 3 },
                PresetLineDashValues.DashDot => new() { 3, 3, 1, 3 },
                PresetLineDashValues.LargeDashDot => new() { 7.5, 3.5, 1, 3.5 },
                PresetLineDashValues.LargeDashDotDot => new() { 8, 3, 1, 3, 1, 3 },
                PresetLineDashValues.SystemDash => new() { 3, 1 },
                PresetLineDashValues.SystemDot => new() { 1, 1 },
                PresetLineDashValues.SystemDashDot => new() { 2, 2, 0, 2 },
                PresetLineDashValues.SystemDashDotDot => new() { 2, 2, 0, 2 },
                _ => new DoubleCollection()
            };
            return dashStyle;
        }
最终绘制线条的方法:
        private Line ConverterToGeometry(double width, double height, DoubleCollection dashDoubleCollection)
        {
            var line = new Line
            {
                X1 = 0,
                Y1 = 0,
                X2 = width,
                Y2 = height,
                StrokeDashArray = dashDoubleCollection,
                Stroke = Stroke,
                StrokeThickness = StrokeThickness
            };
            return line;
        }
最终的效果:
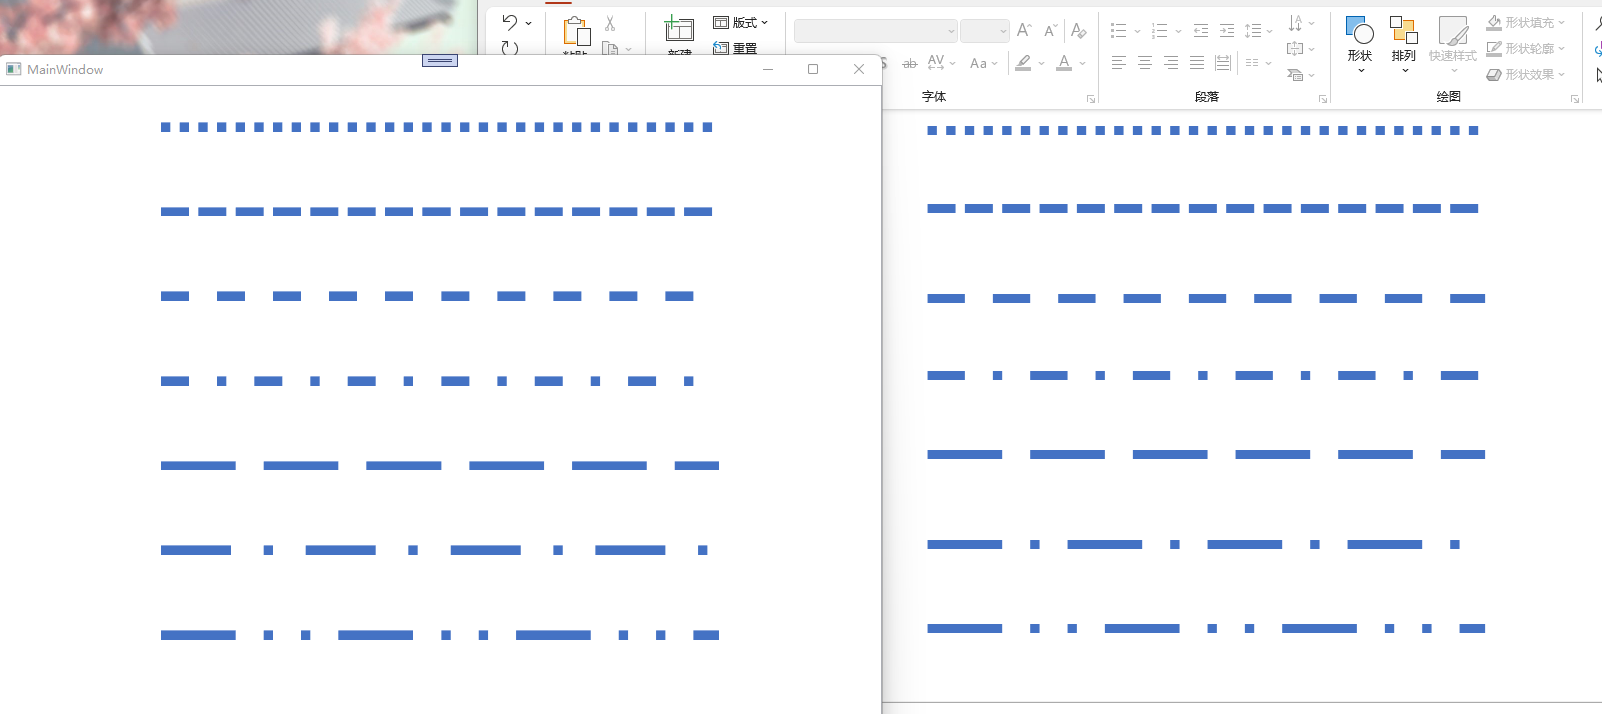
我们可以看到几乎是接近的效果了,当然你也可以根据我的代码去微调更精确的值,只需要稍微改下GetDashArrayByPresetLineDashValues方法内相对应的值即可
后话
实际上,openxml文档是给出了PresetDash的值的,大致如下:

但是其值跟WPF的设置Dash的DoubleCollection不对应,因此以上的映射值都是我自己微调的
源码
BlogCodeSample/PptDashConverToWpfSample at main · ZhengDaoWang/BlogCodeSample

 浙公网安备 33010602011771号