
Linux YUM 配置源
Linux Yum 简介
YUM是交互式的以rpm为基础的软件包管理工具。YUM可以根据仓库的元数据信息,去自动的实现系统更新,包括依赖性分析,过期软件包处理。我们也可以利用yum来进行软件安装,删除旧包。也可以通过其他命令或服务来查询已经安装或可以安装的包。
YUM仓库源的配置
当我们想要使用yum 安装、更新包的时候我们要先配置yum 仓库。就是软件的源头。我们向安装包的时候,必须有可提供给我们下载包的仓库,否则我们是没有办法安装和更新包的。
配置YUM仓库源,有几种方式,一种是网络仓库源,就是一些公司开放到网络的仓库,另一种就是我们本地的仓库,例如网盘,或者其他。
配置本地仓库源
#YUM仓库源配置文件的地址
[root@node1 ~]# cd /etc/yum.repos.d/
#手动添加仓库源
[root@node1 yum.repos.d]# mkdir -p /mnt/cdrom
#/dev/sr0为我们光盘的设备,将它挂载到/mnt/cdrom目录下:
[root@node1 yum.repos.d]# mount /dev/sr0 /mnt/cdrom
#编辑配置仓库,enable表示仓库是否使用,gpgcheck表示是否校验包,这里因为是自己的光盘。所以就不做gpgcheck
# baseurl指向我们仓库的地址,因为仓库源在本地所以使用/mnt/cdrom
# 本地仓库源使用file://协议
# name是自己起的名字,方便区分
[root@node1 yum.repos.d]# vi local.repo
[local]
name=local
baseurl=file:///mnt/cdrom
enable=1
gpgcheck=0
配置公网源
配置aliyun地址
centos镜像-centos下载地址-centos安装教程-阿里巴巴开源镜像站 (aliyun.com)
######此处地址由aliyun官方提供
2. 下载新的 CentOS-Base.repo 到 /etc/yum.repos.d/
centos8(centos8官方源已下线,建议切换centos-vault源)
wget -O /etc/yum.repos.d/CentOS-Base.repo https://mirrors.aliyun.com/repo/Centos-vault-8.5.2111.repo
或者

curl -o /etc/yum.repos.d/CentOS-Base.repo https://mirrors.aliyun.com/repo/Centos-vault-8.5.2111.repo
centos6(centos6官方源已下线,建议切换centos-vault源)

wget -O /etc/yum.repos.d/CentOS-Base.repo https://mirrors.aliyun.com/repo/Centos-vault-6.10.repo
或者

curl -o /etc/yum.repos.d/CentOS-Base.repo https://mirrors.aliyun.com/repo/Centos-vault-6.10.repo
CentOS 7

wget -O /etc/yum.repos.d/CentOS-Base.repo https://mirrors.aliyun.com/repo/Centos-7.repo
或者

curl -o /etc/yum.repos.d/CentOS-Base.repo https://mirrors.aliyun.com/repo/Centos-7.repo
#确定自己的操作系统类型
[root@node1 yum.repos.d]# cat /etc/*release
.......

CentOS Linux release 7.9.2009 (Core)
CentOS Linux release 7.9.2009 (Core)

#按照aliyun配置指导,选择适合自己系统的源,我这里是Centos7所以选择Centos-7.repo
[root@node1 yum.repos.d]# cd /etc/yum.repos.d/
[root@node1 yum.repos.d]# wget -O /etc/yum.repos.d/CentOS-Base.repo https://mirrors.aliyun.com/repo/Centos-7.repo
[root@node1 yum.repos.d]# yum clean all
[root@node1 yum.repos.d]# yum makecache
配置163源
使用说明
首先备份/etc/yum.repos.d/CentOS-Base.repo

mv /etc/yum.repos.d/CentOS-Base.repo /etc/yum.repos.d/CentOS-Base.repo.backup
下载对应版本repo文件, 放入/etc/yum.repos.d/(操作前请做好相应备份)

CentOS7    #右键复制网络连接
CentOS6
CentOS5
运行以下命令生成缓存

yum clean all
yum makecache
#地址为自己选择的右键复制网络连接
[root@node1 yum.repos.d]# wget -O 163.repo https://mirrors.163.com/.help/CentOS7-Base-163.repo^C
[root@node1 yum.repos.d]# yum clean all
[root@node1 yum.repos.d]# yum makecache
配置mysql源
有的时候由于配置的yum仓库源里的包不是最新的安装包。我们需要自己配置想要的软件的源, 例如配置mysql或nginx源.
需要先下载以下rpm。安装后会自动配置mysql的源。
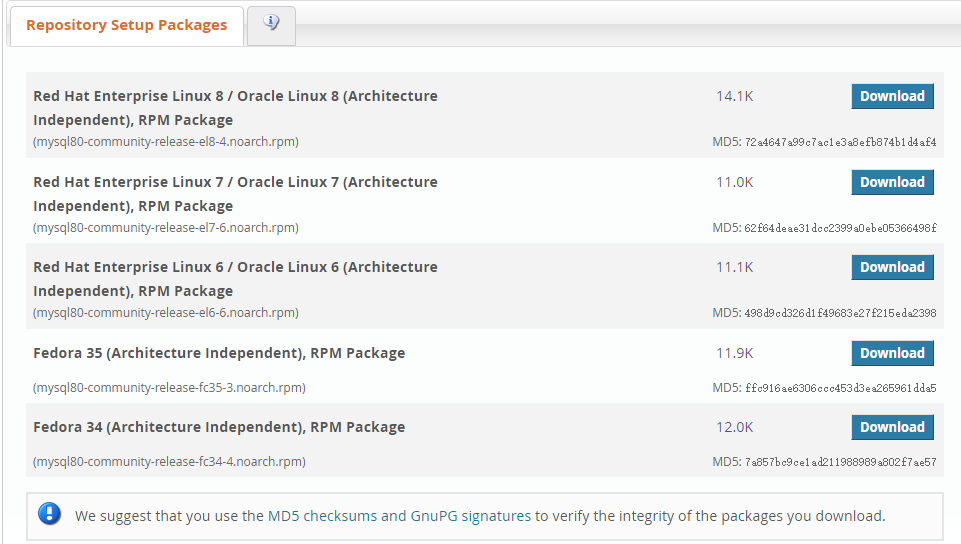
下载该rpm文件上次的服务器上后,安装该rpm文件
[root@node1 ~]# yum install mysql80-community-release-el7-6.noarch.rpm
Loaded plugins: fastestmirror
Examining mysql80-community-release-el7-6.noarch.rpm: mysql80-community-release-el7-6.noarch
Marking mysql80-community-release-el7-6.noarch.rpm to be installed
Resolving Dependencies
--> Running transaction check
---> Package mysql80-community-release.noarch 0:el7-6 will be installed
--> Finished Dependency Resolution

Dependencies Resolved

================================================================================================================================================================================================================
 Package                                                 Arch                                 Version                               Repository                                                             Size
================================================================================================================================================================================================================
Installing:
 mysql80-community-release                               noarch                               el7-6                                 /mysql80-community-release-el7-6.noarch                                10 k

Transaction Summary
================================================================================================================================================================================================================
Install  1 Package

Total size: 10 k
Installed size: 10 k
Is this ok [y/d/N]: y
Downloading packages:
Running transaction check
Running transaction test
Transaction test succeeded
Running transaction
  Installing : mysql80-community-release-el7-6.noarch                                                                                                                                                       1/1
  Verifying  : mysql80-community-release-el7-6.noarch                                                                                                                                                       1/1

Installed:
  mysql80-community-release.noarch 0:el7-6

Complete!
查看mysql80-community-release rpm的安装文件,这样mysql仓库源就配置好了。我们可以根据需要自己enable或disable不同版本的源。
[root@node1 ~]# rpm -ql mysql80-community-release
/etc/RPM-GPG-KEY-mysql
/etc/RPM-GPG-KEY-mysql-2022
/etc/yum.repos.d/mysql-community-debuginfo.repo
/etc/yum.repos.d/mysql-community-source.repo
/etc/yum.repos.d/mysql-community.repo
[root@node1 ~]# cd /etc/yum.repos.d/
[root@node1 yum.repos.d]# cat mysql-community.repo
# Enable to use MySQL 5.7
[mysql57-community]
name=MySQL 5.7 Community Server
baseurl=http://repo.mysql.com/yum/mysql-5.7-community/el/7/$basearch
enabled=0
gpgcheck=1
gpgkey=file:///etc/pki/rpm-gpg/RPM-GPG-KEY-mysql-2022
       file:///etc/pki/rpm-gpg/RPM-GPG-KEY-mysql

[mysql80-community]
name=MySQL 8.0 Community Server
baseurl=http://repo.mysql.com/yum/mysql-8.0-community/el/7/$basearch
enabled=1
gpgcheck=1
gpgkey=file:///etc/pki/rpm-gpg/RPM-GPG-KEY-mysql-2022
       file:///etc/pki/rpm-gpg/RPM-GPG-KEY-mysql
安装最新版本mysql-community
yum repolist all | grep mysql
yum-config-manager --disable mysql57-community
yum-config-manager --enable mysql80-community
yum repolist enabled | grep mysql
yum install mysql-community-server

 浙公网安备 33010602011771号