

SpringBoot集成Dubbo
1、概览
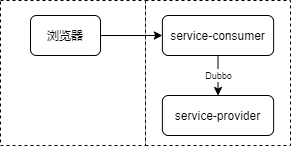
1)访问流程总览
浏览器发起http请求,请求到达第一个服务(消费者服务),第一个服务请求第二个服务(服务提供者)
2)项目结构

-
DubboBootDemo最外层的父工程,是一个空的maven项目 -
service-consumer消费者服务 -
service-provider生产者服务(服务提供者) -
user-api是service-consumer和service-provider的公共基础包,定义了接口、公共的JavaBean
2、创建项目
1)创建父工程,一个空的maven项目
2)创建user-api子项目
在父工程中,创建一个普通的maven项目
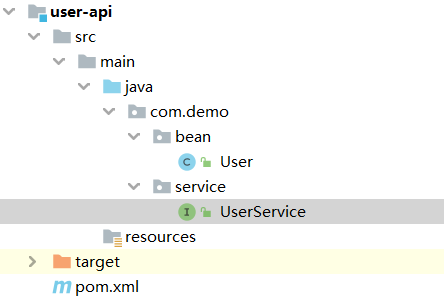
User的JavaBean类
package com.demo.bean; import java.io.Serializable; public class User implements Serializable { private String name; private String sex; private int age; public User() { } public String getName() { return name; } public User setName(String name) { this.name = name; return this; } public String getSex() { return sex; } public User setSex(String sex) { this.sex = sex; return this; } public int getAge() { return age; } public User setAge(int age) { this.age = age; return this; } @Override public String toString() { return "Student{" + "name='" + name + '\'' + ", sex='" + sex + '\'' + ", age=" + age + '}'; } }
公共接口 UserService
package com.demo.service; import com.demo.bean.User; /** * 服务接口,定义服务的规范 */ public interface UserService { User getUserByName(String name); }
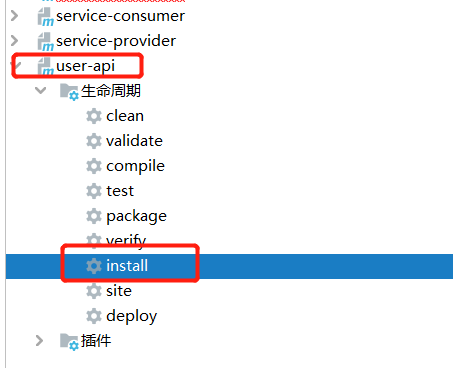
项目的公共代码写完之后,将此项目进行 install,打包到本地maven仓库,方便后面两个子模块的引用。
3)创建service-provider服务提供者子项目
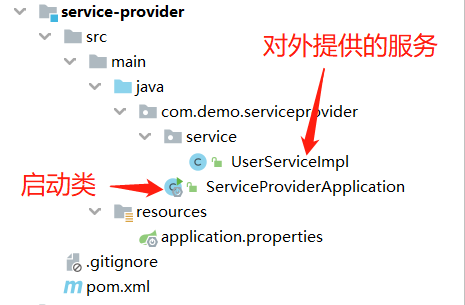
创建一个SpringBoot项目,注意,pom文件中不需要spring-boot-starter-web依赖,因为服务提供者只提供服务,不需要提供Controller(除非你的项目服务提供者也需要提供Controller)。给启动类加上@EnableDubbo注解,表示开启Dubbo
服务提供者的启动类
package com.demo.serviceprovider; import org.apache.dubbo.config.spring.context.annotation.EnableDubbo; import org.springframework.boot.SpringApplication; import org.springframework.boot.autoconfigure.SpringBootApplication; @EnableDubbo @SpringBootApplication public class ServiceProviderApplication { public static void main(String[] args) { SpringApplication.run(ServiceProviderApplication.class, args); System.out.println("生产者服务已启动..."); } }
pom.xml依赖
<dependencies> <!--生产者不需要web服务--> <!-- <dependency>--> <!-- <groupId>org.springframework.boot</groupId>--> <!-- <artifactId>spring-boot-starter-web</artifactId>--> <!-- </dependency>--> <dependency> <groupId>org.springframework.boot</groupId> <artifactId>spring-boot-starter</artifactId> <version>2.3.4.RELEASE</version> </dependency> <!-- 引入公共依赖,就是上一步的子项目--> <dependency> <groupId>org.example</groupId> <artifactId>user-api</artifactId> <version>1.0-SNAPSHOT</version> </dependency> <!-- 引入dubbo--> <dependency> <groupId>org.apache.dubbo</groupId> <artifactId>dubbo-spring-boot-starter</artifactId> <version>2.7.15</version> </dependency> <!-- 连接zookeeper的客户端--> <dependency> <groupId>org.apache.curator</groupId> <artifactId>curator-recipes</artifactId> <version>2.13.0</version> </dependency> </dependencies>
UserServiceImpl服务的具体实现
package com.demo.serviceprovider.service; import com.demo.bean.User; import com.demo.service.UserService; import org.apache.dubbo.config.annotation.DubboService; /** * <p>服务提供者所提供的服务的真实实现</p> * 原来的{@link com.alibaba.dubbo.config.annotation.Service}已经弃用了, * 现在换为{@link org.apache.dubbo.config.annotation.DubboService},作用是用于暴露服务 */ @DubboService public class UserServiceImpl implements UserService { @Override public User getUserByName(String name) { System.out.printf("服务提供者 getStudentByName 被调用,name=%s%n", name); return new User().setName(name).setAge(18).setSex("男"); } }
服务提供者的application.properties配置文件
server.port=9992 #当前服务、应用名字 dubbo.application.name=UserServiceProvider #注册中心地址 dubbo.registry.protocol=zookeeper dubbo.registry.address=127.0.0.1:2181 #通信协议 dubbo.protocol.name=dubbo dubbo.protocol.port=20880 #连接监控中心 dubbo.monitor.protocol=registry
4) 创建service-consumer服务消费者
创建一个SpringBoot项目,这个需要创建为web项目,给启动类加上@EnableDubbo注解。

服务消费者的启动类
package com.demo.serviceconsumer; import org.apache.dubbo.config.spring.context.annotation.EnableDubbo; import org.springframework.boot.SpringApplication; import org.springframework.boot.autoconfigure.SpringBootApplication; @EnableDubbo @SpringBootApplication public class ServiceConsumerApplication { public static void main(String[] args) { SpringApplication.run(ServiceConsumerApplication.class, args); System.out.println("消费者服务已启动..."); } }
服务消费者的pom依赖
<dependencies> <dependency> <groupId>org.springframework.boot</groupId> <artifactId>spring-boot-starter-web</artifactId> </dependency> <!-- 引入dubbo--> <dependency> <groupId>org.apache.dubbo</groupId> <artifactId>dubbo-spring-boot-starter</artifactId> <version>2.7.15</version> </dependency> <!-- 连接zookeeper的客户端--> <dependency> <groupId>org.apache.curator</groupId> <artifactId>curator-recipes</artifactId> <version>2.13.0</version> </dependency> <!-- 引入公共依赖--> <dependency> <groupId>org.example</groupId> <artifactId>user-api</artifactId> <version>1.0-SNAPSHOT</version> </dependency> </dependencies>
服务消费者的application.properties
server.port=9991 #当前服务、应用名字 dubbo.application.name=UserServiceConsumer #注册中心地址 dubbo.registry.protocol=zookeeper dubbo.registry.address=127.0.0.1:2181
服务消费者的Controller——MyController
package com.demo.serviceconsumer.controller; import com.demo.bean.User; import com.demo.serviceconsumer.service.MyService; import org.springframework.beans.factory.annotation.Autowired; import org.springframework.web.bind.annotation.GetMapping; import org.springframework.web.bind.annotation.RequestMapping; import org.springframework.web.bind.annotation.RestController; @RestController @RequestMapping public class MyController { //此处是Spring的注入 @Autowired public MyService myService; @GetMapping("/aaa") public User getStudentByName() { User student = myService.getStudentByName("张三"); System.out.printf("consumer端请求结果:%s %n", student); return student; } }
服务消费者的service层接口
package com.demo.serviceconsumer.service; import com.demo.bean.User; public interface MyService { User getStudentByName(String name); }
服务消费者的service层实现,调用了服务提供者的服务
package com.demo.serviceconsumer.service.impl; import com.demo.bean.User; import com.demo.service.UserService; import com.demo.serviceconsumer.service.MyService; import org.apache.dubbo.config.annotation.DubboReference; import org.springframework.stereotype.Service; //Spring的Service注解 @Service public class MyServiceImpl implements MyService { /** * 原来的{@link org.apache.dubbo.config.annotation.Reference}已经弃用,现在换为:{@link DubboReference} */ @DubboReference UserService userService; public User getStudentByName(String name) { return userService.getUserByName(name); } }
3、测试
项目创建完成之后,就可以开始测试了
-
下载zookeeper,将
apache-zookeeper-3.8.0-bin\conf目录下的配置文件名字改为:zoo.cfg -
打开
zoo.cfg文件,修改数据存储位置,加上此配置
dataDir=../data
并在apache-zookeeper-3.8.0-bin的根目录下,创建一个data文件夹(和conf目录平级)。
-
启动zookeeper,进入到
apache-zookeeper-3.8.0-bin\bin目录下,启动zkServer.cmd -
zookeeper启动完成之后,先启动服务提供者,然后启动服务消费者
-
从页面访问服务消费者的Controller, http://127.0.0.1:9991/aaa
-
页面显示

-
服务提供者打印日志:

-
服务消费者打印日志:

本文来自博客园,作者:周星星、同学,转载请注明原文链接:https://www.cnblogs.com/rxx1005/p/16013368.html


【推荐】国内首个AI IDE,深度理解中文开发场景,立即下载体验Trae
【推荐】编程新体验,更懂你的AI,立即体验豆包MarsCode编程助手
【推荐】抖音旗下AI助手豆包,你的智能百科全书,全免费不限次数
【推荐】轻量又高性能的 SSH 工具 IShell:AI 加持,快人一步
· DeepSeek 开源周回顾「GitHub 热点速览」
· 物流快递公司核心技术能力-地址解析分单基础技术分享
· .NET 10首个预览版发布:重大改进与新特性概览!
· AI与.NET技术实操系列(二):开始使用ML.NET
· 单线程的Redis速度为什么快?