Mac m1 安装PHP 7.3 任何版本 切换版本
准备
Mac安装brew已安装的自行跳过
官网
brew官网 Homebrew — The Missing Package Manager for macOS (or Linux)
安装
执行如下命令,期间需要输入几次密码
/bin/bash -c "$(curl -fsSL https://raw.githubusercontent.com/Homebrew/install/HEAD/install.sh)"
1
卸载
执行如下命令
/usr/bin/ruby -e "$(curl -fsSL https://raw.githubusercontent.com/Homebrew/install/master/uninstall)"
1
常用命令
安装软件:brew install xxx
卸载软件:brew uninstall xxx
搜索软件:brew search xxx
更新软件:brew upgrade xxx
查看列表:brew list
更新brew:brew update
————————————————
版权声明:本文为CSDN博主「SUPER_童」的原创文章,遵循CC 4.0 BY-SA版权协议,转载请附上原文出处链接及本声明。
原文链接:https://blog.csdn.net/weixin_40354683/article/details/116847197
安装
查看提供的PHP所有版本brew search php,默认只有PHP最新版本
如果想安装其他版本比如php7.3版本,执行brew tap shivammathur/php
再执行brew search php就会发现有PHP7.3版本了
执行安装PHP命令,遇到Y/N输入Y,静等执行成功,然后启动服务。
# 默认最新版本
brew install php
# 安装指定版本 比如7.3
brew install php@7.3
切换版本工具
安装命令brew install brew-php-switcher
$brew install brew-php-switcher

==> Downloading https://github.com/philcook/brew-php-switcher/archive/v2.2.tar.g
==> Downloading from https://codeload.github.com/philcook/brew-php-switcher/tar.
#=#=-# #
==> Installing brew-php-switcher
🍺 /usr/local/Cellar/brew-php-switcher/2.2: 6 files, 11.0KB, built in 4 seconds
使用方法
$brew-php-switcher 7.1
Switching to php@7.1
Switching your shell
Unlinking /opt/homebrew/Cellar/php@7.1/7.1.33... 0 symlinks removed
Unlinking /opt/homebrew/Cellar/php@7.4/7.4.14_1... 25 symlinks removed
Linking /opt/homebrew/Cellar/php@7.1/7.1.33... 25 symlinks created

If you need to have this software first in your PATH instead consider running:
echo 'export PATH="/opt/homebrew/opt/php@7.1/bin:$PATH"' >> ~/.zshrc
echo 'export PATH="/opt/homebrew/opt/php@7.1/sbin:$PATH"' >> ~/.zshrc
You will need sudo power from now on
Switching your apache conf
Restarting apache
All done!
命令
PHP启动brew services start php@7.3
PHP停止brew services stop php@7.3
PHP重启brew services restart php@7.3
安装位置
配置路径(php.ini在这个路径下)/opt/homebrew/etc/php/7.3
安装路径/opt/homebrew/opt/php@7.3
源路径/opt/homebrew/Cellar/php
配置
加入环境变量,执行命令成功。php -v就会发现变成想要的版本
# 依次执行如下命令
echo 'export PATH="/opt/homebrew/opt/php@7.3/bin:$PATH"' >> ~/.zshrc
echo 'export PATH="/opt/homebrew/opt/php@7.3/sbin:$PATH"' >> ~/.zshrc
source ~/.zshrc
nginx+php配置
Mac配置php+nginx
Mac m1 配置php+nginx_mac m1 homebrew nginx + php-CSDN博客
准备
Mac安装brew已安装的自行跳过 Mac 安装brew 卸载_brew卸载软件-CSDN博客
Mac安装PHP Mac m1 安装PHP 7.3 任何版本 切换版本_m1 mac 切换brew 版本-CSDN博客
Mac安装/配置nginx Mac m1 安装配置nginx_m1安装nginx-CSDN博客
配置
进入配置文件

vim /opt/homebrew/etc/nginx/nginx.conf
1
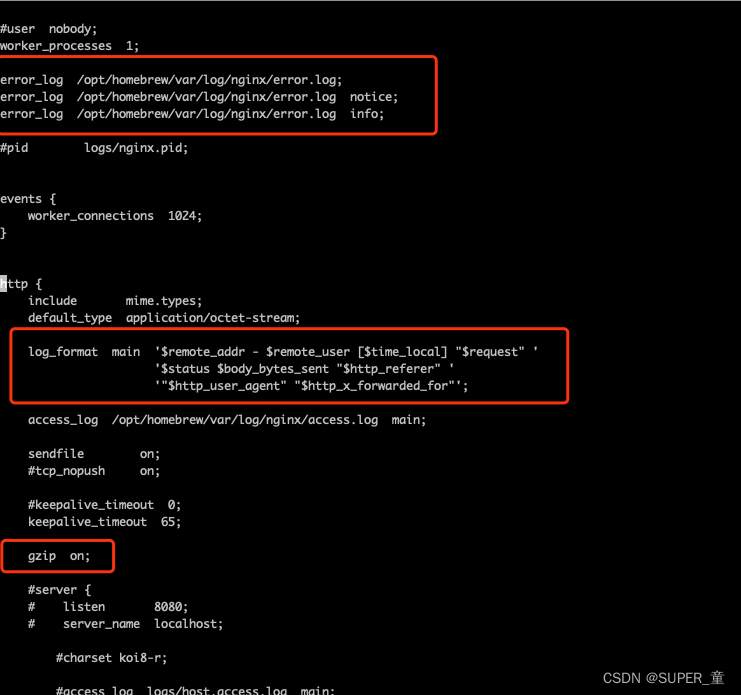
打开日志路径、打开压缩,如图所示前面的注释去掉,路径根据自己情况来定。

找到server服务,整体注释掉

翻到最下面,找到include,去掉注释

进入/usr/local/etc/nginx/servers,然后新建.conf后缀的文件

vim /usr/local/etc/nginx/servers/default.conf
1
复制如下代码到这个文件中,其中的端口80、路径/Users/zhoushitong/www/default根据自身情况来定

server {
    listen       80;
    server_name  127.0.0.1;

    access_log  /opt/homebrew/var/log/nginx/default.access.log  main;

    location / {
        root   /Users/zhoushitong/www/default;
        index welcome.html index.php index.html index.htm;
    }

    #error_page  404              /404.html;

    # redirect server error pages to the static page /50x.html
    #
    error_page   500 502 503 504  /50x.html;
    location = /50x.html {
        root   /Users/zhoushitong/www/default;
    }

    # proxy the PHP scripts to Apache listening on 127.0.0.1:80
    #
    #location ~ \.php$ {
    #    proxy_pass   http://127.0.0.1;
    #}

    # pass the PHP scripts to FastCGI server listening on 127.0.0.1:9000
    #
    location ~ \.php$ {
        root           html;
        fastcgi_pass   127.0.0.1:9000;
        fastcgi_index  index.php;
        fastcgi_param  SCRIPT_FILENAME  /Users/zhoushitong/www/default$fastcgi_script_name;
        include        fastcgi_params;
    }

    # deny access to .htaccess files, if Apache's document root
    # concurs with nginx's one
    #
    #location ~ /\.ht {
    #    deny  all;
    #}
}

laravel框架配置项目

server {
    listen       81;
    server_name  127.0.0.1;

    access_log  /opt/homebrew/var/log/nginx/elec-workshop.access.log  main;
    client_max_body_size 20m;
    location / {
        root   /Users/zhoushitong/www/rnv/elec-workshop/public;
        index  index.php index.html index.htm;
            try_files $uri $uri/ /index.php$is_args$query_string;
    }

    #error_page  404              /404.html;

    # redirect server error pages to the static page /50x.html
    #
    error_page   500 502 503 504  /50x.html;
    location = /50x.html {
        root   /Users/zhoushitong/www/default;
    }

    # proxy the PHP scripts to Apache listening on 127.0.0.1:80
    #
    #location ~ \.php$ {
    #    proxy_pass   http://127.0.0.1;
    #}

    # pass the PHP scripts to FastCGI server listening on 127.0.0.1:9000
    #
    location ~ \.php$ {
        root           html;
        fastcgi_pass   127.0.0.1:9000;
        fastcgi_index  index.php;
        fastcgi_param  SCRIPT_FILENAME  /Users/zhoushitong/www/rnv/elec-workshop/public$fastcgi_script_name;
        include        fastcgi_params;
    }

    # deny access to .htaccess files, if Apache's document root
    # concurs with nginx's one
    #
    #location ~ /\.ht {
    #    deny  all;
    #}
}

根据配置文件中的路径,在对应路径下新建phpinfo.php文件

重启brew services restart nginx

查错重载nginx -s reload

访问,成功

————————————————
版权声明:本文为CSDN博主「SUPER_童」的原创文章,遵循CC 4.0 BY-SA版权协议,转载请附上原文出处链接及本声明。
原文链接:https://blog.csdn.net/weixin_40354683/article/details/116851220
————————————————
版权声明:本文为CSDN博主「SUPER_童」的原创文章,遵循CC 4.0 BY-SA版权协议,转载请附上原文出处链接及本声明。
原文链接:https://blog.csdn.net/weixin_40354683/article/details/116848693


【推荐】国内首个AI IDE,深度理解中文开发场景,立即下载体验Trae
【推荐】编程新体验,更懂你的AI,立即体验豆包MarsCode编程助手
【推荐】抖音旗下AI助手豆包,你的智能百科全书,全免费不限次数
【推荐】轻量又高性能的 SSH 工具 IShell:AI 加持,快人一步
· 无需6万激活码!GitHub神秘组织3小时极速复刻Manus,手把手教你使用OpenManus搭建本
· C#/.NET/.NET Core优秀项目和框架2025年2月简报
· 葡萄城 AI 搜索升级:DeepSeek 加持,客户体验更智能
· 什么是nginx的强缓存和协商缓存
· 一文读懂知识蒸馏
2020-01-21 Mint UI教程汇总
2020-01-21 Vue框架Element UI教程(二)
2020-01-21 Vue框架Element UI教程-安装环境搭建(一)
2018-01-21 测试