Ember.js实现单页面应用程序
1.1.1 摘要
单页应用程序 (SPA) 是加载单个HTML 页面并在用户与应用程序交互时动态更新该页面的Web应用程序。
SPA使用AJAX和HTML5创建流畅且响应迅速的Web应用程序,不会经常进行页面重载。 但是,这意味着许多工作在客户端的JavaScript中进行。这导致我们需要在客户端中编程更多的Javascript代码来处理数据的交互问题,幸运的是,我们可以借助许多开放源代码JavaScript框架来简化创建SPA的任务,例如:Ember、Backbone、Angular、Knockout、DurandalJS和Hot Towel等等。
目录
- 创建ASP.NET MVC 项目
- 服务端的Model
- RESTful服务
- Ember应用程序
- Ember Model
- Ember Controller
- Ember Route
- Ember Template
1.1.2 正文
Ember是一个强大的JavaScript MVC框架,它用来创建复杂的Web应用程序,消除了样板,并且提供了一个标准的应用程序架构,它支持用户界面绑定、视图、Web表示层并且很好的和其他框架结合,为了创建一个实时交互的Web应用程序中,这里我们使用了ASP.NET MVC的REST服务。
MVC概念
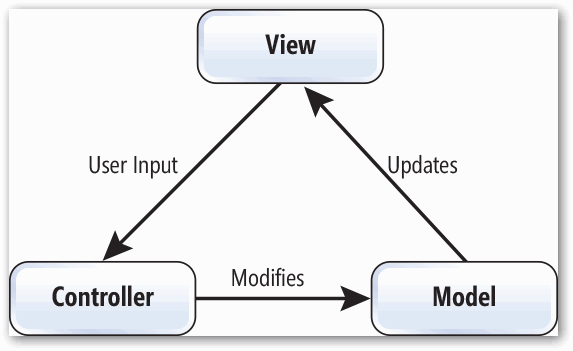
相信大家对于MVC模式再熟悉不过了,这里我们简单说一下MVC模式:它目的是为了分离视图、模型和控制器而设计出来的;其中模型用来储存数据,视图用来向用户展示应用程序,控制器充当模型和视图之间的桥梁。
图1 MVC模式
图2 Ember MVC
上图是Ember实现MVC模式,它包括了View、Controller、Router、Template以及Model等概念,接下来,我们将通过实现单页面应用程序来介绍Ember和Web API结合使用。
创建ASP.NET MVC 项目
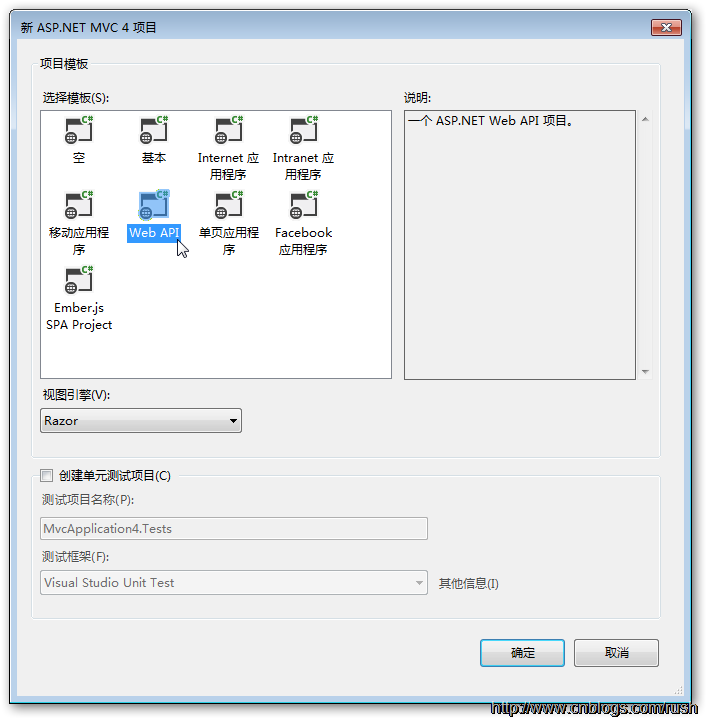
首先,我们创建一个ASP.NET MVC 4 Web应用程序,然后,选择项目模板Web API,这里为了简单所以没有使用Ember.js的模板,如果大家想使用或学习请到这里下载。
图3 创建ASP.NET MVC 4程序
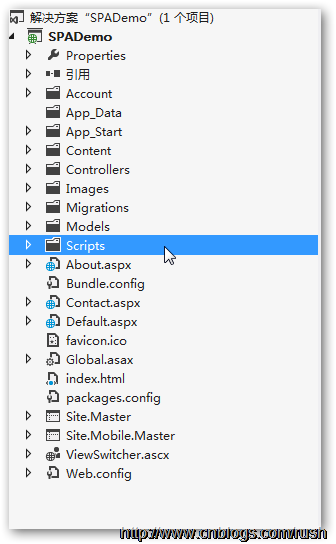
接着,我们在Script文件夹中添加引用脚本文件ember.js、ember-data.js、handlebars-1.0.0.js和jquery-2.0.3.js等,然后创建app文件,它用来存放客户端的脚本文件,我们创建application.js、models.js、routes.js和controllers.js文件。
图4 创建ASP.NET MVC 4程序
现在,我们通过实现ASP.NET MVC应用程序来提供服务端的API,单页面应用程序通过调用我们的API接口对数据进行操作,接下来,我们将给出具体的实现方法。
服务端的Model
接下来,我们在Models文件中创建一个数据传输类Employee,具体定义如下:
/// <summary>
/// Defines a DTO Employee.
/// </summary>
public class Employee
{
    public int Id { get; set; }
    public string FirstName { get; set; }
    public string LastName { get; set; }
    public string Title { get; set; }
    public string Department { get; set; }
    public string Remarks { get; set; }
}
接着,我们使用EF6进行数据持久化操作,我们知道EF的编程模式有3种:
- Database First:数据库先行
- Model First:模型先行
- Code First:代码先行
前面,我们已经定义数据传输对象Employee,但我们没有定义数据表,所以我们将使用代码先行(Code First)模型创建数据表。
接下来,我们定义EmployeesContext类型,具体定义如下:
/// <summary>
/// Defines a DB context.
/// </summary>
public class EmployeesContext : DbContext
{
    /// <summary>
    /// Initializes a new instance of the <see cref="EmployeesContext"/> class.
    /// </summary>
    public EmployeesContext()
        : base("name=EmployeesContext")
    {
    }

    /// <summary>
    /// Gets or sets the employees.
    /// </summary>
    /// <value>
    /// The employees.
    /// </value>
    public DbSet<Employee> Employees { get; set; }
}
在构造函数EmployeesContext()中,我们定义了数据库连接的名称为EmployeesContext,接下来,我们需要在Web.config文件中添加相应的数据库连接,具体定义如下:
<connectionStrings>
  <add name="EmployeesContext" providerName="System.Data.SqlClient" connectionString="Data Source=Your_DataSourceName;Initial Catalog= Your_DataBaseName;Integrated Security=True" />
</connectionStrings>
RESTful服务
接下来,我们需要提供接口让客户端程序调用,所以,我们在Controller文件中创建REST API的web控件器EmployeesController,它继承于ApiController并且定义方法GetEmployeesBy()和PutEmployee(),具体定义如下:
|
HTTP 动词 |
URI |
说明 |
|
GET |
/api/employees |
获取所有员工的列表 |
|
GET |
/api/employees/{id} |
获取 ID 等于 {id} 的员工信息 |
|
PUT |
/api/employees/{id} |
更新 ID 等于 {id} 的员工信息 |
|
POST |
/api/employees |
向数据库添加新员工信息 |
|
DELETE |
/api/employees/{id} |
从数据库中删除员工信息 |
表1 REST API
/// <summary>
/// PUT api/Employees/30005
/// </summary>
/// <param name="id">The identifier.</param>
/// <param name="employee">The employee.</param>
/// <returns></returns>
public async Task<IHttpActionResult> PutEmployee(int id, Employee employee)
{
    if (!ModelState.IsValid)
    {
        return BadRequest(ModelState);
    }

    if (id != employee.Id)
    {
        return BadRequest();
    }

    db.Entry(employee).State = EntityState.Modified;

    try
    {
        await db.SaveChangesAsync();
    }
    catch (DbUpdateConcurrencyException)
    {
        if (!EmployeeExists(id))
        {
            return NotFound();
        }
        // You can log the error.
        throw;
    }
    return Ok();
}
上面,我们实现了REST API提供了接口GetEmployeesBy()和PutEmployee(),客户端通过将类型置于URI的查询字符串中进行调用;例如,我们要获取 IT部所有员工的信息,客户端会发送Http GET请求/api/employees?department=IT,那么Web API将自动将查询参数绑定到 GetEmployeesBy()方法中。
也许有人会疑问:“Web API是如何自动将查询绑定到不同的API方法中的呢?”首先,我们要知道在客户端是通过发送Http请求来调用Web API的,当我们的Web API接受到Http请求时,它会根据路由选择来绑定具体的方法。
接下来,让我们看看默认路由方法的实现,具体定义如下:
/// <summary>
/// Registers the specified configuration.
/// </summary>
/// <param name="config">The configuration.</param>
public static void Register(HttpConfiguration config)
{
    // Web API configuration and services
    // Web API routes
    config.Routes.MapHttpRoute(
        name: "DefaultApi",
        routeTemplate: "api/{controller}/{id}",
        defaults: new { id = RouteParameter.Optional }
    );
}
在WebApiConfig类中,已经提供了默认的路由实现,当然我们也可以重新实现该方法,但是我们这里还是使用默认的路由方法。
例如:客户端发送Http请求/api/employees?department=IT,路由选择会到EmployeesController控制器中找参数是department的方法,最后绑定该方法调用。
图5 Http请求
现在,我们已经实现了服务器端REST API了,接下来,我们将通过EF的Code First模式创建数据库表。
我们的程序使用是EF 6和Web API 5.0,我们可以在程序包管理控制台中输入以下命令进行安装。
- Install-Package Microsoft.AspNet.WebApi -Version 5.0.0
- Install-Package EntityFramework -Version 6.0.2
我们也可以使用Update-Package口令更新所有的包,Code First迁移有三个主命令,具体如下:
- Enable-Migrations:启用迁移。
- Add-Migration:将根据自创建上次迁移以来您对模型所做的更改,为下一次迁移搭建基架。
- Update-Database:将所有挂起的迁移应用于数据库。
当成功启用数据迁移会在我们的项目中增加Migrations文件并且会在我们的数据库中生成相应的数据库表。
图6 数据迁移
图 7 Employees数据表
前面,我们通过创建ASP.NET MVC应用程序来提供服务器端的API,接下来让我们实现Ember客户端吧,关于Ember入门可以参考这里。
Ember应用程序
首先,我们在application.js文件中创建一个Ember应用程序,具体定义如下:
/// <summary>
/// Create an ember application.
/// </summary>
window.App = Ember.Application.create({
    // For debugging, log the information as below.
    LOG_TRANSITIONS: true,
    LOG_TRANSITIONS_INTERNAL: true
});
Ember Model
接着,我们需要在客户端中创建一个数据存储对象Employee,具体定义如下:
/// <summary>
/// Create an employee model.
/// </summary>
App.Employee = DS.Model.extend({
    Id: DS.attr(),
    FirstName: DS.attr(),
    LastName: DS.attr(),
    Title: DS.attr(),
    Department: DS.attr(),
    Remarks: DS.attr(),
});
在之前的部分中,我们已经定义了服务器端的数据模型Employee,由于RESTful服务只返回JSON格式的对象,为了方便把数据模型绑定到视图中,我们需要在客户端中定义一个与服务器端对应的Ember数据模型Employee。
Ember Controller
控制器定义在Scripts/app/controllers.js中,如果我们要表示单一的模型(单个Employee对象),那么我们可以继承ObjectController。
如果我们表示多模型(一系列Employee对象),那么就需要继承ArrayController。
/// <summary>
/// To represent a collection of models by extending Ember.ArrayController.
/// </summary>
App.EmployeesController = Ember.ArrayController.extend();


/// <summary>
/// To represent a single model, extend Ember.ObjectController
/// </summary>
App.EmployeeController = Ember.ObjectController.extend({

    // Marks the model is edited or not.
    isEditing: false,
    // Binding corresponding event.
    actions: {
        edit: function() {
            this.set('isEditing', true);
        },
        save: function() {
            this.content.save();
            this.set('isEditing', false);
        },
        cancel: function() {
            this.set('isEditing', false);
            this.content.rollback();
        }
    }
});
上面,我们定义了两个控制器分别是EmployeeController和EmployeesController,在EmployeesController中,我们实现了事件处理方法;当用户点击保存时调用save()方法,接着,我们需要定义EmployeeAdapter对象序列化数据,并且调用Web API的方法进行保存。
/// <summary>
/// Create a custom adapter for employee, it will invoke our web api.
/// </summary>
App.EmployeeAdapter = DS.RESTAdapter.extend({
    // Override how the REST adapter creates the JSON payload for PUT requests.
    // Of course, we can use other verbs POST, DELETE and so forth.
    updateRecord: function(store, type, record) {
        var data = store.serializerFor(type.typeKey).serialize(record);
        return this.ajax(this.buildURL(type.typeKey, data.Id), "POST", { data: data });
    },
    namespace: 'api'
});
我们实现了updateRecord()方法,获取用户提交的数据进行序列化,然后调用Web API进行保存。
Ember Route
路由定义在Scripts/app/routes.js中,这里我们定义了departments和about的路由。
/// <summary>
/// Defines departments and about router.
/// </summary>
App.Router.map(function() {
    this.route('about');
    this.resource('departments', function() {
        // The employees router under department.
        this.route('employees', { path: '/:department_name' });
    });
});
Ember Template
我们知道Ember使用Handlebars模板引擎,那么我们定义的模板是基于Handlebars语法的,如果大家有使用过jQuery模板或其他脚本模板,那么对于掌握handlebars.js的使用就没有太大的困难了,如果确实没有使用过也不用担心,因为handlebars.js的使用也是挺简单的。
首先,我们定义了6个模板,它们分别是application、about、departments、departments/employees、_employees和error。
application.hbs:当应用程序启动时默认加载的模板。
about.hbs:为“/about”路由的模板。
departments.hbs:为“/departments”路由的模板,显示部门导航条。
departments/employees.hbs:为“/departments/employees”路由的模板,根据部门获取所有用户信息。
_employees:现在每个用户信息的模板,这里我们要注意模板名开头的下划是有意义的,因为我们使用了partial来渲染_employees,简单来说,接收一个模板作为其参数,然后恰当地渲染这个模板(具体请参考这里)。
error:是现在一些错误信息的模板。
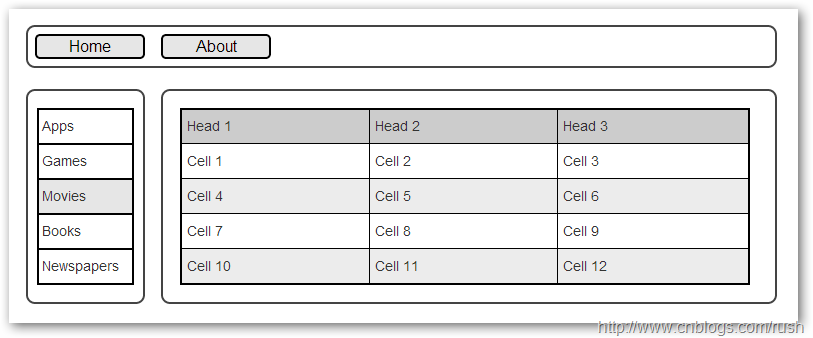
图 8 程序界面设计
<!-- application START --> <script type="text/x-handlebars" data-template-name="application"> <div class="container"> <h1>Ember SPA Demo</h1> <div class="well"> <div class="navbar navbar-static-top"> <div class="navbar-inner"> <ul class="nav nav-tabs"> <li>{{#linkTo 'departments'}}Departments{{/linkTo}} </li> <li>{{#linkTo 'about'}}About{{/linkTo}} </li> </ul> </div> </div> </div> <div class="container"> <div class="row">{{outlet}}</div> </div> </div> <div class="container"> <p>©2013 Jackson Huang</p> </div> </script> <!-- application END --> <!-- about START --> <script type="text/x-handlebars" data-template-name="about"> <div class="container"></div> <h3>Ember SPA Demo</h3> </script> <!-- about END --> <!-- departments START --> <script type="text/x-handlebars" data-template-name="departments"> <div class="span2"> <div class="navbar"> <div class="navbar-inner"> <ul class="nav nav-stacked"> {{#each item in model}} <li>{{#linkTo 'departments.employees' item}}{{item.name}}{{/linkTo}}</li> {{/each}} </ul> </div> </div> </div> <div class="span8">{{outlet}}</div> </script> <!-- departments END --> <!-- departments/employees START --> <script type="text/x-handlebars" data-template-name="departments/employees">{{partial "employees"}}</script> <!-- departments/employees END --> <!-- _employees START --> <script type="text/x-handlebars" data-template-name="_employees"> {{#if model}} <table class="table table-bordered table-condensed" > <thead> <tr><th>FirstName</th><th>LastName</th><th>Department</th><th>Title</th><th>Remarks</th></tr> </thead> <tbody> {{#each employee in model itemController="employee"}} <tr> {{#if employee.isEditing}} <td>{{input type="text" value=employee.FirstName }}</td> <td>{{input type="text" value=employee.LastName}}</td> <td>{{view Ember.Select class="input-small" contentBinding="App.EmployeeController.departments" valueBinding="employee.Department"}}</td> <td>{{input type="text" value=employee.Title }}</td> <td>{{input type="text" value=employee.Remarks }}</td> <td> <button class="btn" {{action 'save'}}>Save</button> <button class="btn" {{action 'cancel'}}>Cancel</button> </td> {{else}} <td>{{employee.FirstName}}</td> <td>{{employee.LastName}}</td> <td>{{employee.Department}}</td> <td>{{employee.Title}}</td> <td>{{employee.Remarks}}</td> <td> <button class="btn" {{action 'edit'}}>Edit</button> </td> {{/if}} </tr> {{/each}} </tbody> </table> {{else}} <p>No matches.</p> {{/if}} </script> <!-- _employees END --> <!-- error START --> <script type="text/x-handlebars" data-template-name="error"> <h1>Error</h1> <h2>{{status}}.. {{statusText}}</h2> </script> <!-- error END –>上面,我们分别定义了application、about、departments、departments/employees、_employees和error,其中,在departments/employees模板中,通过partial方法把模拟通过参数的形式传递给_employee模板。
图 9程序界面
现在,我们已经完成了Ember单页面应用程序,这里我想大家推荐一个好用Chrome插件Ember Inspector,通过它我们可以更加容易理解Ember的模板,路由和控制之间的关系,从而提高我们的开发效率。
1.1.3 总结
我们通过一个单页面应用程序的实现介绍了Ember和Web API的结合使用,其实,Ember中控制器、视图、模型和路由的概念和ASP.NET MVC非常相似,如果我们有ASP.NET MVC编程经验,那么对于掌握Ember的使用就没有太多的困难,本文仅仅是介绍关于Ember.js一些基础知识,如果大家想进一步学习,推荐大家到官方论坛学习或参考相应的文章。
最后,祝大家新年快乐,身体健康,阖家幸福,Code with pleasure。
参考
- http://www.cnblogs.com/rush/archive/2012/05/15/2502264.html
- http://msdn.microsoft.com/en-us/data/jj591621
- http://msdn.microsoft.com/zh-cn/data/jj591621.aspx
- http://www.asp.net/single-page-application/overview/templates/emberjs-template
- http://www.codeproject.com/Articles/511031/A-sample-real-time-web-application-using-Ember-js
- http://msdn.microsoft.com/zh-cn/magazine/dn463786.aspx
|
|
关于作者:[作者]:
JK_Rush从事.NET开发和热衷于开源高性能系统设计,通过博文交流和分享经验,欢迎转载,请保留原文地址,谢谢。 |

 单页应用程序 (SPA) 是加载单个HTML 页面并在用户与应用程序交互时动态更新该页面的Web应用程序。...


 浙公网安备 33010602011771号