
本次安装所有使用的包将在文末进行分享。
系统环境:CentOS7,FdfsV5.05
一、FastDFS依赖安装
安装libevent
1).解压压缩包:
tar -zxvf libevent-2.0.22-stable.tar.gz
2)进入目录进行配置
cd libevent-2.0.22-stable
./configure --prefix=/data/libevent
安装libfastcommon
解压压缩包
tar -zxvf libfastcommon.tar.gz
2)进入目录进行编译安装
cd libfastcommon
./make.sh
./make.sh install
注:执行make失败的同学,请根据错误信息解决。最小化安装的系统有可能会存在gcc不存在的情况,自行安装gcc环境即可。
3)libfastcommon.so默认安装到了/usr/lib64/libfastcommon.so,而FastDFS主程序设置的lib目录是/usr/local/lib,所以设置软连接:
ln -s /usr/lib64/libfastcommon.so /usr/local/lib/libfastcommon.so
注:软连接为绿色,表示链接成功,红色表示失败,此时需要用户找出正确的libfastcommon.so文件地址进行链接。
二、FastDFS 安装
1.安装tracker
1)解压压缩包:
tar -xzvf FastDFS_v5.05.tar.gz
2)进入解压后的目录,修改make.sh文件, 将 TARGET_PREFIX=$DESTDIR/usr 改成 TARGET_PREFIX=$DESTDIR/usr/local:
cd FastDFS
vim make.sh
3)编译安装:
./make.sh && ./make.sh install
4)配置tracker
(1).创建tracker文件目录
mkdir -p /data/fdfs/tracker
(2)将/etc/fdfs/目录下的tracker.conf.sample文件复制并重命名为tracker.conf:
cp /etc/fdfs/tracker.conf.sample /etc/fdfs/tracker.conf
(3)修改tracker.conf文件,配置base_path=/data/fdfs/tracker
vim /etc/fdfs/tracker.conf
5)将tracker配置为服务并设置自动启动,然后启动tracker
(1)将fdfs_trackerd添加到/etc/init.d/下:
cp /home/FastDFS/init.d/fdfs_trackerd /etc/init.d/
(2)添加开机自动启动
chkconfig --add fdfs_trackerd
(3)设置fdfs_trackerd服务各等级为on
chkconfig fdfs_trackerd on
(4)启动tracker服务
service fdfs_trackerd start
2.安装storage
安装storage步骤同安装tracker,如果是同一台机器则不用再安装,只需配置storage即可再启动即可。
编译安装
略:见tracker安装步骤。
配置storage
(1)创建storage文件目录
mkdir -p /data/fdfs/storage
(2)将/etc/fdfs/目录下的storage.conf.sample文件复制并重命名为storage.conf
cp /etc/fdfs/storage.conf.sample /etc/fdfs/storage.conf
(3)修改storage.conf文件,具体要修改的参数如下:
vim /etc/fdfs/storage.conf
要修改的参数:
base_path=/data/fdfs/storage
store_path0=/data/fdfs/storage
tracker_server=192.168.31.254:22122 #tracker的ip和端口
3)将storage配置为服务设置开机自动启动,并启动storage
cp /home/FastDFS/init.d/fdfs_storaged /etc/init.d/
chkconfig --add fdfs_storaged
chkconfig fdfs_storaged on
service fdfs_storaged start
3.测试
经过以上tracker和storage的安装以及启动,FastDFS的安装已经完成,我们可以测试安装是否成功。自信的同学可以直接跳过此步骤(^_^)。
1).查看端口监听:
netstat -unltp|grep fdfs
2)上传文件
(1)配置client.conf文件:
cp /etc/fdfs/client.conf.sample /etc/fdfs/client.conf
vim /etc/fdfs/client.conf
修改以下参数:
base_path=/data/fdfs/ tracker #tracker服务器文件路径
tracker_server=192.168.31.254:22122 #tracker服务器IP地址和端口号
http.tracker_server_port=8080 # tracker 服务器的 http 端口号,必须和tracker.conf的设置对应起来
(2)测试文件上传:
/usr/local/bin/fdfs_test /etc/fdfs/client.conf upload /home/timg.jpg
(3)测试文件下载
/usr/local/bin/fdfs_download_file /etc/fdfs/client.conf group1/M00/00/00/wKgf_ln1fLyAchE7AAEIhvAoRxA722_big.jpg timg2.jpg
此处要下载的文件,在测试上传成功之后,测试程序会给出。
三、文件服务器迁移
背景,在另外一台机器上安装配置好了FastDFS,需要将现有FastDFS的文件迁移过来。
原服务器ip:192.168.31.254
新服务器ip:192.168.31.73
如果使用了自定义server ID特性,那么比较容易,直接将tracker上的IP和ID映射文件storage_ids.conf修改好,然后将storage的data文件一一对应拷贝过去即可。(血泪史!,后续安装的时候最好开启此项特性!)
开启方法:tracker.conf文件中多修改以下三个参数
use_storage_id = true
storage_ids_filename = stirafe_ids.conf
id_type_in_filename = id
由于我们使用的默认安装,并未设置server ID,需要修改tracker和storage的data目录下的几个数据文件,将旧IP调整为新IP。
迁移步骤
旧服务器data数据打包下载到新服务器。
新服务器停止tracker和storage,分别将其数据文件目录用旧服务器的文件替换掉。( 一定要先停掉tracker和storage服务)
如下所示,新服务器已经停止服务:
删除新服务器data数据,使用旧服务器data替换
修改新服务器storage和tracker ip信息。
(1).修改tracker的data文件
data/storage_groups_new.dat
data/storage_servers_new.dat
data/storage_sync_timestamp.dat
这三个文件要将旧IP设置为新ip。
(2)修改storage的data文件
data/.data_init_flag
data/sync/${ip_addr}_${port}.mark:此类文件,需要将文件名中的IP地址调整过来。
启动新服务器测试文件下载。
所有文件修改完毕,启动新服务器,测试之前在旧服务器上上传的文件是否可以下载。
四、nginx代理模块安装
安装该模块主要是为了提供FastDFS文件系统的http下载功能,文件系统本身提供的http下载功能在V4版本的时候就已经被移除。
安装fastdfs-nginx-module插件
1)解压压缩包,到合适位置解压即可,后安装nginx的时候会设置插件路径
tar -zxvf fastdfs-nginx-module_v1.16.tar.gz
2)修改插件模块的config文件,将CORE_INCS="$CORE_INCS /usr/local/include/fastdfs /usr/local/include/fastcommon/" 改成 CORE_INCS="$CORE_INCS /usr/local/include/fastdfs /usr/include/fastcommon/"
3)将mod_fastdfs.conf拷贝到/etc/fdfs目录下并修改配置信息
修改的信息有:
base_path=/data/fdfs/storage
traker_server=192.169.0.2:22122
url_have_group_name= true
store_path0=/data/fdfs/storage
group_count=1
在末尾加上
[group1]
group_name=group1
storage_server_port=23000
store_path_count=1
store_path0=/data/fdfs/storage
其他参数根据实际情况可以自行调整
4)设置软连接
ln -s /usr/local/lib64/libfdfsclient.so /usr/lib64/libfdfsclient.so
ln -s /usr/local/lib64/libfdfsclient.so /usr/local/lib/libfdfsclient.so
pcre依赖包准备
到合适位置解压即可,后续安装nginx的时候会指定pcre路径
zlib依赖包准备
到合适位置解压即可,后续安装nginx的时候会指定zlib路径
4.Nginx安装
1)解压nginx,并进行编译参数设置
tar -zxvf nginx-1.8.0.tar.gz
cd /home/nginx-1.8.0/
./configure --prefix=/data/nginx --add-module=/home/fastdfs-nginx-module/src --with-pcre=/home/pcre-8.36 --with-zlib=/home/zlib-1.2.11
2)编译安装
./configure --prefix=/usr/local/nginx --with-http_stub_status_module --with-http_ssl_module --with-http_gzip_static_module --with-http_gunzip_module --with-file-aio --with-http_flv_module --with-http_mp4_module --with-pcre --with-http_realip_module --with-pcre=/root/fastdfs安装相关软件/pcre-8.36 --with-zlib=/root/fastdfs安装相关软件/zlib-1.2.11 --add-module=/root/fastdfs安装相关软件/nginx-1.8.0/headers-more-nginx-module-0.33
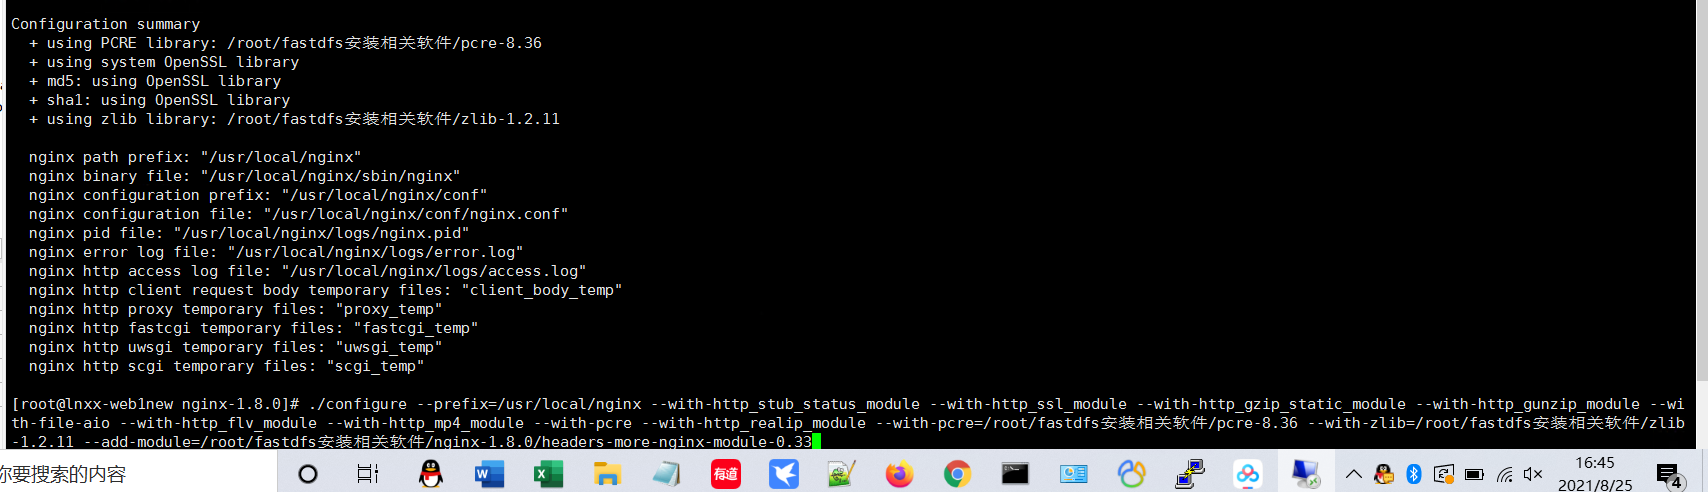
./configure: error: SSL modules require the OpenSSL library.
You can either do not enable the modules, or install the OpenSSL library
into the system, or build the OpenSSL library statically from the source
with nginx by using --with-openssl=<path> option.
yum -y isntall openssl-devel
make && make install
如果提示"You need a C++ compiler for C++ support",安装相应的gcc-c++模块即可。
使用离线方式安装gcc-c++的同学一定要注意gcc-c++必须要和gcc版本匹配才可以使用。使用gcc -v命令可以查看gcc版本。如果不确定是否匹配,可以使用笔者提供的gcc和gcc-c++ rpm包进行升级替换(笔者安装日期为2017年10月29日,CentOS最新的gcc版本为4.8.5-16)。
3)修改nginx.conf文件
vim /data/nginx/conf/nginx.conf
设置以下参数:
修改nginx server监听端口:listen 9000;#该端口是nginx要启动的端口,可以根据自己实际需要调整
加入location :
location ~ /group1/M00 {
root /data/fdfs/storage/data;
set $filename $arg_filename;
if ($args ~ (.*)filename=[^&]*(.*)) {
set $args $1$2;
}
ngx_fastdfs_module;
add_header Content-Disposition "attachment; filename=$filename";
}
4)将fdfs的相关被nginx需要的配置文件copy到/etc/fdfs目录
cp /home/FastDFS/conf/mime.types /etc/fdfs
cp /home/FastDFS/conf/http.conf /etc/fdfs
5)建立M00至存储目录的符号连接
ln -s /data/fdfs/storage/data /data/fdfs/storage/data/M00
6)启动nginx
/data/nginx/sbin/nginx
至此,文件服务器所有安装配置完成,我们可以在浏览器中输入刚才测试上传的文件下载地址获取到图片:
http://192.168.31.254:9000/group1/M00/00/00/wKgf_ln1fLyAchE7AAEIhvAoRxA722_big.jpg
可能 的配置nginx
conf.d/storage.conf
# storage.conf
server {
    listen       8080 ;
    #server_name  _ ;

    location / {
        root   html;
        index  index.html index.htm;
    }

    location ~/group1/ {
        #alias   /var/fdfs/data/;
        alias   /data/fdfsenv/storage/data/;
        ngx_fastdfs_module;
    }

}
nginx.conf
user  nobody;
worker_processes  4;

error_log  logs/error.log warn;
pid        /var/run/nginx.pid;


events {
    worker_connections  1024;
}


http {
    include       mime.types;
    default_type  application/octet-stream;

    log_format  main  '$remote_addr - $remote_user [$time_local] "$request" '
                      '$status $body_bytes_sent "$http_referer" '
                      '"$http_user_agent" "$http_x_forwarded_for"';

    access_log  logs/access.log  main;

    sendfile        on;
    #tcp_nopush     on;

    keepalive_timeout  65;

    #gzip  on;

    include conf.d/*.conf;
}
ps:如果需要其他计算机能够访问图片,记得将9000端口防火墙关闭,同时fastdfs的storage,tracker的22122和23000端口防火墙也要关闭。这里就不再赘述如何关闭防火墙端口了,在上一篇mysql安装中已经有所提及。
附:本次探索所有使用的包(含gcc与gcc-c++相关包)
百度网盘:http://pan.baidu.com/s/1bKhyLC

 浙公网安备 33010602011771号