springboot 集成druid 集成mybatise
spring加载druid和mybatise 和这里的ssm 框架的配置比对:https://www.cnblogs.com/ruber/p/17582147.html
pom依赖
<?xml version="1.0" encoding="UTF-8"?>
<project xmlns="http://maven.apache.org/POM/4.0.0" xmlns:xsi="http://www.w3.org/2001/XMLSchema-instance"
         xsi:schemaLocation="http://maven.apache.org/POM/4.0.0 https://maven.apache.org/xsd/maven-4.0.0.xsd">
    <modelVersion>4.0.0</modelVersion>
    <parent>
        <groupId>org.springframework.boot</groupId>
        <artifactId>spring-boot-starter-parent</artifactId>
        <version>2.7.14</version>
        <relativePath/> <!-- lookup parent from repository -->
    </parent>
    <groupId>com.example</groupId>
    <artifactId>springbootdruidmybatise</artifactId>
    <version>0.0.1-SNAPSHOT</version>
    <name>springbootdruidmybatise</name>
    <description>springbootdruidmybatise</description>
    <properties>
        <java.version>17</java.version>
    </properties>
    <dependencies>
        <dependency>
            <groupId>org.springframework.boot</groupId>
            <artifactId>spring-boot-starter-web</artifactId>
        </dependency>

        <dependency>
            <groupId>org.springframework.boot</groupId>
            <artifactId>spring-boot-starter-test</artifactId>
            <scope>test</scope>
        </dependency>

        <!--====================== druid=====================================-->
        <!-- spring-boot-starter-jdbc 里面也加载了 spring-jdbc-->
        <dependency>
            <groupId>org.springframework.boot</groupId>
            <artifactId>spring-boot-starter-jdbc</artifactId>
        </dependency>
<!--    直接加载 spring-jdbc 也行    -->
<!--        <dependency>-->
<!--            <groupId>org.springframework</groupId>-->
<!--            <artifactId>spring-jdbc</artifactId>-->
<!--        </dependency>-->
        <dependency>
            <groupId>com.alibaba</groupId>
            <artifactId>druid-spring-boot-starter</artifactId>
            <version>1.2.18</version>
        </dependency>
        <dependency>
            <groupId>mysql</groupId>
            <artifactId>mysql-connector-java</artifactId>
            <version>8.0.33</version>
        </dependency>

        <!--mybatis mapper生成插件-->
        <dependency>
            <groupId>org.mybatis.generator</groupId>
            <artifactId>mybatis-generator-core</artifactId>
            <version>1.4.2</version>
        </dependency>
        <!-- mybatis 启动 注意与springboot版本适配-->
        <dependency>
            <groupId>org.mybatis.spring.boot</groupId>
            <artifactId>mybatis-spring-boot-starter</artifactId>
            <version>2.3.1</version>
        </dependency>

    </dependencies>

    <build>
        <plugins>
            <plugin>
                <groupId>org.springframework.boot</groupId>
                <artifactId>spring-boot-maven-plugin</artifactId>
            </plugin>

            <!-- Mybatis-Generator插件,自动生成代码 -->
            <plugin>
                <groupId>org.mybatis.generator</groupId>
                <artifactId>mybatis-generator-maven-plugin</artifactId>
                <version>1.3.5</version>
                <configuration>
                    <configurationFile>${project.basedir}/src/main/resources/generatorConfig.xml</configurationFile>
                    <verbose>true</verbose>
                    <overwrite>true</overwrite>
                </configuration>
                <dependencies>
                    <!--必須要引入数据库驱动-->
                    <dependency>
                        <groupId>mysql</groupId>
                        <artifactId>mysql-connector-java</artifactId>
                        <!--必须制定版本-->
                        <version>8.0.33</version>
                    </dependency>
                </dependencies>
            </plugin>
        </plugins>
    </build>

</project>
application.yml 分别是
- druid 连接池配置
- 表初始化配置
- mybatis配置
spring:
  mvc:
    pathmatch.matching-strategy: ant_path_matcher
  messages:
    basename: i18n.message
  web:
    locale-resolver: accept_header

  datasource:
    url: jdbc:mysql://localhost:3306/mytest?useUnicode=true&characterEncoding=UTF-8&useSSL=false&serverTimezone=UTC
    driver-class-name: com.mysql.cj.jdbc.Driver
    username: root
    password: 123456
    type: com.alibaba.druid.pool.DruidDataSource
    druid:
      initial-size: 5
      min-idle: 5
      max-active: 20
      max-wait: 60000
      time-between-eviction-runs-millis: 60000
      min-evictable-idle-time-millis: 300000
      validation-query: SELECT 1 FROM DUAL
      test-while-idle: true
      test-on-borrow: false
      pool-prepared-statements: true

      filters: stat,wall
      max-pool-prepared-statement-per-connection-size: 20
      use-global-data-source-stat: true
      connection-properties: druid.stat.mergeSql=true;druid.stat.slowSqlMillis=500
      #开启druid 监控台servlet 登录地址:http://localhost:8080/druid/index.html
      stat-view-servlet:
        enabled: true
        #监控台登录账号密码
        login-username: root
        login-password: 123456
      #开启druid 监控filter
      web-stat-filter:
        enabled: true
  #插入表,插入一次就关掉
#  sql:
#    init:
#      schema-locations: classpath:sql/mytest.sql
#      mode: always
mybatis:
  mapper-locations: classpath:com/example/springboot04_mocmvc/mapper/*Mapper.xml
  type-aliases-package: com.example.springboot04_mocmvc.pojo
  configuration:
    map-underscore-to-camel-case: true

#指定mybatis配置文件。以前使用配置文件的方式
#  config-location: classpath:mybatis-config.xml
访问druid监控台:http://localhost:8080/druid/index.html
generatorConfig.xml
<!DOCTYPE generatorConfiguration PUBLIC
        "-//mybatis.org//DTD MyBatis Generator Configuration 1.0//EN"
        "http://mybatis.org/dtd/mybatis-generator-config_1_0.dtd">
<generatorConfiguration>
    <context id="simple" targetRuntime="MyBatis3Simple">

        <!--数据源-->
        <jdbcConnection driverClass="com.mysql.cj.jdbc.Driver"
                        connectionURL="jdbc:mysql://localhost:3306/mytest"
                        userId="root"
                        password="123456"/>

        <!-- pojo JAVA实体生成的规则
            targetPackage:生成到哪个包下面
            targetProject:当前文件的哪个相对路径下
        -->
        <javaModelGenerator targetPackage="com.example.springboot04_mocmvc.pojo" targetProject="src/main/java"/>


        <!--mapper xml映射文件 生成的规则
            targetPackage:生成到哪个包下面
            targetProject:当前文件的哪个相对路径下

            注意:sqlMapGenerator 在 javaClientGenerator 前面,注意语句顺序
        -->
        <sqlMapGenerator targetPackage="com.example.springboot04_mocmvc.mapper" targetProject="src/main/resources"></sqlMapGenerator>


        <!--mapper 接口 生成的规则
            targetPackage:生成到哪个包下面
            targetProject:当前文件的哪个相对路径下
            type:指定生成的方式
                1.使用注解的方式
                2.使用接口绑定的方式生成 (要配置sqlMapGenerator)
        -->
        <javaClientGenerator type="XMLMAPPER" targetPackage="com.example.springboot04_mocmvc.mapper" targetProject="src/main/java"/>


        <!--配置哪些表进行代码生成
                tableName:表明
                domainObjectName:指定pojo 类名 (可省略自动生成)
                mapperName:指定mapper mapper接口 和 xml映射文件 用的同一个名字 (可省略自动生成)
        -->
        <table tableName="mytable"/>
        <table tableName="person"/>
    </context>
</generatorConfiguration>
注意此处是使用插件方式生成代码,
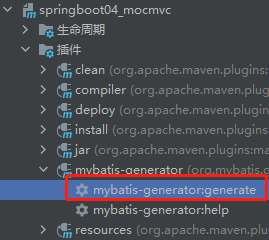
代码方式生成:
 @Test
    public void MybatisTool() throws XMLParserException, IOException,
            InvalidConfigurationException, SQLException, InterruptedException {
        List<String> warnings = new ArrayList<String>();
        boolean overwrite = true;
        File configFile = new File("src/main/resources/mybatis-jenerator.xml");
        ConfigurationParser cp = new ConfigurationParser(warnings);
        Configuration config = cp.parseConfiguration(configFile);
        DefaultShellCallback callback = new DefaultShellCallback(overwrite);
        MyBatisGenerator myBatisGenerator = new MyBatisGenerator(config, callback, warnings);
        myBatisGenerator.generate(null);
    }
注意:使用mybatise @MapperScan 扫描接口,否则自动注入失败
@MapperScan("com.example.springbootdruidmybatise.mapper")
@SpringBootApplication
@MapperScan("com.example.springbootdruidmybatise.mapper")
public class SpringbootdruidmybatiseApplication {

    public static void main(String[] args) {
        SpringApplication.run(SpringbootdruidmybatiseApplication.class, args);
    }

}
只引入druid的配置文件,仅供参考
<dependency>
    <groupId>com.alibaba</groupId>
    <artifactId>druid</artifactId>
    <version>1.2.18</version>
</dependency>
package com.example.springbootdruidmybatise.config;

import com.alibaba.druid.support.http.StatViewServlet;
import com.alibaba.druid.support.http.WebStatFilter;
import org.springframework.boot.autoconfigure.jdbc.DataSourceProperties;
import org.springframework.boot.web.servlet.FilterRegistrationBean;
import org.springframework.boot.web.servlet.ServletRegistrationBean;
import org.springframework.context.annotation.Bean;
import org.springframework.context.annotation.Configuration;

import javax.sql.DataSource;

/**
 * @authour cyf
 * 2023/8/4 22:52
 */
@Configuration
public class DruidConfiguration {
    /**
     * 方式一:
     */
    //@Bean
    //@ConfigurationProperties(prefix = "spring.datasource")
    //public DataSource dataSource(){
    //    return new DruidDataSource();
    //}

    /**
     * 方式二
     */
    @Bean
    public DataSource dataSource(DataSourceProperties dataSourceProperties){
        return dataSourceProperties.initializeDataSourceBuilder().build();
    }

    @Bean
    public ServletRegistrationBean statViewServlet() {
        ServletRegistrationBean servletRegistrationBean = new ServletRegistrationBean(new StatViewServlet(), "/druid/*");
        // 添加IP白名单
        servletRegistrationBean.addInitParameter("allow", "127.0.0.1");
        // 添加IP黑名单,当白名单和黑名单重复时,黑名单优先级更高
        servletRegistrationBean.addInitParameter("deny", "127.0.0.1");
        // 添加控制台管理用户
        servletRegistrationBean.addInitParameter("loginUsername", "admin");
        servletRegistrationBean.addInitParameter("loginPassword", "123456");
        // 是否能够重置数据
        servletRegistrationBean.addInitParameter("resetEnable", "false");
        return servletRegistrationBean;
    }

    /**
     * 配置服务过滤器
     *
     * @return 返回过滤器配置对象
     */
    @Bean
    public FilterRegistrationBean statFilter() {
        FilterRegistrationBean filterRegistrationBean = new FilterRegistrationBean(new WebStatFilter());
        // 添加过滤规则
        filterRegistrationBean.addUrlPatterns("/*");
        // 忽略过滤格式
        filterRegistrationBean.addInitParameter("exclusions", "*.js,*.gif,*.jpg,*.png,*.css,*.ico,/druid/*,");
        return filterRegistrationBean;
    }
}
mybatis支持的映射方式有
方式一:基于xml的 mapper.xml 文件、基于java的使用 Mapper接口class。
特点是:可以实现复杂sql语句,功能更全面。但是编写.xml配置文件比较繁琐
方式二:从mybatis3.4.0开始加入了@Mapper注解,目的就是为了不再写mapper映射文件。接口方法注解主要是四个:@Insert、@Delete、@Update、@Select。
特点是:更灵活,满足大部分需求,减少编写.xml文件的繁琐。缺点是对复杂sql语句支持不够
上面使用的是 方式一,需要同时拥有 mapper.xml文件 和 接 口类mapper 配合实现
方式二的话只需要在 接口类上加入 @Mapper,然后通过 @MapperScan 扫描即可,并且,方式二可以单独使用 ,也可以与方式一混用。 举例代码如下
@Mapper
public interface MytableMapper {
    /**
     * @param name @Param 接口可以指定参数别名
     * @return
     */
    @Select("select * from mytable where name = #{aaa}")
    Mytable selectByName(@Param("aaa") String name );

    /**
     * This method was generated by MyBatis Generator.
     * This method corresponds to the database table mytable
     *
     * @mbg.generated Fri Aug 04 20:35:34 CST 2023
     */
    int deleteByPrimaryKey(Integer id);

    /**
     * This method was generated by MyBatis Generator.
     * This method corresponds to the database table mytable
     *
     * @mbg.generated Fri Aug 04 20:35:34 CST 2023
     */
    int insert(Mytable record);

    /**
     * This method was generated by MyBatis Generator.
     * This method corresponds to the database table mytable
     *
     * @mbg.generated Fri Aug 04 20:35:34 CST 2023
     */
    Mytable selectByPrimaryKey(Integer id);

    /**
     * This method was generated by MyBatis Generator.
     * This method corresponds to the database table mytable
     *
     * @mbg.generated Fri Aug 04 20:35:34 CST 2023
     */
    List<Mytable> selectAll();

    /**
     * This method was generated by MyBatis Generator.
     * This method corresponds to the database table mytable
     *
     * @mbg.generated Fri Aug 04 20:35:34 CST 2023
     */
    int updateByPrimaryKey(Mytable record);
}
注意 mybatis-generator 生成的文件会 覆盖掉混合方式的接口文件。

 浙公网安备 33010602011771号