Netty + Spring + ZooKeeper搭建轻量级RPC框架
本文参考
本篇文章主要参考自OSCHINA上的一篇"轻量级分布式 RPC 框架",因为原文对代码的注释和讲解较少,所以我打算对这篇文章的部分关键代码做出一些详细的解释
在本篇文章中不详细列出原文章的代码,根据试验,原文的代码是可以跑通的,只不过原文写自2014年,它给出的pom文件稍微有点旧,我们只需要更新原文的框架版本即可,原文链接如下
https://my.oschina.net/huangyong/blog/361751
另外再推荐一篇文章,作者在OSCHINA文章的基础上增加了部分功能,并且也改进了部分代码
https://www.cnblogs.com/luxiaoxun/p/5272384.html
代码中涉及到CGLib代理,Java动态代理,以及Protostuff的使用,本篇文章不作详解,在之后的文章中单独作解
环境
idea 2020 + Spring 5.2.4.RELEASE + Netty 4.1.42.FINAL + ZooKeeper 3.4.10(CentOS 7)
任务分工
注意我们需要先启动服务器进程,服务器的任务如下:
-
与ZooKeeper节点建立连接
-
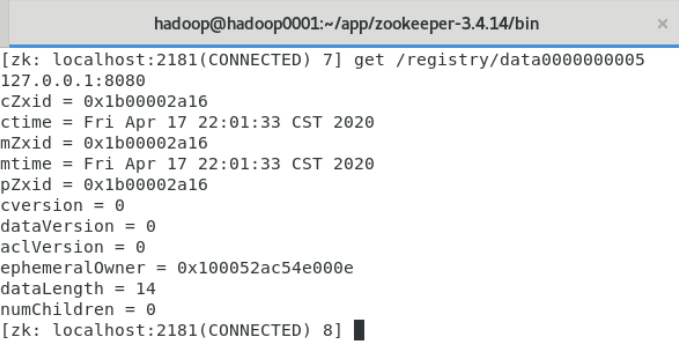
将服务器的地址注册到ZooKeeper中,注册的路径为 /registry/data****
-
加载所有具备@RpcService注解的Bean,保存@RpcService注解的value值(value值保存Bean实现的服务接口名)以及这个Bean,作为"服务注册表"以供查询
-
打开Netty的Socket监听端口,准备和客户端进行连接
-
连接到客户端并接收到客户端发送的消息时,解码消息,按消息中的某个字段值查询服务注册表,然后根据消息的其它字段值和注册表内容决定执行哪一项服务,最后将服务执行结果编码后发送回客户端
之后启动客户端进程,客户端的任务如下:
-
从ZooKeeper获得服务端的地址,地址保存在ZooKeeper的 /registry 节点下,地址可能有多个,根据具体情况选取
-
与服务端建立连接,发送编码后的消息,请求某项服务
接下来举例说明和这些任务相关的代码,以便对这些任务有更好的认识
下面大部分代码中的变量名,方法名,类名,接口名等都和OSCHINA文章中相同
两个基本的POJO
RpcRequest的各个字段的含义如下
public class RpcRequest {
/**
* 全局唯一UUID
*/
private String requestId;
/**
* 远程服务接口名
* (原文中为className,或许interfaceName更好理解)
*/
private String className;
/**
* 远程服务方法名
*/
private String methodName;
/**
* 方法的参数类型
*/
private Class<?>[] parameterTypes;
/**
* 要赋给方法的实参
*/
private Object[] parameters;
……
}
RpcResponse的各个字段的含义如下
public class RpcResponse {
/**
* 全局唯一UUID
*/
private String requestId;
/**
* 错误信息,若error不为空,则result为空
*/
private Throwable error;
/**
* 请求响应结果,若result不为空,则error为空
*/
private Object result;
……
}
与ZooKeeper节点建立连接
不管是服务端注册地址还是客户端获取地址,我们都需要先连接ZooKeeper获取client,下面是connectServer()方法的代码片段
zk = new ZooKeeper(registryAddress, Constant.ZK_SESSION_TIMOUT, new Watcher() {
@Override
public void process(WatchedEvent watchedEvent) {
/*
* 连接成功
*/
if (watchedEvent.getState() == Event.KeeperState.SyncConnected) {
/*
* 若计数值为零,释放所有等待的线程
*/
latch.countDown();
}
}
});
/*
* 线程等待
*/
latch.await();
我们向ZooKeeper构造方法的第一个参数connectionString传递了registryAddress,它可以仅包含一个ZooKeeper的地址,如:127.0.0.1:2181,也可以按逗号分隔填写多个地址,有多个地址时可以保证容错性,允许其中几个地址无法成功建立连接
To create a ZooKeeper client object, the application needs to pass a connection string containing a comma separated list of host:port pairs, each corresponding to a ZooKeeper server.
The instantiated ZooKeeper client object will pick an arbitrary server from the connectString and attempt to connect to it. If establishment of the connection fails, another server in the connect string will be tried (the order is non-deterministic, as we random shuffle the list), until a connection is established. The client will continue attempts until the session is explicitly closed.
第二个参数表示连接超时时间
因为和客户端的连接是异步的,所以需要向第三个参数传递一个Watch对象监听状态变化,当监听到连接成功的状态事件时,CountDownLartch对象的值减1
这种机制也类似于Netty的ChannelFuture和userEventTriggered()
Session establishment is asynchronous. This constructor will initiate connection to the server and return immediately - potentially (usually) before the session is fully established. The watcher argument specifies the watcher that will be notified of any changes in state. This notification can come at any point before or after the constructor call has returned.
我们注意到这里有一个奇怪的减1操作,因为CountDownLatch的awaite()方法能够保证在计数值为零时才会停止线程等待,并且countDown()操作可以发生在其它线程内,这就能够应对ZooKeeper构造方法异步所导致的,还未与服务器成功建立连接而继续执行后续代码的危险
A synchronization aid that allows one or more threads to wait until a set of operations being performed in other threads completes.
A CountDownLatch is initialized with a given count. The await methods block until the current count reaches zero due to invocations of the countDown method, after which all waiting threads are released and any subsequent invocations of await return immediately. This is a one-shot phenomenon -- the count cannot be reset. If you need a version that resets the count, consider using a CyclicBarrier.
注册服务端地址
我们需要创建一个临时的znode存放服务端地址值
private void creatNode(ZooKeeper zk, String data) {
try {
byte[] bytes = data.getBytes();
String path = zk.create(Constant.ZK_DATA_PATH, bytes,
ZooDefs.Ids.OPEN_ACL_UNSAFE, CreateMode.EPHEMERAL_SEQUENTIAL);
LOGGER.debug("create zookeeper node({} => {})", path, data);
} catch (InterruptedException | KeeperException e) {
LOGGER.error(e.getMessage(), e);
}
}
create()方法对应了ZooKeeper命令行的create命令,在程序中,它的参数分别代表存放服务器地址的znode路径,服务器地址值的byte数组形式,开放所有权限,创建znode的策略为——当服务端和ZooKeeper断连时,删除创建的znode,下一次创建znode时的name递增
The znode will be deleted upon the client's disconnect, and its name will be appended with a monotonically increasing number.
这里要求父节点必须已经创建,原文的路径为 /registry/data,那么必须已有 /registry路径
下面的代码调用了connectServer()和createNode(),实现了与ZooKeeper的连接和服务器地址的存放
public void register(String data) {
if (data != null) {
ZooKeeper zk = connectServer();
if (zk != null) {
creatNode(zk, data);
}
}
}
最后在启动服务端的afterPropertiesSet()方法内调用register()
ChannelFuture future = serverBootstrap.bind(host, port).sync();
if (serviceRegistry != null) {
/*
* 在 ZooKeeper 注册 server 地址
*/
serviceRegistry.register(serverAddress);
}
serverAddress值从properties文件中读取
服务端加载"服务注册表"
从Spring容器获取所有被@ RpcService注解的Bean,再获取@ RpcService注解的value值,这个value值就是Bean实现的服务接口名,handlerMap即为"服务注册表"
@Override
public void setApplicationContext(ApplicationContext applicationContext)
throws BeansException {
/*
* 获取被 @RpcService 注解的类
*/
Map<String, Object> serviceMap = applicationContext.getBeansWithAnnotation(RpcService.class);
if (MapUtils.isNotEmpty(serviceMap)) {
for (Object serviceBean : serviceMap.values()) {
/*
* 获取 Annotation 的值
*/
String interfaceName = serviceBean.getClass()
.getAnnotation(RpcService.class).value().getName();
/*
* 存放注册的服务
*/
handlerMap.put(interfaceName, serviceBean);
}
}
}
到这里我们注意到"服务注册表"的加载在setApplicationContext()重载方法中,而上面服务端地址的注册却在afterPropertiesSet()方法中,这有什么讲究吗?
setApplicationContext()方法的调用在afterPropertiesSet()方法之前,可以保证afterPropertiesSet()方法的channelHandler查询"服务注册表"时,"服务注册表"已经建立
Set the ApplicationContext that this object runs in. Normally this call will be used to initialize the object.
Invoked after population of normal bean properties but before an init callback such as org.springframework.beans.factory.InitializingBean.afterPropertiesSet() or a custom init-method.
服务端处理客户端消息
服务端包括三个ChannelHandler,接收客户端消息和发送客户端消息会经过它们
pipeline.addLast(new RpcDecoder(RpcRequest.class))
.addLast(new RpcEncoder(RpcResponse.class))
.addLast(new RpcHandler(handlerMap));
一个自定义的解码器,一个自定义的编码器,以及一个处理请求消息的RpcHandler
此处WebSocket数据帧的解码是基于长度的协议,不过没有应用LengthFieldBasedFrameDecoder,采用自定义实现的解码器
关键的处理过程在RpcHandler中,通过CGLib代理获取了服务执行后的结果存放到RpcResponse的result字段中
private Object handleRpcRequest(RpcRequest request)
throws Throwable {
/*
* 远程接口名
*/
String className = request.getClassName();
/*
* 查询"服务注册表"
*/
Object serviceBean = handlerMap.get(className);
Class<?> serviceClass = serviceBean.getClass();
String methodName = request.getMethodName();
Class<?>[] parameterTypes = request.getParameterTypes();
Object[] parameters = request.getParameters();
/*
* 使用 CGLib 提供的反射 API
* 返回实现类、方法名、形参类型和实参指定下的处理结果
*/
FastClass serviceFastClass = FastClass.create(serviceClass);
FastMethod serviceFastMethod = serviceFastClass.getMethod(methodName, parameterTypes);
return serviceFastMethod.invoke(serviceBean, parameters);
}
handlerMap.get()方法的调用,便是查询"服务注册表"获取Bean的过程
最后在channelRead0()方法中,将RpcResponse冲刷到客户端即可
客户端获取服务端地址
首先获取 /registry 下所有的 znode,在我们的程序中,若只启动一个服务端,则只有一个 znode
然后获取所有 znode 的值存放到指定的List中
private void watchNode(final ZooKeeper zk) {
try {
/*
* 获取 /registry 下的 znode
*/
List<String> nodeList = zk.getChildren(Constant.ZK_REGISTRY_PATH, new Watcher() {
@Override
public void process(WatchedEvent event) {
/*
* znode 发生变化时重新调用 watchNode() 为 nodeList 赋值
*/
if (event.getType() == Event.EventType.NodeChildrenChanged) {
watchNode(zk);
}
}
});
List<String> dataList = new ArrayList<>();
for (String node : nodeList) {
/*
* 获取 /registry 下每一个 znode 注册的 server 地址
*/
byte[] bytes = zk.getData(Constant.ZK_REGISTRY_PATH + '/' + node, false, null);
dataList.add(new String(bytes));
}
LOGGER.debug("node data: {}", dataList);
this.serverList = dataList;
} catch (KeeperException | InterruptedException e) {
LOGGER.error(e.getMessage(), e);
}
}
getData()方法对应了ZooKeeper命令行中的get命令,第一个参数给定存放服务端地址值的路径,第二个参数watcher监听指定路径的znode的data是否被修改或被删除,因为前面已经有getChildren()方法监听是否有新的znode被创建,或已存在的znode被删除,所以此处设置为false,没有做值修改的严格检查
当然我们也可以不设置为false,监听Event.EventType.NodeDataChanged事件是否发生,若发生,则重新执行watchNode()方法
Return the data and the stat of the node of the given path.
If the watch is true and the call is successful (no exception is thrown), a watch will be left on the node with the given path. The watch will be triggered by a successful operation that sets data on the node, or deletes the node.
A KeeperException with error code KeeperException.NoNode will be thrown if no node with the given path exists.
客户端发送请求
OSCHINA原文中使用Object的wait()方法和notifyAll()方法来使线程等待和唤醒,但是这实际上存在假死等待的情况,这里借用另一篇文章的话:
这里每次使用代理远程调用服务,从Zookeeper上获取可用的服务地址,通过RpcClient send一个Request,等待该Request的Response返回。这里原文有个比较严重的bug,在原文给出的简单的Test中是很难测出来的,原文使用了obj的wait和notifyAll来等待Response返回,会出现"假死等待"的情况:一个Request发送出去后,在obj.wait()调用之前可能Response就返回了,这时候在channelRead0里已经拿到了Response并且obj.notifyAll()已经在obj.wait()之前调用了,这时候send后再obj.wait()就出现了假死等待,客户端就一直等待在这里。使用CountDownLatch可以解决这个问题
channelRead0()方法更改后的代码如下
@Override
protected void channelRead0(ChannelHandlerContext ctx, RpcResponse msg) throws Exception {
response = msg;
latch.countDown();
}
然后在send()方法中调用latch.await()方法
执行结果


 浙公网安备 33010602011771号