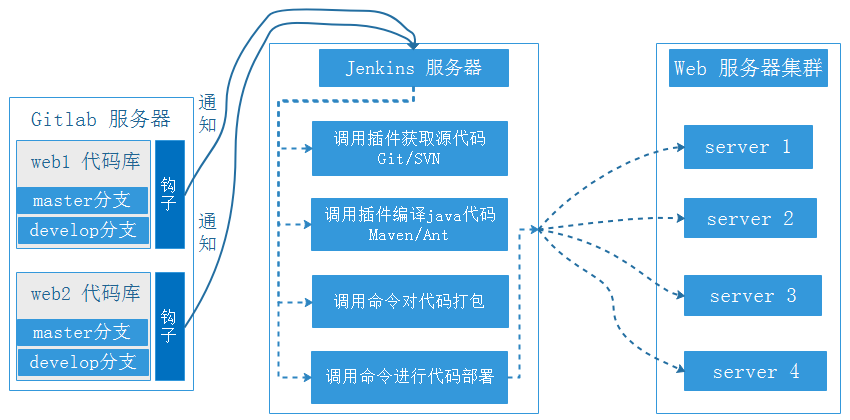
DevOps-Gitlab分支管理、代码合并及实现develop与master分支代码部署
代码自动部署流程
gitlab 新建 develop 分支
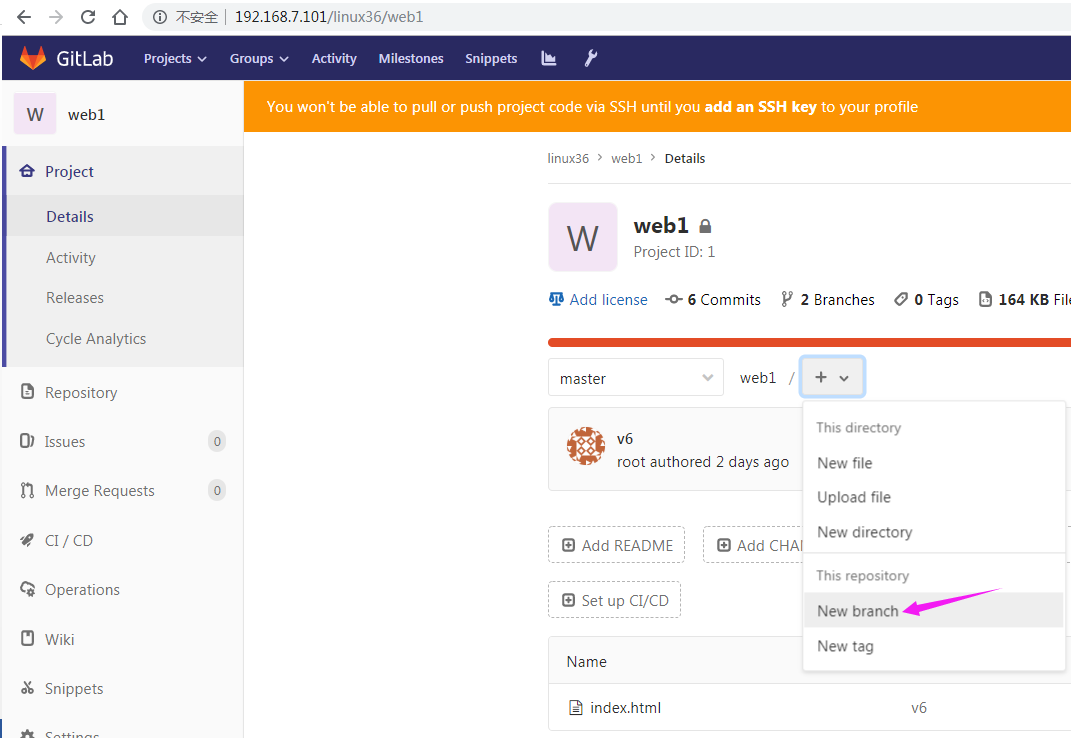
gitlab 定义分支名称并创建

由于之前授予了laomao和laoxiao用户对各自项目的Developer权限,所以只拥有代码的更新权限,而并没有代码的合并权限。下面模拟分支develop的代码更新,经测试后合并入master分支
clone linux39的develop分支代码并更新重新上传
报错key校验失败
[root@master metrics]# git clone -b develop https://github.com/kubernetes-sigs/metrics-server.git

重新上传公钥到gitlab,上传私钥到jenkins
[root@jenkins ~]# cat ~/.ssh/
authorized_keys  id_rsa           id_rsa.pub       known_hosts
[root@jenkins ~]# cat ~/.ssh/id_rsa.pub
ssh-rsa AAAAB3NzaC1yc2FFKRcZ13SgU/zNQUcJvP+5a4Rt8KYVPU9DCCl root@jenkins
[root@jenkins ~]# cat ~/.ssh/id_rsa
-----BEGIN RSA PRIVATE KEY-----
MIIEpQIBAAKCAQEAwng9wP5drQoCJT7X6g1L3QICRu0wXCk4pJNQAUws9L8Ei6le
M87lm8b7OnugJAxQ4sH93TaoOCh25iaO7mCWafqy/k3KHKf4iU291fgBAMHPXmEg
zPg+0Demd+Ag8fOkC/Qx5JC8qls+1FSoRGDw6YodSAlz0vl+d8YfRd1SdqX9visD
uVmah0w1H/B5ngnMCuw4/NEw1d1RpRsSlvsrvTwI4OOImMqsBIvMPFo=
-----END RSA PRIVATE KEY-----

[root@jenkins ~]# git clone -b develop git@159.138.5.152:linux39/web1.git   //重新clone
Cloning into 'web1'...
The authenticity of host '159.138.5.152 (159.138.5.152)' can't be established.
ECDSA key fingerprint is SHA256:aq/XMS7sSqpxsDdUaS1+kFzeYWNxoc8mdK5+CCoj+Yg.
ECDSA key fingerprint is MD5:79:2b:4c:44:ec:66:e1:d1:d9:00:1b:5d:a7:33:cc:b9.
Are you sure you want to continue connecting (yes/no)? yes
Warning: Permanently added '159.138.5.152' (ECDSA) to the list of known hosts.
remote: Enumerating objects: 3, done.
remote: Counting objects: 100% (3/3), done.
remote: Total 3 (delta 0), reused 0 (delta 0)
Receiving objects: 100% (3/3), done.
[root@jenkins ~]# ll
total 4
drwxr-xr-x 3 root root 4096 Dec 27 22:50 web1
[root@jenkins ~]# cd web1/
[root@jenkins web1]# ll
total 4
-rw-r--r-- 1 root root 37 Dec 27 22:50 index.html
[root@jenkins web1]# cat index.html
<h1>this is linux39 test page v1</h1>

[root@jenkins web1]# echo "<h1>this is linux39 test page v2</h1>" >>  index.html
[root@jenkins web1]# cat index.html
<h1>this is linux39 test page v1</h1><h1>this is linux39 test page v2</h1>    //这里发现居然追加到了末尾
]# echo '<h1>this is linux39 test page v3</h1>' >> index.html //使用单引号发现追加完成
[root@jenkins web1]# cat index.html
<h1>this is linux39 test page v1</h1>
<h1>this is linux39 test page v2</h1>
<h1>this is linux39 test page v3</h1>
[root@jenkins web1]# git add .
[root@jenkins web1]# git status
# On branch develop
# Changes to be committed:
#   (use "git reset HEAD <file>..." to unstage)
#
#       modified:   index.html
#
[root@jenkins web1]# git commit -m "develop v2"
[develop c07a3ea] develop v2
 1 file changed, 2 insertions(+), 1 deletion(-)
[root@jenkins web1]# git push
warning: push.default is unset; its implicit value is changing in
Git 2.0 from 'matching' to 'simple'. To squelch this message
and maintain the current behavior after the default changes, use:

  git config --global push.default matching

To squelch this message and adopt the new behavior now, use:

  git config --global push.default simple

See 'git help config' and search for 'push.default' for further information.
(the 'simple' mode was introduced in Git 1.7.11. Use the similar mode
'current' instead of 'simple' if you sometimes use older versions of Git)

Counting objects: 5, done.
Compressing objects: 100% (2/2), done.
Writing objects: 100% (3/3), 278 bytes | 0 bytes/s, done.
Total 3 (delta 0), reused 0 (delta 0)
remote:
remote: To create a merge request for develop, visit:
remote:   http://159.138.5.152/linux39/web1/merge_requests/new?merge_request%5Bsource_branch%5D=develop
remote:
To git@159.138.5.152:linux39/web1.git
   b8aeb8d..c07a3ea  develop -> develop

进入gitlab查看已经更新完成
测试如何将灰度环境的代码和master的代码部署到不同的服务器
web1 master

web2 develop
jenkins创建工程
linux38-web1-develop
分支选择 */develop
#cd /var/lib/jenkins/workspace/linux39-web1 //使用jenkins拉取代码默认工作路径,当项目名称发生变化,对应的代码工作目录会发生变化
cd /var/lib/jenkins/workspace/linux38-web1-develop
tar -zcvf myapp.tar.gz ./*
scp myapp.tar.gz www@web2:/data/tomcat/tomcat_appdir
ssh www@web2 "bash /opt/apps/tomcat.sh stop"
ssh www@web2 "cd /data/tomcat/tomcat_appdir ; rm -rf /data/tomcat/tomcat_webapps/myapp/* ; tar -xvf /data/tomcat/tomcat_appdir/myapp.tar.gz -C /data/tomcat/tomcat_webapps/myapp"
ssh www@web2 "bash /opt/apps/tomcat.sh start"
构建完成测试访问,发现已经部署完成
[root@jenkins workspace]# curl http://192.168.0.79:8080/myapp/index.html
<h1>this is linux39 test page v1</h1>
<h1>this is linux39 test page v2</h1>
在服务器上如何查看项目配置
]# cat /var/lib/jenkins/jobs/linux38-web1-develop/config.xml
当develop分支代码测试没问题后,将代码部署到现网环境,这里为web1服务器
使用laomao用户提交合并develop分支代码到master的申请,由项目主管审批
jenkins新建master分支部署项目,当代码分支合并完成后部署到现网web1 tomcat服务器
项目名称: linux38-web1-master
cd /var/lib/jenkins/workspace/linux38-web1-master

tar -zcvf myapp.tar.gz ./*

scp myapp.tar.gz www@web1:/data/tomcat/tomcat_appdir

ssh www@web1 "bash /opt/apps/tomcat.sh stop"

ssh www@web1  "cd /data/tomcat/tomcat_appdir ; rm -rf /data/tomcat/tomcat_webapps/myapp/* ; tar -xvf /data/tomcat/tomcat_appdir/myapp.tar.gz -C  /data/tomcat/tomcat_webapps/myapp"

ssh www@web1 "bash /opt/apps/tomcat.sh start"
部署完成后测试tomcat
[root@jenkins ~]# curl http://web1:8080/myapp/index.html
<h1>this is linux39 test page v1</h1>
<h1>this is linux39 test page v2</h1>
<h1>this is linux39 test page v3</h1>

[root@jenkins ~]# curl http://web1:8080/myapp/index.html
<h1>this is linux39 test page v1</h1>
<h1>this is linux39 test page v2</h1>
如何使用haproxy代理将测试环境服务器和现网服务器区分访问
listen web_port
  bind 192.168.0.100:80   //keepalived虚拟地址
  mode http
  log global
  server web1 192.168.0.142:8080 check inter 3000 fall 2 rise 5

listen web_port
  bind 192.168.64.101:80 //keepalived虚拟地址
  mode http
  log global
  server web2 192.168.0.79:8080 check inter 3000 fall 2 rise 5
本文来自博客园,作者:不会跳舞的胖子,转载请注明原文链接:https://www.cnblogs.com/rtnb/p/15734977.html

 浙公网安备 33010602011771号