.net core 微服务之API网关 (Ocelot)
网关
为什么要使用网关
1、聚合微服务增多,导致客户端不好维护
2、聚合微服务进行集群
2.1 增加和修改聚合微服务集群,都要修改客户端,导致客户端不稳定
2.2 服务集群,无法解决复杂均衡的问题
3、客户端访问多个聚合微服务
3.1 如果需要对客户端身份验证和授权,会导致每个服务都进行授权
3.2 如何客户端访问过大,无法限制客户端流量,导致系统宕机
3.3 如果客户端访问微服务系统,每个微服务之间进行调用。会导致耗时操作很难统计。
3.4 如果客户端访问微服务系统,如何统计客户端的调用日志
现有几种网关类型
1、Netflix Zuul +java实现
2、Kong nginx +lua脚本实现
3、Tyk go语言开发,收费版本
4、Ocelot aspnetcore开发的
Ocelot是什么
简单的来说Ocelot是一堆的asp.net core middleware组成的一个管道。当它拿到请求之后会用一个request builder来构造一个HttpRequestMessage发到下游的真实服务器,等下游的服务返回response之后再由一个middleware将它返回的HttpResponseMessage映射到HttpResponse上。
Ocelot几种概念
1. 上游:Upstream, Ocelot为上游
2. 下游:Downstream,Ocelot下面映射的服务为下游
3. 路由
3.1 接受客户端请求
3.2 奖客户端请求转换成下游地址
3.3 调用下游服务,并返回结果
3.4 将下游服务返回的结果返回到前端
4. 限流
5. 熔断降级
6. 认证
7. 授权
8. 负载均衡
9. 链路监控
10. 请求聚合
11. Service Fabric
项目实例
创建一个基础的Ocelot
1. 创建一个名为gateway网关项目,添加nuget包
Ocelot
2. 注入网关服务
public void ConfigureServices(IServiceCollection services)
{
      // 1、添加网关Ocelot到ioc容器
      services.AddOcelot();
}
3. Configure添加到中间件
if (env.IsDevelopment())
{
    app.UseDeveloperExceptionPage();
}


// 2、使用网关
app.UseOcelot().Wait();
4. 配置Json文件,我这里新建了一个ocelot.json 文件,也可以直接在appsettings.json里面配置,只是看着比较乱就分出来了
{
  "ReRoutes": [
    {
      "DownstreamPathTemplate": "/ConsulHealthCheck/GetTest", //下游转发接口
      "DownstreamScheme": "http",
      "DownstreamHostAndPorts": [   //配置下游集群
        {
          "Host": "localhost",
          "Port": 5001
        },
        {
          "Host": "localhost",
          "Port": 5002
        },
        {
          "Host": "localhost",
          "Port": 5003
        }
      ],
      "LoadBalancerOptions": {      //负载均衡配置
        "Type": "LeastConnection"  //“轮询”算法  可以配置其他的
      },
      "UpstreamPathTemplate": "/gateway",  //上游接口地址
      "UpstreamHttpMethod": [ "Get","Post" ]  //限制网关http请求方式
    }
  ],

  "GlobalConfiguration": {

  }
}
5. 引入Json文件,如果第四步在appsettings.json里面配置,可以省略这一步
public static IHostBuilder CreateHostBuilder(string[] args) =>
    Host.CreateDefaultBuilder(args)
        .ConfigureWebHostDefaults(webBuilder =>
        {
            webBuilder.UseStartup<Startup>();
            webBuilder.ConfigureAppConfiguration((hostingContext, config) =>
            {
                // 1、加载ocelot配置文件
                config.AddJsonFile("ocelot.json");
            });
        });
到第五步已经结束了,为了方便测试,这里修改了前面一节 .net core 微服务之Consul 的项目,如果没有也没关系,可以自己手动创建一个项目,将这个接口添加进去再启动不同的端口号进行测试。或者直接跳过看效果
/// <summary>
/// 方便其他客户端进行调用测试
/// </summary>
/// <param name="url"></param>
/// <returns></returns>
[HttpGet("GetTest")]
public IActionResult GetTest(string url)
{
    return Ok($"你正在调用端口号为{Request.HttpContext.Connection.LocalPort}的方法");
}


基于Consul的Ocelot项目
1. 引入nuget包
Ocelot.Provider.Consul
2. 注入服务
 public void ConfigureServices(IServiceCollection services)
 {
     services.AddOcelot().AddConsul();
 }
3. 修改ocelot.json文件配置,将下游配置集群 DownstreamHostAndPorts 替换成 ServiceName 就行了,配置的value就是注入consul的服务名称,可以手动添加 ServiceDiscoveryProvider 配置Consul的地址,如果没有添加则默认为 localhost:8500
{
  "ReRoutes": [
    {
      "DownstreamPathTemplate": "/ConsulHealthCheck/GetTest", //下游转发接口
      "DownstreamScheme": "http",
      //"DownstreamHostAndPorts": [   //配置下游集群
      //  {
      //    "Host": "localhost",
      //    "Port": 5001
      //  },
      //  {
      //    "Host": "localhost",
      //    "Port": 5002
      //  },
      //  {
      //    "Host": "localhost",
      //    "Port": 5003
      //  }
      //],
      "ServiceName": "consualapi",

      "LoadBalancerOptions": { //负载均衡配置
        "Type": "LeastConnection" //“轮询”算法  可以配置其他的
      },
      "UpstreamPathTemplate": "/gateway", //上游接口地址
      "UpstreamHttpMethod": [ "Get", "Post" ] //限制网关http请求方式
    }
  ],

  "GlobalConfiguration": {
    "ServiceDiscoveryProvider": {
      "Host": "localhost",
      "Port": 8500,
      "Type": "Consul"
    }
  }
}
运行效果


设置熔断和限流
1. 设置限流,配置Rerouts路由中的 RateLimitOptions
"ReRoutes": [
    {
      "DownstreamPathTemplate": "/ConsulHealthCheck/GetTest",
      "DownstreamScheme": "http",

      "RateLimitOptions": {
        "ClientWhitelist": [],
        "EnableRateLimiting": true,
        "Period": "2s",
        "PeriodTimespan": 5,
        "Limit": 3
      },

      "ServiceName": "consualapi",
      "LoadBalancerOptions": { //负载均衡配置
        "Type": "LeastConnection" //“轮询”算法  可以配置其他的
      },
      "UpstreamPathTemplate": "/gateway", //上游接口地址
      "UpstreamHttpMethod": [ "Get", "Post" ] //限制网关http请求方式
    }
  ],
相关参数:
- ClientWihteList     白名单,不限流的IP名单
- EnableRateLimiting    是否启用限流
- Period            统计时间段:1s, 5m, 1h, 1d
- PeroidTimeSpan     多少秒之后客户端可以重试
- Limit            在统计时间段内允许的最大请求数量
设置自定义的提示信息,配置 GlobalConfiguration 中 RateLimitOptions 中的
"GlobalConfiguration": {
    "ServiceDiscoveryProvider": {
      "Host": "localhost",
      "Port": 8500,
      "Type": "Consul"
    },
    "RateLimitOptions": {
      "DisableRateLimitHeaders": false,
      "QuotaExceededMessage": "Custom Tips",
      "HttpStatusCode": 999,
      "ClientIdHeader": "Test"
    }
  }
相关参数:
- Http头                          X-Rate-Limit 和 Retry-After 是否禁用
- QuotaExceedMessage             当请求过载被截断时返回的消息
- HttpStatusCode                 当请求过载被截断时返回的http status
- ClientIdHeader                 用来识别客户端的请求头,默认是 ClientId
测试效果

2. 设置Polly熔断
熔断的意思是停止将请求转发到下游服务。当下游服务已经出现故障的时候再请求也是功而返,并且增加下游服务器和API网关的负担。这个功能是用的Pollly来实现的,我们只需要为路由做一些简单配置即可
2.1 引入Nuget包
Ocelot.Provider.Polly
2.2 注入服务
services.AddOcelot().AddConsul().AddPolly();
2.3 配置路由
"QoSOptions": {
        "ExceptionsAllowedBeforeBreaking": 3,
        "DurationOfBreak": 5,
        "TimeoutValue": 5000
      },
相关参数:
- ExceptionsAllowedBeforeBreaking 允许多少个异常请求
- DurationOfBreak 熔断的时间,单位为秒
- TimeoutValue 如果下游请求的处理时间超过多少则自动将请求设置为超时
动态路由
1. 动态加载多个服务映射
1.1 将每个服务作为ocelot.jsond的下级

1.2 配置 program.cs 热加载
public static IHostBuilder CreateHostBuilder(string[] args) =>
            Host.CreateDefaultBuilder(args)
                .ConfigureWebHostDefaults(webBuilder =>
                {
                    webBuilder.UseStartup<Startup>();
                    webBuilder.ConfigureAppConfiguration((hostingContext, config) =>
                    {
                        // 1、加载ocelot配置文件
                        //config.AddJsonFile("ocelot.json");

                        config
                            .SetBasePath(hostingContext.HostingEnvironment.ContentRootPath)
                            .AddJsonFile("appsettings.json", true, true)
                           .AddJsonFile($"appsettings.{hostingContext.HostingEnvironment.EnvironmentName}.json", true, true)
                           .AddOcelot(hostingContext.HostingEnvironment)
                          .AddEnvironmentVariables();
                    });
                });
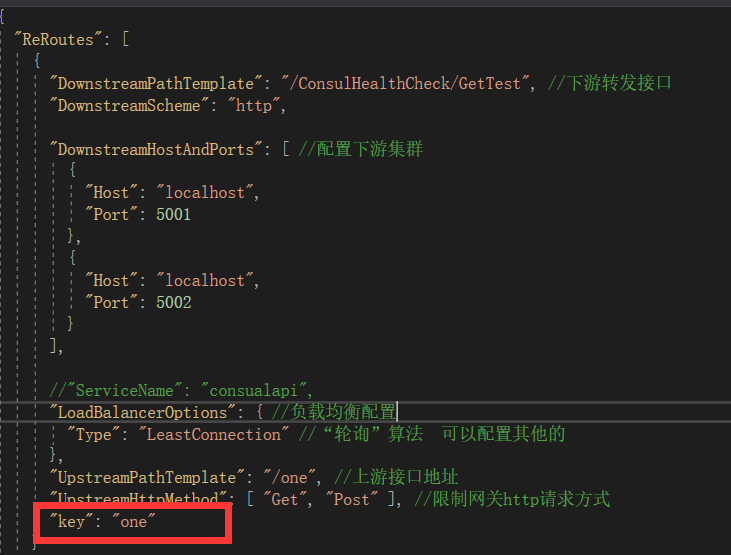
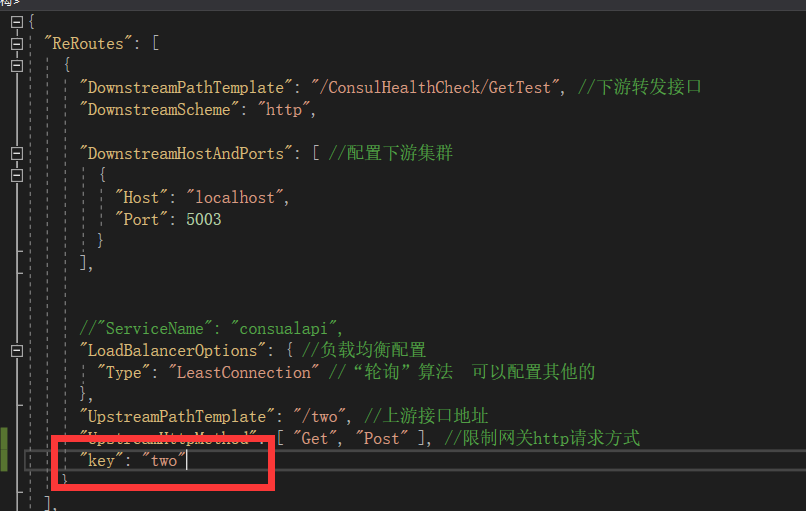
2. 配置聚合请求
2.1 添加一个聚合请求配置 ocelot.aggregate.json
{
  "ReRoutes": [

  ],
  "Aggregates": [
    {
      "ReRouteKeys": [
        "one",
        "two"
      ],
      "UpstreamPathTemplate": "/ocelot/common"
    }
  ]
}
2.2 在需要聚合的配置里面设置key参数


运行效果

自定义扩展Ocelot中间件
参考github源代码,不同的版本可能重写的代码不一样,所以我这里代码可能会运行报错,思维一样的
1. 添加自定义中间件,继承 OcelotMiddleware ,然后重写 BuildOcelotPipeline (我这里重写名字叫FcbBuildOcelotPipeline),在相应的 BuildOcelotPipeline 代码 中加入我们自定义的中间件 UseFcbResponseMiddleware 就行了
public static class FcbOcelotExtension
    {
        public static IApplicationBuilder UseFcbResponseMiddleware(this IApplicationBuilder builder)
        {
            return builder.UseMiddleware<FcbResponseMiddleware>();
        }
    }
/// <summary>
    /// 自定义ocelot中间件
    /// </summary>
    public class FcbResponseMiddleware : OcelotMiddleware
    {
        private readonly RequestDelegate _next;
        public FcbResponseMiddleware(RequestDelegate next, IOcelotLoggerFactory loggerFactory)
            : base(loggerFactory.CreateLogger<FcbResponseMiddleware>())
        {
            _next = next;
        }


        public async Task Invoke(HttpContext context)
        {
            if ( context.Request.Method.ToUpper() != "OPTIONS")
            {
                Console.WriteLine("自定义中间件");
                Console.WriteLine("自定义业务逻辑处理");
                // 1、处理统一结果
                // 2、统一日志记录
                // 3、做链路监控
                // 4、性能监控
                // 5、流量统计

            }
            else
            {
                await _next.Invoke(context);
            }
        }
    }
public static class OcelotPipelineExtension
    {
        public static RequestDelegate FcbBuildOcelotPipeline(this IApplicationBuilder app,
           OcelotPipelineConfiguration pipelineConfiguration)
        {
            // this sets up the downstream context and gets the config
            app.UseDownstreamContextMiddleware();

            // This is registered to catch any global exceptions that are not handled
            // It also sets the Request Id if anything is set globally
            app.UseExceptionHandlerMiddleware();

            // If the request is for websockets upgrade we fork into a different pipeline
            app.MapWhen(httpContext => httpContext.WebSockets.IsWebSocketRequest,
                wenSocketsApp =>
                {
                    wenSocketsApp.UseDownstreamRouteFinderMiddleware();
                    wenSocketsApp.UseMultiplexingMiddleware();
                    wenSocketsApp.UseDownstreamRequestInitialiser();
                    wenSocketsApp.UseLoadBalancingMiddleware();
                    wenSocketsApp.UseDownstreamUrlCreatorMiddleware();
                    wenSocketsApp.UseWebSocketsProxyMiddleware();
                });

            // Allow the user to respond with absolutely anything they want.
            app.UseIfNotNull(pipelineConfiguration.PreErrorResponderMiddleware);

            // This is registered first so it can catch any errors and issue an appropriate response
            app.UseResponderMiddleware();

            // Then we get the downstream route information
            app.UseDownstreamRouteFinderMiddleware();

            // Multiplex the request if required
            app.UseMultiplexingMiddleware();

            // This security module, IP whitelist blacklist, extended security mechanism
            app.UseSecurityMiddleware();

            //Expand other branch pipes
            if (pipelineConfiguration.MapWhenOcelotPipeline != null)
            {
                foreach (var pipeline in pipelineConfiguration.MapWhenOcelotPipeline)
                {
                    // todo why is this asking for an app app?
                    app.MapWhen(pipeline.Key, pipeline.Value);
                }
            }

            // Now we have the ds route we can transform headers and stuff?
            app.UseHttpHeadersTransformationMiddleware();

            // Initialises downstream request
            app.UseDownstreamRequestInitialiser();

            // We check whether the request is ratelimit, and if there is no continue processing
            app.UseRateLimiting();

            // This adds or updates the request id (initally we try and set this based on global config in the error handling middleware)
            // If anything was set at global level and we have a different setting at re route level the global stuff will be overwritten
            // This means you can get a scenario where you have a different request id from the first piece of middleware to the request id middleware.
            app.UseRequestIdMiddleware();

            // Allow pre authentication logic. The idea being people might want to run something custom before what is built in.
            app.UseIfNotNull(pipelineConfiguration.PreAuthenticationMiddleware);

            // Now we know where the client is going to go we can authenticate them.
            // We allow the ocelot middleware to be overriden by whatever the
            // user wants
            if (pipelineConfiguration.AuthenticationMiddleware == null)
            {
                app.UseAuthenticationMiddleware();
            }
            else
            {
                app.Use(pipelineConfiguration.AuthenticationMiddleware);
            }

            // The next thing we do is look at any claims transforms in case this is important for authorisation
            app.UseClaimsToClaimsMiddleware();

            // Allow pre authorisation logic. The idea being people might want to run something custom before what is built in.
            app.UseIfNotNull(pipelineConfiguration.PreAuthorisationMiddleware);

            // Now we have authenticated and done any claims transformation we
            // can authorise the request
            // We allow the ocelot middleware to be overriden by whatever the
            // user wants
            if (pipelineConfiguration.AuthorisationMiddleware == null)
            {
                app.UseAuthorisationMiddleware();
            }
            else
            {
                app.Use(pipelineConfiguration.AuthorisationMiddleware);
            }

            // Now we can run the claims to headers transformation middleware
            app.UseClaimsToHeadersMiddleware();

            // Allow the user to implement their own query string manipulation logic
            app.UseIfNotNull(pipelineConfiguration.PreQueryStringBuilderMiddleware);

            // Now we can run any claims to query string transformation middleware
            app.UseClaimsToQueryStringMiddleware();

            app.UseClaimsToDownstreamPathMiddleware();

            // Get the load balancer for this request
            app.UseLoadBalancingMiddleware();

            // This takes the downstream route we retrieved earlier and replaces any placeholders with the variables that should be used
            app.UseDownstreamUrlCreatorMiddleware();

            // Not sure if this is the best place for this but we use the downstream url
            // as the basis for our cache key.
            app.UseOutputCacheMiddleware();

            //We fire off the request and set the response on the scoped data repo
            app.UseHttpRequesterMiddleware();

            #region 添加自定义的中间件扩展
            app.UseFcbResponseMiddleware();
            #endregion

            return app.Build();
        }

        private static void UseIfNotNull(this IApplicationBuilder builder,
            Func<HttpContext, Func<Task>, Task> middleware)
        {
            if (middleware != null)
            {
                builder.Use(middleware);
            }
        }
    }
2. 在 Configure 中间件 注入UseOcelot 中间件的时候 写入 我们重写的管道
app.UseOcelot((build, config) => {
                build.FcbBuildOcelotPipeline(config); // 自定义ocelot中间件完成
            }).Wait();
执行效果:

介绍路由配置
#### 整体的路由配置 ####

- Downstream是下游服务配置
- UpStream是上游服务配置
- Aggregates 服务聚合配置
- ServiceName, LoadBalancer, UseServiceDiscovery 配置服务发现
- AuthenticationOptions 配置服务认证
- RouteClaimsRequirement 配置Claims鉴权
- RateLimitOptions为限流配置
- FileCacheOptions 缓存配置
- QosOptions 服务质量与熔断
- DownstreamHeaderTransform头信息转发

#### 路由基本使用 ####

- DownstreamPathTemplate:下游路径模板
- DownstreamScheme:下游服务http schema
- DownstreamHostAndPorts:下游服务的地址,如果使用LoadBalancer的话这里可以填多项
- UpstreamPathTemplate: 上游也就是用户输入的请求Url模板
- UpstreamHttpMethod: 上游请求http方法,可使用数组

##### 路由负载均衡
LoadBalancer将决定负载均衡的算法

- LeastConnection – 将请求发往最空闲的那个服务器
- RoundRobin – 轮流发送
- NoLoadBalance – 总是发往第一个请求或者是服务发现
完整的配置

{
    "DownstreamPathTemplate": "/",
    "UpstreamPathTemplate": "/",
    "UpstreamHttpMethod": [
        "Get"
    ],
    "AddHeadersToRequest": {},
    "AddClaimsToRequest": {},
    "RouteClaimsRequirement": {},
    "AddQueriesToRequest": {},
    "RequestIdKey": "",
    "FileCacheOptions": {
    "TtlSeconds": 0,
    "Region": ""
    },
    "ReRouteIsCaseSensitive": false,
    "ServiceName": "",
    "DownstreamScheme": "http",
    "DownstreamHostAndPorts": [
    {
    "Host": "localhost",
    "Port": 51876,
    }
    ],
    "QoSOptions": {
    "ExceptionsAllowedBeforeBreaking": 0,
    "DurationOfBreak": 0,
    "TimeoutValue": 0
    },
    "LoadBalancer": "",
    "RateLimitOptions": {
    "ClientWhitelist": [],
    "EnableRateLimiting": false,
    "Period": "",
    "PeriodTimespan": 0,
    "Limit": 0
    },
    "AuthenticationOptions": {
    "AuthenticationProviderKey": "",
    "AllowedScopes": []
    },
    "HttpHandlerOptions": {
    "AllowAutoRedirect": true,
    "UseCookieContainer": true,
    "UseTracing": true
    },
    "UseServiceDiscovery": false
}


 浙公网安备 33010602011771号